• 0 items$0.00
  • Skip to primary navigation
  • Skip to main content
  • Skip to primary sidebar
  • Skip to footer

Hands Occupied

Colorful knitting, crochet, latch hook and macrame from craft book author & designer Heidi Gustad.

  • BLOG
    • Knitting
    • Crochet
    • Latch Hook
    • Macramé
    • Punch Needle
  • ABOUT
  • Shop
  • Nav Social Menu

    • Instagram
    • Pinterest
    • RSS
    • TikTok
    • YouTube

Square Latch Hook Finishing Tutorial

July 1, 2020 2 Comments

Square latch hook finishing tutorial: Learn how to do finishing in latch hook projects with square corners. This is a work-as-you-go method that helps you save time during the finishing process in latch hook rug making. #latchhook #rugmaking #rughooking #rugbinding

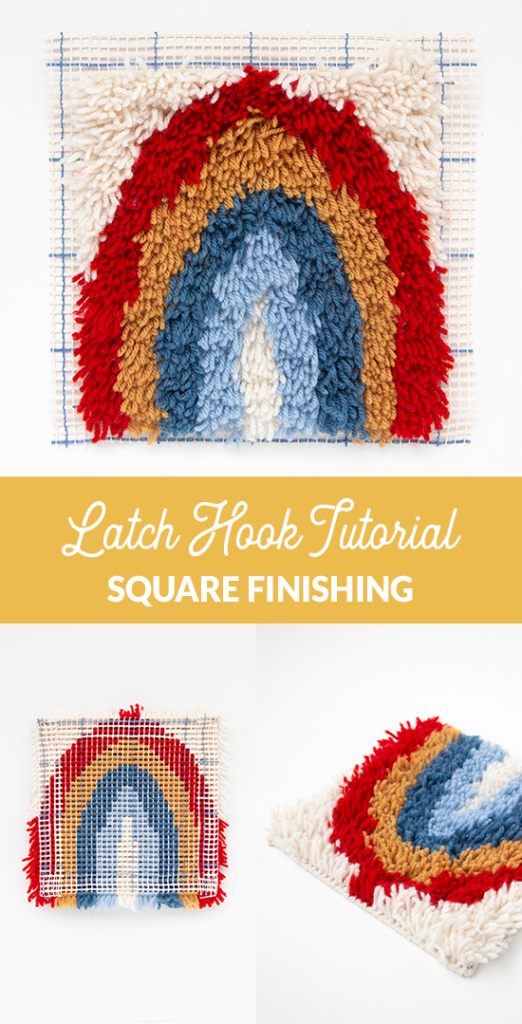
Last winter, I spent most of my time writing an introductory latch hook book. (More on that here!) During the design and writing process, several requests came via comments and emails for more latch hook tutorials on Hands Occupied, and for the folks who have patiently waited, thank you! Today we’ll be getting back into the swing of things by tackling how to finish a square latch hook project. Something easy to get us started, but a useful technique that I wish I’d known as a latch hooking beginner!

When hooking a square latch hook project – that is, a latch hooking project with square/straight edges, you may elect to finish your canvas as you work, rather than saving all finishing and binding of your rug canvas edges for after your project has been knotted.

Lost? Let’s talk vocabulary.

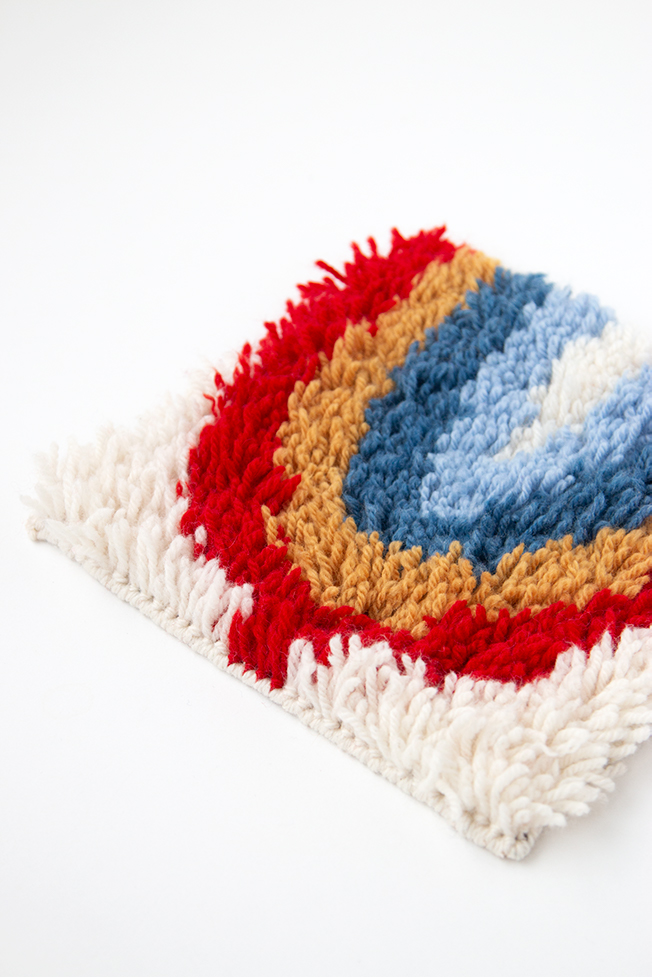
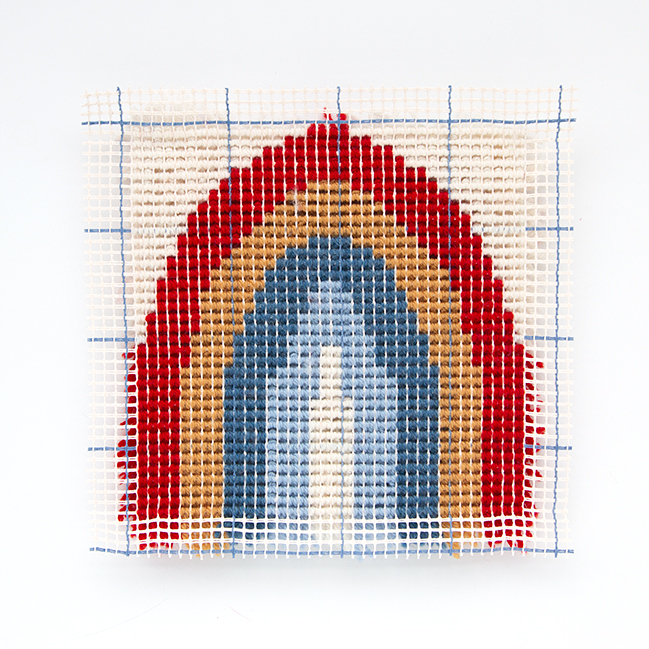
Seam allowance in latch hook is not unlike seam allowance in sewing for sewists in the room. Seam allowance is the excess canvas beyond where the knotted portion of your work ends. In the photo below, it’s the canvas that remains plain all around the edges of the knotted work.

Square latch hook finishing tutorial: Learn how to do finishing in latch hook projects with square corners. This is a work-as-you-go method that helps you save time during the finishing process in latch hook rug making. #latchhook #rugmaking #rughooking #rugbinding

Finishing vs. Binding in Latch Hook

In my book that’s coming out this fall and on this blog, I differentiate between finishing and binding processes in latch hooking. At some point, project seam allowance needs to be folded to the back of your work and secured in place with hand stitching or knotting. This is called finishing.

Square latch hook finishing tutorial: Learn how to do finishing in latch hook projects with square corners. This is a work-as-you-go method that helps you save time during the finishing process in latch hook rug making. #latchhook #rugmaking #rughooking #rugbinding
A latch hook project with square finishing done, but not yet bound. You can see how the canvas is secure, but without binding, the edges aren’t as crisply defined or structured as they could be. The corners aren’t completely secure yet either.

In quilting, binding is the process makers use to finish the raw edge of a quilt, preventing fraying and securing layers together. In latch hook, binding refers to finishing the raw edge of a seam, preventing fraying but largely done to hide and reinforce the folded canvas edges and help prop up yarn strands at the edge of a project. The binding process can vary a lot from project to project (or be skipped entirely).  When it is done in latch hook, binding occurs after finishing.

Square latch hook finishing tutorial: Learn how to do finishing in latch hook projects with square corners. This is a work-as-you-go method that helps you save time during the finishing process in latch hook rug making. #latchhook #rugmaking #rughooking #rugbinding
A completed latch hook project with square finishing and an edge bound with yarn and whip stitch.

Square Latch Hook Project Finishing

You may knot an entire latch hook project, leaving your seam allowance intact and untouched. (If you’re hooking a project without square corners, that is the only way to do it- but that’s a subject for another tutorial!)

Square latch hook finishing tutorial: Learn how to do finishing in latch hook projects with square corners. This is a work-as-you-go method that helps you save time during the finishing process in latch hook rug making. #latchhook #rugmaking #rughooking #rugbinding
An example of a very non-square latch hook project that has been knotted, but no finishing or binding work has been done.
Square latch hook finishing tutorial: Learn how to do finishing in latch hook projects with square corners. This is a work-as-you-go method that helps you save time during the finishing process in latch hook rug making. #latchhook #rugmaking #rughooking #rugbinding
An example of a square latch hook project that has been knotted, but no finishing or binding work has been done.

If you’re hooking a project with square corners, you may finish your project as you go, saving yourself needing to stop to finish edges by hand after the fact. You may also use this finishing technique on part of a project if you’re working on a rug with a combination of square and non-square corners.

How to accomplish square finishing as you knot

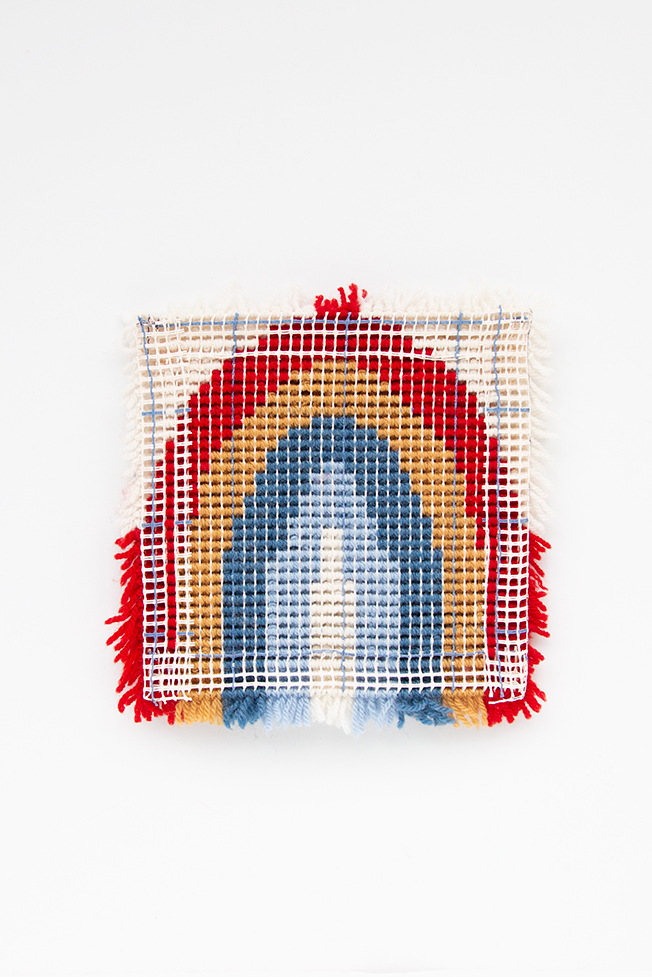
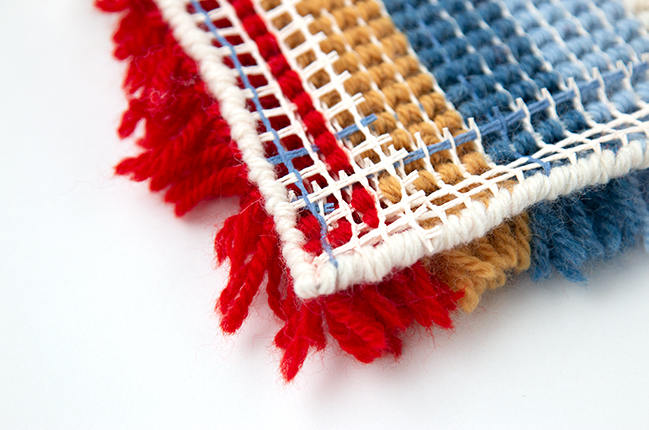
To finish a square edge, fold the unhooked seam allowance to the back (non-fuzzy side) of your work, aligning the grid of your canvas to avoid a twisted edge.

If you haven’t already knotted the rows of canvas stitches that your seam allowance will be folded over, please do so now. When folding back seam allowance, I recommend using clothespins or sewing clips to hold it in place as you work to maintain canvas alignment. (Similar to straight pins in sewing, but better suited for working a rug. 😉 )

The actual finishing is simple. With your grid aligned, hook your latch hook knots around two layers of rug canvas: the canvas comprising the body of your latch hook project and the folded back seam allowance canvas. Doing this holds back the raw canvas from the right side of your finished project, in addition to providing some strength and structure to your work.

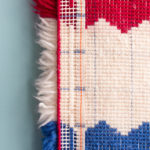
When square finishing the edge perpendicular to your first square finished edge, you’ll notice something. There will always be a small rectangle of unnecessary canvas at each corner. Simply cut out or fold under the unnecessary piece of canvas before finishing its perpendicular edge. “Unnecessary canvas” isn’t an official latch hook vocabulary word – it’s just canvas that needs to be removed to avoid excess bulk at the back of your work. At the corner of a square project, you could end up with up to 6 layers of overlapping canvas because of how the canvas must be folded to create a corner.

Pro tip: If your canvas is falling apart or fraying at the edge, you may want to knot through two canvas layers to reinforce an edge that’s feeling/looking weak to you. Often by “weak” I mean literally shredding before your eyes – lock it down by working through more layers of canvas.

Square latch hook finishing tutorial: Learn how to do finishing in latch hook projects with square corners. This is a work-as-you-go method that helps you save time during the finishing process in latch hook rug making. #latchhook #rugmaking #rughooking #rugbinding
In this sample, I’ve done square finishing, removing excess canvas in the corner, as well as whip stitch binding my edge. As you can see in the corner especially, I’ve knotted 2 and even 3 layers of canvas together to secure my canvas edges and prevent fraying.

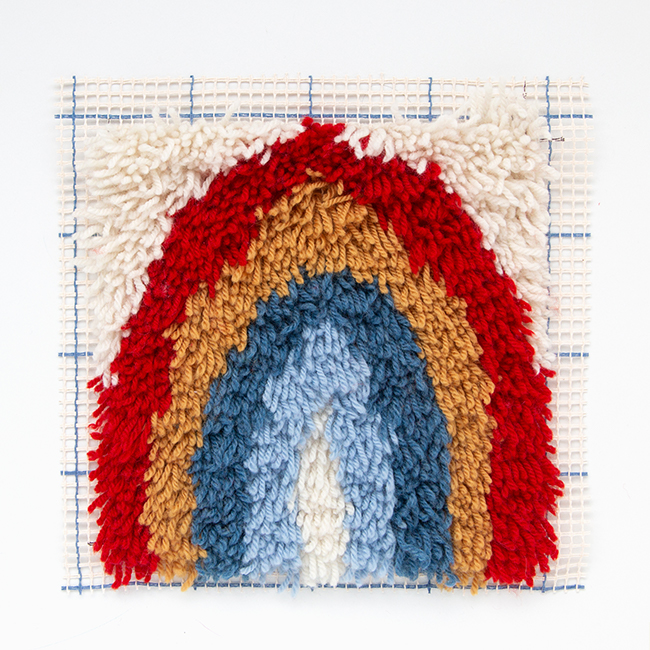
About the Rainbow Latch Hook Project Featured in this Tutorial

If the rainbow in this tutorial looked familiar, that’s because it’s from the teaser my upcoming latch hook book. The Rainbow Back Patch pattern will be exclusively available in the book, coming out this fall. Never fear, though! If you’re impatient like me, but also like my design style, I have a few fresh patterns headed to the blog this summer – stay tuned. 😊

The teaser image for Heidi Gustad's new latch hook book, publishing fall 2020 with Leisure Arts
Read more about my upcoming book here.
Image credit: Jason Masters, Photographer / Lori Wenger, Stylist
Square latch hook finishing tutorial: Learn how to do finishing in latch hook projects with square corners. This is a work-as-you-go method that helps you save time during the finishing process in latch hook rug making. #latchhook #rugmaking #rughooking #rugbinding

All images featured in this post are by me save for the book teaser image.

Filed Under: Latch Hook, Yarn Crafts Tagged With: finish a rug, latch hook, latch hook binding, latch hook finish, square finishing, square latch hook corners, square latch hook finishing

About Heidi

Heidi Gustad (she/her) is a craft book author & designer specializing in yarn crafts. Her work combines vintage and modern design elements, prioritizing color and graphic motifs. Her first book, Latch Hook: 12 Projects for the Modern Maker, is out now.

Previous Post: « Picks of the Week
Next Post: Non-Square Latch Hook Finishing Tutorial »

Reader Interactions

DID YOU LIKE THIS POST?
Visit similar articles...

  • Whip Stitch Binding in Latch HookWhip Stitch Binding in Latch Hook
  • It’s 2022 already?It’s 2022 already?
  • Picks of the SeasonPicks of the Season
  • Making My Way Through The Rest of 2020Making My Way Through The Rest of 2020

Comments

  1. steve snyder

    August 20, 2021 at 3:28 pm

    My wife is having troubles with a project that’s she’s finished. The edges of the rug are curling slightly backward distorting the image around the edges. I’m pretty sure it’s the stiff canvas. She’s tried looser and tighter stitches, but it’s still happening. I though that given time it might relax flat, or maybe we could press it flat under books. Any suggestions?

    Reply
    • Heidi

      August 31, 2021 at 3:39 pm

      Sometimes curling happens because the yarn is too thick. Sometimes curling can be the result of how it’s being finished. Doing both finishing and binding (as defined in this post above) can help, and also backing the rug. I like to use cheap non-skid rug padding cut to slightly smaller than my rug. Sometimes the rug grip can help encourage those edges to lie flat. I hope these suggestions are helpful, best of luck!

      Reply

Leave a Reply Cancel reply

Your email address will not be published. Required fields are marked *

This site uses Akismet to reduce spam. Learn how your comment data is processed.

Primary Sidebar

Heidi Gustad from Hands Occupied / Craft Book Author and Knitting, Crochet, Latch Hook and Macrame Designer

Hi! I’m Heidi (she/her/hers), and I’ve been helping yarn crafters untangle various techniques on the internet since 2010. I got my start here, as a blogger, and since then I’ve shared more than a few tutorials here and on YouTube as I’ve grown as a pattern designer. 🧶 

learn more / work with me

Find Me on Social Media

  • Instagram
  • Pinterest
  • TikTok
  • YouTube
Latch Hook by Heidi Gustad

Footer

INSTAGRAM

handsoccupied

Knitting & yarn crafts designer 🧶
.
Stay up-to-date 💌 & shop new patterns ⤵️

POV: Showing you how my new Bevelled Tank pattern POV: Showing you how my new Bevelled Tank pattern fits with no ease vs. 4” of positive ease. There’s a bit more length to the cotton (brighter color) sample, but both are cropped and feature shoulder seams designed to sit an inch back onto the shoulder instead of on top, giving it a little swing. Length is easily adjustable for folks looking for less of a crop. 
.
Pattern: Bevelled Tank by @handsoccupied for @pompommag x @hobbii_yarn summer 2024. Available for free from Hobbii at the 🔗 in my profile.
Yarn pictured: @kelbournewoolens Skipper and Camper. 
Dress form is adjusted to a 36” chest and ~5’3”ish in height. 
Human has a 40” chest and is 5’5”.
Both skirts are vintage.
.
#pompomxhobbiisummer2024 #handsoccupied #intarsia #handmade #knitting #colorwork
Let’s talk about fit and ease! . During the Beve Let’s talk about fit and ease!
.
During the Bevelled Tank design process for @pompommag, I knit 2 samples using 2 different @KelbourneWoolens yarns. One was in Skipper (100% cotton, second photo) and the other was in Camper (100% 2 ply wool). The Skipper sample was knit for a 36” bust, which measures in at 40” with 4” of positive ease. And I knit the Camper Sample for my 40” bust with a 44” finished measurement. (BTW, I’m 5’5” for folks that find that measurement helpful in visualizing fit.)
.
Based on the size chart for the Bevelled Tank, that means I knit one size 3 sample and one size 4. As designed, I conveniently fit a size 4 as intended with 4” of positive ease. When I wear the 3, there is no ease at all because the garment and my body are both 40” in size. Comparing the 2 garments, you can see how the fiber content (cotton vs. wool) and fit (no ease vs. 4” of positive ease) makes a difference in the look and feel of the finished garment. 
.
These samples are a great way to compare what ease looks like on different bodies. While I can fit both a size 3 and 4, the garment with no ease feels more like pajamas or a bralette when I wear it. On the other hand, when I wear the one with 4” of positive ease, I feel comfortable enough to wear it to work, even as a crop top. Plus, it leaves me with enough room to layer it with a nice button down if I’m not feeling the cropped look one day. 
.
I’m curious - how would you style this tank? Would you modify it with a few stockinette rows for added length? I’m so curious now that this pattern is finally out in the world. :) 
.
#pompomxhobbiisummer2024 #bevelledtank #handsoccupied #knitting #intarisa #handmade #kelbournewoolens #croppedsweater #summerknits
After a 6 month hiatus, I am happy to say I’m ba After a 6 month hiatus, I am happy to say I’m back with a brand new pattern in 9 sizes, and it’s FREE as part of @pompommag x @hobbii_yarn’s summer design collection! (Link is in my bio.)
.
In my December newsletter, I announced that I was soliciting test knitters for a pattern that had originally been selected for the summer ’24 issue of Pom Pom Quarterly magazine. However, the magazine ceased publication after its spring ’24 issue, leaving in-progress designs unpublished. (It happens.) As a result, I’d begun the long process of editing, testing, and photographing the pattern for independent release through the Hands Occupied pattern shop and Ravelry.
.
Before I was done with that process, Pom Pom Quarterly’s former editors reached out with an exciting proposal for the pattern. Post-magazine, they’ve begun to partner with yarn companies to produce high quality pattern collections. They wanted to include designs from the would-be current issue of Pom Pom Quarterly in a new collection for Hobbii yarn, including my Bevelled Tank. I worked with the same technical editors I would have for the magazine on this one, and as you can see from the photos, Pom Pom’s team did an amazing job of styling the garment to the beautiful standards they’re known for.
.
You can learn more about the pattern on my blog and get the free pattern from Hobbii yarn - links to both in my profile. I’ll post sizing info in the comments for quick reference too. 🧶
.
#pompomxhobbiisummer2024 #knitting #intarsia #sponsored #colorworkknitting 
.
Photos: @dianascarrunz 
Model: @angel.jade_
Here’s a nice throwback for you: my take on a vi Here’s a nice throwback for you: my take on a vintage knitting pattern from 1938 called the Fernlace Pullover. A pattern so nice, I knit it twice.
.
Yellow version 💛: knit with Despondent Dyes’ Vintage Vixen Sport after attending a @squidneyknits vintage knitting retreat in 2019 & learning *so much*. Paired with a self-drafted circle skirt pattern. 
.
Blue version 💙: knit with @eweeweyarns Ewe So Sporty in Sky Blue. Paired with the 1940s Boardwalk Duet sewing pattern from @decades_of_style 
.
Head to my stories for 🔗🔗 to the handmade wardrobe blog posts I wrote about each take on the Fernlace Pullover, working with a vintage pattern, where to find vintage patterns (including the one I used), & some thoughts on sizing. 
.
Image descriptions available in alt text. 
.
#handsoccupied #handmadewardrobe #fernlacepullover #vintageknitting #vintageknittingpatterns #knitting_inspiration
Frogging is a word in the knitting world that mean Frogging is a word in the knitting world that means to rip out your knitting. It’s called frogging because frogs say “ribbit,” and when you’re tearing out your knitting, you will “rip it” out, and that sounds like ribbit. No really. 🐸 Did you know this fun fact? 
.
P.S. I did like this design concept, but to make the pattern more knitter friendly as well as more wearable, I am making some tweaks to the construction. Excited to share when it’s ready! 🥰🧶
.
Yarn: @blueskyfibers Woolstok North in Morning Frost & Highland Fleece 
.
#handsoccupied #knitting #frogging #blueskyfibers #knittersofinstagram #blueskymakers #knittingvocabulary #bsfmakers #knitdesign
Follow on Instagram

Copyright © 2025 / Foodie Pro Theme On Genesis Framework / Branding by Ink + Mortar
All Site & Shop Policies / Privacy Policy / Cookie Policy