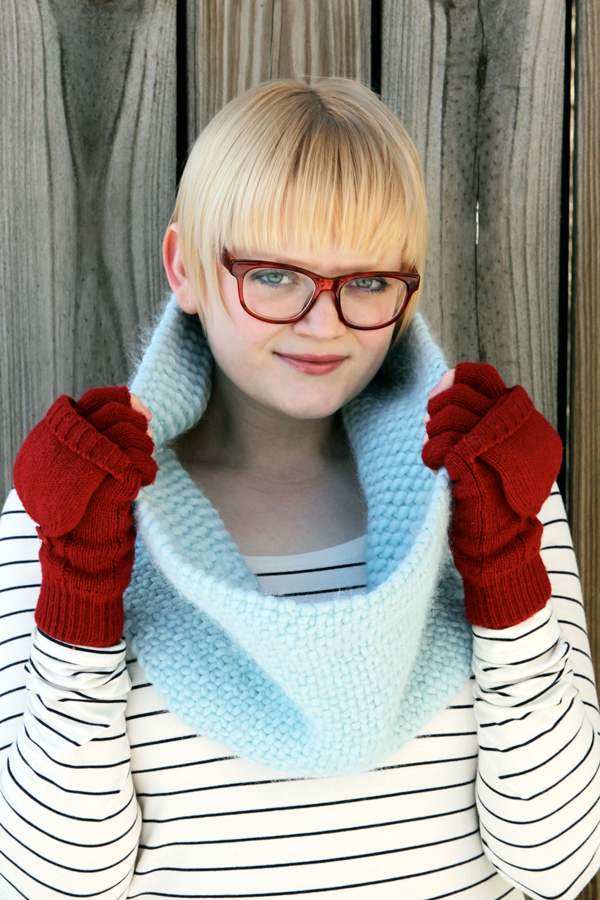
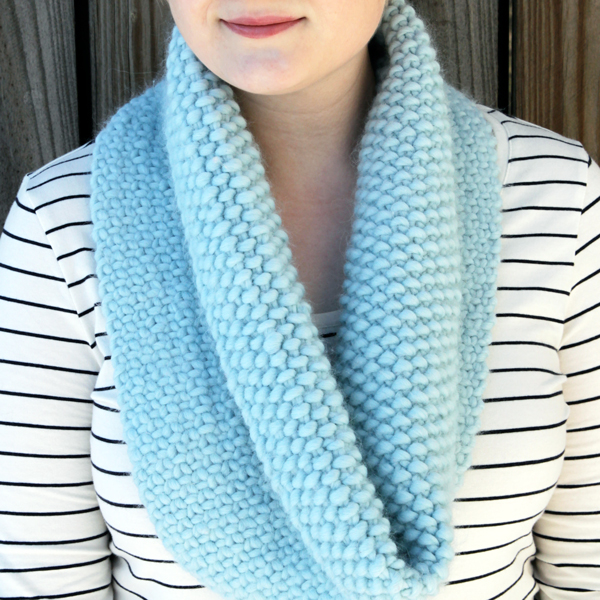
I knitted up a version of this cowl in dijon mustard yellow for my husband for Christmas this year, and he loves it so much! A Chicago train commuter, he’s been walking face first through the polar vortex and claims his cowl is nearly impenetrable by wind. This is one of my favorite knitting designs, and I’m super excited to share the pattern & technique used with you. :)
*Pattern edited 1/23/14 to conform to traditional knitting pattern standards. When I first drafted this pattern, I was new to design. Cheers to growing and learning!*
FAUX WOVEN COWL – KNITTING PATTERN
Skill level: easy
Supplies
3 skeins Blue Sky Fibers Bulky in Frost
knitting needles in the right size
yarn needle
scissors
Abbreviations & Terms
CO – cast on
provisional cast on – Here’s a tutorial.
sts – stitches
k – knit
sl1wyif – slip 1 st with yarn in front
rep – repeat
sl1wyib – slip 1 st with yarn in back
p – purl
BO – bind off
kitchener stitch – See tutorial below.
Gauge & Dimensions: Approx. 2.5 sts/inch. Finished cowl measures approx. 9.5″ wide.
The Pattern
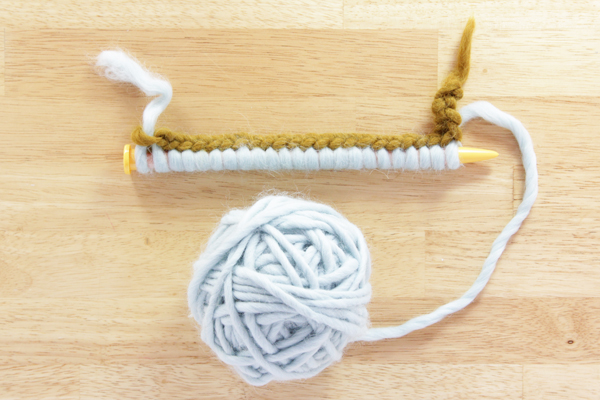
CO 23 sts (or any odd number of sts) using a provisional cast on.
1. *k1, sl1wyif; rep from * until last st, k1.
2. *sl1wyib, p1; rep from * until last st, k1.Rep rows 1-2, leaving a 24” tail.
Join CO and BO ends using the kitchener stitch (tutorial is below). Weave in all ends and block to finish.
The faux weave effect is super unique, which is partly why I think it’s so beautiful. That also means it can be a little tough to learn from a knitting pattern, so I made a video demoing how to do this. Here ya go!
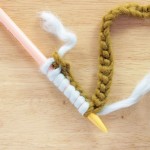
Grafting / Kitchener Stitch
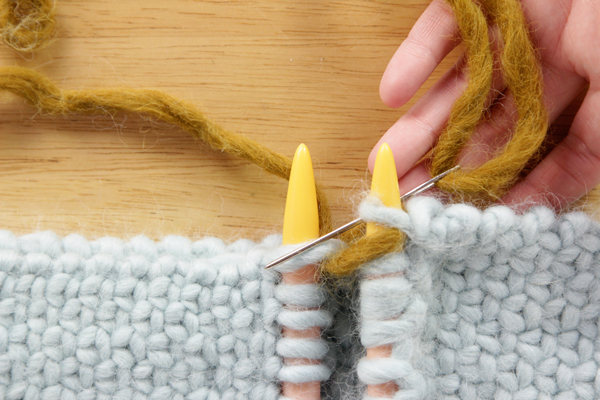
1. Keep both ends of your knitting on your knitting needles. Thread the long tail of your yarn onto a yarn needle.
2. To set up your grafting, hold your knitting needles parallel to each other. Poke your (yarn) needle through the first loop on the needle closest to you purlwise, as shown. Keeping the loop on the needle, pull the yarn tail through.
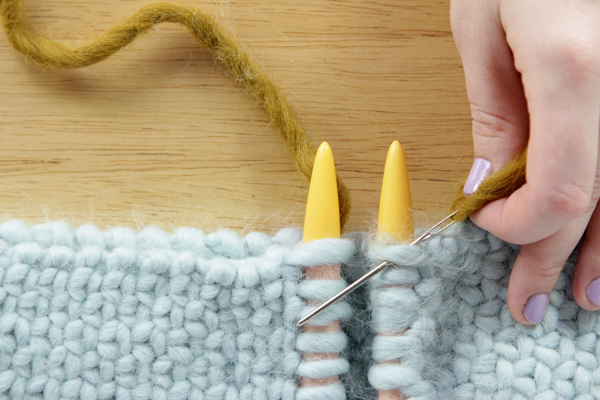
3. The other part of the setup is to poke your needle through the first loop on the far knitting needle knitwise, also leaving the loop on the needle. Pull the tail through.
Now the setup is done. For all the loops from now until the final two loops, you’ll do the following.
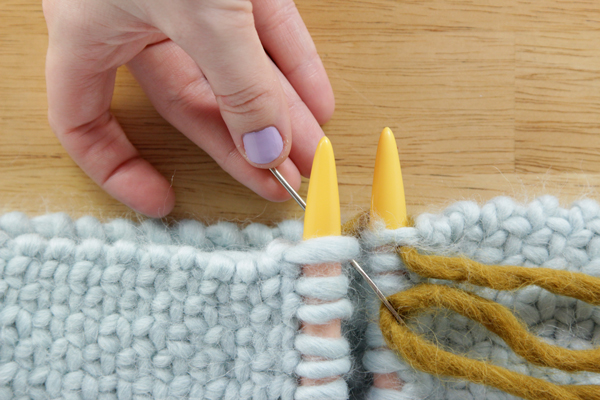
4. Insert the yarn needle again through the first loop on the closer knitting needle knitwise, slipping it off the end. Sew through the next loop purlwise, pulling the tail through.
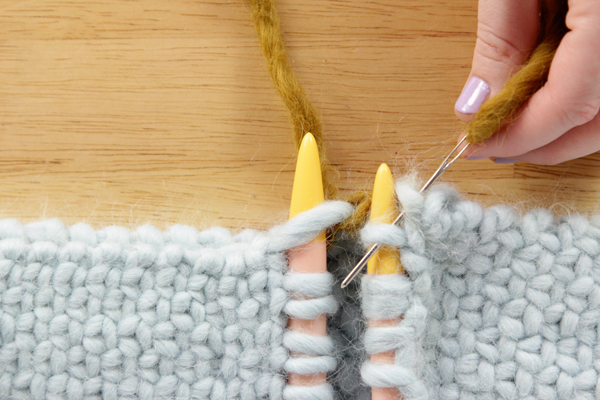
5. Insert the needle through the first loop on the far knitting needle purlwise, slipping it off the end. Sew through the next loop knitwise, pulling the tail through.

The pattern to remember from now until the last two loops is: knit, purl, purl, knit. KPPK.
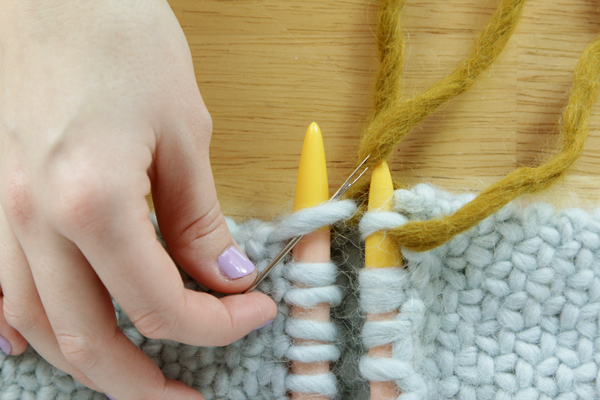
6. After a few stitches you’ll want to pull on your working yarn to tighten your work. This helps keep the invisible cast on invisible.
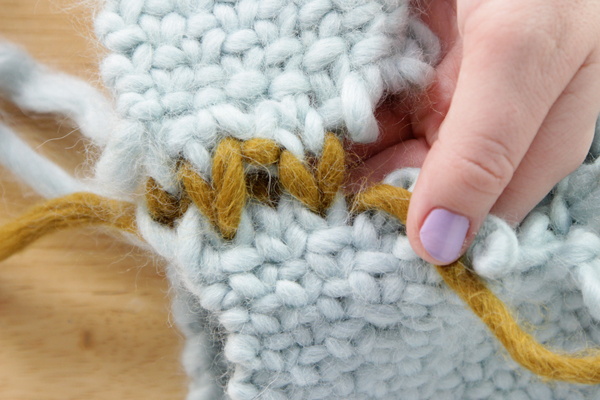
7. When you find yourself with just one loop on each knitting needle, you’ll finish by repeating steps 2 and 3. Weave in all ends, and trim all tails to finish your cowl.
I first learned this knitted faux weaving technique when I knitted my way through Knit Scarves! by Candi Jensen in high school.


Super cute Heidi! Actually makes me want to give knitting another try :)
This is super cute! Thanks for sharing the pattern.
Great stitch, thanks for showing
I love this cowl. I am going to give this a try after I finish my husbands sweater. TFS the pattern and video!!
Hi, thanks for the pattern, super cute! I have a question, I knit in the round. How many stitches do u think I should cast on? Thanks
Hi Viviana! Do an odd number of stitches (the exact amount will vary depend in the gauge of your yarn), and mark the beginning of each round with a stitch marker. Since you won’t be flipping your work, you’ll just alternate knitting and slipping, but you alternate starting each round with a knit or a slip. Let me know if that doesn’t make sense :) -Heidi
I marked the needle used for the row to slip purlwise.
Heidi, did you block the cowl? I’ve never done it & besides, I don’t know if I want to stretch it & not leave it tight for warmth
Thanks again,
Cristina
I didn’t block mine for similar reasons. If you really want to block yours, just make sure to look up the best method for the yarn you used.
Years ago when my daughter was a little girl I made her a hat, scarf and mittens using the same stitch. It is easy and very warm.
I love that cowl, awesome. I also love your gloves. . . What pattern did you use or is it your own?
You caught me, Elaine :). I got those as a gift for the holidays, I threw them on since they matched my glasses so well! Forgive me?
Your cowl looks stunning!
Thanks for sharing this stitch (great work with tutorial btw) because now I finally know perfect pattern to knit rug/door mat from t-shirt yarn. I’ve already tried the gauge and works great. You should try too if you are DIY addict :)
Warm Regards from Rotterdam (NL)
Thank you! I appreciate it :)
Heidi, being fairly new to knitting I have no idea what size needles to use, what is an “appropriate” size? Thanks.
Hi Deb! Here’s how to use our yarn’s label to determine the needles you need: http://www.craftsy.com/blog/2013/06/deciphering-yarn-labels/. Since this is just a cowl, and not something more complicated like a sweater, you should be good just using the needle size recommended on the label! Don’t hesitate to email/comment if you have any questions! :) -Heidi
Oh, I love the stitch and the color !!
And, as I already knitted a cowl with this yarn, I have the right needles ! No excuse !
I think I might update my blog with this cowl in a few weeks… :-)
Thanks for the pattern !
Great pattern :)
Thank you for sharing.
Hugs
Frida
http://www.fridaspeach.wordpress.com
Love this cowl. I am making one now for a good friend. Can’t wait to make one for myself. Thanks for the nice pattern.
Hi Heidi,
My cowl is ready ! I followed all the instructions of your blog : I mean, I used the same yarn, same color, same quantity, same number of stitchs… :-) http://www.ravelry.com/projects/Kokeshette/faux-woven-cowl
I love it !! And thanks for the explanation, especially the video of the stitch !
Moreover, it made me try the provisional cast on and grafting.
I’d like to share it on my blog, which is in French. Are you ok, if I just translate the part where you explain the pattern ? For the other instructions, I will redirect to your blog or some video in French.
Thanks again for sharing !
No problem! I’ve blogged my take on someone else’s pattern before (here’s how I formatted it: https://handsoccupied.com/2013/12/lovely-lacey-scarf/ – I didn’t paste her charts or the pattern into my post since I didn’t write it). If you could refer your readers to this post for the pattern in English, that would be great. Thanks so much for asking ahead of time! :) You’re the best.
Thanks :-)
It’s now on my blog (in French) :-)
http://kokeshette.fr/2014/02/diy-le-tuto-du-snood-tisse.html
Superbe merci beaucoup pour ce beau modèle , il me tarde de l’essayer
Bises
Ingrid
Hi Heidi,
I’ve made it!
Only 2 days work :-)
I’ve followed your instructions and made it with the very same yarn (that I had to mail order as it’s not easy to find in Spain). When the first skein finished I balled the second and then I took a pic of the work the ball & 3rd skein as was in a shabby chic theme. As usual I got side tracked with a mini chest of drawers I was decoupaging and was in the mentioned picture. When I restarted knitting I didn’t remember which side I was in & had to repeat the row 4 times :-(
And then came the grafting. I didn’t follow it well the 1st time & had to repeat, but then I realized it was the same way my mum had taught me to join it (but for the leaving it on the needles) and as it was a bit loose I pulled the yarn. Once at the end. I realizad the loose thread was from the last row not the grafting so I ended up with 3 threads to hide thru the stitches. And now is 25ºC here in Alcalá de Henares so it’ll be a while before I try its warmth.
Thank you very much for your detailed explanation & all the pics
XOXO, Cristina
Simply beautiful! Thanks for sharing this lovely stitch. :)
Thank you for this pattern! (And for tips on working it in the round) I just started it last night and it’s knitting up like a dream!
I LOVE the texture of this stitch! I would like to knit a hat using the same pattern. Is this stitch particularly stretchy? Have you used for something other than a cowl before?
Thanks!
It’s actually, ironically, not stretchy at all! But if you get creative with a more elastic yarn than the one used in this pattern, you might be able to make it work. -Heidi
Would you please show me your (A.K.A.) Provisional Cast On again.
missed it.
Thank you Edith
Here you go, Edith: provisional cast on tutorial.
Just a suggestion. Don’t play music in the background on your videos. It makes it very hard to hear what you are saying. And for those of us prone to migraines, that particular piece made it impossible to watch the whole video. Although it looks like you do a good job otherwise with your videos. :)
Thanks, Pamela! This was one of my first knitting tutorial videos – you might want to check out the more recent ones to see what they’re like these days. Spoiler alert: Great minds! ;)
I made this very same cowl thanks to you. The joining was a bit tricky, but…
ON THE RIGHT SIDE : When you KNIT 1 THRU THE BACK LOOP FOR ONLY THE FIRST EDGE STITCH, it creates such a nice edge then follow the instructions above ending with a SL1 Yarn in front purlwise.
On THE WRONG SIDE : P1, THEN SL1with yarn in back purlwise.
This creates edges on both sides of right side that are similar (like v’s) instead of one side v’s and the other knots.