• 0 items$0.00
  • Skip to primary navigation
  • Skip to main content
  • Skip to primary sidebar
  • Skip to footer

Hands Occupied

Colorful knitting, crochet, latch hook and macrame from craft book author & designer Heidi Gustad.

  • BLOG
    • Knitting
    • Crochet
    • Latch Hook
    • Macramé
    • Punch Needle
  • ABOUT
  • Shop
  • Nav Social Menu

    • Instagram
    • Pinterest
    • RSS
    • TikTok
    • YouTube

How-to: Dotted Parasol Makeover

July 8, 2013 2 Comments

How-to: Dotted Parasol Makeover - HandsOccupied.com

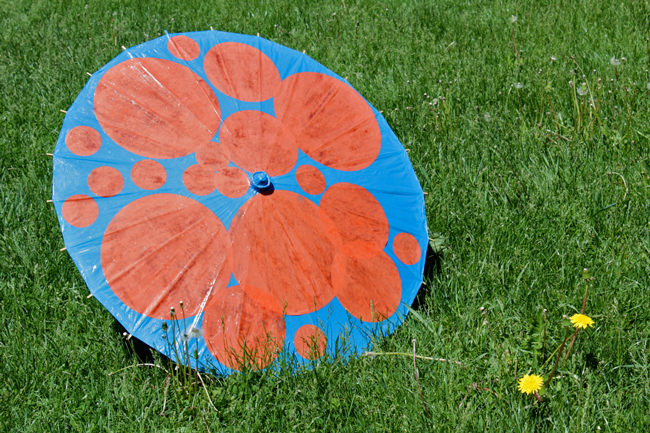
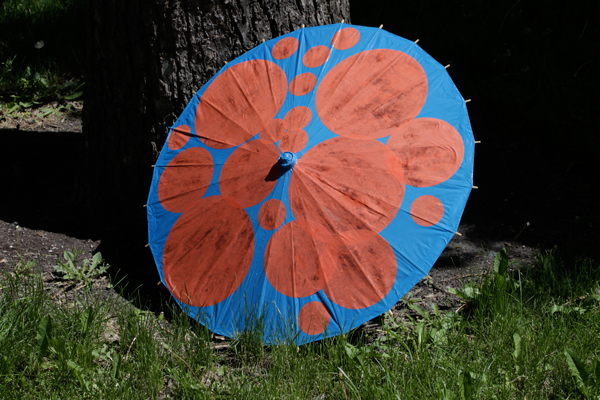
Paper parasols are an excellent surface for decoupage projects, so when I spotted a very torn paper parasol for $3 at a craft store, I knew I had to snatch it up and Mod Podge it back into shape. As you might have noticed in pictures of me, I’m one of the palest humans on earth. For me, parasols are also a great beach party companion when I need more than several applications of SPF 50 a day to keep safe from sunburn.
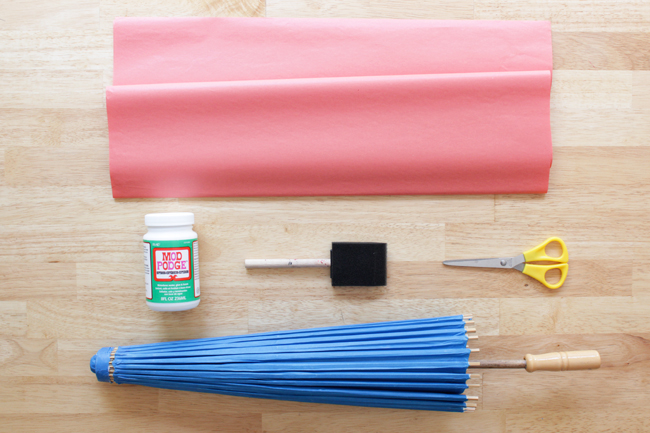
Supplies

tissue paper
differently sized circular objects
scissors
pencil
Outdoor Mod Podge
sponge brush
parasol

How-to: Dotted Parasol Makeover - HandsOccupied.com

Directions

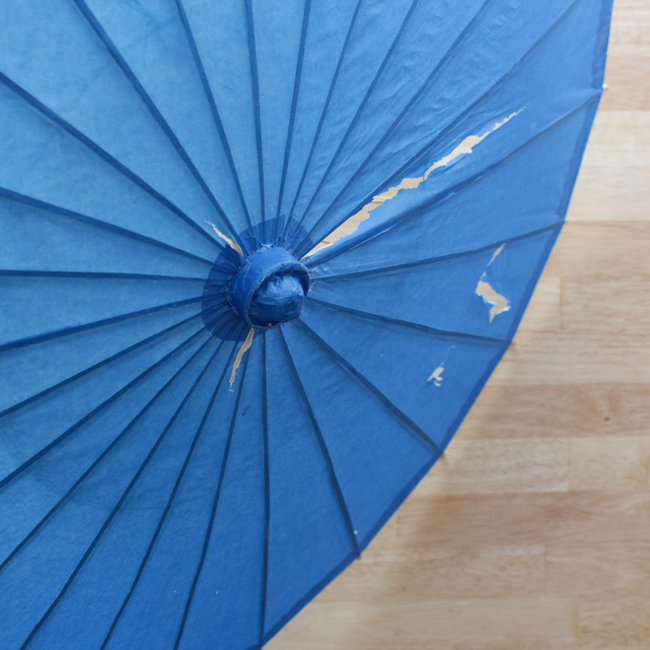
Here’s the sorry state my blue parasol was in at the time I bought it:

How-to: Dotted Parasol Makeover - HandsOccupied.com

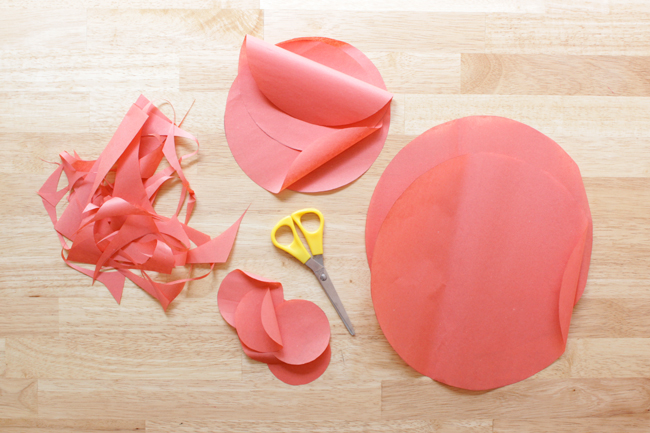
Since that one tear is so massive, I needed to find a circle-shaped object slightly larger than the tear to trace onto tissue paper. My kitchen plates and a drinking glass worked perfectly. If your parasol isn’t torn, you can get creative and use object of any size to stencil your circles onto some tissue paper.

How-to: Dotted Parasol Makeover - HandsOccupied.com

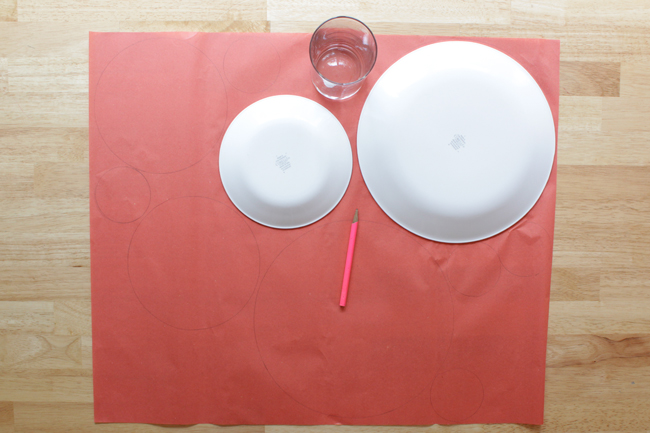
Next, cut out all of your circles and sort them into piles by size.

How-to: Dotted Parasol Makeover - HandsOccupied.com

It’s easy in this next step to make the tear larger in your parasol since the moisture of the ‘Podge can weaken the structure of the paper parasol, so be careful. If your parasol is damaged, carefully apply a layer of Outdoor Mod Podge around the largest tear to start. Apply the ‘Podge to an area about the same size as the circle you’ll be decoupaging onto the parasol. Pat a large paper circle onto the Mod Podge.

How-to: Dotted Parasol Makeover - HandsOccupied.com

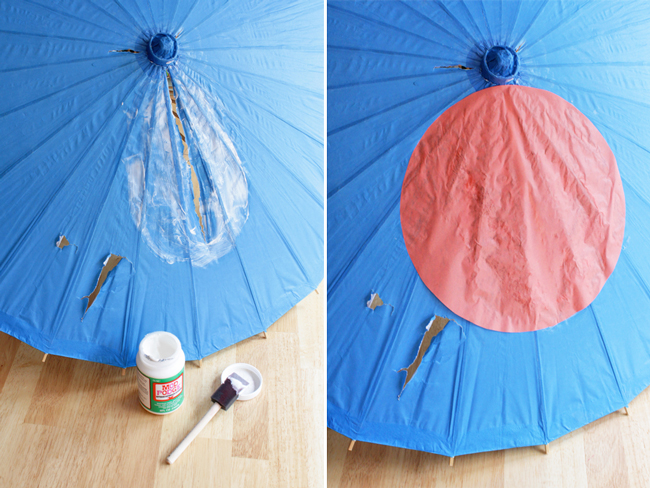
Covering a tear? Also apply a layer of Mod Podge onto the inside of the parasol to seal the back of the tear.

How-to: Dotted Parasol Makeover - HandsOccupied.com

Back on the outside of the parasol, paint a final layer of Mod Podge over the dry side of the circle. Keep applying circles to your parasol in any pattern you like: evenly spaced polka dots, overlapping dots, you name it. If they are covering a tear, follow the steps outlined above. Otherwise, simply apply Mod Podge, smooth on a paper circle, and paint over the outside with Mod Podge. No need to paint the backside if the circle isn’t covering a tear.

How-to: Dotted Parasol Makeover - HandsOccupied.com

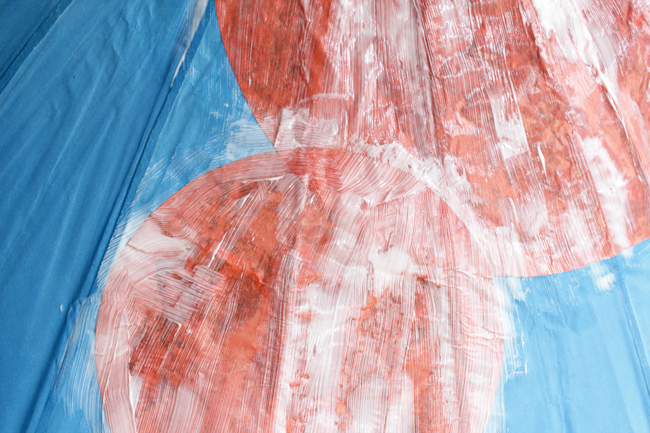
When all of the Mod Podge dries, paint a last layer of Outdoor Mod Podge over the entire parasol and let dry for a couple days. Not only does the Outdoor Mod Podge seal the parasol, but it makes it better for outdoor use than in its original, plain paper form.

How-to: Dotted Parasol Makeover - HandsOccupied.com

I first posted this project at Mod Podge Rocks. I write a monthly tutorial for Mod Podge Rocks, which you should check out on Facebook, Pinterest & Twitter for tons of decoupage craft project instructions. 

Filed Under: Decoupage, How-to, My Work Elsewhere, Summer Tagged With: beach, crafts, decoupage, diy, kids crafts, mod podge, paper, parasol, recycled crafts, summer

About Heidi

Heidi Gustad is a craft book author, designer & creator specializing in yarn crafts like knitting, crochet, latch hook & macramé. Her first book, Latch Hook: 12 Projects for the Modern Maker, is out now.

Previous Post: « Weekly Reader
Next Post: Wild about wood »

Reader Interactions

DID YOU LIKE THIS POST?
Visit similar articles...

  • How-to: Optical Illusion Yo-yoHow-to: Optical Illusion Yo-yo
  • Twinkle in Your Eye Sunglasses Twinkle in Your Eye Sunglasses
  • Glitter Polka Dot NotebookGlitter Polka Dot Notebook
  • Weekly ReaderWeekly Reader

DON’T MISS ANOTHER UPDATE

Comments

  1. Pam

    January 31, 2014 at 11:31 pm

    Hi! What a great tutorial! Do you know if the results will be as awesome on a silk parasol?

    Reply
    • Heidi

      February 2, 2014 at 11:03 am

      Hmm, I’ve never tried Mod Podge on silk. My only concern with Mod Podge on silk is the fact that MP is water based, and water and silk don’t always work well together. :(

      Reply

Leave a Reply Cancel reply

Your email address will not be published. Required fields are marked *

This site uses Akismet to reduce spam. Learn how your comment data is processed.

Primary Sidebar

Heidi Gustad from Hands Occupied / Craft Book Author and Knitting, Crochet, Latch Hook and Macrame Designer

Hi! I’m Heidi (she/her/hers), a craft book author & pattern designer specializing in knitting, crochet, latch hook & macrame. Really anything with yarn! ❤️  My work combines vintage and modern design elements, featuring bold colors and graphic motifs.

EMAIL NEWSLETTER

Never miss a tutorial with these short & sweet monthly updates.

Find Me on Social Media

  • Instagram
  • Pinterest
  • TikTok
  • YouTube
Latch Hook by Heidi GustadDiscover Unique Items

Footer

INSTAGRAM

handsoccupied

Craft book author, designer & creator specializing in yarn crafts like knitting, crochet, latch hook & macramé
❤️ Email preferred

Heidi Gustad 🧶✂️
Nobody panic. This is just the back of an (admitte Nobody panic. This is just the back of an (admittedly insane) intarsia project. One day, this will be a seamed sweater, but today is not that day. 🧶 
.
Have a good weekend, everyone! 
.
Yarn: @universal_yarn’s Fibra Natura Cobblestone in Antarctica & Dragon’s Breath 
.
#handsoccupied #intarsia #intarsiaknitting #wip #knitting
Here’s how to work a Norwegian purl stitch for e Here’s how to work a Norwegian purl stitch for easier continental style knitting. With this purling method, the working yarn says tensioned (held) at the back of your knitting at all times. For many knitters, always holding the yarn at the back helps with tension issues, as well as feeling a little more comfortable. 
.
Have you ever encountered this style of purling before? If you’ve tried it, have you found it helps with your purl tension and knitting speed? I’m curious.
.
For a written tutorial, visit handsoccupied-dot-com. For video, you guessed it, You2be. Both of these platforms allow for longer, more in-depth versions of this tutorial, including full transcripts, alt text & the ability to pause, slow down or speed up at will. (Like if you really want to learn this, I recommend using a platform that doesn’t keep your hands occupied. Thinking of putting this in all my captions these days tbh - shout out to you if you made it this far. 🙌🏻😂)
.
#handsoccupied #learntoknit #continentalknitting #howtoknit #norwegianpurl #norwegianknitting #knit #knitting #knitter #knittersofinstagram #knittinghack  #handknitting #handknit #norwegianpurling
Have you ever tried this style of purl? . All thi Have you ever tried this style of purl? 
.
All this recent talk about throwing vs. continental style knitting made it clear many people struggle with purling in continental knitting. Turns out that Norway may have the answer! In Norwegian purling, the working yarn stays tensioned at the back at all times, helping with speed and tension. 🤯
. 
Head to the bl0g (🔗 in bi0) for a more in-depth look at how to work a Norwegian purl stitch, including a photo tutorial with animated GIF & a video tutorial. Wrapping your mind around how to work a stitch you’re familiar with in a totally new way can be confusing, so I tried to give a few options for clarity. 🤙🏻 Video is also on You2be. 
.
#handsoccupied #norwegianpurl #norwegianknitting #norwegianpurling #continentalknitting #howtoknit #learntoknit #knitterofinstagram #knitters
It’s been a hot second since I showed my face or It’s been a hot second since I showed my face or reintroduced myself, so here goes! I’m Heidi Gustad, a craft book author, pattern designer, and tutorial creator who specializes in yarn crafts. Lately, I’ve been focused on releasing quality knitting videos and related blog posts to help teach things like the difference between provisional cast ons and how to fix common knitting mistakes. Next week I’m shooting requested crochet and latch hook videos, so h👀kers, your time is coming! And if you ever have tutorial requests, please let me know. ☺️
. 
TLDR: I’m Heidi. I design & teach yarn crafts. You can find tutorials on my blog (est. 2010) & You2be. I also have several knitting & crochet patterns + a book about latch hook available. / All of these can be found on my website, the 🔗 is where you’d think. 
.
#handsoccupied #fridayintroduction #heidigustad #knitting #knitter #knittersofinstagram #yarncrafts #latchhookbook
Are you a picker or a thrower? Do you knit Contine Are you a picker or a thrower? Do you knit Continental or English Style? Here’s a quick overview of the differences between the two most common knitting styles, including a side by side comparison. (A good one to save for future reference. 👍🏻) 
.
There’s more on the differences between picking and throwing in my latest blog post & You 2ube video - the l1nk is where you’d think!
.
#handsoccupied #learntoknit #knittingstyles #howtoknit #knittersofinstagram #knitter
Load More... Follow on Instagram

Copyright © 2023 / Foodie Pro Theme On Genesis Framework / Branding by Ink + Mortar
All Site & Shop Policies / Privacy Policy / Cookie Policy