• 0 items$0.00
  • Skip to primary navigation
  • Skip to main content
  • Skip to primary sidebar
  • Skip to footer

Hands Occupied

Colorful knitting, crochet, latch hook and macrame from craft book author & designer Heidi Gustad.

  • BLOG
    • Knitting
    • Crochet
    • Latch Hook
    • Macramé
    • Punch Needle
  • ABOUT
  • Shop
  • Nav Social Menu

    • Instagram
    • Pinterest
    • RSS
    • YouTube

How-to: Mess Free Tie Dye

August 19, 2013 7 Comments

How-to: Mess Free Tie Dye | Hands Occupied

Tie dye is a favorite summer activity because it’s known for being super messy, the kind of craft you want to do outdoors. But what do you do if you want to dye something when it’s cold outside or if you don’t have a yard? Like if you’re crafting in a dorm room? This alternative dyeing technique is a fun way to add some DIY to your wardrobe. Tie dye can be hard to get just right too, but you can do this even if you’ve never done a craft before in your life- it’s that easy! You just need a few unscary supplies.

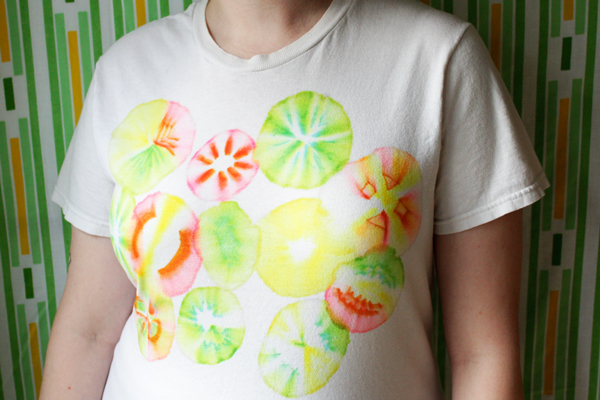
And ps? Using orange, yellows and greens are great if you want a neon dyed shirt. This technique brings out the pinks and lighter tones from the ink. 
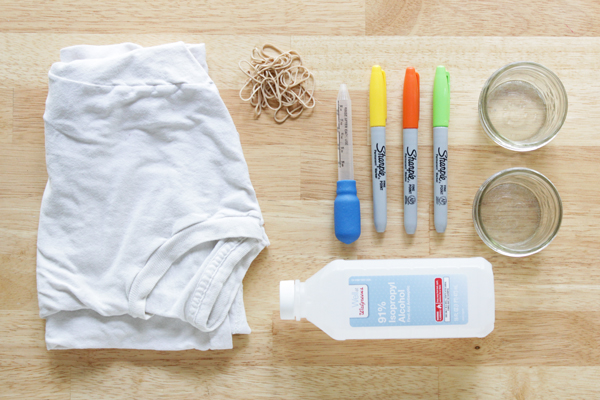
Supplies

plain t-shirt
permanent markers
rubbing alcohol
rubber bands
a few jars
dropper
cardboard

Directions

How-to: Mess Free Tie Dye | Hands Occupied

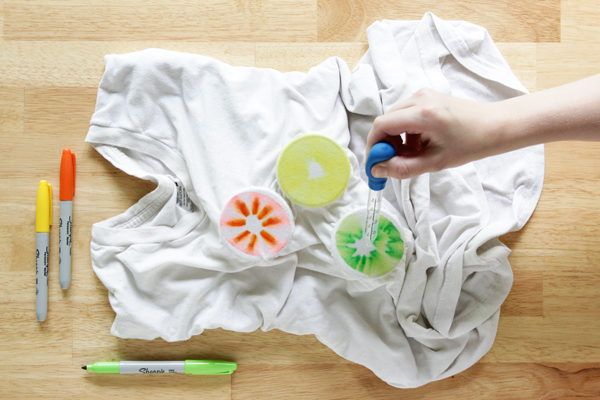
Lay your clean and dry t-shirt out, sliding a piece of cardboard in between the layers of your shirt to prevent bleed through. Place a jar (or a few) between its front and back layers, and put a rubber band over the shirt around the mouth of the jar.

How-to: Mess Free Tie Dye | Hands Occupied

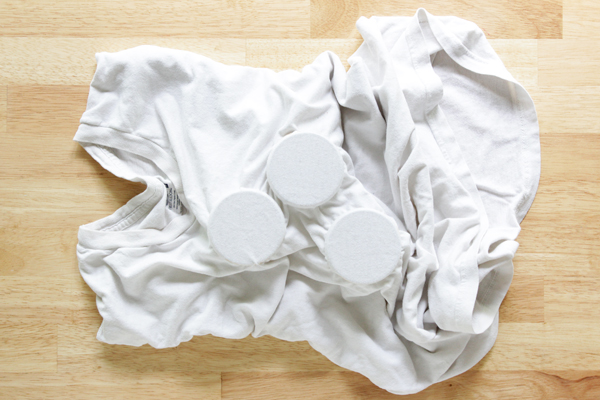
With permanent markers, draw where the shirt is stretched over each jar.

How-to: Mess Free Tie Dye | Hands Occupied

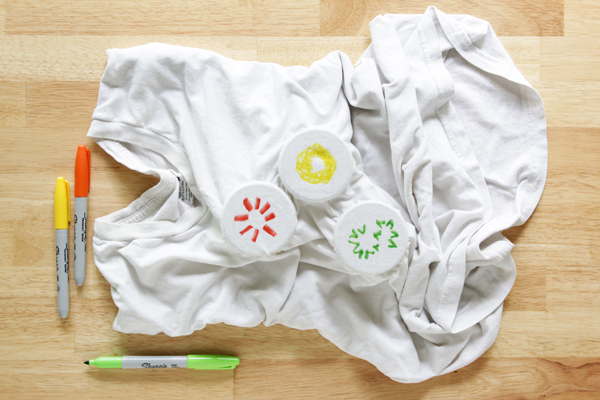
Fill a dropper with rubbing alcohol, aim the dropper over the center of one of your designs, and drip several drops of rubbing alcohol onto the t-shirt. Don’t go crazy – the rubbing alcohol will continue to bleed along the fabric outward toward the edge of your jar even after you stop dripping rubbing alcohol on it. The rubbing alcohol will bleed past the rubber band and down the jar if you apply enough. If you apply a lot of rubbing alcohol quickly, rubbing alcohol not absorbed by the t-shirt will drip through the fabric and into the jar below.

How-to: Mess Free Tie Dye | Hands Occupied

Carefully remove the rubber band from around your jar, move the jar to a new position, and repeat the rubber banding, drawing and rubbing alcohol steps until you’re happy with your design.

How-to: Mess Free Tie Dye | Hands Occupied

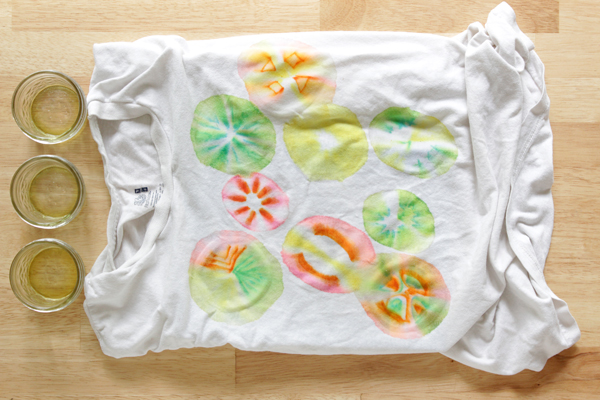
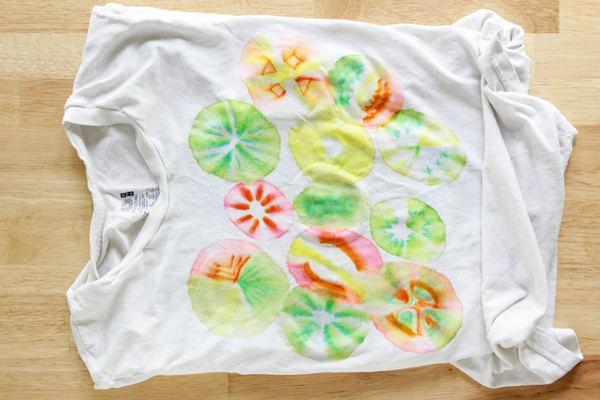
Remove all rubber bands and jars, being careful not to spill any rubbing alcohol inside the shirt, and let your shirt dry, cardboard intact. Unless you went totally crazy with tons of rubbing alcohol, your shirt should dry pretty quickly.

How-to: Mess Free Tie Dye | Hands Occupied

I learned this dyeing technique in high school science class (I have no clue what the heck we were supposed to be learning in that unit), and I still have the shirt I dyed back then. The ink will fade over time, particularly if you use harsh detergents, so keep that in mind if you want your shirt to stay nice and bright. And by keep that in mind, I mean wash it in cold water and don’t use bleach. :-)

Filed Under: Back to School, DIY Style, How-to Tagged With: college, crafts, diy, diy style, dorm, dorm crafts, easy crafts, mess free tie dye, neon, t-shirt, tie dye, tshirt

About Heidi

Heidi Gustad is a craft book author & content creator in love with primary colors & vintage vibes. She specializes in knitting, crochet, latch hook and macramé, and her first book, Latch Hook: 12 Projects for the Modern Maker, is out now!

Previous Post: « Weekly Reader
Next Post: Best Back to School DIY Ideas »

Reader Interactions

DID YOU LIKE THIS POST?
Visit similar articles...

  • How-to: State Pride T-shirts How-to: State Pride T-shirts
  • Back to School Project RoundupBack to School Project Roundup
  • How-to: Decorate with Glue DotsHow-to: Decorate with Glue Dots
  • Weekly ReaderWeekly Reader

DON’T MISS ANOTHER UPDATE

Comments

  1. Jaya joy jakob

    August 19, 2013 at 8:00 pm

    Easy and lovely. Sometime I dies my t shirt but this trick is new for me , thanks very much.

    Reply
  2. wanda

    August 20, 2013 at 7:37 am

    This would work so well for children to do along with people in assisted living. Could you think about putting just the directions together then one photo completed so we could print out and save in our craft book. Thanks wanda

    Reply
  3. Lindsey

    August 21, 2013 at 9:15 pm

    Thank you for a great tutorial! I just tried this out with an old tote bag and it totally breathed new life into it. Perfect for back to school!

    Reply
    • Heidi

      August 21, 2013 at 9:23 pm

      I’m glad to hear it! Super simple, right?

      Reply
      • Lindsey

        August 21, 2013 at 9:32 pm

        Totally. It actually worked quite well with a tote that already had a (fairly simple) screenprinted design on the front. You can actually see the results on my Flickr–front: http://www.flickr.com/photos/daharyn/9565327455/ and back: http://www.flickr.com/photos/daharyn/9568118308/

        Thanks again for inspiring some creativity!

        Reply
        • Heidi

          August 21, 2013 at 11:05 pm

          Thanks for the pictures. That looks freaking cool.

          Reply

Trackbacks

  1. Science Meets Crafts Program Kit: Permanent Marker-Dyed T-shirts | Library as Incubator Project says:
    October 25, 2013 at 7:02 am

    […] out How to Make a Mess Free Tie Dye T-shirt for the step by step on making these one at a time. I encourage you to make one yourself before […]

    Reply

Leave a Reply Cancel reply

Your email address will not be published. Required fields are marked *

This site uses Akismet to reduce spam. Learn how your comment data is processed.

Primary Sidebar

Heidi Gustad from Hands Occupied / Craft Book Author and Knitting, Crochet, Latch Hook and Macrame Designer

Hi! I’m Heidi (she/her/hers), a craft book author & pattern designer specializing in knitting, crochet, latch hook & macrame. Really anything with yarn! ❤️  My work combines vintage and modern design elements, featuring bold colors and graphic motifs.

UPDATES BY EMAIL

Monthly highlights sent to your inbox.

Find Me Elsewhere, If You’re There

  • Instagram
  • Pinterest
  • YouTube
Latch Hook by Heidi GustadDiscover Unique Items

Footer

INSTAGRAM

handsoccupied

Craft book author & pattern designer ❤️💛💙
knitting, crochet, latch hook & macramé
.
Please email for pattern support. 🧶

Heidi Gustad 🧶✂️
Working on a sample for some upcoming videos. It’s an overcast day with intermittent sunshine & I have a scruffy little sidecar. 🐶 Can’t complain! 
.
What’s on your needles this week? 
.
Yarn: @debbieblissknits Cashmerino Aran 
.
#handsoccupied #knitting #knittinglife
Peg boards and craft room organization go together Peg boards and craft room organization go together like peanut butter and jelly. So, as you can see, do latch hook tools and screwdriver organizers! 🪛 
.
I think this trick translates to any tool with a thick handle, so leather working tools, punch needles, print making tools, etc. should work! What other tools am I, a needlecrafter, blanking on right now? 
.
#craftorganization #handsoccupied #latchhook #latchhooking
Pegboard storage is my favorite for craft supplies Pegboard storage is my favorite for craft supplies, so getting a few hung in my new studio has been a priority. Here’s my first attempt. 🔨 
.
Details: This pegboard panel is for organizing my knitting needles, latch hook tools, sewing thread, etc. It doesn’t need to hold much weight, so I didn’t anchor this into a stud - just used basic drywall anchors. I’ve also got a set of two 2’x4’ panels for another spot in my studio, and those will need a stud/more than 3 drywall anchors. Wish me luck! 
.
[description: video features a woman hanging a panel of pegboard using a square dowel and drill]
It’s time for the annual Hands Occupied new year It’s time for the annual Hands Occupied new year update, and for the first time in years, I feel like I have some clarity about what I’m doing next. ❤️ Head to the blog to read all about it, the 1ink is where you’d think. 
.
#handsoccupied #knitting #creativeburnout
June’s face is giving, “What fresh heck is thi June’s face is giving, “What fresh heck is this?” 😆
.
June’s big ears can get cold in winter, so I’m improvising a doggie ear warmer/hood for her. What are the odds she tries to shred it immediately when it’s done? 
.
#knitting #knittingfordogs #handsoccupied #schneagle #wipwednesday #wip
Load More... Follow on Instagram

Copyright © 2023 / Foodie Pro Theme On Genesis Framework / Branding by Ink + Mortar
All Site & Shop Policies / Privacy Policy / Cookie Policy