• 0 items$0.00
  • Skip to primary navigation
  • Skip to main content
  • Skip to primary sidebar
  • Skip to footer

Hands Occupied

Colorful knitting, crochet, latch hook and macrame from craft book author & designer Heidi Gustad.

  • BLOG
    • Knitting
    • Crochet
    • Latch Hook
    • Macramé
    • Punch Needle
  • ABOUT
  • Shop
  • Nav Social Menu

    • Instagram
    • Pinterest
    • RSS
    • YouTube

How-to: Stencil and Cut Vinyl

July 27, 2011 2 Comments

Reupholstering some worn out bar stools has been on my mental decor projects list for longer than I’d like to admit. I think part of why I put this project off so long was a complete lack of experience working with furniture, the cost of vinyl, and wanting to incorporate a stenciled element in my reupholstery project.

So I said screw it. Let’s just try this. I whipped out the ole credit card (and some coupons) at JoAnn’s and decided to go for it. Today, I wanted to share how I stenciled some nautical silhouettes on to a piece of vinyl.

Supplies

vinyl (check out the remnant rack at your local fabric store before paying full price)

freezer paper

very sharp fabric scissors

printed silhouettes of your choosing

iron

pencil

straight pins

x-acto knife

scrap cardboard

Directions

Trace your silhouettes on to the unwaxed side of a piece of freezer paper. Iron the waxed side of your freezer paper to the wrong side of your vinyl.
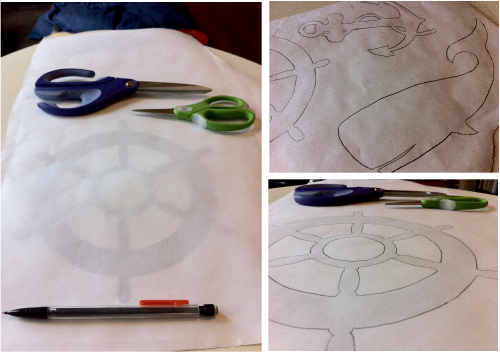
I found that the freezer paper didn’t want to adhere to the vinyl too well. Stenciling other fabrics, felt in particular, with freezer paper has worked much better for me than the vinyl did. That being said, I didn’t want to let my tracing efforts go to waste. Adding straight pins before cutting my vinyl helped secure the freezer paper for the next step.

Using your x-acto knife, cut along the lines you traced and in to the vinyl itself. Make sure to lay a piece of cardboard on your work surface to protect it from damage.
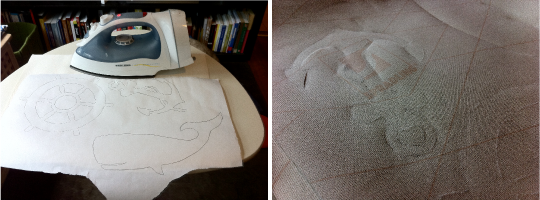
Peel the freezer paper from your vinyl, and you should be able to see your silhouettes on it. Cut along those silhouette lines with a sharp, sharp, sharp scissors. A great timesaver I discovered involved carefully examining my vinyl before cutting:
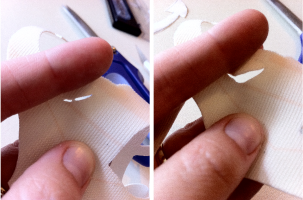
Looking at the vinyl, you should be able to see where you’ve cut all the way through it and where you haven’t. Use your x-acto knife or scissors to carefully trim little pieces like those shown above, rather than maneuvering a scissors inside those little nooks and crannies. For lines that are not cut that far through, follow the silhouette lines using a fabric scissors.
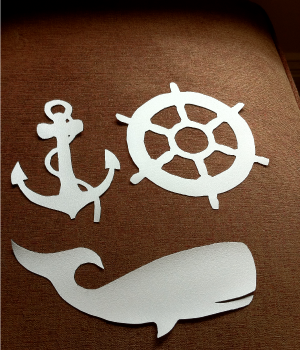
Hours later, you’re all done. Check back or subscribe to the feed because next week, I’ll be showing you how I reupholstered some thrift store bar stools and appliqued these silhouettes to the back of them!

Filed Under: How-to Tagged With: freezer paper, How-to, stencil, vinyl, x-acto

About Heidi

Heidi Gustad is a craft book author & content creator in love with primary colors & vintage vibes. She specializes in knitting, crochet, latch hook and macramé, and her first book, Latch Hook: 12 Projects for the Modern Maker, is out now!

Previous Post: « Not too Hot for Inspiration
Next Post: Inspiration Thursday »

Reader Interactions

DID YOU LIKE THIS POST?
Visit similar articles...

  • Twinkle in Your Eye Sunglasses Twinkle in Your Eye Sunglasses
  • Attention, DIY Brides & Handmade Hostesses!Attention, DIY Brides & Handmade Hostesses!
  • Top 10 DIYs of 2013Top 10 DIYs of 2013
  • How-to: Easy Vintage Style PennantHow-to: Easy Vintage Style Pennant

DON’T MISS ANOTHER UPDATE

Comments

  1. Hillary

    October 10, 2015 at 10:36 am

    Where did you find your templates for the whale? I have been looking every where for one shaped like that.

    Reply
    • Heidi

      October 22, 2015 at 10:02 pm

      I found a whale on google images, printed it, traced it & cut out the fabric vinyl by hand with an x-acto knife.

      Reply

Leave a Reply Cancel reply

Your email address will not be published. Required fields are marked *

This site uses Akismet to reduce spam. Learn how your comment data is processed.

Primary Sidebar

Heidi Gustad from Hands Occupied / Craft Book Author and Knitting, Crochet, Latch Hook and Macrame Designer

Hi! I’m Heidi (she/her/hers), a craft book author & pattern designer specializing in knitting, crochet, latch hook & macrame. Really anything with yarn! ❤️  My work combines vintage and modern design elements, featuring bold colors and graphic motifs.

UPDATES BY EMAIL

Monthly highlights sent to your inbox.

Find Me Elsewhere, If You’re There

  • Instagram
  • Pinterest
  • YouTube
Latch Hook by Heidi GustadDiscover Unique Items

Footer

INSTAGRAM

handsoccupied

Craft book author & pattern designer ❤️💛💙
knitting, crochet, latch hook & macramé
.
Please email for pattern support. 🧶

Heidi Gustad 🧶✂️
When you have four big skeins of pretty 2 ply yarn When you have four big skeins of pretty 2 ply yarn, you immediately think sweater, right? 
.
My wardrobe could use another handmade sweater - I’m thinking something simple, seamed and with a decent amount of ease for potentially wearing tucked in with jeans or skirts. 🤔 
.
Yarn: @universal_yarn Fibra Natura Cobblestone in Antarctica and Dragon’s Breath, wound in thick skeins of 100% superwash wool that’s a light DK weight.
How to to knit throwing (a.k.a. English) style . How to to knit throwing (a.k.a. English) style 
.
In knitting, there are a few common knitting styles. Most often you’re going to encounter continental style and English (throwing) style on your knitting journey. I recently had an old video teaching continental style get a lot of views. Based on the comments, it was clear the people wanted to also see a throwing tutorial, so here you go! 🧶
.
Please note that there is a LOT of variation in knitting styles, and one isn’t necessarily better than another. Most often, I’ve found it comes down to two things: how you were taught and whether or not you’re really into colorwork knitting (which can involve a mix of styles). 
.
Longer-term knitters who’ve made it this far: do you prefer one over the other? And why? 
.
#handsoccupied #englishknitting #learntoknit #knitting #howtoknit #knittersofinstagram #knitting_inspiration
How to do a one-step provisional knitting cast on How to do a one-step provisional knitting cast on / a.k.a. crochet provisional cast on, scrap yarn cast on
.
I read recently that tiktok and Instagram are being used as search engines more and more. 🤔 I thought since I’m going to all the work of making tutorials on YouTube, I should experiment with making a quick version of them for other platforms. There are obvious teaching limitations to vertical video, short-form content like this, but I think I covered the gist of this cast on in a minute. The YouTube version also covers how to unzip this cast on because there was time for it 👍🏻 L1nk is in my profile. 
.
I’m very much looking for feedback as I continue to make instructional knitting & craft videos. Sometimes good tutorials are hard to find, and (ideally polite) feedback helps me improve. 
.

#handsoccupied #provisionalcaston #knitting #knititngtutorial #knittersofinstagram #crochethook #knittingtutorial
For the first time in a long time, there’s a new For the first time in a long time, there’s a new tutorial from Hands Occupied! 🎉 The video is live on YouTube & the blog. 
.
The post covers what provisional cast ons are & how they differ, and the video covers how to work a one-step provisional cast on using scrap yarn and a crochet hook. (This is a great one to save for future reference.)
.
I learned several names for this method while researching this video & post. Crochet provisional cast on, one-step cast on, scrap yarn cast on - if you know even more names for this technique, please share! 
.
#handsoccupied #provisionalcaston #knitting #scrapyarn #crochethook
Working on a sample for some upcoming videos. It’s an overcast day with intermittent sunshine & I have a scruffy little sidecar. 🐶 Can’t complain! 
.
What’s on your needles this week? 
.
Yarn: @debbieblissknits Cashmerino Aran 
.
#handsoccupied #knitting #knittinglife
Load More... Follow on Instagram

Copyright © 2023 / Foodie Pro Theme On Genesis Framework / Branding by Ink + Mortar
All Site & Shop Policies / Privacy Policy / Cookie Policy