• 0 items$0.00
  • Skip to primary navigation
  • Skip to main content
  • Skip to primary sidebar
  • Skip to footer

Hands Occupied

Colorful knitting, crochet, latch hook and macrame from craft book author & designer Heidi Gustad.

  • BLOG
    • Knitting
    • Crochet
    • Latch Hook
    • Macramé
    • Punch Needle
  • ABOUT
  • Shop
  • Nav Social Menu

    • Instagram
    • Pinterest
    • RSS
    • TikTok
    • YouTube

How-to: Vintage Bird Feeder Ornament

December 5, 2013 15 Comments

How-to: Vintage Bird Feeder Ornament DIY | Hands Occupied

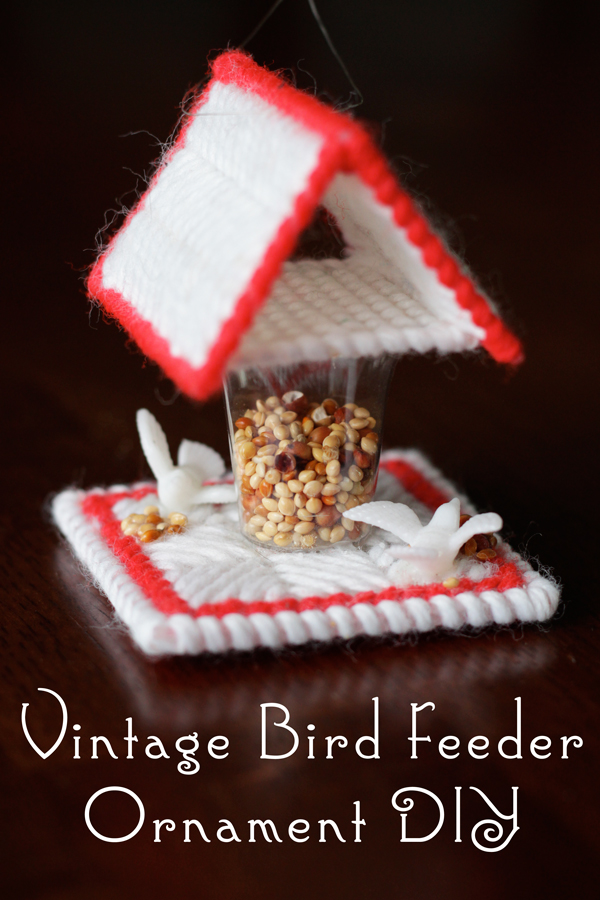
Just like the crazy midcentury Santa decoration I shared last week, this birdhouse ornament is from my mom’s stash of homemade ornaments dating back to the early 1900s. This little bird feeder has always been a favorite ornament of mine – I think because rather than just hanging there looking pretty, it’s a little bit like a snapshot of a moment in time. The birds are resting on the feeder of a birdhouse to grab a quick snack before taking off. It’s really adorable hanging from a Christmas tree, and so easy to make.

Supplies

plastic canvas
red and white yarn
scissors
yarn needle
plastic shot glass (like these)
bird seed
tiny plastic birds (like these)
tacky glue
fishing line or thread

Directions

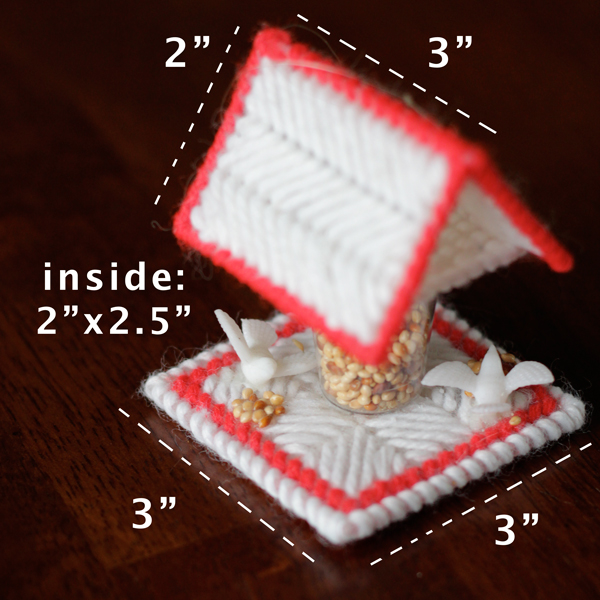
Cut the following from your plastic canvas: two 2″x3″ rectangles, one 2″x2.5″ rectangle & one 3″x3″ square.

How-to: Vintage Bird Feeder Ornament DIY | Hands Occupied  
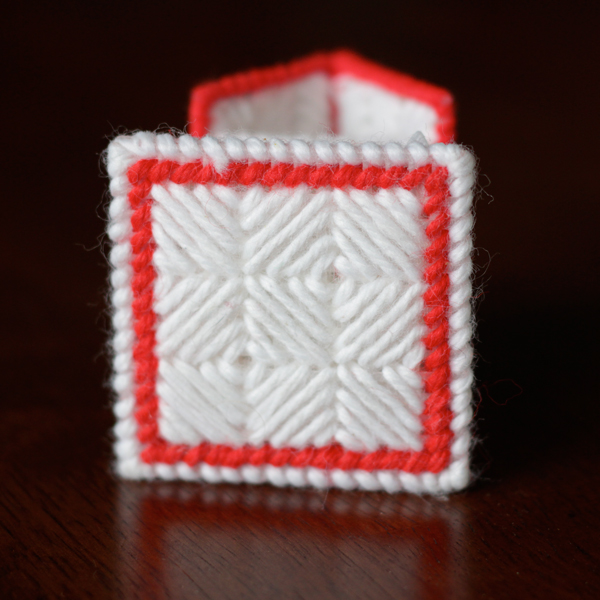
Sew a pattern like the one pictured on the 3×3 square with red and white yarn, bordering it with a whip stitch to cover the edges of the plastic canvas.

How-to: Vintage Bird Feeder Ornament DIY | Hands Occupied

Sew yarn in a zig zag pattern over the two 2×3 rectangle pieces, whip stitching over the two short edges and one long edge. Whip stitch the rectangles together on the remaining long side, forming the peak of the birdhouse’s roof. (See: how to whip stitch plastic canvas together.)

How-to: Vintage Bird Feeder Ornament DIY | Hands Occupied

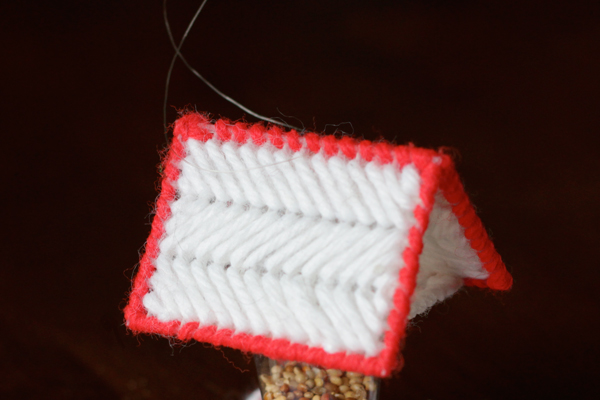
Sew over the remaining 2×2.5″ plastic canvas piece, whip stitching over the edges. Sew it to the inside of the rest of the birdhouse roof.

How-to: Vintage Bird Feeder Ornament DIY | Hands Occupied

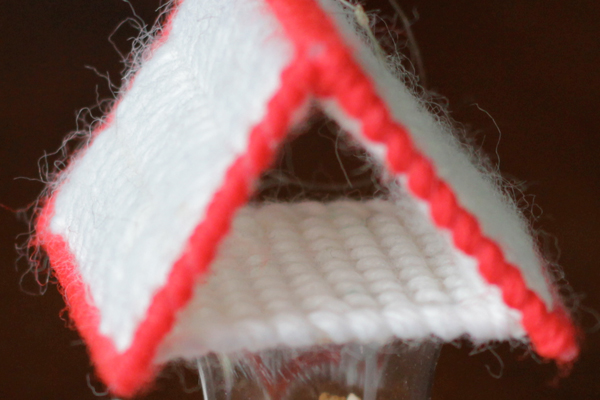
This ornament is about 50 years old, so you’ll have to pardon a bit of frizz in the detail pics.  

Fill the tiny plastic cup halfway with some bird seed and glue the roof to the top edge of the cup, centering it. Glue the bottom of the cup to the center of the 3×3″ square too. Let dry.

How-to: Vintage Bird Feeder Ornament DIY | Hands Occupied

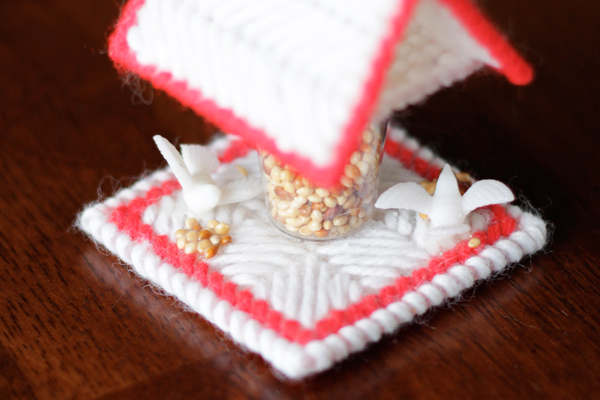
Glue a couple teeny tiny piles of bird seed and two little birds to the base of the birdhouse to finish, and use a little bit of fishing line or thread sewn through the top edge of the roof to hang.

How-to: Vintage Bird Feeder Ornament DIY | Hands Occupied

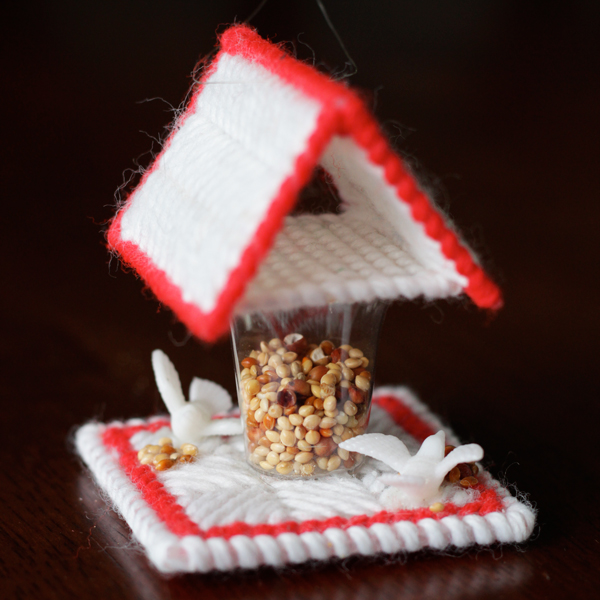
So adorable, right? Do you have a favorite (possibly even homemade) Christmas ornament hanging on your or a relative’s tree? I’d love to hear all about it! :)

Filed Under: Christmas, How-to Tagged With: bird feeder, birdhouse ornament, birds, christmas, crafts, diy, ornament, vintage

About Heidi

Heidi Gustad (she/her) is a craft book author & designer specializing in yarn crafts. Her work combines vintage and modern design elements, prioritizing color and graphic motifs. Her first book, Latch Hook: 12 Projects for the Modern Maker, is out now.

Previous Post: « How to Survive a Long Road Trip
Next Post: Weekly Reader »

Reader Interactions

DID YOU LIKE THIS POST?
Visit similar articles...

  • 6 Beautiful Vintage Holiday Decorations6 Beautiful Vintage Holiday Decorations
  • Weekly ReaderWeekly Reader
  • 50 Great DIY Gift Ideas50 Great DIY Gift Ideas
  • Carved Styrofoam Holly WreathCarved Styrofoam Holly Wreath

Comments

  1. Tori D

    December 6, 2013 at 7:15 am

    This is sooo cool its a great idea! I wish i had all the stuff to make it

    Reply
  2. Diane

    December 10, 2013 at 3:29 pm

    Ooh, I’m just seeing this – what a great project!! Thank you for carrying the PC torch! :-)

    Reply
  3. Karen

    June 13, 2014 at 9:41 am

    OMG! My mom made these YEARS ago!! I still have one on my tree every year. She also made mailbox, drum, jack-in-the-box and a few other ornaments utilizing the plastic canvas method. I treasure them because she made them. She is gone now, but these ornaments live on and her memory with them.

    Reply
    • Heidi

      June 13, 2014 at 10:39 am

      Yeah, homemade ornaments are my favorite heirlooms!

      Reply
  4. Brenda

    August 28, 2014 at 2:10 am

    So glad I found this bird feeder. My mother-in-law always made these. Been wanting to make some also. Thanks!

    Reply
  5. lydia

    December 10, 2014 at 11:50 pm

    just love these bird feeders as well as some of your other cafts. thank you so very much

    Reply
  6. ELeanor baker

    November 18, 2015 at 4:14 pm

    I have made a dozen of these from a kit that had all the supplies. Can you tell me where to get the little shot glasses. The hanks in advance

    Reply
    • Heidi

      November 18, 2015 at 6:43 pm

      Hi Eleanor,

      Since this is a vintage ornament from my mom’s tree, I don’t know where she got those exact glasses, but after a quick Google search for “tiny plastic shot glasses,” I found several options. There were many options. I recommend starting there and choosing the ones whose look you like best!

      -Heidi

      Reply
    • Robin

      August 14, 2016 at 10:07 pm

      That is not a shot glass, they are called commumion cups and you get them at a store that carry supplies for the churches. I’m making some now. I made them a long time ago but I just went a picked up the cups.

      Reply
  7. Debra

    October 2, 2016 at 5:34 pm

    I bought the communion cups/small cups at The Dollar General store.

    Reply
  8. sandra

    September 29, 2018 at 10:49 pm

    i have made these for several years and given away at nursing homes, and church . everyone has loved them. I save the communion cups from church service and take then home and wash them.

    Reply
  9. Virginia lund

    December 31, 2018 at 6:32 am

    I want the pattern for the little bird feeder ornaments

    Reply
    • Heidi

      December 31, 2018 at 12:30 pm

      I don’t have one as this is vintage. The detail shots & text give you an idea of how this would come together.

      Reply
  10. Betsy Jumper

    January 10, 2022 at 8:01 am

    My Girl Scout troop and I made the bird feeder ornaments back in the 1980’s. I had also given them to friends and family . Many years ago, a mouse took up residence in one of my ornament boxes. She chewed through the plastic communion cup to get the bird seed and used the yarn in her nest. Haven’t given it any more thought until I was decorating my sister in love’,s tree for her. She came home from the hospital on Christmas eve. As I hung the little bird feeder on her tree, I knew I needed to make me another one, or more. So I went and purchased my plastic canvas and I am now well on the way to making my new ” vintage” ornaments.

    Reply
    • Heidi

      January 10, 2022 at 11:25 am

      That’s so sweet! I love to hear stories like this. (Well, maybe with fewer mice to clean up after…) ;) Enjoy!

      Reply

Leave a Reply Cancel reply

Your email address will not be published. Required fields are marked *

This site uses Akismet to reduce spam. Learn how your comment data is processed.

Primary Sidebar

Heidi Gustad from Hands Occupied / Craft Book Author and Knitting, Crochet, Latch Hook and Macrame Designer

Hi! I’m Heidi (she/her/hers), and I’ve been helping yarn crafters untangle various techniques on the internet since 2010. I got my start here, as a blogger, and since then I’ve shared more than a few tutorials here and on YouTube as I’ve grown as a pattern designer. 🧶 

learn more / work with me

Find Me on Social Media

  • Instagram
  • Pinterest
  • TikTok
  • YouTube
Latch Hook by Heidi Gustad

Footer

INSTAGRAM

Heidi Gustad 🧶 knitting & yarn crafts

handsoccupied

Knitting & yarn crafts designer 🧶
.
Stay up-to-date 💌 & shop new patterns ⤵️

POV: Showing you how my new Bevelled Tank pattern POV: Showing you how my new Bevelled Tank pattern fits with no ease vs. 4” of positive ease. There’s a bit more length to the cotton (brighter color) sample, but both are cropped and feature shoulder seams designed to sit an inch back onto the shoulder instead of on top, giving it a little swing. Length is easily adjustable for folks looking for less of a crop. 
.
Pattern: Bevelled Tank by @handsoccupied for @pompommag x @hobbii_yarn summer 2024. Available for free from Hobbii at the 🔗 in my profile.
Yarn pictured: @kelbournewoolens Skipper and Camper. 
Dress form is adjusted to a 36” chest and ~5’3”ish in height. 
Human has a 40” chest and is 5’5”.
Both skirts are vintage.
.
#pompomxhobbiisummer2024 #handsoccupied #intarsia #handmade #knitting #colorwork
Let’s talk about fit and ease! . During the Beve Let’s talk about fit and ease!
.
During the Bevelled Tank design process for @pompommag, I knit 2 samples using 2 different @KelbourneWoolens yarns. One was in Skipper (100% cotton, second photo) and the other was in Camper (100% 2 ply wool). The Skipper sample was knit for a 36” bust, which measures in at 40” with 4” of positive ease. And I knit the Camper Sample for my 40” bust with a 44” finished measurement. (BTW, I’m 5’5” for folks that find that measurement helpful in visualizing fit.)
.
Based on the size chart for the Bevelled Tank, that means I knit one size 3 sample and one size 4. As designed, I conveniently fit a size 4 as intended with 4” of positive ease. When I wear the 3, there is no ease at all because the garment and my body are both 40” in size. Comparing the 2 garments, you can see how the fiber content (cotton vs. wool) and fit (no ease vs. 4” of positive ease) makes a difference in the look and feel of the finished garment. 
.
These samples are a great way to compare what ease looks like on different bodies. While I can fit both a size 3 and 4, the garment with no ease feels more like pajamas or a bralette when I wear it. On the other hand, when I wear the one with 4” of positive ease, I feel comfortable enough to wear it to work, even as a crop top. Plus, it leaves me with enough room to layer it with a nice button down if I’m not feeling the cropped look one day. 
.
I’m curious - how would you style this tank? Would you modify it with a few stockinette rows for added length? I’m so curious now that this pattern is finally out in the world. :) 
.
#pompomxhobbiisummer2024 #bevelledtank #handsoccupied #knitting #intarisa #handmade #kelbournewoolens #croppedsweater #summerknits
After a 6 month hiatus, I am happy to say I’m ba After a 6 month hiatus, I am happy to say I’m back with a brand new pattern in 9 sizes, and it’s FREE as part of @pompommag x @hobbii_yarn’s summer design collection! (Link is in my bio.)
.
In my December newsletter, I announced that I was soliciting test knitters for a pattern that had originally been selected for the summer ’24 issue of Pom Pom Quarterly magazine. However, the magazine ceased publication after its spring ’24 issue, leaving in-progress designs unpublished. (It happens.) As a result, I’d begun the long process of editing, testing, and photographing the pattern for independent release through the Hands Occupied pattern shop and Ravelry.
.
Before I was done with that process, Pom Pom Quarterly’s former editors reached out with an exciting proposal for the pattern. Post-magazine, they’ve begun to partner with yarn companies to produce high quality pattern collections. They wanted to include designs from the would-be current issue of Pom Pom Quarterly in a new collection for Hobbii yarn, including my Bevelled Tank. I worked with the same technical editors I would have for the magazine on this one, and as you can see from the photos, Pom Pom’s team did an amazing job of styling the garment to the beautiful standards they’re known for.
.
You can learn more about the pattern on my blog and get the free pattern from Hobbii yarn - links to both in my profile. I’ll post sizing info in the comments for quick reference too. 🧶
.
#pompomxhobbiisummer2024 #knitting #intarsia #sponsored #colorworkknitting 
.
Photos: @dianascarrunz 
Model: @angel.jade_
Here’s a nice throwback for you: my take on a vi Here’s a nice throwback for you: my take on a vintage knitting pattern from 1938 called the Fernlace Pullover. A pattern so nice, I knit it twice.
.
Yellow version 💛: knit with Despondent Dyes’ Vintage Vixen Sport after attending a @squidneyknits vintage knitting retreat in 2019 & learning *so much*. Paired with a self-drafted circle skirt pattern. 
.
Blue version 💙: knit with @eweeweyarns Ewe So Sporty in Sky Blue. Paired with the 1940s Boardwalk Duet sewing pattern from @decades_of_style 
.
Head to my stories for 🔗🔗 to the handmade wardrobe blog posts I wrote about each take on the Fernlace Pullover, working with a vintage pattern, where to find vintage patterns (including the one I used), & some thoughts on sizing. 
.
Image descriptions available in alt text. 
.
#handsoccupied #handmadewardrobe #fernlacepullover #vintageknitting #vintageknittingpatterns #knitting_inspiration
Frogging is a word in the knitting world that mean Frogging is a word in the knitting world that means to rip out your knitting. It’s called frogging because frogs say “ribbit,” and when you’re tearing out your knitting, you will “rip it” out, and that sounds like ribbit. No really. 🐸 Did you know this fun fact? 
.
P.S. I did like this design concept, but to make the pattern more knitter friendly as well as more wearable, I am making some tweaks to the construction. Excited to share when it’s ready! 🥰🧶
.
Yarn: @blueskyfibers Woolstok North in Morning Frost & Highland Fleece 
.
#handsoccupied #knitting #frogging #blueskyfibers #knittersofinstagram #blueskymakers #knittingvocabulary #bsfmakers #knitdesign
Load More... Follow on Instagram

Copyright © 2025 / Foodie Pro Theme On Genesis Framework / Branding by Ink + Mortar
All Site & Shop Policies / Privacy Policy / Cookie Policy