• 0 items$0.00
  • Skip to primary navigation
  • Skip to main content
  • Skip to primary sidebar
  • Skip to footer

Hands Occupied

Colorful knitting, crochet, latch hook and macrame from craft book author & designer Heidi Gustad.

  • BLOG
    • Knitting
    • Crochet
    • Latch Hook
    • Macramé
    • Punch Needle
  • ABOUT
  • Shop
  • Nav Social Menu

    • Instagram
    • Pinterest
    • RSS
    • TikTok
    • YouTube

How-to: Woven Ribbon Lampshade

May 6, 2013 3 Comments

How-to: Woven Ribbon Lampshade at HandsOccupied.com

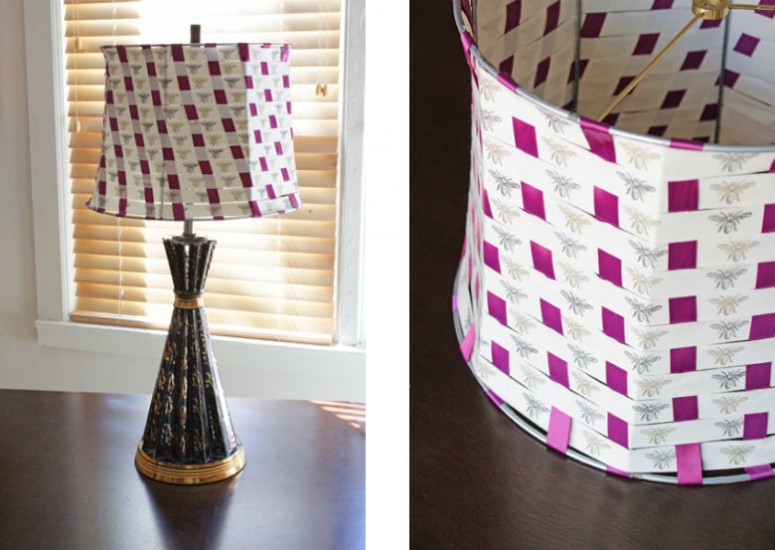
Sometimes, you’re out walking the dogs and find a couple of perfectly good lampshades in the trash, and you have no choice but to take their existence as a sign you need some new lampshades. Even if you aren’t lucky enough to find craftable trash lying around, this project can be done with any wire-framed lampshade in need of a makeover.

Supplies

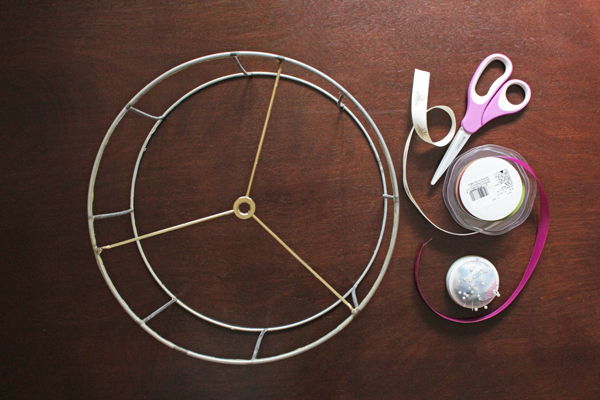
lots of ribbon, in 2 contrasting colors
an old lampshade with a wire frame
scissors
liquid stitch/fabric glue
lots of straight pins

Directions

Using whatever means necessary, strip your lampshade down to its wire frame.

How-to: Woven Ribbon Lampshade at HandsOccupied.com

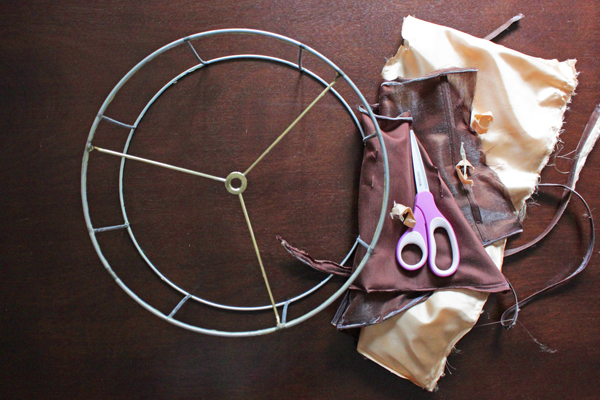
Since I literally found my lampshade in an alley, and since even non-alley lampshades get dusty over time, I advise you to take this opportunity to throw away the probably-gross fabric removed from the shade and clean off your workspace.

How-to: Woven Ribbon Lampshade at HandsOccupied.com

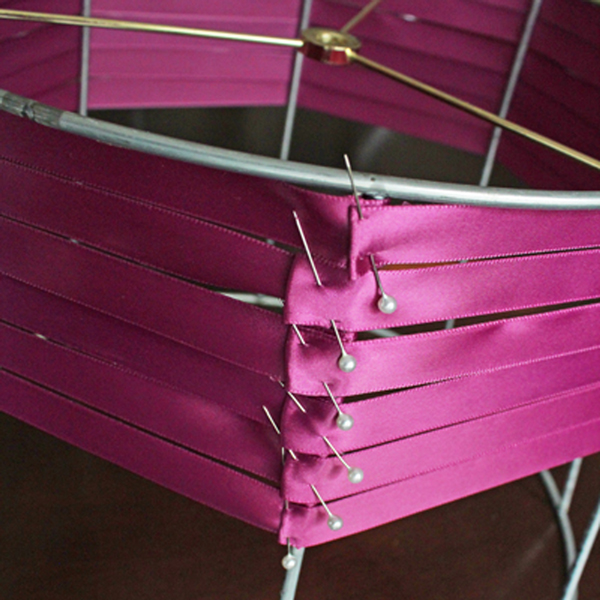
Cut a piece of ribbon long enough to wrap tightly around your lampshade plus two inches. Pin one end around a vertical support of your lampshade skeleton as shown below.

How-to: Woven Ribbon Lampshade at HandsOccupied.com

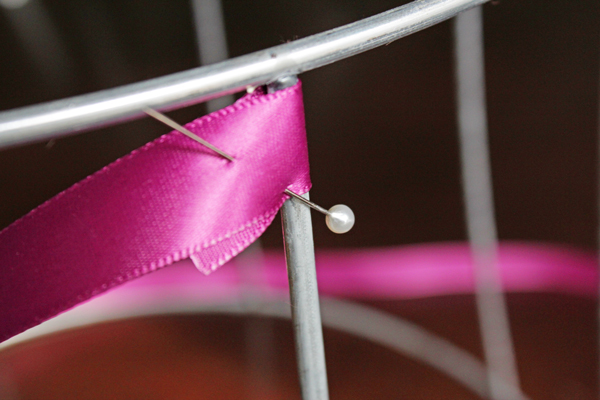
Wrap the ribbon around the outside of the shade. When you get around to where you began, fold down the second raw end and pin it to the first, folded over end of the piece of ribbon.

lampshade6

Cover your lampshade frame from top to bottom in this manner. The next step is weaving in vertical pieces of ribbon. You don’t have to do this in a contrasting color, but I found it made the weaving effect really pop.

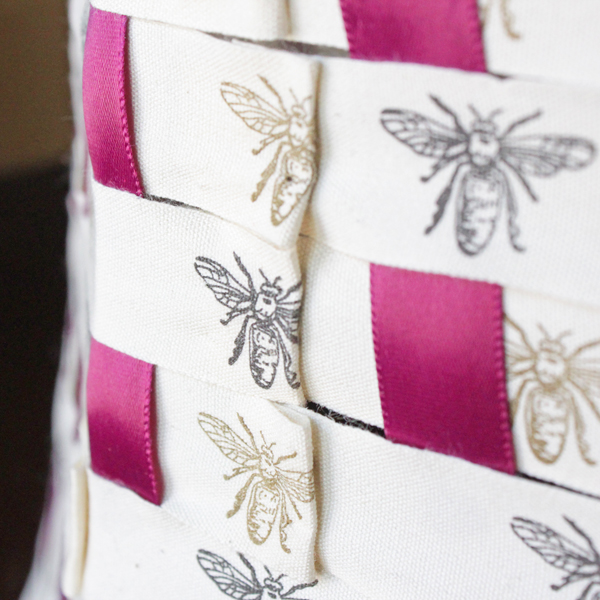
(I made two lampshades, using the purple ribbon for the horizontal loops for the first, and then using some cute bumble bee ribbon for the horizontal loops on the second. The pictures above feature the first lampshade, and the pictures below feature the second one. FYI.)

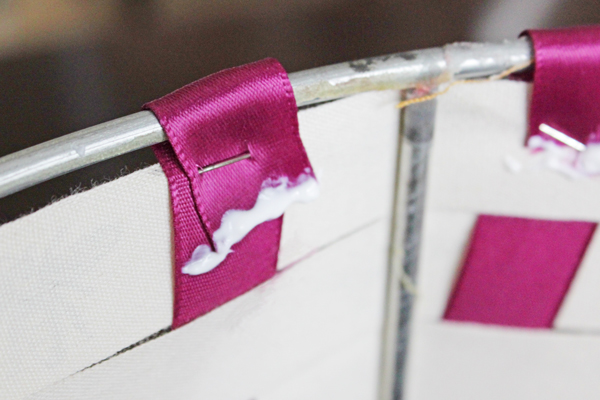
To weave in the vertical ribbon pieces, cut several pieces of ribbon that are two inches longer than your shade skeleton is tall. Fold one end of the ribbon over the top of the shade frame and secure to the top horizontal loop of ribbon with a pin. Repeat this process all the way around the shade, leaving the bottom end of the ribbon free and alternating how you weave the vertical ribbon among the horizontal. See the checkerboard effect of the purple ribbon on the bee ribbon?

How-to: Woven Ribbon Lampshade at HandsOccupied.com

Next, it’s time to glue everything in place as well as to glue over the ribbons’ raw ends to prevent raveling. Begin with the top of the vertical ribbons. Leave the pins in place until the glue is totally dry.

How-to: Woven Ribbon Lampshade at HandsOccupied.com

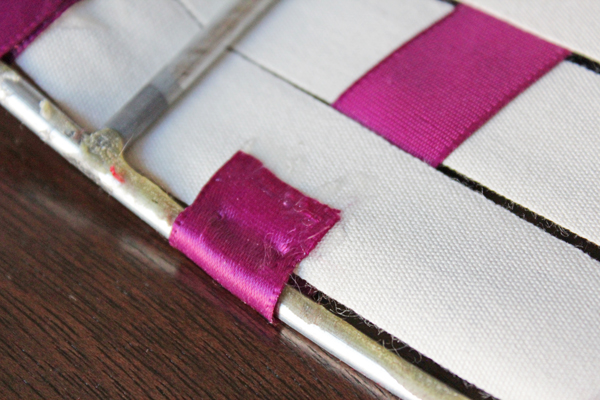
For the bottom of the shade, fold each end around the bottom metal piece similarly to the top, pin it in place, and glue to finish. Remove the pins when the glue has dried.

How-to: Woven Ribbon Lampshade at HandsOccupied.com

When the vertical ribbons are all set, you’ll need to glue the horizontal ribbon pieces too. Put a little glue inside each folded end and over the raw edge of the ribbon to keep it from raveling. Again, wait until the glue is totally dry to remove the straight pins.

How-to: Woven Ribbon Lampshade at HandsOccupied.com

An optional last step, if you’re so inclined, is to cover the exposed metal skeleton of the shade with more ribbon. For once, I decided to go with the shabby chic look on mine and left it raw.

I first posted this project at The Good Weekly, the blog for Goodsmiths. In case you didn’t know, I write twice a month for The Good Weekly. The bee ribbon used was provided by May Arts Ribbon. 

Filed Under: Home Decor, How-to, My Work Elsewhere Tagged With: home decor, lampshade, ribbon, upcycle, woven

About Heidi

Heidi Gustad is a craft book author, designer & creator specializing in yarn crafts like knitting, crochet, latch hook & macramé. Her first book, Latch Hook: 12 Projects for the Modern Maker, is out now.

Previous Post: « Weekly Reader
Next Post: The Best Mother’s Day Ideas »

Reader Interactions

DID YOU LIKE THIS POST?
Visit similar articles...

  • Picks of the WeekPicks of the Week
  • Over the Rainbow Softie – Free Crochet PatternOver the Rainbow Softie – Free Crochet Pattern
  • Picks of the Week for December 23, 2016 | Hands OccupiedPicks of the Week
  • Picks of the WeekPicks of the Week

DON’T MISS ANOTHER UPDATE

Comments

  1. Carol

    May 11, 2013 at 5:05 pm

    Fun shade.

    Reply
  2. Mia Ethan

    August 7, 2015 at 2:13 am

    Simple and powerful decoration. What ribbon did you use? I have bookmarked your snap. Thank you

    Reply

Trackbacks

  1. Weekly Reader, May 10, 2013 – Hands Occupied says:
    May 10, 2013 at 11:06 am

    […] On Monday, I showed you guys how to revamp a lampshade with woven ribbon. […]

    Reply

Leave a Reply Cancel reply

Your email address will not be published. Required fields are marked *

This site uses Akismet to reduce spam. Learn how your comment data is processed.

Primary Sidebar

Heidi Gustad from Hands Occupied / Craft Book Author and Knitting, Crochet, Latch Hook and Macrame Designer

Hi! I’m Heidi (she/her/hers), a craft book author & pattern designer specializing in knitting, crochet, latch hook & macrame. Really anything with yarn! ❤️  My work combines vintage and modern design elements, featuring bold colors and graphic motifs.

EMAIL NEWSLETTER

Never miss a tutorial with these short & sweet monthly updates.

Find Me on Social Media

  • Instagram
  • Pinterest
  • TikTok
  • YouTube
Latch Hook by Heidi GustadDiscover Unique Items

Footer

INSTAGRAM

handsoccupied

Craft book author, designer & creator specializing in yarn crafts like knitting, crochet, latch hook & macramé
❤️ Email preferred

Heidi Gustad 🧶✂️
Nobody panic. This is just the back of an (admitte Nobody panic. This is just the back of an (admittedly insane) intarsia project. One day, this will be a seamed sweater, but today is not that day. 🧶 
.
Have a good weekend, everyone! 
.
Yarn: @universal_yarn’s Fibra Natura Cobblestone in Antarctica & Dragon’s Breath 
.
#handsoccupied #intarsia #intarsiaknitting #wip #knitting
Here’s how to work a Norwegian purl stitch for e Here’s how to work a Norwegian purl stitch for easier continental style knitting. With this purling method, the working yarn says tensioned (held) at the back of your knitting at all times. For many knitters, always holding the yarn at the back helps with tension issues, as well as feeling a little more comfortable. 
.
Have you ever encountered this style of purling before? If you’ve tried it, have you found it helps with your purl tension and knitting speed? I’m curious.
.
For a written tutorial, visit handsoccupied-dot-com. For video, you guessed it, You2be. Both of these platforms allow for longer, more in-depth versions of this tutorial, including full transcripts, alt text & the ability to pause, slow down or speed up at will. (Like if you really want to learn this, I recommend using a platform that doesn’t keep your hands occupied. Thinking of putting this in all my captions these days tbh - shout out to you if you made it this far. 🙌🏻😂)
.
#handsoccupied #learntoknit #continentalknitting #howtoknit #norwegianpurl #norwegianknitting #knit #knitting #knitter #knittersofinstagram #knittinghack  #handknitting #handknit #norwegianpurling
Have you ever tried this style of purl? . All thi Have you ever tried this style of purl? 
.
All this recent talk about throwing vs. continental style knitting made it clear many people struggle with purling in continental knitting. Turns out that Norway may have the answer! In Norwegian purling, the working yarn stays tensioned at the back at all times, helping with speed and tension. 🤯
. 
Head to the bl0g (🔗 in bi0) for a more in-depth look at how to work a Norwegian purl stitch, including a photo tutorial with animated GIF & a video tutorial. Wrapping your mind around how to work a stitch you’re familiar with in a totally new way can be confusing, so I tried to give a few options for clarity. 🤙🏻 Video is also on You2be. 
.
#handsoccupied #norwegianpurl #norwegianknitting #norwegianpurling #continentalknitting #howtoknit #learntoknit #knitterofinstagram #knitters
It’s been a hot second since I showed my face or It’s been a hot second since I showed my face or reintroduced myself, so here goes! I’m Heidi Gustad, a craft book author, pattern designer, and tutorial creator who specializes in yarn crafts. Lately, I’ve been focused on releasing quality knitting videos and related blog posts to help teach things like the difference between provisional cast ons and how to fix common knitting mistakes. Next week I’m shooting requested crochet and latch hook videos, so h👀kers, your time is coming! And if you ever have tutorial requests, please let me know. ☺️
. 
TLDR: I’m Heidi. I design & teach yarn crafts. You can find tutorials on my blog (est. 2010) & You2be. I also have several knitting & crochet patterns + a book about latch hook available. / All of these can be found on my website, the 🔗 is where you’d think. 
.
#handsoccupied #fridayintroduction #heidigustad #knitting #knitter #knittersofinstagram #yarncrafts #latchhookbook
Are you a picker or a thrower? Do you knit Contine Are you a picker or a thrower? Do you knit Continental or English Style? Here’s a quick overview of the differences between the two most common knitting styles, including a side by side comparison. (A good one to save for future reference. 👍🏻) 
.
There’s more on the differences between picking and throwing in my latest blog post & You 2ube video - the l1nk is where you’d think!
.
#handsoccupied #learntoknit #knittingstyles #howtoknit #knittersofinstagram #knitter
Load More... Follow on Instagram

Copyright © 2023 / Foodie Pro Theme On Genesis Framework / Branding by Ink + Mortar
All Site & Shop Policies / Privacy Policy / Cookie Policy