• 0 items$0.00
  • Skip to primary navigation
  • Skip to main content
  • Skip to primary sidebar
  • Skip to footer

Hands Occupied

Colorful knitting, crochet, latch hook and macrame from craft book author & designer Heidi Gustad.

  • BLOG
    • Knitting
    • Crochet
    • Latch Hook
    • Macramé
    • Punch Needle
  • ABOUT
  • Shop
  • Nav Social Menu

    • Instagram
    • Pinterest
    • RSS
    • TikTok
    • YouTube

How to Weave in Punch Needle Ends

April 3, 2019 Leave a Comment

Yarn pictured was provided by Shepherd’s Lamb.

Weaving in your ends on a punch needle project is easy! Check out this step-by-step tutorial for tips and tricks for hiding and securing your punch needle rug hooking tails.

We recently took a look at how to do basic punch needle rug hooking, covering how to start a punch needle project and work with a punch needle tool. So what’s next? What do you do with something once it’s all punch needled? While it all depends on the project in question, today we’re going to tackle how to weave in and secure your ends. For many punch needle projects, you will need to weave in your ends before securing your canvas in a frame, sewing it to a cushion cover, or whatever finishing your particular project calls for. Ready to weave in your ends? Let’s dive in!

Note: I use the words “tail” and “end” interchangeably throughout this tutorial.
Also note: This is a tutorial designed for beginning punch needlers.
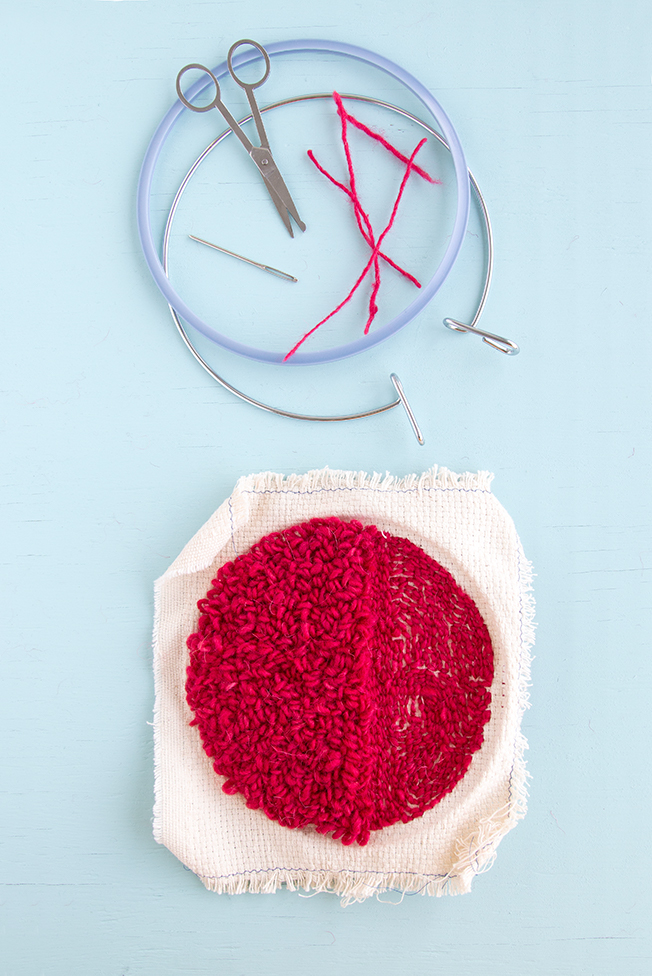
Supplies
punch needle project in need of end-weaving
tapestry needle (large-eyed, blunt-tipped)
scissors

Weaving in Right Side Punch Needle Ends

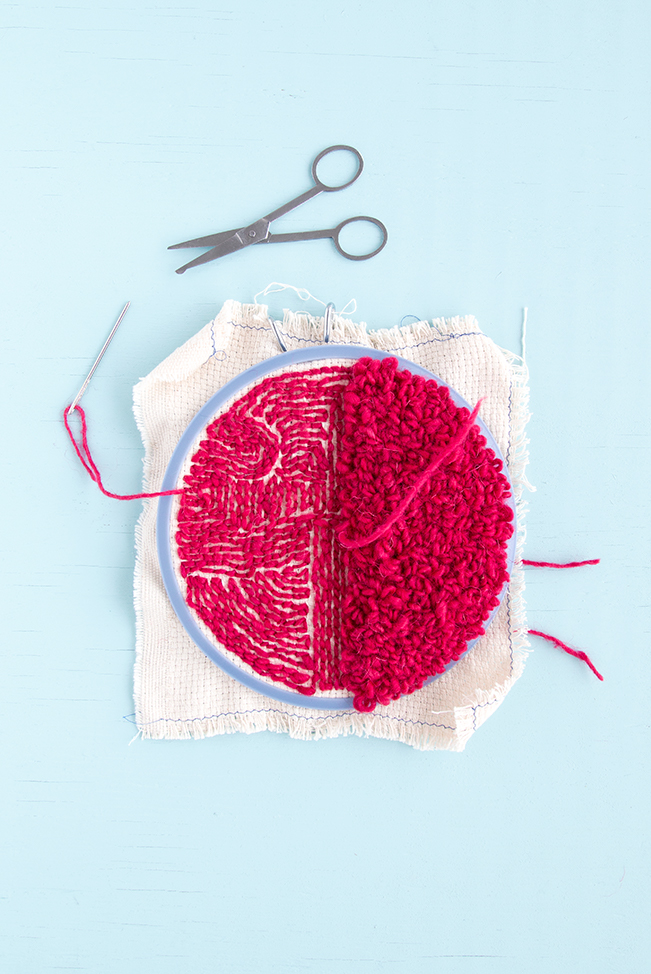
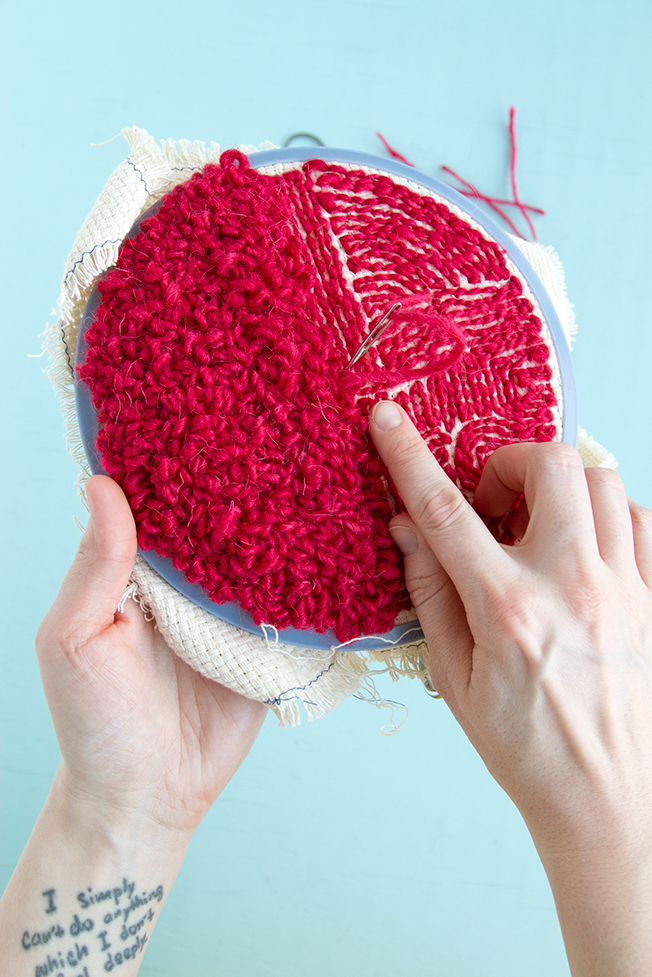
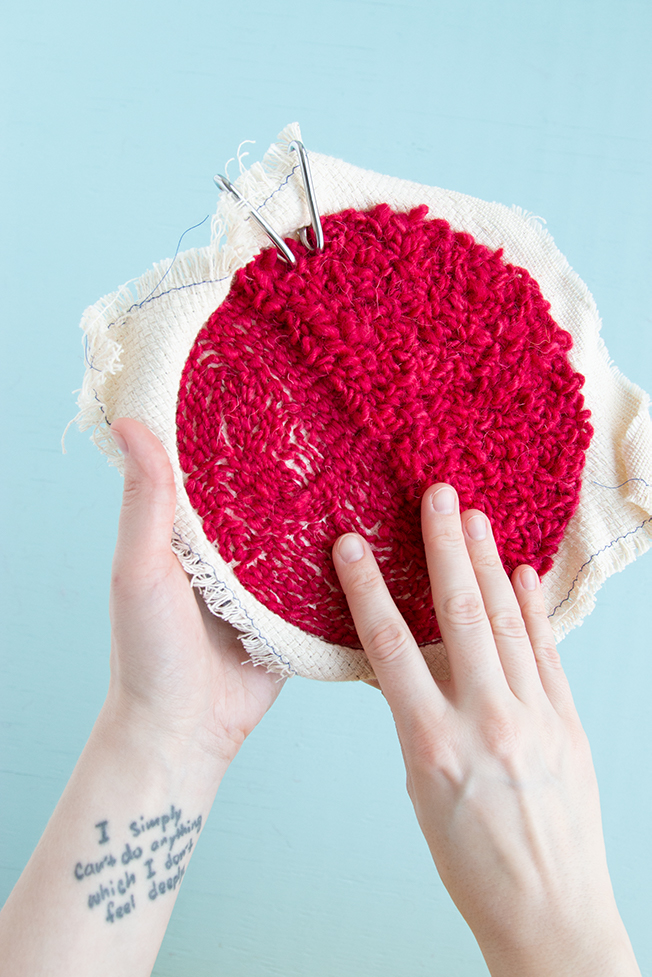
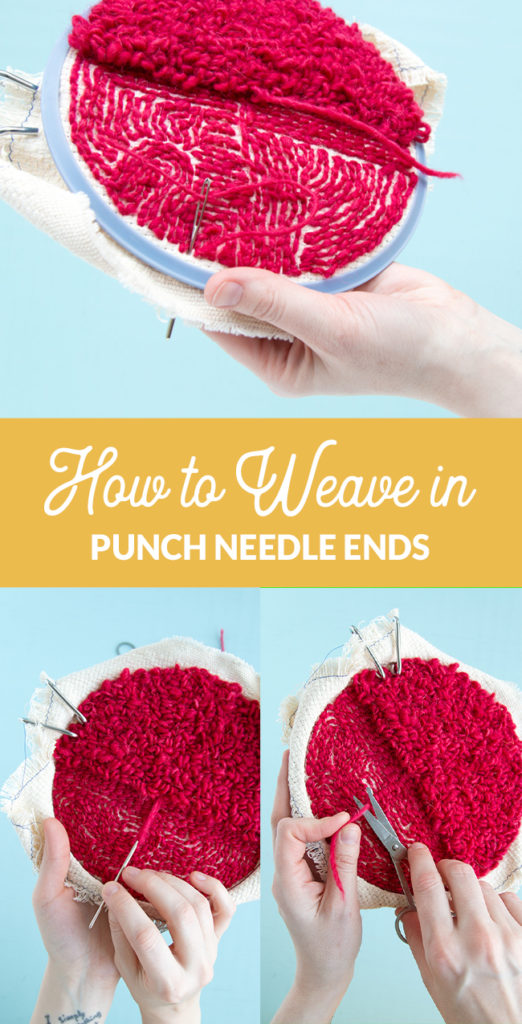
Begin by determining which side of your project is the “right side” and which is the “wrong side.” (Brand new to punch needle? Check out my punch needle 101 tutorial to learn how to do the technique, including some more info about right vs. wrong sides!)

How to hide ends on the right side of a “stitched” section of punch needle.

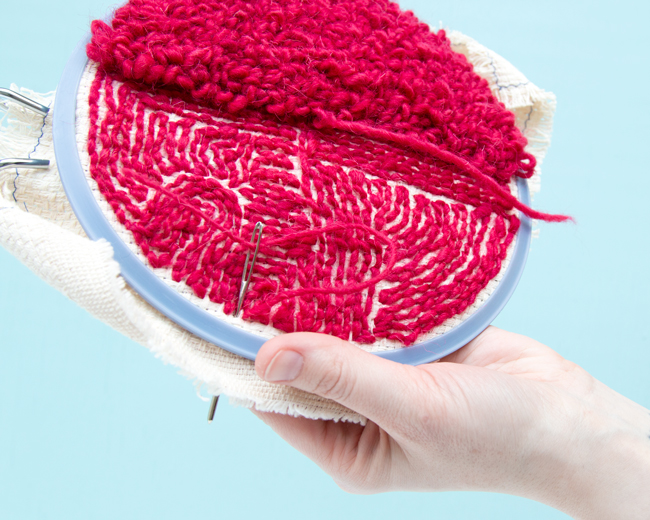
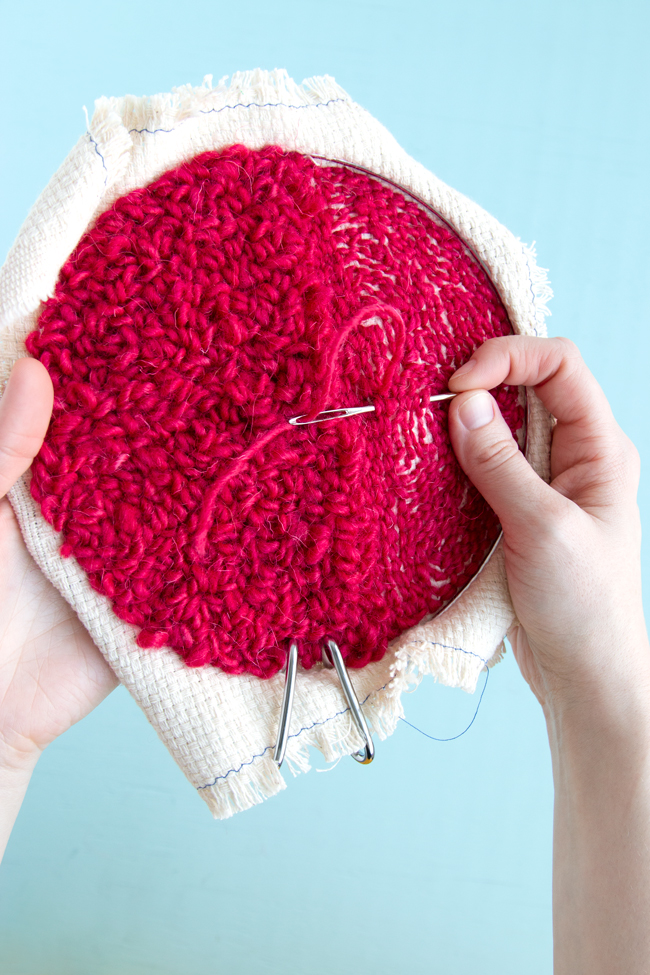
Using a tapestry (large-eyed) needle, bring your ends to the wrong side of your work. You’ll be sewing a stitch, rather than punching it with a punch needle tool. To hide your stitch effectively, it should be approximately as wide as the other stitches on the right side of your work.

Weaving in your ends on a punch needle project is easy! Check out this step-by-step tutorial for tips and tricks for hiding and securing your punch needle rug hooking tails.
The right side of my work. The “stitched” section of my work is at the bottom of this photo, and the looped section is at the top.
Weaving in your ends on a punch needle project is easy! Check out this step-by-step tutorial for tips and tricks for hiding and securing your punch needle rug hooking tails.
Here, I’m hiding an end on the “stitched” half of the right side of my work by sewing the tail through to the wrong side of my work.

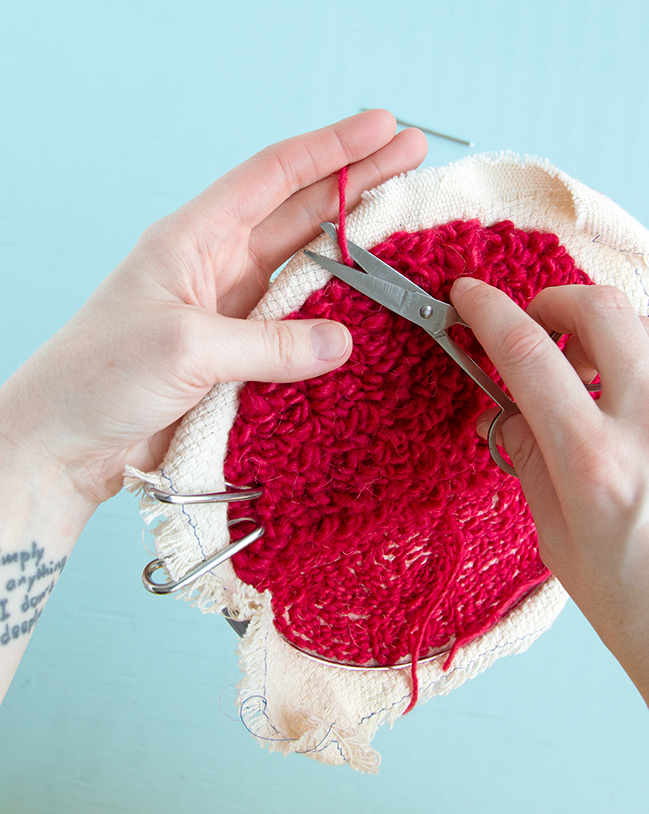
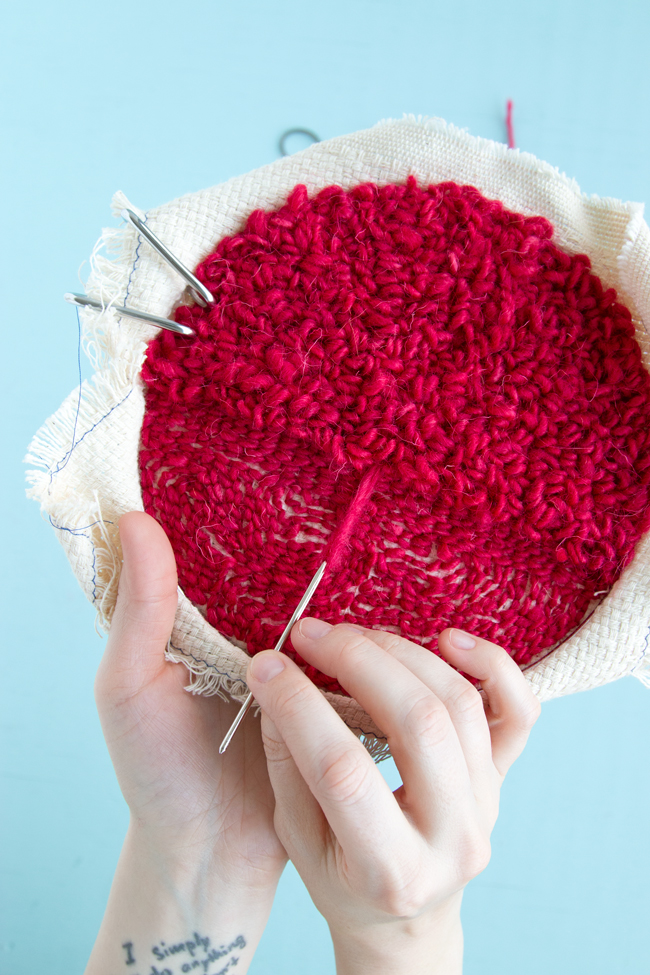
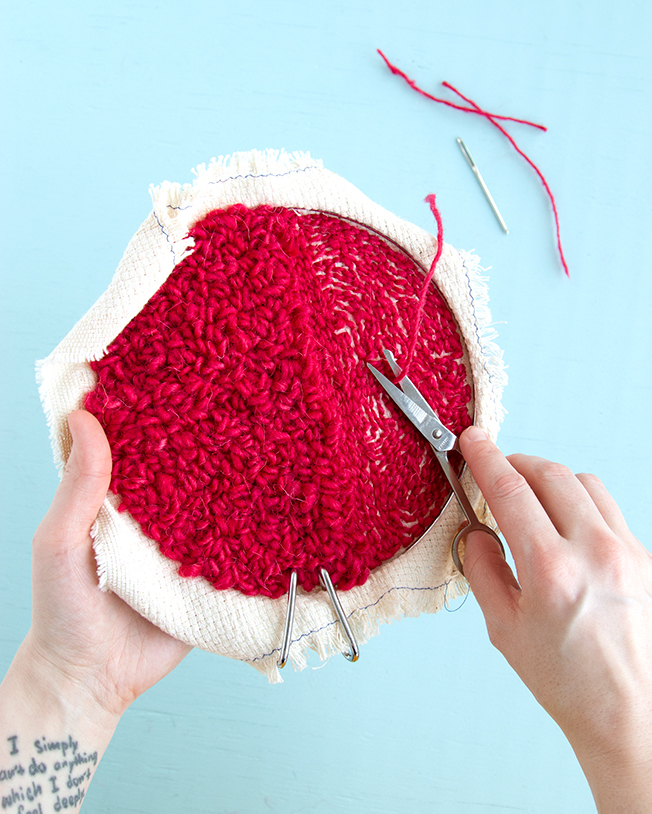
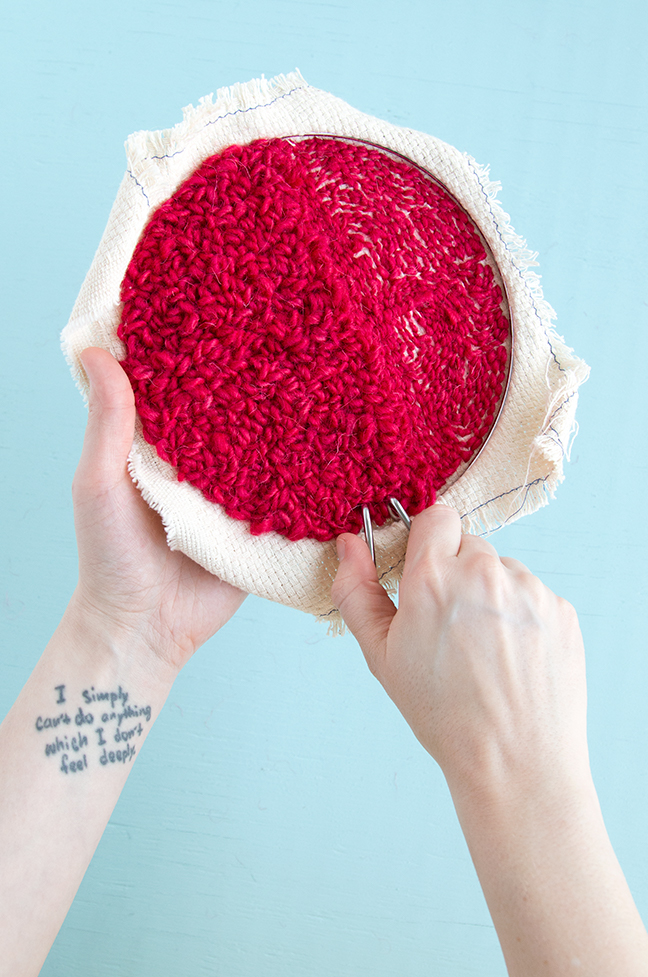
Turn your work so that the wrong side is facing you. Being careful not to pull on the tail, trim it with scissors, blending the tail in with its surrounding loops. Since the wrong side of a patch of “stitched” punch needle is a patch of loops, you should also be careful not to cut any of the loops in the process.

Weaving in your ends on a punch needle project is easy! Check out this step-by-step tutorial for tips and tricks for hiding and securing your punch needle rug hooking tails.

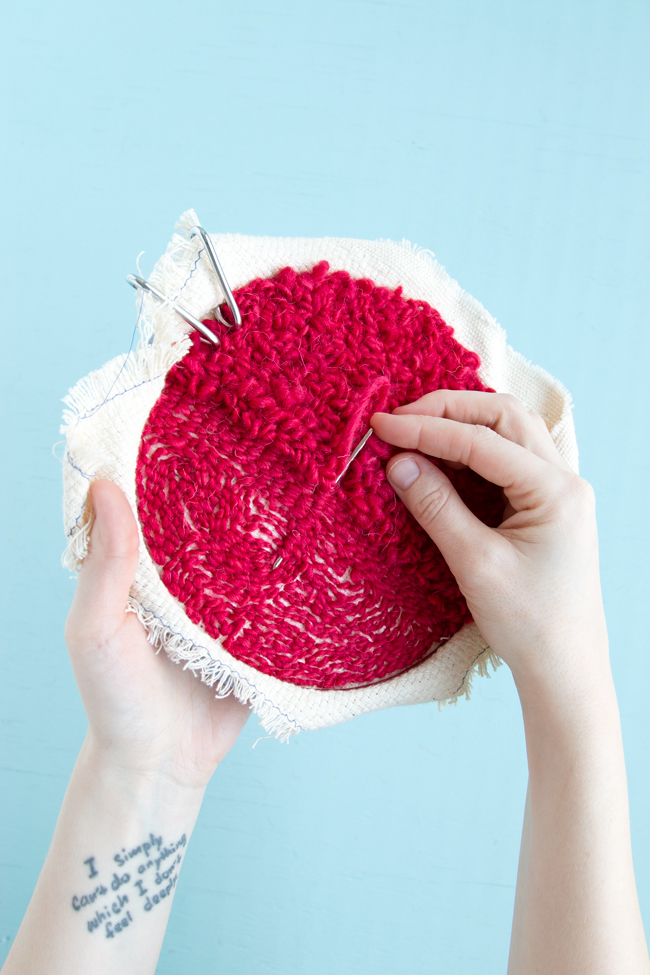
Hiding ends on the right side of a looped section of punch needle.

For hiding tails in a looped section of punch needle, it’s just the opposite. Thread your end into your tapestry needle and, hiding it in your right side loops, draw it to the wrong (in this case “stitched”) side of your work.

Weaving in your ends on a punch needle project is easy! Check out this step-by-step tutorial for tips and tricks for hiding and securing your punch needle rug hooking tails.
Here, I’m weaving an end into a looped, right side section.
Weaving in your ends on a punch needle project is easy! Check out this step-by-step tutorial for tips and tricks for hiding and securing your punch needle rug hooking tails.
Drawing my looped, right side tail through to the wrong side of my work.

Next, glide your tapestry needle, end threaded, under an inch or two of “stitches” on the wrong side. Be careful not to pull up a loop as you go.

Weaving in your ends on a punch needle project is easy! Check out this step-by-step tutorial for tips and tricks for hiding and securing your punch needle rug hooking tails.

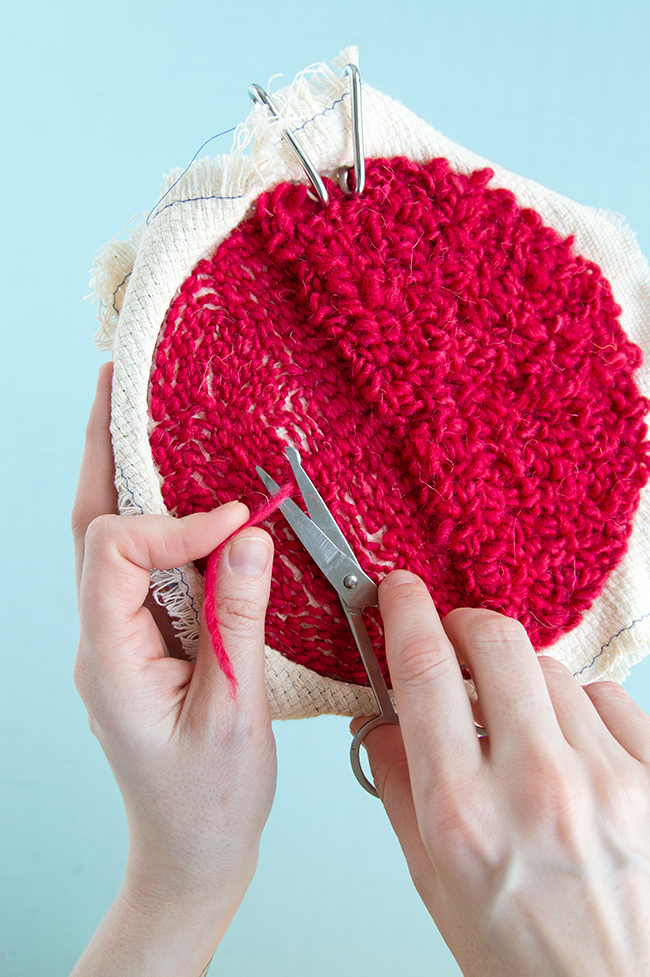
To finish, trim any excess yarn close to your work.

Weaving in your ends on a punch needle project is easy! Check out this step-by-step tutorial for tips and tricks for hiding and securing your punch needle rug hooking tails.
Trimming excess yarn from the wrong side of my work.
Weaving in your ends on a punch needle project is easy! Check out this step-by-step tutorial for tips and tricks for hiding and securing your punch needle rug hooking tails.
This is what the trimmed tail looks like on the wrong side of my work, as woven into a “stitched” wrong side section.

How to weave in wrong side punch needle ends

Since the wrong side of your work won’t often be looked at, depending on your project, weaving in these ends is a bit simpler. You get to skip the whole artfully-bringing-ends-to-the-wrong-side step!

Weaving in wrong side “stitched” ends

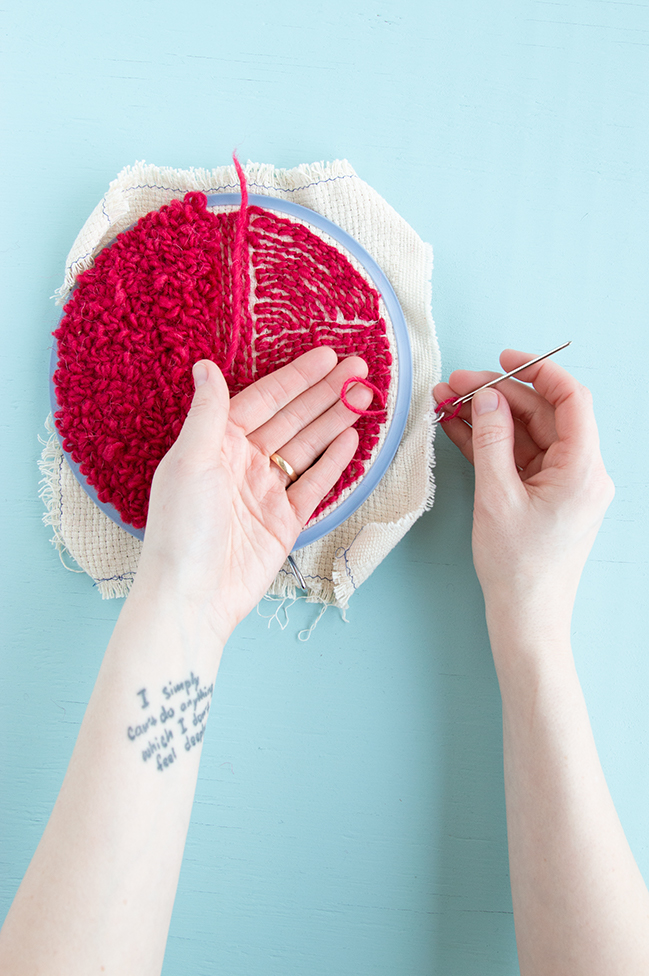
If you’re not already looking at the wrong side of your work, turn it to face you. Thread your end onto your tapestry needle and carefully sew it under several stitches, again being careful not to pull out or loosen them. When you’re all stitched, simply trim the excess tail.

Weaving in your ends on a punch needle project is easy! Check out this step-by-step tutorial for tips and tricks for hiding and securing your punch needle rug hooking tails.
Weaving a tail into the “stitched” wrong side of my work.

Weaving in wrong side looped ends

Well, I saved the easiest for last! If you’ve got yourself a tail coming out of a looped, wrong side section, you just sew it under a few stitches & trim. Just that simple!

Weaving in your ends on a punch needle project is easy! Check out this step-by-step tutorial for tips and tricks for hiding and securing your punch needle rug hooking tails.
Trimming the rest of my tail on the “stitched” wrong side of my work.

What happens when all ends are woven in?

There are SO MANY creative ways to finish a punch needle project beyond weaving in ends! So many, in fact, that I plan on saving that topic for another day. Now that we’ve covered the basic mechanics of how to punch needle and, today, how to weave in punch needle ends, we’ve got a good foundation to work from for blog posts featuring punch needle patterns! In the coming weeks, I’ve got a couple posts planned featuring punch needle rug hooking, all designed with beginners in mind. Each project will involve different methods for punch needle finishing, so I plan on including finishing tutorials with each of them. Are you as excited as I am for more punch needle rug hooking? :)

Weaving in your ends on a punch needle project is easy! Check out this step-by-step tutorial for tips and tricks for hiding and securing your punch needle rug hooking tails.
Removing my punch needle project from its hoop.
Weaving in your ends on a punch needle project is easy! Check out this step-by-step tutorial for tips and tricks for hiding and securing your punch needle rug hooking tails.
The wrong side of my punch needle project with ends woven in, sans embroidery hoop.
Weaving in your ends on a punch needle project is easy! Check out this step-by-step tutorial for tips and tricks for hiding and securing your punch needle rug hooking tails.

Yarn pictured was provided by Shepherd’s Lamb.

Filed Under: Punch Needle, Yarn Crafts Tagged With: punch needle, punch needle ends, punch needle finishing, rug hooking, weave in ends

About Heidi

Heidi Gustad (she/her) is a craft book author & designer specializing in yarn crafts. Her work combines vintage and modern design elements, prioritizing color and graphic motifs. Her first book, Latch Hook: 12 Projects for the Modern Maker, is out now.

Previous Post: « Lhasa Wilderness Yarn Review & Giveaway
Next Post: Picks of the Week »

Reader Interactions

DID YOU LIKE THIS POST?
Visit similar articles...

  • Punch Needle Rug Hooking BasicsPunch Needle Rug Hooking Basics
  • Yarniversal Championship Belt Design Diary & A New YouTube SeriesYarniversal Championship Belt Design Diary & A New YouTube Series
  • Whip Stitch Binding in Latch HookWhip Stitch Binding in Latch Hook
  • How to Finish Nooks & Crannies in Latch HookHow to Finish Nooks & Crannies in Latch Hook

Leave a Reply Cancel reply

Your email address will not be published. Required fields are marked *

This site uses Akismet to reduce spam. Learn how your comment data is processed.

Primary Sidebar

Heidi Gustad from Hands Occupied / Craft Book Author and Knitting, Crochet, Latch Hook and Macrame Designer

Hi! I’m Heidi (she/her/hers), and I’ve been helping yarn crafters untangle various techniques on the internet since 2010. I got my start here, as a blogger, and since then I’ve shared more than a few tutorials here and on YouTube as I’ve grown as a pattern designer. 🧶 

learn more / work with me

Find Me on Social Media

  • Instagram
  • Pinterest
  • TikTok
  • YouTube
Latch Hook by Heidi Gustad

Footer

INSTAGRAM

handsoccupied

Knitting & yarn crafts designer 🧶
.
Stay up-to-date 💌 & shop new patterns ⤵️

POV: Showing you how my new Bevelled Tank pattern POV: Showing you how my new Bevelled Tank pattern fits with no ease vs. 4” of positive ease. There’s a bit more length to the cotton (brighter color) sample, but both are cropped and feature shoulder seams designed to sit an inch back onto the shoulder instead of on top, giving it a little swing. Length is easily adjustable for folks looking for less of a crop. 
.
Pattern: Bevelled Tank by @handsoccupied for @pompommag x @hobbii_yarn summer 2024. Available for free from Hobbii at the 🔗 in my profile.
Yarn pictured: @kelbournewoolens Skipper and Camper. 
Dress form is adjusted to a 36” chest and ~5’3”ish in height. 
Human has a 40” chest and is 5’5”.
Both skirts are vintage.
.
#pompomxhobbiisummer2024 #handsoccupied #intarsia #handmade #knitting #colorwork
Let’s talk about fit and ease! . During the Beve Let’s talk about fit and ease!
.
During the Bevelled Tank design process for @pompommag, I knit 2 samples using 2 different @KelbourneWoolens yarns. One was in Skipper (100% cotton, second photo) and the other was in Camper (100% 2 ply wool). The Skipper sample was knit for a 36” bust, which measures in at 40” with 4” of positive ease. And I knit the Camper Sample for my 40” bust with a 44” finished measurement. (BTW, I’m 5’5” for folks that find that measurement helpful in visualizing fit.)
.
Based on the size chart for the Bevelled Tank, that means I knit one size 3 sample and one size 4. As designed, I conveniently fit a size 4 as intended with 4” of positive ease. When I wear the 3, there is no ease at all because the garment and my body are both 40” in size. Comparing the 2 garments, you can see how the fiber content (cotton vs. wool) and fit (no ease vs. 4” of positive ease) makes a difference in the look and feel of the finished garment. 
.
These samples are a great way to compare what ease looks like on different bodies. While I can fit both a size 3 and 4, the garment with no ease feels more like pajamas or a bralette when I wear it. On the other hand, when I wear the one with 4” of positive ease, I feel comfortable enough to wear it to work, even as a crop top. Plus, it leaves me with enough room to layer it with a nice button down if I’m not feeling the cropped look one day. 
.
I’m curious - how would you style this tank? Would you modify it with a few stockinette rows for added length? I’m so curious now that this pattern is finally out in the world. :) 
.
#pompomxhobbiisummer2024 #bevelledtank #handsoccupied #knitting #intarisa #handmade #kelbournewoolens #croppedsweater #summerknits
After a 6 month hiatus, I am happy to say I’m ba After a 6 month hiatus, I am happy to say I’m back with a brand new pattern in 9 sizes, and it’s FREE as part of @pompommag x @hobbii_yarn’s summer design collection! (Link is in my bio.)
.
In my December newsletter, I announced that I was soliciting test knitters for a pattern that had originally been selected for the summer ’24 issue of Pom Pom Quarterly magazine. However, the magazine ceased publication after its spring ’24 issue, leaving in-progress designs unpublished. (It happens.) As a result, I’d begun the long process of editing, testing, and photographing the pattern for independent release through the Hands Occupied pattern shop and Ravelry.
.
Before I was done with that process, Pom Pom Quarterly’s former editors reached out with an exciting proposal for the pattern. Post-magazine, they’ve begun to partner with yarn companies to produce high quality pattern collections. They wanted to include designs from the would-be current issue of Pom Pom Quarterly in a new collection for Hobbii yarn, including my Bevelled Tank. I worked with the same technical editors I would have for the magazine on this one, and as you can see from the photos, Pom Pom’s team did an amazing job of styling the garment to the beautiful standards they’re known for.
.
You can learn more about the pattern on my blog and get the free pattern from Hobbii yarn - links to both in my profile. I’ll post sizing info in the comments for quick reference too. 🧶
.
#pompomxhobbiisummer2024 #knitting #intarsia #sponsored #colorworkknitting 
.
Photos: @dianascarrunz 
Model: @angel.jade_
Here’s a nice throwback for you: my take on a vi Here’s a nice throwback for you: my take on a vintage knitting pattern from 1938 called the Fernlace Pullover. A pattern so nice, I knit it twice.
.
Yellow version 💛: knit with Despondent Dyes’ Vintage Vixen Sport after attending a @squidneyknits vintage knitting retreat in 2019 & learning *so much*. Paired with a self-drafted circle skirt pattern. 
.
Blue version 💙: knit with @eweeweyarns Ewe So Sporty in Sky Blue. Paired with the 1940s Boardwalk Duet sewing pattern from @decades_of_style 
.
Head to my stories for 🔗🔗 to the handmade wardrobe blog posts I wrote about each take on the Fernlace Pullover, working with a vintage pattern, where to find vintage patterns (including the one I used), & some thoughts on sizing. 
.
Image descriptions available in alt text. 
.
#handsoccupied #handmadewardrobe #fernlacepullover #vintageknitting #vintageknittingpatterns #knitting_inspiration
Frogging is a word in the knitting world that mean Frogging is a word in the knitting world that means to rip out your knitting. It’s called frogging because frogs say “ribbit,” and when you’re tearing out your knitting, you will “rip it” out, and that sounds like ribbit. No really. 🐸 Did you know this fun fact? 
.
P.S. I did like this design concept, but to make the pattern more knitter friendly as well as more wearable, I am making some tweaks to the construction. Excited to share when it’s ready! 🥰🧶
.
Yarn: @blueskyfibers Woolstok North in Morning Frost & Highland Fleece 
.
#handsoccupied #knitting #frogging #blueskyfibers #knittersofinstagram #blueskymakers #knittingvocabulary #bsfmakers #knitdesign
Follow on Instagram

Copyright © 2025 / Foodie Pro Theme On Genesis Framework / Branding by Ink + Mortar
All Site & Shop Policies / Privacy Policy / Cookie Policy