• 0 items$0.00
  • Skip to primary navigation
  • Skip to main content
  • Skip to primary sidebar
  • Skip to footer

Hands Occupied

Colorful knitting, crochet, latch hook and macrame from craft book author & designer Heidi Gustad.

  • BLOG
    • Knitting
    • Crochet
    • Latch Hook
    • Macramé
    • Punch Needle
  • ABOUT
  • Shop
  • Nav Social Menu

    • Instagram
    • Pinterest
    • RSS
    • TikTok
    • YouTube

How to: Make a Coffee Filter Garland Pt. 1

September 29, 2010 Leave a Comment

Supplies
bleached coffee filters
string (doesn’t really matter what kind – I used plastic twine)
food coloring
a large bowl
needle and thread

Here’s how to make an adorable pom-pom garland out of coffee filters. This project was inspired by this wedding featured at MarthaStewartWeddings.com, and I followed these instructions for constructing the pom-poms themselves.

When I find inspiring crafts online, there aren’t always instructions to go along with them. This was the case with the Martha Stewart garland. They had the glorious (seriously – click the link above) pictures from a featured DIY wedding on their site , and absolutely no instructions. It turns out that coffee filter garlands of many shapes and forms aren’t all that uncommon. A couple years ago, Anthropologie used a garland made of unbleached (brown) coffee filters in a winter catalog, and the crafty blogosphere exploded. This woman was one such reactionary crafter.

I digress. Back to the how to! See right column for photos showing you what the heck I’m trying to describe in my instructions. I’m dead serious when I say that there’s nothing more frustrating than bad crafting instructions.

  1. Lay out some garbage bags on a flat surface. These will be used for laying out the filters to dry.
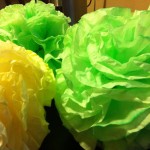
  2. Grab two coffee filters. Fold them in half together, grab the center, and fold them up around that center point as shown.
  3. Mix a couple drops of food coloring and water. Tip: If you want a variety of colors, add just a couple drops of color at first. Then add a couple more drops of color for every subsequent dyeing. That way you’ll get darker and darker results as you go.
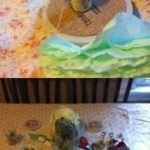
  4. Dip and flip:
    • Wear gloves to avoid dying your hands
    • Grab two bundles of filters
    • Dip only the top half of them in your dye water
    • Flip them to allow the dye to filter (pun not intended) the dye through the entire filter
    • Squeeze out excess dye, though there shouldn’t be too much to get rid of – the dip & flip technique avoids having much excess dye all over the place. This will also help speed up drying time.
  5. Lay dyed, wet filters on your garbage bags to dry. This blogger was totally upfront about her impatience with drying dyed coffee filters and suggests drying the filters in the oven. Personally, that made me nervous, and I knew I needed to make these en masse. I just set up card tables in my basement and turned up the dehumidifier.
  6. Remember to turn your dyed filters every couple of hours to make sure they dry completely. I found that the garbage bags I used as a drying surface worked great for storage, but make sure your filters are 100% dry before putting them in there. Garbage bags don’t exactly breathe. I had visions of a giant bag of mold when I realized I’d stored some of my filters before they were completely dry.

I’ll have instructions for assembling the pom-poms and garland ready in the next couple days. For now, happy dyeing.

Filed Under: DIY Wedding, How-to Tagged With: coffee filter, dyeing, food coloring, garland, wedding

About Heidi

Heidi Gustad (she/her) is a craft book author & designer specializing in yarn crafts. Her work combines vintage and modern design elements, prioritizing color and graphic motifs. Her first book, Latch Hook: 12 Projects for the Modern Maker, is out now.

Previous Post: « In Progress: My Wedding Bouquet
Next Post: How to: Make a Coffee Filter Garland Pt. 2 »

Reader Interactions

DID YOU LIKE THIS POST?
Visit similar articles...

  • Coffee Filter Garland RoundupCoffee Filter Garland Roundup
  • How to: My Wedding Craft Party Pom Pons!How to: My Wedding Craft Party Pom Pons!
  • Expanding on the Coffee Filter ConceptExpanding on the Coffee Filter Concept
  • Picks of the Week for June 30, 2017 | Hands OccupiedPicks of the Week

Leave a Reply Cancel reply

Your email address will not be published. Required fields are marked *

This site uses Akismet to reduce spam. Learn how your comment data is processed.

Primary Sidebar

Heidi Gustad from Hands Occupied / Craft Book Author and Knitting, Crochet, Latch Hook and Macrame Designer

Hi! I’m Heidi (she/her/hers), and I’ve been helping yarn crafters untangle various techniques on the internet since 2010. I got my start here, as a blogger, and since then I’ve shared more than a few tutorials here and on YouTube as I’ve grown as a pattern designer. 🧶 

learn more / work with me

Find Me on Social Media

  • Instagram
  • Pinterest
  • TikTok
  • YouTube
Latch Hook by Heidi Gustad

Footer

INSTAGRAM

handsoccupied

Knitting & yarn crafts designer 🧶
.
Stay up-to-date 💌 & shop new patterns ⤵️

Surprise, I had a baby 3 weeks ago! The pregnancy Surprise, I had a baby 3 weeks ago! The pregnancy was high risk, so I chose to be quiet about it online until recently.

My son was born on Saturday 8/30. My water broke at 2 am, and he was born at 11:26 am, which the nurses kept telling us was very fast for a first labor. He weighed 5 lbs 14.2 oz and was 18.5” long. 

My husband & I both put so much effort into educating ourselves about pregnancy and natural childbirth, and when we found out an induction was highly likely, we embraced the lack of control we had in favor of hoping the baby would arrive healthy. To our surprise, he arrived spontaneously at 37 weeks + 4 days, and the labor progressed so quickly, we did end up with a natural labor experience (which I was glad I was prepared for! 😮‍💨😅).

We’re all happy and healthy. June has become his little nanny dog and makes sure we know when he’s crying or has a dirty diaper. We are very grateful for all the love and support we’ve already received from friends and family. Much love to everyone! ❤️❤️❤️
POV: Showing you how my new Bevelled Tank pattern POV: Showing you how my new Bevelled Tank pattern fits with no ease vs. 4” of positive ease. There’s a bit more length to the cotton (brighter color) sample, but both are cropped and feature shoulder seams designed to sit an inch back onto the shoulder instead of on top, giving it a little swing. Length is easily adjustable for folks looking for less of a crop. 
.
Pattern: Bevelled Tank by @handsoccupied for @pompommag x @hobbii_yarn summer 2024. Available for free from Hobbii at the 🔗 in my profile.
Yarn pictured: @kelbournewoolens Skipper and Camper. 
Dress form is adjusted to a 36” chest and ~5’3”ish in height. 
Human has a 40” chest and is 5’5”.
Both skirts are vintage.
.
#pompomxhobbiisummer2024 #handsoccupied #intarsia #handmade #knitting #colorwork
Let’s talk about fit and ease! . During the Beve Let’s talk about fit and ease!
.
During the Bevelled Tank design process for @pompommag, I knit 2 samples using 2 different @KelbourneWoolens yarns. One was in Skipper (100% cotton, second photo) and the other was in Camper (100% 2 ply wool). The Skipper sample was knit for a 36” bust, which measures in at 40” with 4” of positive ease. And I knit the Camper Sample for my 40” bust with a 44” finished measurement. (BTW, I’m 5’5” for folks that find that measurement helpful in visualizing fit.)
.
Based on the size chart for the Bevelled Tank, that means I knit one size 3 sample and one size 4. As designed, I conveniently fit a size 4 as intended with 4” of positive ease. When I wear the 3, there is no ease at all because the garment and my body are both 40” in size. Comparing the 2 garments, you can see how the fiber content (cotton vs. wool) and fit (no ease vs. 4” of positive ease) makes a difference in the look and feel of the finished garment. 
.
These samples are a great way to compare what ease looks like on different bodies. While I can fit both a size 3 and 4, the garment with no ease feels more like pajamas or a bralette when I wear it. On the other hand, when I wear the one with 4” of positive ease, I feel comfortable enough to wear it to work, even as a crop top. Plus, it leaves me with enough room to layer it with a nice button down if I’m not feeling the cropped look one day. 
.
I’m curious - how would you style this tank? Would you modify it with a few stockinette rows for added length? I’m so curious now that this pattern is finally out in the world. :) 
.
#pompomxhobbiisummer2024 #bevelledtank #handsoccupied #knitting #intarisa #handmade #kelbournewoolens #croppedsweater #summerknits
After a 6 month hiatus, I am happy to say I’m ba After a 6 month hiatus, I am happy to say I’m back with a brand new pattern in 9 sizes, and it’s FREE as part of @pompommag x @hobbii_yarn’s summer design collection! (Link is in my bio.)
.
In my December newsletter, I announced that I was soliciting test knitters for a pattern that had originally been selected for the summer ’24 issue of Pom Pom Quarterly magazine. However, the magazine ceased publication after its spring ’24 issue, leaving in-progress designs unpublished. (It happens.) As a result, I’d begun the long process of editing, testing, and photographing the pattern for independent release through the Hands Occupied pattern shop and Ravelry.
.
Before I was done with that process, Pom Pom Quarterly’s former editors reached out with an exciting proposal for the pattern. Post-magazine, they’ve begun to partner with yarn companies to produce high quality pattern collections. They wanted to include designs from the would-be current issue of Pom Pom Quarterly in a new collection for Hobbii yarn, including my Bevelled Tank. I worked with the same technical editors I would have for the magazine on this one, and as you can see from the photos, Pom Pom’s team did an amazing job of styling the garment to the beautiful standards they’re known for.
.
You can learn more about the pattern on my blog and get the free pattern from Hobbii yarn - links to both in my profile. I’ll post sizing info in the comments for quick reference too. 🧶
.
#pompomxhobbiisummer2024 #knitting #intarsia #sponsored #colorworkknitting 
.
Photos: @dianascarrunz 
Model: @angel.jade_
Here’s a nice throwback for you: my take on a vi Here’s a nice throwback for you: my take on a vintage knitting pattern from 1938 called the Fernlace Pullover. A pattern so nice, I knit it twice.
.
Yellow version 💛: knit with Despondent Dyes’ Vintage Vixen Sport after attending a @squidneyknits vintage knitting retreat in 2019 & learning *so much*. Paired with a self-drafted circle skirt pattern. 
.
Blue version 💙: knit with @eweeweyarns Ewe So Sporty in Sky Blue. Paired with the 1940s Boardwalk Duet sewing pattern from @decades_of_style 
.
Head to my stories for 🔗🔗 to the handmade wardrobe blog posts I wrote about each take on the Fernlace Pullover, working with a vintage pattern, where to find vintage patterns (including the one I used), & some thoughts on sizing. 
.
Image descriptions available in alt text. 
.
#handsoccupied #handmadewardrobe #fernlacepullover #vintageknitting #vintageknittingpatterns #knitting_inspiration
Follow on Instagram

Copyright © 2025 / Foodie Pro Theme On Genesis Framework / Branding by Ink + Mortar
All Site & Shop Policies / Privacy Policy / Cookie Policy