• 0 items$0.00
  • Skip to primary navigation
  • Skip to main content
  • Skip to primary sidebar
  • Skip to footer

Hands Occupied

Colorful knitting, crochet, latch hook and macrame from craft book author & designer Heidi Gustad.

  • BLOG
    • Knitting
    • Crochet
    • Latch Hook
    • Macramé
    • Punch Needle
  • ABOUT
  • Shop
  • Nav Social Menu

    • Instagram
    • Pinterest
    • RSS
    • TikTok
    • YouTube

How to: My Wedding Craft Party Pom Pons!

December 31, 2010 Leave a Comment

To start off, I wanted to wish you all a fantastic New Year! My fiance and I got an amazing Christmas present last week – we found out we’re moving to Chicago next summer! We’re getting married in just 64 days (holy sh*t) and will be moving in June. It gets better, too! I’ve got some pretty promising prospects on a library internship next summer and will have my Master’s in August.

Ok, I’ll stop digressing now. The other night, I threw a craft party and enlisted some of my friends (who are amazing!) to help me make a dent in the 50 pom pons with which I’m decorating my wedding venue.

from top: wine cork pin cushion, the craft party spread

The Math

50 pom pons x 5 packets per filter x 5 filters per packet =

50 pom pons x 25 filters per pom = 1,250 filters in need of dyeing

I wanted half of my poms in green and half in yellow, so 1,250/2 = 625 filters in each color. Phew!

Supplies

1250 bleached coffee filters

1 bottle of green food coloring

1 bottle of yellow food coloring

upholstery thread (color doesn’t matter)

1 tapestry needle

1 coaster

1 pin cushion (since I threw a party, I gave my guests some old wine corks so they could each have a pin cushion)

Dyeing the filters

In this post, I go over step-by-step instructions for dyeing the filters. However, to dye the absurd amount of filters I needed to dye without taking MONTHS, I dyed them in the sink in bunches of 50 or so and dried them in the dryer. Just make sure to use a gentle dryer setting, and you should use a timer! The ones that I accidentally over-dried shrunk like clothes.

Producing Pom Pons en Masse

My darling mother came to visit me from North Dakota last week, and she helped me figure out how to make these beasts more efficiently. I should have thought to ask for her help earlier on in my pom pon prototyping experiments. After all, she’s the one who taught me how to craft. :)

She came up with the idea of having my party guests sew packets of coffee filters together, rather than assemble whole poms. It turned out to be great because not everyone is comfortable with sewing, especially using a paper material.

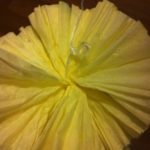
How to Make a Packet of Filters

  • Take 5 filters from your laundry basket.
  • Fold them in half and in half again, and layer them in alternating directions (see picture). Use your coaster to hold each filter in place as you fold.
  • Thread your needle, doubling the thread and tyeing a knot securing the two ends together. Punch a hole through all 5 layered filters. Sew back through the hole you punched a couple times.
  • Punch a second hole through your filters, and sew back through the new hole twice again.
  • Punch your third and final hole, making a triangle of holes in your filter. Sew a couple of times through this last hole. Secure your thread with a couple of knots and cut your thread.

Assembling the Packets in to Poms

Using 5 completed packets, start sewing them together. That’s it! You just have to, pardon the Tim Gunn reference, make it work. Just make sure not to sew too close to the end of the packet of filters. You’ll end up with packets raining down from the sky and your future pom pon garland will look like crap.

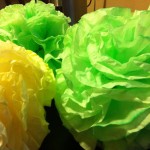
Once you’ve sewn 5 packets together, you’ll notice how flat-looking your poms are. Fluffing them is as easy as unfolding them at the crease. A picture is worth a thousand words:

I have yet to assemble my full pom pon garlands, other than the party decorations below, but my plan is to use fishing line. I’ll post full details when I reach that point. For now, my wonderful party guests helped me finish assembling 190 of the 250 packets of filters I needed.

I need to end this absurdly long tutorial and get back to assembling poms! Happy New Year!

Filed Under: DIY Wedding, How-to Tagged With: coffee filters, dyeing, food coloring, heidedwed, party, pom pons, poms, Sewing, wedding crafts

About Heidi

Heidi Gustad is a craft book author, designer & creator specializing in yarn crafts like knitting, crochet, latch hook & macramé. Her first book, Latch Hook: 12 Projects for the Modern Maker, is out now.

Previous Post: « How-to: Sushi-Inspired Day Bed
Next Post: Fun New Year’s Crafts! »

Reader Interactions

DID YOU LIKE THIS POST?
Visit similar articles...

  • Coffee Filter Garland RoundupCoffee Filter Garland Roundup
  • How to: Make a Coffee Filter Garland Pt. 2How to: Make a Coffee Filter Garland Pt. 2
  • How to: Make a Coffee Filter Garland Pt. 1How to: Make a Coffee Filter Garland Pt. 1
  • Picks of the WeekPicks of the Week

DON’T MISS ANOTHER UPDATE

Leave a Reply Cancel reply

Your email address will not be published. Required fields are marked *

This site uses Akismet to reduce spam. Learn how your comment data is processed.

Primary Sidebar

Heidi Gustad from Hands Occupied / Craft Book Author and Knitting, Crochet, Latch Hook and Macrame Designer

Hi! I’m Heidi (she/her/hers), a craft book author & pattern designer specializing in knitting, crochet, latch hook & macrame. Really anything with yarn! ❤️  My work combines vintage and modern design elements, featuring bold colors and graphic motifs.

EMAIL NEWSLETTER

Never miss a tutorial with these short & sweet monthly updates.

Find Me on Social Media

  • Instagram
  • Pinterest
  • TikTok
  • YouTube
Latch Hook by Heidi GustadDiscover Unique Items

Footer

INSTAGRAM

handsoccupied

Craft book author, designer & creator specializing in yarn crafts like knitting, crochet, latch hook & macramé
❤️ Email preferred

Heidi Gustad 🧶✂️
Here’s how to work a Norwegian purl stitch for e Here’s how to work a Norwegian purl stitch for easier continental style knitting. With this purling method, the working yarn says tensioned (held) at the back of your knitting at all times. For many knitters, always holding the yarn at the back helps with tension issues, as well as feeling a little more comfortable. 
.
Have you ever encountered this style of purling before? If you’ve tried it, have you found it helps with your purl tension and knitting speed? I’m curious.
.
For a written tutorial, visit handsoccupied-dot-com. For video, you guessed it, You2be. Both of these platforms allow for longer, more in-depth versions of this tutorial, including full transcripts, alt text & the ability to pause, slow down or speed up at will. (Like if you really want to learn this, I recommend using a platform that doesn’t keep your hands occupied. Thinking of putting this in all my captions these days tbh - shout out to you if you made it this far. 🙌🏻😂)
.
#handsoccupied #learntoknit #continentalknitting #howtoknit #norwegianpurl #norwegianknitting #knit #knitting #knitter #knittersofinstagram #knittinghack  #handknitting #handknit #norwegianpurling
Have you ever tried this style of purl? . All thi Have you ever tried this style of purl? 
.
All this recent talk about throwing vs. continental style knitting made it clear many people struggle with purling in continental knitting. Turns out that Norway may have the answer! In Norwegian purling, the working yarn stays tensioned at the back at all times, helping with speed and tension. 🤯
. 
Head to the bl0g (🔗 in bi0) for a more in-depth look at how to work a Norwegian purl stitch, including a photo tutorial with animated GIF & a video tutorial. Wrapping your mind around how to work a stitch you’re familiar with in a totally new way can be confusing, so I tried to give a few options for clarity. 🤙🏻 Video is also on You2be. 
.
#handsoccupied #norwegianpurl #norwegianknitting #norwegianpurling #continentalknitting #howtoknit #learntoknit #knitterofinstagram #knitters
It’s been a hot second since I showed my face or It’s been a hot second since I showed my face or reintroduced myself, so here goes! I’m Heidi Gustad, a craft book author, pattern designer, and tutorial creator who specializes in yarn crafts. Lately, I’ve been focused on releasing quality knitting videos and related blog posts to help teach things like the difference between provisional cast ons and how to fix common knitting mistakes. Next week I’m shooting requested crochet and latch hook videos, so h👀kers, your time is coming! And if you ever have tutorial requests, please let me know. ☺️
. 
TLDR: I’m Heidi. I design & teach yarn crafts. You can find tutorials on my blog (est. 2010) & You2be. I also have several knitting & crochet patterns + a book about latch hook available. / All of these can be found on my website, the 🔗 is where you’d think. 
.
#handsoccupied #fridayintroduction #heidigustad #knitting #knitter #knittersofinstagram #yarncrafts #latchhookbook
Are you a picker or a thrower? Do you knit Contine Are you a picker or a thrower? Do you knit Continental or English Style? Here’s a quick overview of the differences between the two most common knitting styles, including a side by side comparison. (A good one to save for future reference. 👍🏻) 
.
There’s more on the differences between picking and throwing in my latest blog post & You 2ube video - the l1nk is where you’d think!
.
#handsoccupied #learntoknit #knittingstyles #howtoknit #knittersofinstagram #knitter
Spent time with family this weekend down South. Go Spent time with family this weekend down South. Got some stitching in & felt spring for a minute, which was lovely. ☀️ 
.
I’ll be catching up on comments, etc. tomorrow. 
.
#handsoccupied #travelknitting #planeknitting
Load More... Follow on Instagram

Copyright © 2023 / Foodie Pro Theme On Genesis Framework / Branding by Ink + Mortar
All Site & Shop Policies / Privacy Policy / Cookie Policy