• 0 items$0.00
  • Skip to primary navigation
  • Skip to main content
  • Skip to primary sidebar
  • Skip to footer

Hands Occupied

Colorful knitting, crochet, latch hook and macrame from craft book author & designer Heidi Gustad.

  • BLOG
    • Knitting
    • Crochet
    • Latch Hook
    • Macramé
    • Punch Needle
  • ABOUT
  • Shop
  • Nav Social Menu

    • Instagram
    • Pinterest
    • RSS
    • TikTok
    • YouTube

DIY Color Blocked Glitter Bangle Bracelet

February 4, 2014 4 Comments

DIY Color Blocked Glitter Bangle at Hands Occupied

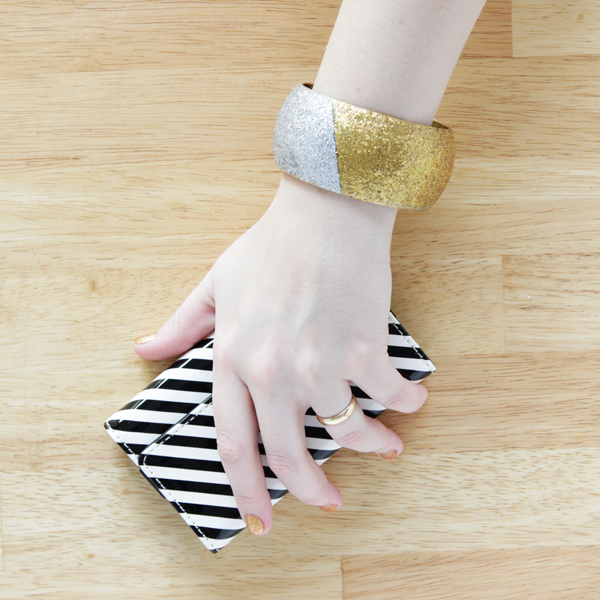
Don’t you just love a DIY that takes something that cost a quarter and makes it look like a million bucks? Well, maybe not a million, but more than 25 cents! I got a bangle bracelet at a thrift store years ago and realized I hadn’t been wearing it at all as it was, so a quickie makeover was in order! :)
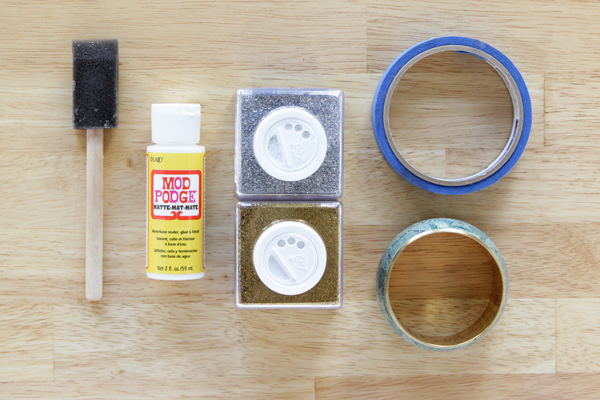
Supplies

thrift store bangle bracelet
Mod Podge Matte
painter’s tape
sponge brush
extra fine gold glitter
extra fine silver glitter
paper towel (optional – it’s just an easy way to keep the mess to a minimum)
acrylic sealant (optional)

DIY Color Blocked Glitter Bangle - An Easy Mod Podge craft project!

Directions

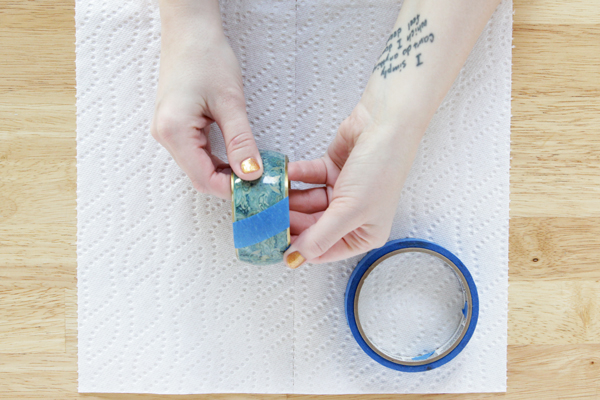
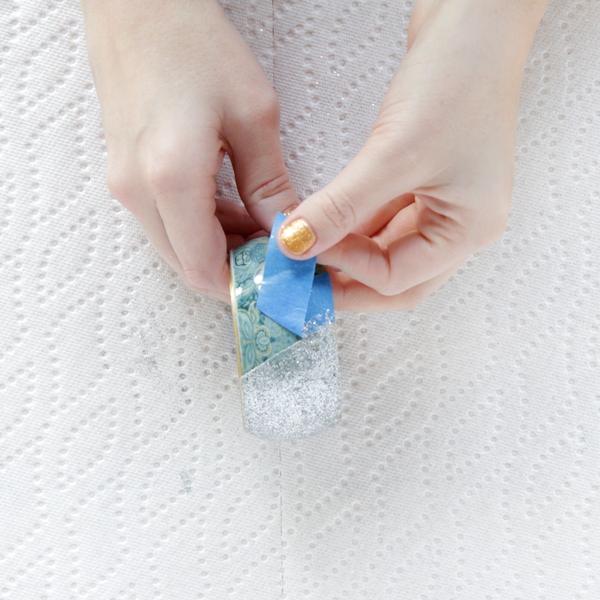
Clean and dry your bracelet. Tape two lines of painter’s tape where you’d like your first color of glitter to be. Press down the edges of the tape so there are openings along its edges.

DIY Color Blocked Glitter Bangle - An Easy Mod Podge craft project!

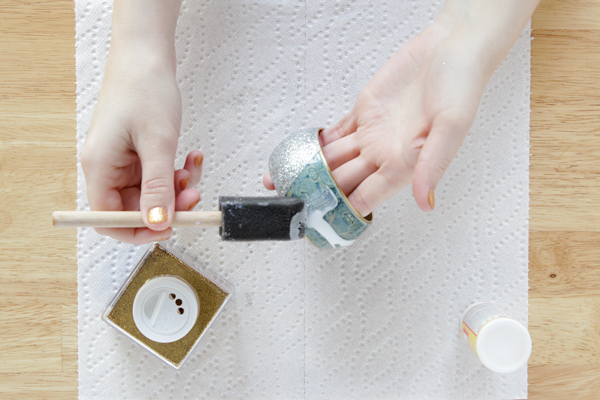
Paint a layer of Mod Podge onto half of the bracelet, right onto the edges of the tape.

DIY Color Blocked Glitter Bangle - An Easy Mod Podge craft project!

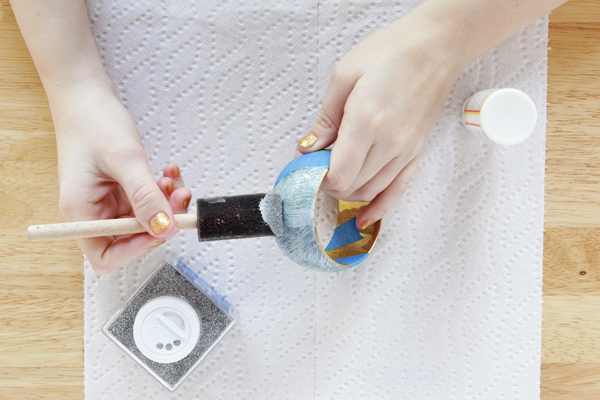
Sprinkle a generous amount of extra fine glitter onto the wet Mod Podge, and use your sponge brush to press the glitter into the Podge. Keep sprinkling and pressing glitter all over the first section of the bangle until you’ve completely covered the bracelet’s color underneath. Let dry completely – the Mod Podge will dry clear, leaving only the glitter visible!

DIY Color Blocked Glitter Bangle - An Easy Mod Podge craft project!

Carefully peel of the painter’s tape, revealing a hard line where your glitter ends and the rest of the bracelet begins.

DIY Color Blocked Glitter Bangle - An Easy Mod Podge craft project!

Repeat the process of painting Mod Podge, sprinkling glitter, and pressing the glitter into the Mod Podge, but with your second glitter.

DIY Color Blocked Glitter Bangle - An Easy Mod Podge craft project!

You don’t need to use painter’s tape for the second half of the bracelet. Since the (in my case) silver glitter is so thick on top of the bangle, it’s easy to apply gold glitter and Mod Podge right up to the edge of the silver glitter. Just make sure to cover the bracelet entirely so you can’t see the original color underneath.

DIY Color Blocked Glitter Bangle - An Easy Mod Podge craft project!

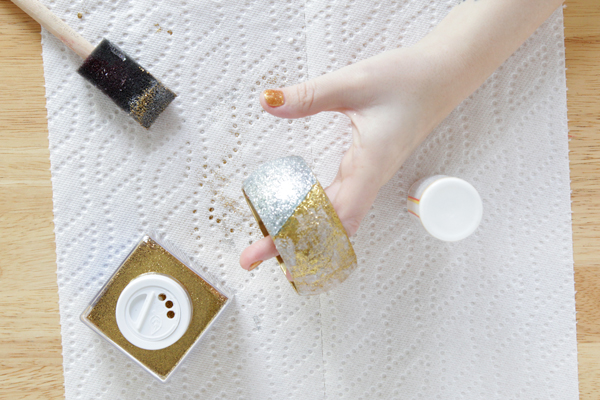
Let the second half of the bracelet dry totally before painting over the whole bracelet to seal in the glitter. If the completed bracelet is sticky to the touch, you might want to use an acrylic sealant to finish it.

The sparkly metallic bracelet is now something I wear all the time since it’s more on trend and matches everything! What would you do differently if you make this? Any color changes?

I first posted a version of this bracelet over at Mod Podge Rocks.

Filed Under: Decoupage, DIY Style, How-to, My Work Elsewhere Tagged With: bangle, bracelet, craft, diy, diy style project, glitter bangle, glitter bracelet, mod podge, thrift store craft, thrift store makeover

About Heidi

Heidi Gustad (she/her) is a craft book author & designer specializing in yarn crafts. Her work combines vintage and modern design elements, prioritizing color and graphic motifs. Her first book, Latch Hook: 12 Projects for the Modern Maker, is out now.

Previous Post: « Staggered Holes Baby Blanket Knitting Pattern
Next Post: Olympic Rings Valentine »

Reader Interactions

DID YOU LIKE THIS POST?
Visit similar articles...

  • Twinkle in Your Eye Sunglasses Twinkle in Your Eye Sunglasses
  • Dimensional Easter Egg EarringsDimensional Easter Egg Earrings
  • Glitter Polka Dot NotebookGlitter Polka Dot Notebook
  • Simple Ribbon Vase DIYSimple Ribbon Vase DIY

Comments

  1. washi tape ideas

    February 5, 2014 at 5:42 am

    I blog frequently and I genuinely thank you for your content.
    This great article has really peaked my interest.
    I’m going to take a note of your site and keep checking for new information about once per week.
    I opted in for your RSS feed as well.

    Reply
  2. Tan of Squirrelly Minds

    February 5, 2014 at 12:42 pm

    SUCH a great way to spruce up an old bangle. I love it!

    Reply
    • Heidi

      February 5, 2014 at 5:44 pm

      Thanks! And SO easy.

      Reply

Trackbacks

  1. Program Kit: Glitter Bangle Bracelet Makeover | Library as Incubator Project says:
    February 21, 2014 at 7:02 am

    […] my tutorial for making these color blocked glitter bangles to learn the process of how to make one successfully and have a sample on hand for the program. […]

    Reply

Leave a Reply Cancel reply

Your email address will not be published. Required fields are marked *

This site uses Akismet to reduce spam. Learn how your comment data is processed.

Primary Sidebar

Heidi Gustad from Hands Occupied / Craft Book Author and Knitting, Crochet, Latch Hook and Macrame Designer

Hi! I’m Heidi (she/her/hers), and I’ve been helping yarn crafters untangle various techniques on the internet since 2010. I got my start here, as a blogger, and since then I’ve shared more than a few tutorials here and on YouTube as I’ve grown as a pattern designer. 🧶 

learn more / work with me

Find Me on Social Media

  • Instagram
  • Pinterest
  • TikTok
  • YouTube
Latch Hook by Heidi Gustad

Footer

INSTAGRAM

Heidi Gustad 🧶 knitting & yarn crafts

handsoccupied

Knitting & yarn crafts designer 🧶
.
Stay up-to-date 💌 & shop new patterns ⤵️

POV: Showing you how my new Bevelled Tank pattern POV: Showing you how my new Bevelled Tank pattern fits with no ease vs. 4” of positive ease. There’s a bit more length to the cotton (brighter color) sample, but both are cropped and feature shoulder seams designed to sit an inch back onto the shoulder instead of on top, giving it a little swing. Length is easily adjustable for folks looking for less of a crop. 
.
Pattern: Bevelled Tank by @handsoccupied for @pompommag x @hobbii_yarn summer 2024. Available for free from Hobbii at the 🔗 in my profile.
Yarn pictured: @kelbournewoolens Skipper and Camper. 
Dress form is adjusted to a 36” chest and ~5’3”ish in height. 
Human has a 40” chest and is 5’5”.
Both skirts are vintage.
.
#pompomxhobbiisummer2024 #handsoccupied #intarsia #handmade #knitting #colorwork
Let’s talk about fit and ease! . During the Beve Let’s talk about fit and ease!
.
During the Bevelled Tank design process for @pompommag, I knit 2 samples using 2 different @KelbourneWoolens yarns. One was in Skipper (100% cotton, second photo) and the other was in Camper (100% 2 ply wool). The Skipper sample was knit for a 36” bust, which measures in at 40” with 4” of positive ease. And I knit the Camper Sample for my 40” bust with a 44” finished measurement. (BTW, I’m 5’5” for folks that find that measurement helpful in visualizing fit.)
.
Based on the size chart for the Bevelled Tank, that means I knit one size 3 sample and one size 4. As designed, I conveniently fit a size 4 as intended with 4” of positive ease. When I wear the 3, there is no ease at all because the garment and my body are both 40” in size. Comparing the 2 garments, you can see how the fiber content (cotton vs. wool) and fit (no ease vs. 4” of positive ease) makes a difference in the look and feel of the finished garment. 
.
These samples are a great way to compare what ease looks like on different bodies. While I can fit both a size 3 and 4, the garment with no ease feels more like pajamas or a bralette when I wear it. On the other hand, when I wear the one with 4” of positive ease, I feel comfortable enough to wear it to work, even as a crop top. Plus, it leaves me with enough room to layer it with a nice button down if I’m not feeling the cropped look one day. 
.
I’m curious - how would you style this tank? Would you modify it with a few stockinette rows for added length? I’m so curious now that this pattern is finally out in the world. :) 
.
#pompomxhobbiisummer2024 #bevelledtank #handsoccupied #knitting #intarisa #handmade #kelbournewoolens #croppedsweater #summerknits
After a 6 month hiatus, I am happy to say I’m ba After a 6 month hiatus, I am happy to say I’m back with a brand new pattern in 9 sizes, and it’s FREE as part of @pompommag x @hobbii_yarn’s summer design collection! (Link is in my bio.)
.
In my December newsletter, I announced that I was soliciting test knitters for a pattern that had originally been selected for the summer ’24 issue of Pom Pom Quarterly magazine. However, the magazine ceased publication after its spring ’24 issue, leaving in-progress designs unpublished. (It happens.) As a result, I’d begun the long process of editing, testing, and photographing the pattern for independent release through the Hands Occupied pattern shop and Ravelry.
.
Before I was done with that process, Pom Pom Quarterly’s former editors reached out with an exciting proposal for the pattern. Post-magazine, they’ve begun to partner with yarn companies to produce high quality pattern collections. They wanted to include designs from the would-be current issue of Pom Pom Quarterly in a new collection for Hobbii yarn, including my Bevelled Tank. I worked with the same technical editors I would have for the magazine on this one, and as you can see from the photos, Pom Pom’s team did an amazing job of styling the garment to the beautiful standards they’re known for.
.
You can learn more about the pattern on my blog and get the free pattern from Hobbii yarn - links to both in my profile. I’ll post sizing info in the comments for quick reference too. 🧶
.
#pompomxhobbiisummer2024 #knitting #intarsia #sponsored #colorworkknitting 
.
Photos: @dianascarrunz 
Model: @angel.jade_
Here’s a nice throwback for you: my take on a vi Here’s a nice throwback for you: my take on a vintage knitting pattern from 1938 called the Fernlace Pullover. A pattern so nice, I knit it twice.
.
Yellow version 💛: knit with Despondent Dyes’ Vintage Vixen Sport after attending a @squidneyknits vintage knitting retreat in 2019 & learning *so much*. Paired with a self-drafted circle skirt pattern. 
.
Blue version 💙: knit with @eweeweyarns Ewe So Sporty in Sky Blue. Paired with the 1940s Boardwalk Duet sewing pattern from @decades_of_style 
.
Head to my stories for 🔗🔗 to the handmade wardrobe blog posts I wrote about each take on the Fernlace Pullover, working with a vintage pattern, where to find vintage patterns (including the one I used), & some thoughts on sizing. 
.
Image descriptions available in alt text. 
.
#handsoccupied #handmadewardrobe #fernlacepullover #vintageknitting #vintageknittingpatterns #knitting_inspiration
Frogging is a word in the knitting world that mean Frogging is a word in the knitting world that means to rip out your knitting. It’s called frogging because frogs say “ribbit,” and when you’re tearing out your knitting, you will “rip it” out, and that sounds like ribbit. No really. 🐸 Did you know this fun fact? 
.
P.S. I did like this design concept, but to make the pattern more knitter friendly as well as more wearable, I am making some tweaks to the construction. Excited to share when it’s ready! 🥰🧶
.
Yarn: @blueskyfibers Woolstok North in Morning Frost & Highland Fleece 
.
#handsoccupied #knitting #frogging #blueskyfibers #knittersofinstagram #blueskymakers #knittingvocabulary #bsfmakers #knitdesign
Load More... Follow on Instagram

Copyright © 2025 / Foodie Pro Theme On Genesis Framework / Branding by Ink + Mortar
All Site & Shop Policies / Privacy Policy / Cookie Policy