• 0 items$0.00
  • Skip to primary navigation
  • Skip to main content
  • Skip to primary sidebar
  • Skip to footer

Hands Occupied

Colorful knitting, crochet, latch hook and macrame from craft book author & designer Heidi Gustad.

  • BLOG
    • Knitting
    • Crochet
    • Latch Hook
    • Macramé
    • Punch Needle
  • ABOUT
  • Shop
  • Nav Social Menu

    • Instagram
    • Pinterest
    • RSS
    • TikTok
    • YouTube

Simple Ribbon Vase DIY

January 2, 2014 Leave a Comment

Simple Mod Podge Ribbon Vase DIY

I know it’s early to share a Valentine’s-appropriate DIY, but in the next month-ish, I’ve got tons of ideas to share for Groundhog Day, Valentine’s Day, the Olympics, and – if I’m feeling really inspired – President’s Day & MLK Day! Let’s ease into early Valentine’s day crafting with a vase that can be done without holiday colors if you wish.
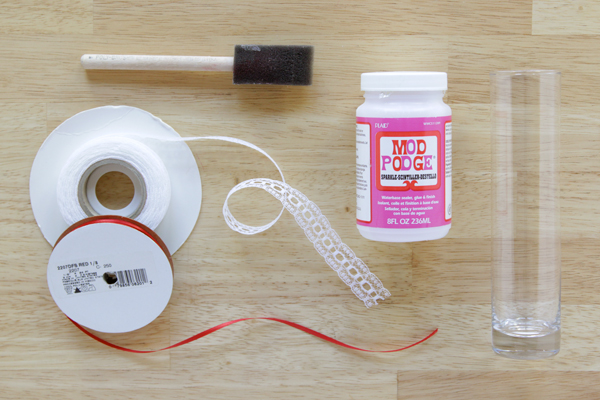
Supplies

plain glass vase
Sparkle Mod Podge
sponge brush
2 kinds of ribbon
scissors
carnations or candy filler (optional)

Simple Mod Podge Ribbon Vase DIY

Directions

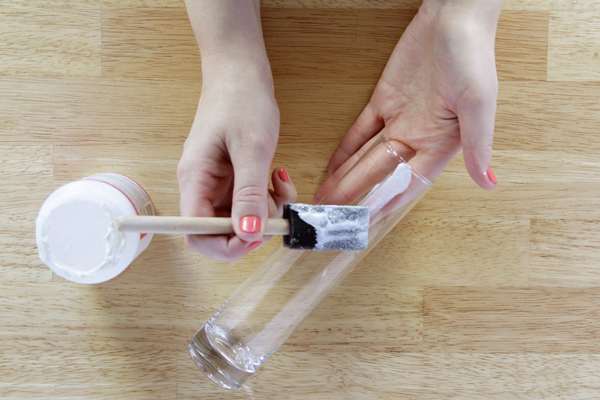
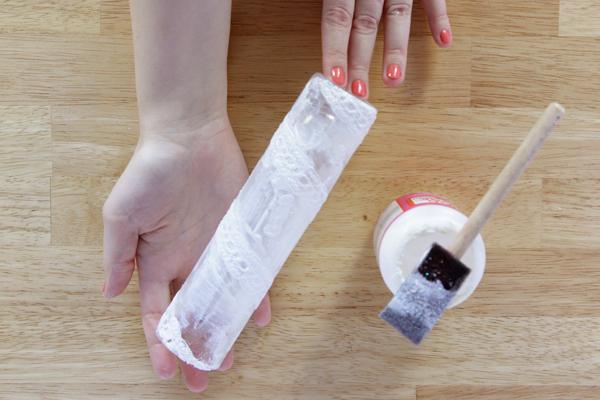
Clean and dry your vase before applying a thick layer of Mod Podge all over the outside.

Simple Mod Podge Ribbon Vase DIY

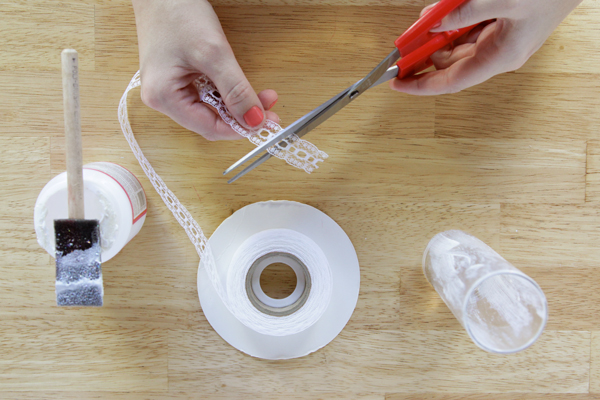
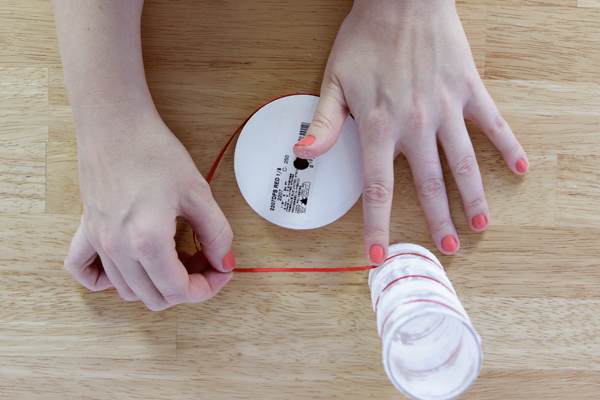
Next, cut one of your ribbons at an angle and place it flush with the top edge of the Podged vase.

Simple Mod Podge Ribbon Vase DIY

Wrap the ribbon in a spiral down the length of the vase, and trim the bottom at an angle, then press it flush with the bottom edge of the vase. I got about 3-4 wraps around the vase with my first, thicker ribbon.

Simple Mod Podge Ribbon Vase DIY

Repeat the angle trimming and spiral application with your second ribbon, making sure it’s parallel to the first ribbon all the way down.

Simple Mod Podge Ribbon Vase DIY

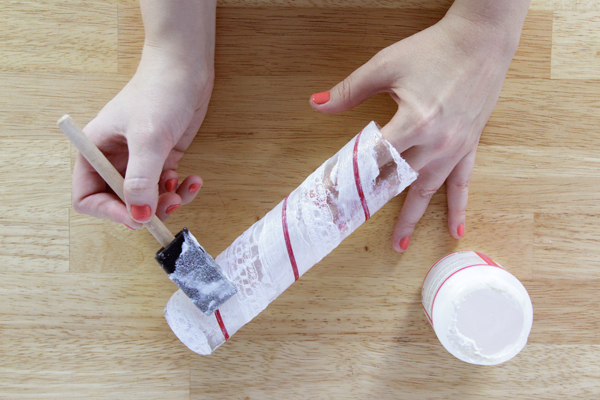
When all the ribbon you want is in place, paint over the outside of it all with another layer of Mod Podge. Since I used the sparkley Mod Podge, there’s no need to worry about Mod Podge making the glass look cloudy when the project dries. The Podge dries clear and the glitter covering the whole vase leaves a nice look!

Simple Mod Podge Ribbon Vase DIY

Filling Your Vase

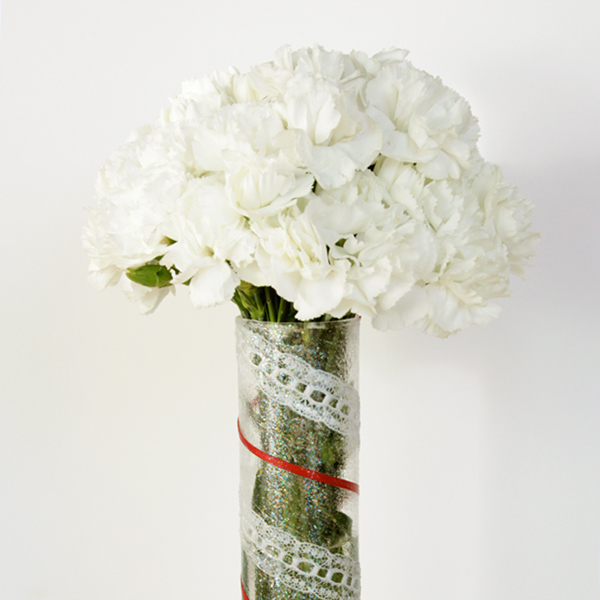
When your vase has dried, you can fill this however you like. An easy floral arrangement trick I learned at a library program years ago is twofold: save money by buying carnations, and pack ’em in tight! The vase I used for this DIY is about 1.5 inches in diameter and about 10 inches tall. All I had to do to get this nice arrangement was place the flowers, one at a time, into my fist, placing each in the natural openings that formed between flower heads, until I used the whole bouquet. Then, I just trimmed the stems so the whole arrangement fit into the vase with all stems reaching approximately the same depth so they can get water-  super easy!

Simple Mod Podge Ribbon Vase DIY

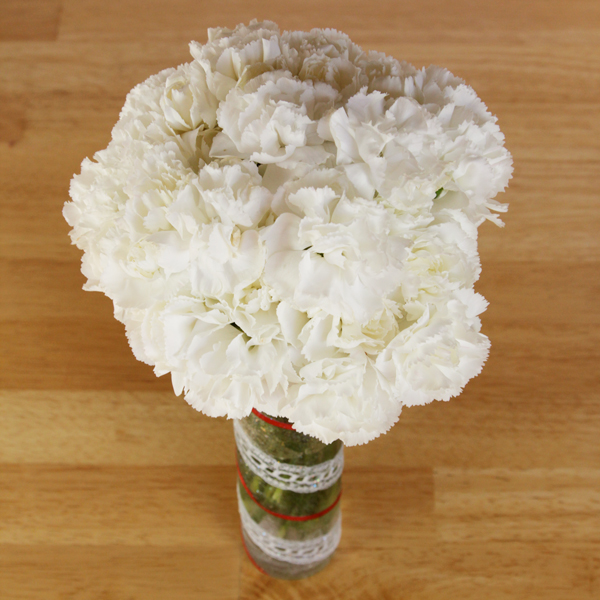
I don’t know what possessed me to shoot this vase on a white background! Between the carnations and the ribbon, has a lot of white going on, so I photoshopped this weeeeird (but I kind of love it in an odd way) background onto this shot to give you a better idea of how this vase looks. Why didn’t I just toss in a purple piece of fabric for a backdrop? I blame Christmas stress madness.

Simple Mod Podge Ribbon Vase DIY

I first posted this idea at Mod Podge Rocks!, a great crafty blog sharing all things ‘Podge. 

Filed Under: Decoupage, How-to, My Work Elsewhere, Valentine's Day Tagged With: carnations, craft, diy, easy valentines craft, easy vase craft, floral arranging, flowers, gift, mod podge, valentines day, valentines diy, vase

About Heidi

Heidi Gustad (she/her) is a craft book author & designer specializing in yarn crafts. Her work combines vintage and modern design elements, prioritizing color and graphic motifs. Her first book, Latch Hook: 12 Projects for the Modern Maker, is out now.

Previous Post: « Top 10 DIYs of 2013
Next Post: Weekly Reader »

Reader Interactions

DID YOU LIKE THIS POST?
Visit similar articles...

  • Twinkle in Your Eye Sunglasses Twinkle in Your Eye Sunglasses
  • Dimensional Easter Egg EarringsDimensional Easter Egg Earrings
  • Glitter Polka Dot NotebookGlitter Polka Dot Notebook
  • DIY Color Blocked Glitter Bangle BraceletDIY Color Blocked Glitter Bangle Bracelet

Leave a Reply Cancel reply

Your email address will not be published. Required fields are marked *

This site uses Akismet to reduce spam. Learn how your comment data is processed.

Primary Sidebar

Heidi Gustad from Hands Occupied / Craft Book Author and Knitting, Crochet, Latch Hook and Macrame Designer

Hi! I’m Heidi (she/her/hers), and I’ve been helping yarn crafters untangle various techniques on the internet since 2010. I got my start here, as a blogger, and since then I’ve shared more than a few tutorials here and on YouTube as I’ve grown as a pattern designer. 🧶 

learn more / work with me

Find Me on Social Media

  • Instagram
  • Pinterest
  • TikTok
  • YouTube
Latch Hook by Heidi Gustad

Footer

INSTAGRAM

Heidi Gustad 🧶 knitting & yarn crafts

handsoccupied

Knitting & yarn crafts designer 🧶
.
Stay up-to-date 💌 & shop new patterns ⤵️

POV: Showing you how my new Bevelled Tank pattern POV: Showing you how my new Bevelled Tank pattern fits with no ease vs. 4” of positive ease. There’s a bit more length to the cotton (brighter color) sample, but both are cropped and feature shoulder seams designed to sit an inch back onto the shoulder instead of on top, giving it a little swing. Length is easily adjustable for folks looking for less of a crop. 
.
Pattern: Bevelled Tank by @handsoccupied for @pompommag x @hobbii_yarn summer 2024. Available for free from Hobbii at the 🔗 in my profile.
Yarn pictured: @kelbournewoolens Skipper and Camper. 
Dress form is adjusted to a 36” chest and ~5’3”ish in height. 
Human has a 40” chest and is 5’5”.
Both skirts are vintage.
.
#pompomxhobbiisummer2024 #handsoccupied #intarsia #handmade #knitting #colorwork
Let’s talk about fit and ease! . During the Beve Let’s talk about fit and ease!
.
During the Bevelled Tank design process for @pompommag, I knit 2 samples using 2 different @KelbourneWoolens yarns. One was in Skipper (100% cotton, second photo) and the other was in Camper (100% 2 ply wool). The Skipper sample was knit for a 36” bust, which measures in at 40” with 4” of positive ease. And I knit the Camper Sample for my 40” bust with a 44” finished measurement. (BTW, I’m 5’5” for folks that find that measurement helpful in visualizing fit.)
.
Based on the size chart for the Bevelled Tank, that means I knit one size 3 sample and one size 4. As designed, I conveniently fit a size 4 as intended with 4” of positive ease. When I wear the 3, there is no ease at all because the garment and my body are both 40” in size. Comparing the 2 garments, you can see how the fiber content (cotton vs. wool) and fit (no ease vs. 4” of positive ease) makes a difference in the look and feel of the finished garment. 
.
These samples are a great way to compare what ease looks like on different bodies. While I can fit both a size 3 and 4, the garment with no ease feels more like pajamas or a bralette when I wear it. On the other hand, when I wear the one with 4” of positive ease, I feel comfortable enough to wear it to work, even as a crop top. Plus, it leaves me with enough room to layer it with a nice button down if I’m not feeling the cropped look one day. 
.
I’m curious - how would you style this tank? Would you modify it with a few stockinette rows for added length? I’m so curious now that this pattern is finally out in the world. :) 
.
#pompomxhobbiisummer2024 #bevelledtank #handsoccupied #knitting #intarisa #handmade #kelbournewoolens #croppedsweater #summerknits
After a 6 month hiatus, I am happy to say I’m ba After a 6 month hiatus, I am happy to say I’m back with a brand new pattern in 9 sizes, and it’s FREE as part of @pompommag x @hobbii_yarn’s summer design collection! (Link is in my bio.)
.
In my December newsletter, I announced that I was soliciting test knitters for a pattern that had originally been selected for the summer ’24 issue of Pom Pom Quarterly magazine. However, the magazine ceased publication after its spring ’24 issue, leaving in-progress designs unpublished. (It happens.) As a result, I’d begun the long process of editing, testing, and photographing the pattern for independent release through the Hands Occupied pattern shop and Ravelry.
.
Before I was done with that process, Pom Pom Quarterly’s former editors reached out with an exciting proposal for the pattern. Post-magazine, they’ve begun to partner with yarn companies to produce high quality pattern collections. They wanted to include designs from the would-be current issue of Pom Pom Quarterly in a new collection for Hobbii yarn, including my Bevelled Tank. I worked with the same technical editors I would have for the magazine on this one, and as you can see from the photos, Pom Pom’s team did an amazing job of styling the garment to the beautiful standards they’re known for.
.
You can learn more about the pattern on my blog and get the free pattern from Hobbii yarn - links to both in my profile. I’ll post sizing info in the comments for quick reference too. 🧶
.
#pompomxhobbiisummer2024 #knitting #intarsia #sponsored #colorworkknitting 
.
Photos: @dianascarrunz 
Model: @angel.jade_
Here’s a nice throwback for you: my take on a vi Here’s a nice throwback for you: my take on a vintage knitting pattern from 1938 called the Fernlace Pullover. A pattern so nice, I knit it twice.
.
Yellow version 💛: knit with Despondent Dyes’ Vintage Vixen Sport after attending a @squidneyknits vintage knitting retreat in 2019 & learning *so much*. Paired with a self-drafted circle skirt pattern. 
.
Blue version 💙: knit with @eweeweyarns Ewe So Sporty in Sky Blue. Paired with the 1940s Boardwalk Duet sewing pattern from @decades_of_style 
.
Head to my stories for 🔗🔗 to the handmade wardrobe blog posts I wrote about each take on the Fernlace Pullover, working with a vintage pattern, where to find vintage patterns (including the one I used), & some thoughts on sizing. 
.
Image descriptions available in alt text. 
.
#handsoccupied #handmadewardrobe #fernlacepullover #vintageknitting #vintageknittingpatterns #knitting_inspiration
Frogging is a word in the knitting world that mean Frogging is a word in the knitting world that means to rip out your knitting. It’s called frogging because frogs say “ribbit,” and when you’re tearing out your knitting, you will “rip it” out, and that sounds like ribbit. No really. 🐸 Did you know this fun fact? 
.
P.S. I did like this design concept, but to make the pattern more knitter friendly as well as more wearable, I am making some tweaks to the construction. Excited to share when it’s ready! 🥰🧶
.
Yarn: @blueskyfibers Woolstok North in Morning Frost & Highland Fleece 
.
#handsoccupied #knitting #frogging #blueskyfibers #knittersofinstagram #blueskymakers #knittingvocabulary #bsfmakers #knitdesign
Load More... Follow on Instagram

Copyright © 2025 / Foodie Pro Theme On Genesis Framework / Branding by Ink + Mortar
All Site & Shop Policies / Privacy Policy / Cookie Policy