My husband and I got married at a really odd time of year. We didn’t hit wedding season, fall, Christmas, New Year’s, Valentine’s Day or spring. March 5 was meaningful for us, but our date kind of fell in to a wedding no man’s land. Vendors were great to work with for the most part because we were the only game in town.
Early on, even before we decided on a date, the beef (husband) and I chose our artichoke and asparagus theme. I’d seen some really incredible bouquets and centerpieces that had incorporated our veggies, but when I went to a bridal expo & talked with some florists, I realized that doing something with veggies was going to cost “extra.” And then when we picked an early March wedding date, we just decided to forget about using any real flowers or plants, which meant I needed to find an affordable alternative. After scouring Martha Stewart Weddings and countless wedding blogs for weeks, I discovered this handmade bouquet and fell in love. Here’s how I made it my own.
Supplies

scissors
assorted rickrack
assorted ribbons
liquid seam sealant
milliner’s sewing needle
quilting thread
floral wire
floral pins (mine have fake pearls on the tip)
floral tape
wire cutter
needle-nose pliers
tacky glue
waxed paper
pie tin
Directions
Make a bunch of ‘flowers’ with rickrack.
I followed these instructions at Martha Stewart Weddings, but I ran in to some huge snags following their tutorial alone. Here are my more  in-depth directions:
Cut your rickrack in to pieces with 16 complete points along one side and 15 complete points plus 2 half-points on the other. Use liquid seam sealant on each end of the rickrack to avoid raveling. Set the rickrack pieces on a piece of waxed paper to dry.

Thread a needle and knot the end. Begin sewing along the 15-point side of your rickrack, folding each point in half and sewing through both halves as evenly as possible. When you have sewn through all 15 points, pull your thread tightly. I broke my thread a few times before realizing that a strong thread, like quilting thread, is a good idea for this project.
The two half-points should be together now. Join them and sew the length of the edges together. MSWeddings recommends using liquid seam sealant along this edge in addition to hand sewing, but I prefer to use the seam sealant earlier in the process. The liquid seam sealant will stick to itself, so it’s easier to apply it and let it dry ahead of time.

Sew through the folds all the way around the back side of the flower to help form its shape. Once you’ve sewn the whole way around, pull your thread a little tight, but not too tight. If you pull it too tight, your flower will look like a cone rather than a daisy. To finish, tie off your thread.

I experimented with a bunch of different types of rickrack. The bigger the rickrack, the harder it is to sew together tightly. Some of the rickrack I used was so big that the center was wider than the fake pearl tip of the floral pins, which made including it in my bouquet kind of impossible. The easiest rickrack to work with was the metallic stuff I found because it’s made out of a material that, when folded, keeps its shape. This makes the sewing part really easy.

Make a bunch of flowers with ribbon or fabric.
These are much easier to make than the rickrack flowers, so I’m going to refer you to the pictures provided with the original directions at MSWeddings. I only used a few of these because I feel in love with how the rickrack buds look. To start, cut your fabric in to pieces that are 1″ wide by 8″ long and your ribbon should be 1/2-3/4″ wide by 4″ long.

Knot your thread and sew along the raw edge of your fabric or ribbon. If there’s no raw edge, just pick a side to sew along. Bunch your fabric/ribbon together on your thread. With right sides facing, join the ends of your material and secure with a knot. Use liquid seam sealant along the raw edges to secure your flower and alleviate any raveling.
These are fun to experiment with. I played around with making multi-layered ribbon flowers and making them in to daffodil-ish creations.
Prepare your flower stems.
The directions at MSWeddings can be found in step 6 of the rickrack flower tutorial, but you should ignore them. For one thing, I couldn’t find artificial stamens anywhere, and for another, their instructions make no sense. Sorry guys.
I made my stems by cutting floral wire in to ten-inch pieces. Fold each piece in half using your needle-nose pliers to make the fold as pronounced as possible. Grab a floral pin and place it in the crux of the folded wire. Twist the wire around the floral pin as shown, trying to wrap the wire as tightly as possible around the pin. Once the wire is wrapped down the length of the pin, continue twisting the wire all the way to the end.

Wrap floral tape down the length of the wire. This part drove me crazy because your hands will turn green and floral tape likes to stick to only itself. Securing the beginning and end of the floral tape on your pin-and-wire “stem” takes some getting used to. Stretching the floral tape just a little bit as you wrap the stem helps a lot.

Attach flower heads to stems.
Grab your pie tin or a small cup. Thread one of your flowers on to a stem so that the tip of the flower pin emerges just a little bit. Apply tacky glue from the back, bend your stem, and set assembled flower in your cup or pie tin to dry. Bending the stem helps your flower stay in place as it dries. Gravity is your friend here, especially if you used some bigger rickrack like I did. It’s hard to glue the flower heads straight on the stems when the heads are a bit heavy. To be honest, some of my flowers didn’t dry completely straight, but this wasn’t a big deal in the end when I wrapped all of my flowers into the finished bouquet.

Assemble your bouquet.
Despite the pain in the ass that was wrapping all of your stems in floral tape, this is where that sticky stuff comes in handy. The floral tape, like I mentioned earlier, likes to stick to itself, so when you’re arranging your bouquet, the adhesive stems really help the bouquet come together. I’m definitely not an expert in floral arranging, but I attended a flower arranging seminar once and learned a helpful bit of advice. Don’t fight the flowers. Yes, these aren’t real flowers, but letting your homemade flowers rest together where they’d like to on their own will save you lots of headache. My biggest challenge was not freaking out about too many of one color being next to each other. I used 9 kinds of rickrack, and I didn’t want too many green flowers being next to too many yellow, blah blah blah. In the end, my bouquet was gorgeous, and I got so many compliments from guests at my wedding who were amazed that I made this myself.
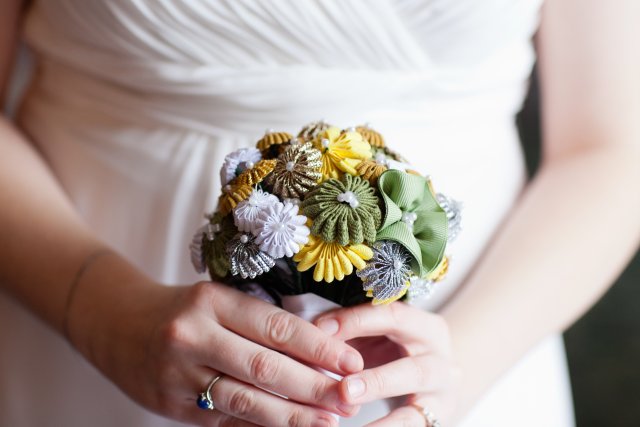
The Finished Bouquet!

Here is my bouquet, and I also rustled up some pics from other women who followed the same MSWeddings pattern to make gorgeous bouquets of their own.

- Ribbon & Fabric Bouquet from Martha Stewart Weddings
- Ribbon Boutonniere from Martha Stewart Weddings
- Ribbon & Rick Rack Bouquet from Leigh Dotson
- A Darling Handcrafted Wedding from Ruffled
- same as #4


Hi Heidi,
Thanks for the awesome tutorial. Im going to try and make these for my sister’s wedding. I don’t quite understand how you attach the pearl to the stem and how the daisy flower is attached to the stem so that the pearl is showing. Also I see that some of your flowers have more two or three pearls, how is this done?
They’re floral pins that come with pearls on the non-point end. Simply wrap them into the floral wire & floral tape stems to attach and/or add more. Best of luck!
So so smart and it lasts forever, DIY at its best! Thanks for sharing!
http://www.ananasa.com/blog
Glad to find your blog,its really fantastic,thank you for sharing it….images are so stunning…..
Amazing tutorial!!
I very much like this DIY bouqet… It looks stunning colorful!!
Love your blog and you are so talented!!!!!!! Thanks for this great idea!!! It looks amazing:)
wow this looks so nice. glad to know about your blog.i wil make this for my sister’s wedding. thanks a lot!! images are stunning!
I decided to make this bouquet for my cousin’s wedding! I’ll match the colors she likes. And what’s even better, I think, is that it can be used as an ornament because it never wipes out!
You are so right about making ribbon flowers is easier than rickrack, it worked great when we tried!
Yay! Glad to hear it. :)
This is divine! I think I have all the supplies to make a sweet little bouquet. Thanks for sharing
What a fantastic guide on creating a homemade wedding bouquet! Thanks for sharing your expertise and making the process feel both achievable and enjoyable.