• 0 items$0.00
  • Skip to primary navigation
  • Skip to main content
  • Skip to primary sidebar
  • Skip to footer

Hands Occupied

Colorful knitting, crochet, latch hook and macrame from craft book author & designer Heidi Gustad.

  • BLOG
    • Knitting
    • Crochet
    • Latch Hook
    • Macramé
    • Punch Needle
  • ABOUT
  • Shop
  • Nav Social Menu

    • Instagram
    • Pinterest
    • RSS
    • TikTok
    • YouTube

Washi Tape Twist Ties

April 14, 2014 4 Comments

Washi Tape Twist Ties at Hands Occupied

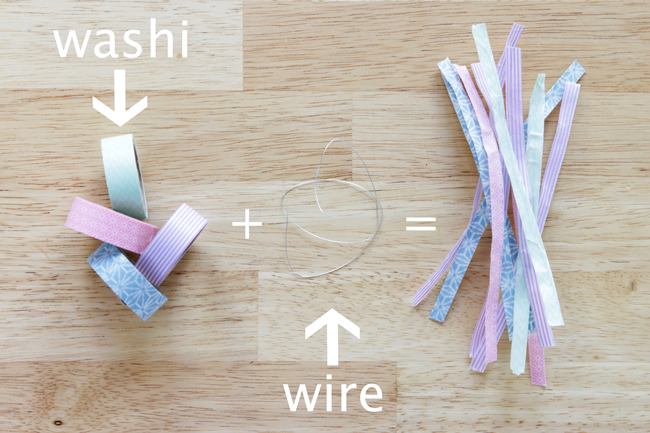
At least in my neighborhood, twist ties are super hard to find!* And sometimes a DIY chick really just needs a couple of frigging twist ties to do her project right now. Such was the position I found myself in last week when it came time to do a final Easter project shoot (tune in Wednesday, btw), so I had to get creative. That’s when washi tape and craft wire from my stash came in very handy!

*(Maybe they’re just not as widely available since so many trash bags have drawstring ties now???)
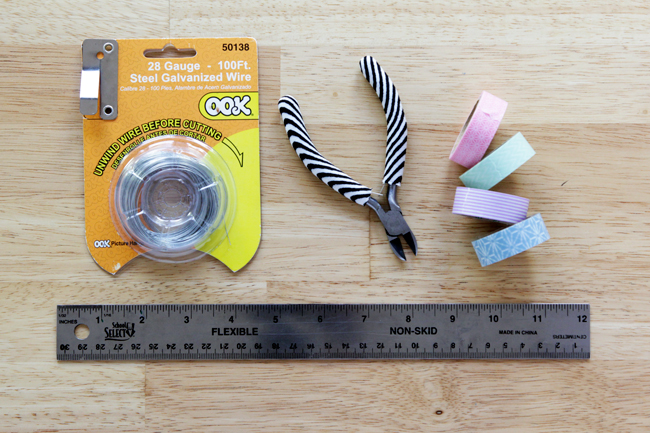
Washi Tape Twist Ties at Hands Occupied

Supplies

washi tape
crafting wire
wire cutters
12 inch ruler

Washi Tape Twist Ties

Directions

Begin by cutting a length of wire a little longer than 12 inches.

Washi Tape Twist Ties

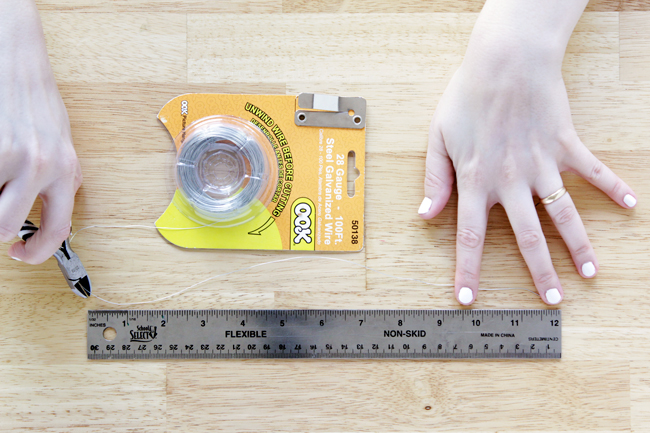
Grab your washi tape, sticking one end to the numbers/front side of your ruler as shown.

Washi Tape Twist Ties

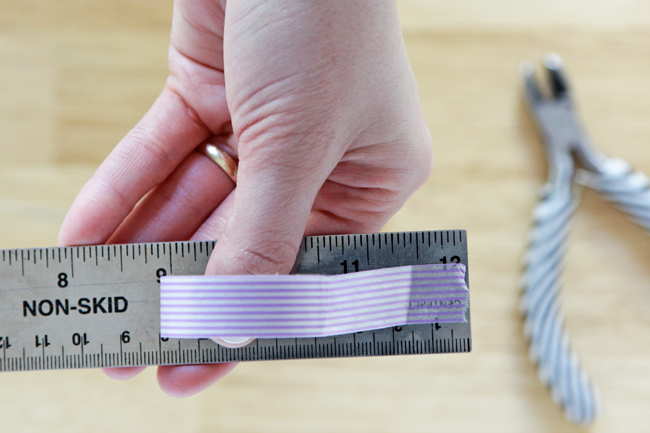
Leapfrog your tape over the end of your ruler as shown so that the sticky side of the tape faces out on the back/non-number side of the ruler.

Washi Tape Twist Ties

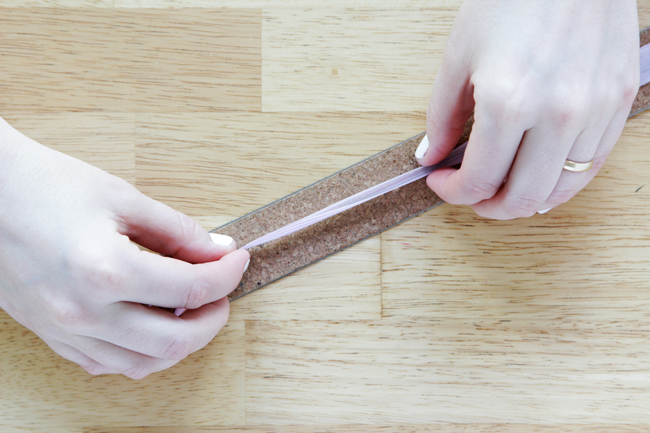
Run your tape, sticky side out, along the whole length of your ruler. Don’t tear the tape from the roll – let the roll hang off the end. The weight of the roll helps you out in the next step. :)

Place your 12+ inch wire on the sticky side of the tape.

Washi Tape Twist Ties

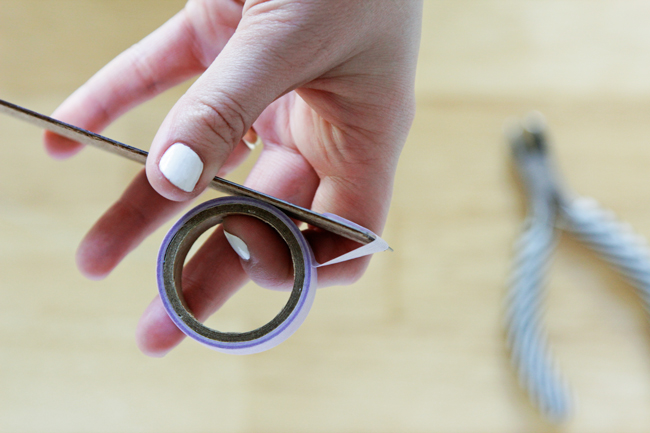
Hold your ruler, tape and wire down with your thumb on the wire, as shown, then tear the tape from the roll just past the wire.

Washi Tape Twist Ties

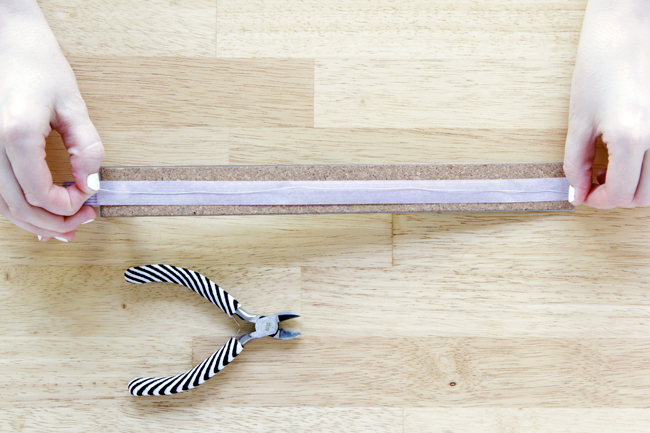
Fold your tape as close to exactly in half as you can around the wire, working from one end to the other.

Washi Tape Twist Ties

When you get to the far end, it will look a bit like this.

Washi Tape Twist Ties

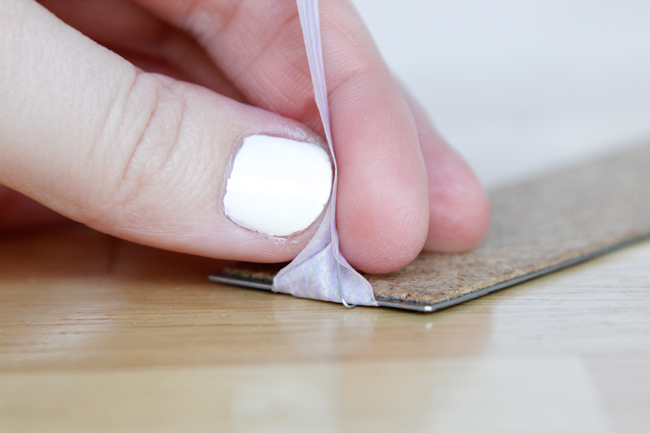
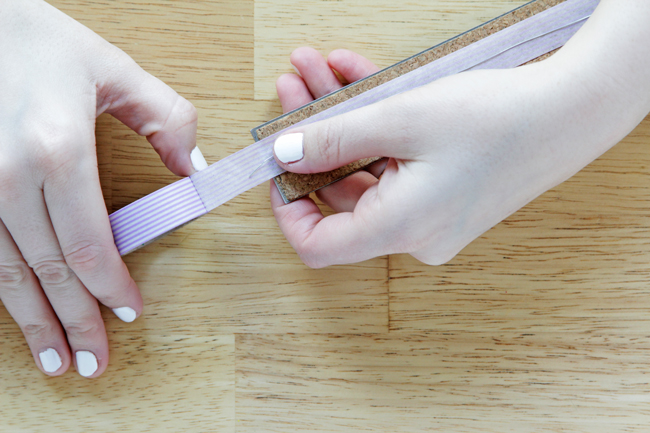
Detach your tape from the ruler and snip off excess wire and tape, all together. If necessary, repeat the snip on the other end.

Washi Tape Twist Ties

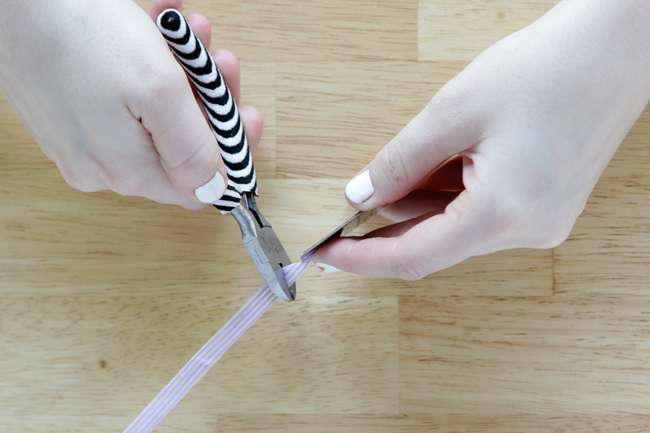
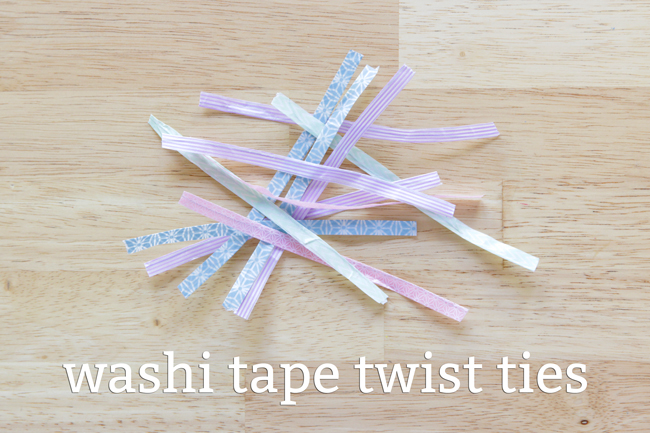
So! 12 inches is kind of a long twist tie, don’t you think? Fold your long twist tie in half to find the center point and cut it there.

Washi Tape Twist Ties

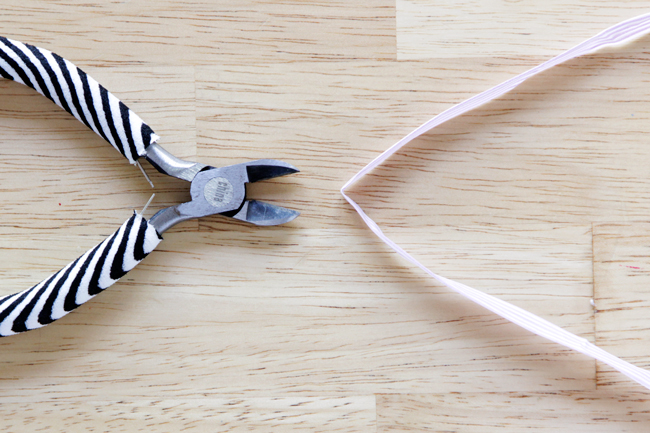
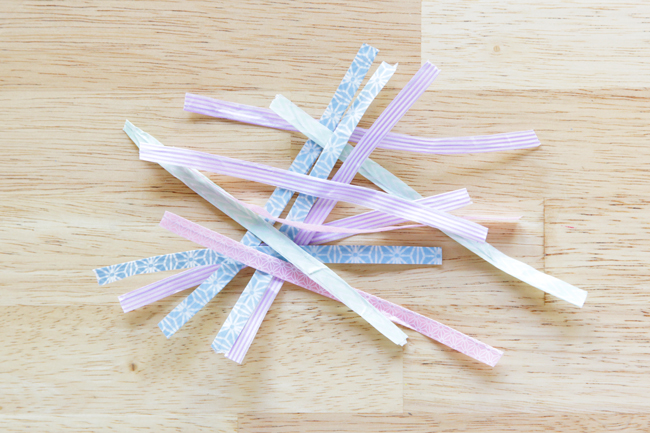
Voila! A pile of the cutest twist ties in the world. Don’t worry if you have a few wrinkles or other imperfections in your ties. Assuming you use these like any other twist tie – you know, folding them and twisting them to secure something – your paper will naturally be wrinkled anyway. This project is awesome because it’s kind of a no-failer!

Washi Tape Twist Ties at Hands Occupied

What you think? Am I nuts to say this one’s no-fail? Do you hate it? Love it? Don’t get it? ;) Let me know!

Filed Under: DIY FYI, How-to Tagged With: craft, diy, easy, twist ties, washi, washi tape twist ties, wire

About Heidi

Heidi Gustad is a craft book author, designer & creator specializing in yarn crafts like knitting, crochet, latch hook & macramé. Her first book, Latch Hook: 12 Projects for the Modern Maker, is out now.

Previous Post: « Weekly Reader
Next Post: Knit Along Day 1: Testing Gauge & Casting On »

Reader Interactions

DID YOU LIKE THIS POST?
Visit similar articles...

  • Twinkle in Your Eye Sunglasses Twinkle in Your Eye Sunglasses
  • Easy No Slip HangersEasy No Slip Hangers
  • How-to: Lantern-style Votive LuminariesHow-to: Lantern-style Votive Luminaries
  • How-to: Easy Vintage Style PennantHow-to: Easy Vintage Style Pennant

DON’T MISS ANOTHER UPDATE

Comments

  1. Peaches

    April 14, 2014 at 10:06 am

    Ummm, why did I never think of this?!

    Reply
  2. Jen @ Girl in the Garage

    April 14, 2014 at 10:51 am

    Adorable! Stopping by from the Stumble group. Pinning also ;)

    Reply
    • Heidi

      April 14, 2014 at 12:02 pm

      Thanks!!

      Reply
  3. Shelley Zawadzki

    April 16, 2014 at 1:15 pm

    Great idea, Heidi! This would be super cute for wrapping an Easter Basket with cellophane.

    Reply

Leave a Reply Cancel reply

Your email address will not be published. Required fields are marked *

This site uses Akismet to reduce spam. Learn how your comment data is processed.

Primary Sidebar

Heidi Gustad from Hands Occupied / Craft Book Author and Knitting, Crochet, Latch Hook and Macrame Designer

Hi! I’m Heidi (she/her/hers), a craft book author & pattern designer specializing in knitting, crochet, latch hook & macrame. Really anything with yarn! ❤️  My work combines vintage and modern design elements, featuring bold colors and graphic motifs.

EMAIL NEWSLETTER

Never miss a tutorial with these short & sweet monthly updates.

Find Me on Social Media

  • Instagram
  • Pinterest
  • TikTok
  • YouTube
Latch Hook by Heidi GustadDiscover Unique Items

Footer

INSTAGRAM

handsoccupied

Craft book author, designer & creator specializing in yarn crafts like knitting, crochet, latch hook & macramé
❤️ Email preferred

Heidi Gustad 🧶✂️
Finally organizing & putting the finishing touches Finally organizing & putting the finishing touches on my home studio. After losing my studio space last fall, it’s feels really great to *occupy* this new space all the way. 😉
.
I started by removing general clutter & returning straggler supplies from various WIPs, videos & design deadlines to their homes. Next, I hung a third peg board in the space - this one is mostly for display and less for organizing tools or projects. For the first time ever, I’m displaying projects from my book, plus a couple other faves. (The best thing about designing more yarn crafts besides knit & crochet is that I have some really fun -and delightfully pettable 😆- samples around.) I finished by adding a square dowel to my small supply storage tower to keep it from tipping over, plus re-arranging and de-cluttering the closet. 
.
This cleaner space already has me feeling so much more creative and less overwhelmed. Now to find a safe spot in the basement for the tower of project samples in Rubbermaid tubs I liberated from my WIPs closet. Also why are there five?! 
.
Here’s to keeping it clean for a few weeks! 🧶 
.
#handsocupied #handsoccupiedstudio #craftroom #craftroomorganization #craftroomstorage #yarncraft #knitter #crocheter #latchhook #latchhookbook
It’s a disaster in here and my video microphone It’s a disaster in here and my video microphone isn’t cooperating, but it could be worse! How’s your day? 
.
(If we haven’t yet met, I’m Heidi and I’m a pattern designer and tutorial creator specializing in yarn crafts like knitting & latch hook. You can learn more about my work and regularly find new tutorials in my profile. ☺️👋🏻)
.
#handsoccupied #craftstudio #knitter #yarncrafter
How to knit a one-row buttonhole 🧶 . Sweater k How to knit a one-row buttonhole 🧶 
.
Sweater knitters, listen up! Learn how to knit a buttonhole over the course of a single row of knitting, a.k.a. a one-row buttonhole. In this technique, a combination of binding off and casting on stitches on opposite sides of the work creates a symmetrical, stretchy buttonhole. 
.
The time limit on these is 90 seconds, so this quick tutorial is perfect to save for future reference. (Did you know you can make folders of saved items like tutorials? 👩🏼‍🏫) 
.
If you’re brand new to the technique or want to see this demonstration slower and more in-depth, my bl0g and You/2be are the place to be. Thanks for watching & let me know if you have any questions or requests for future tutorials in the comments. ☺️
.
#handsoccupied #knitting #onerowbuttonhole #learntoknit #sweaterknitting #knittutorial #knitting_inspiration
One-row buttonholes are one of a few common ways t One-row buttonholes are one of a few common ways to knit a buttonhole. Created using a combination of binding off and casting on stitches over the course of a single row, this technique is one you’ll come back to again and again, and bonus: it’s not wildly challenging. 
.
Find a brand new video tutorial for knitting one-row buttonholes and a post with other useful buttonhole resources on the bl0g, 🔗 in bi0.
.
#handsoccupied #onerowbuttonhole #knitting #sweaterknitting #buttonhole #knittersofinstagram
It was quiet last week as I’ve been working on a It was quiet last week as I’ve been working on a few behind the scenes projects, including filming a bunch. The goal: tutorials most weeks!
.
I also put some time into neglected design projects, in particular the pattern collection I began working on back in 2022. As I work on the samples, you’ll be seeing some sneak peeks here and there in my feed. ☺️
.
The other thing occupying my time: I got an iPad to try digital planning and keep my design notes more organized, not to mention digitized. (Paper scribbling just ain’t it after 12 years.) If anyone has tips for how to make the most of digital planning as a crafter / knitter, I’d love to hear them! Accounts to follow, apps, must-know hacks for crafters - I’m excited to learn it all! 👩🏼‍🏫
.
#handsoccupied #knitting #knittingtutorial #digitalplanning #knitdesign
Load More... Follow on Instagram

Copyright © 2023 / Foodie Pro Theme On Genesis Framework / Branding by Ink + Mortar
All Site & Shop Policies / Privacy Policy / Cookie Policy