• 0 items$0.00
  • Skip to primary navigation
  • Skip to main content
  • Skip to primary sidebar
  • Skip to footer

Hands Occupied

Contemporary yarn crafts by Heidi Gustad. Knitting, crochet, latch hook and macrame.

  • BLOG
    • Knitting
    • Crochet
    • Latch Hook
    • Macramé
  • ABOUT
  • Shop
  • Studio
  • Nav Social Menu

    • Facebook
    • Instagram
    • Pinterest
    • RSS
    • Twitter
    • YouTube

How-to: Autumn Tie-Dye Tablecloth

November 15, 2012 Leave a Comment

I originally designed this project back in August and love how it turned out. This project uses cut up t-shirts, which naturally curl in on the ends like dried leaves. While this is a tie-dye project, it ends up looking much more elegant and less hippie-ish than many tie-dye projects. The colors vary leaf to leaf on the tablecloth, also like real drying leaves. I really enjoyed watching the tablecloth come together each step of the way!

How-to: Autumn Tie-Dye Tablecloth | HandsOccupied.com

Supplies

several clean, white t-shirts
fabric & regular scissors
tag board
pencil
straight pins
9×13 baking pan (optional)
washer & dryer
Tulip One-Step Tie-Dye Kit
waxed paper
iron & ironing board
Liquid Stitch
canvas fabric in desired tablecloth size

Directions

Draw the silhouette of one or more leaves onto a piece of tag board in the size you desire. I went exclusively with maple leaves that are about a foot long each. Since each leaf will be tie-dyed, going with a decent size will really show off your tie-dye prowess.

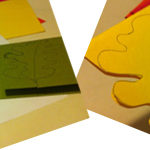
Cut out your tag board. Pin it to a t-shirt with straight pins, all the way through both layers of the shirt. Cut out your leaves two at a time using your stencil(s) as a guide.

How-to: Autumn Tie-Dye Tablecloth | HandsOccupied.com

I created a total of 16 leaves in this first step. My finished tablecloth only needed 12, but the extras gave me some wiggle room to select the best leaves for the finished product. If you’re not sure how many to create, use your table as a guide.

How-to: Autumn Tie-Dye Tablecloth | HandsOccupied.com

Next, grab your Tulip One-Step Tie-Dye Kit and prep your workspace. Follow the directions for mixing the red and yellow dyes from the kit, and read all directions provided with the kit.

How-to: Autumn Tie-Dye Tablecloth | HandsOccupied.com

Get all of your leaves damp. I found it easiest to pile them all into a 9×13 pan with some water – no need for a huge mess or to leave my workspace.

Grab a leaf and ring out excess water. Lay leaf out on your waxed paper. I used the swirl method as described in the kit, which I’ll demo here. There are other methods that could be super fun to play with too – just check out the instructions included in the kit!

How-to: Autumn Tie-Dye Tablecloth | HandsOccupied.com

Pinch the center of your leaf and begin twisting it into a spiral. Secure with two rubber bands in a plus sign, as shown. You can twist and secure two t-shirt leaves at a time to speed up the process, but you’ll have a little less variety in your dyed leaves.

How-to: Autumn Tie-Dye Tablecloth | HandsOccupied.com How-to: Autumn Tie-Dye Tablecloth | HandsOccupied.com How-to: Autumn Tie-Dye Tablecloth | HandsOccupied.com

When they’re all wrapped, grab your dyes and put on a pair of gloves. Apply dye using the ketchup and mustard-style bottles, which are so nice for reducing mess.

Apply colors however you want. I made sure that no two bundles were dyed the same. I even played with squirting the red and yellow onto some bundles simultaneously to get some more orange in the mix.

If the dye doesn’t soak all the way to the other side, remember to flip the bundle and apply more dye. The kit’s instructions warn against using too much dye, but since I wanted my colors to mix (and become orange in some places), I applied a lot of dye.

How-to: Autumn Tie-Dye Tablecloth | HandsOccupied.com How-to: Autumn Tie-Dye Tablecloth | HandsOccupied.com How-to: Autumn Tie-Dye Tablecloth | HandsOccupied.com

When all of your bundles are dyed, let sit for 6-8 hours. Like the kit says, the longer they soak, the more vibrant your colors will be. Remember to wrap the wet bundles in plastic wrap (or the waxed paper from your work surface) to keep them from drying out during the 6-8 hours.

How-to: Autumn Tie-Dye Tablecloth | HandsOccupied.com How-to: Autumn Tie-Dye Tablecloth | HandsOccupied.com

When they’ve sat long enough, rinse out excess dye in the sink and remove the rubber bands. Wash and dry all of the leaves in laundry machine according to the kit’s instructions (separately, hottest water possible, use detergent, etc.).

How-to: Autumn Tie-Dye Tablecloth | HandsOccupied.com

They look something like this when they’re done…

How-to: Autumn Tie-Dye Tablecloth | HandsOccupied.com

Mine came out super wrinkly, looking more like cleaning rags than beautiful fall leaves. Ironing time! Iron each leaf on a steam setting, being careful not to burn yourself. Pinning the leaves’ ends directly into your ironing board is a great safety tip here.

How-to: Autumn Tie-Dye Tablecloth | HandsOccupied.com How-to: Autumn Tie-Dye Tablecloth | HandsOccupied.com

I wanted to use t-shirts for this leaf project because the ends of t-shirt fabric curl when the edges are raw. So even with ironing, you get cool autumnal leaf curls on the edges of each leaf. Lay out your leaves on your tablecloth canvas, ironing the canvas ahead of time if necessary. This is the time to decide exactly how you want the layout of the finished product to be.

How-to: Autumn Tie-Dye Tablecloth | HandsOccupied.com

Once you’re satisfied with the layout, use a dot of Liquid Stitch on the tips of each leaf to secure. I really still wanted my leafy curls, so I placed my dots slightly in from the very tip of each leaf point. I also included some extra Liquid Stitch on particularly curled edges that changed the leafy look of some of the leaves.

How-to: Autumn Tie-Dye Tablecloth | HandsOccupied.com

Let the whole thing dry, and you’re ready to set the table for a fall or Thanksgiving dinner!

How-to: Autumn Tie-Dye Tablecloth | HandsOccupied.com

The Tulip One Step Tie Dye Kit used was provided by iLoveToCreate, and I originally developed this project for FaveCrafts.

Filed Under: How-to, Thanksgiving Tagged With: autumn, fall, kits, leaves, thanksgiving, tie dye, tulip

About Heidi

Heidi Gustad is an artist, author and crafts designer specializing in knitting, crochet, latch hook and macrame. In addition to running the Hands Occupied Blog and Pattern Shop, you can find her making videos & co-hosting the Very Serious Crafts podcast.

Previous Post: « Top 8 Cricut Thanksgiving Projects & Cricut Mini Giveaway!
Next Post: November, November »

Reader Interactions

DID YOU LIKE THIS POST?
Visit similar articles...

  • How to: Family-friendly Autumn BannerHow to: Family-friendly Autumn Banner
  • Picks of the WeekPicks of the Week
  • Weekly ReaderWeekly Reader
  • Fall Festival Time! Fall Festival Time!

DON’T MISS ANOTHER UPDATE

Leave a Reply Cancel reply

Your email address will not be published. Required fields are marked *

This site uses Akismet to reduce spam. Learn how your comment data is processed.

Primary Sidebar

Heidi Gustad from Hands Occupied / Craft Book Author and Knitting, Crochet, Latch Hook and Macrame Designer

Hi! I’m Heidi, an author, yarn craft designer and content creator specializing in knitting, crochet, latch hook & macrame. My work unapologetically features primary colors and vintage-meets-modern style. My first book, Latch Hook: 12 Projects for the Modern Maker, is now available!

work with heidi

UPDATES BY EMAIL

Get a free pattern + biweekly updates sent to your inbox.

Let’s be friends!

  • Facebook
  • Instagram
  • Pinterest
  • Twitter
  • YouTube
Latch Hook by Heidi Gustad

Footer

INSTAGRAM

handsoccupied

Craft book author & content creator in love with primary colors & vintage vibes. / #latchhookbook out now!
.
knitting, crochet, latch hook & macramé

Heidi Gustad 🧶✂️
There’s an update on the blog today, & it’s ab There’s an update on the blog today, & it’s about how I’m going to take the next 2 weeks off to rest & recharge. ☺️🧶 No new content for y’all means I can also take a moment to zoom out & plan what’s next. Link is in bio. 
.
.
A note on Very Serious Crafts: In the post I discuss stepping away from the @seriouscrafts podcast to give myself more time to devote to some minor medical issues. Don’t you worry - my health will be fine, & @molliejohanson @redhandledscissors and I are still pals, and after a short break of their own, the podcast will be back! Just sans moi. 💁🏼‍♀️😆 
.
.
See you in a couple weeks! ✌🏻#handsoccupied #knitdesign #craftdesign #sofadedsweater
Been a little quiet this holiday week, as it shoul Been a little quiet this holiday week, as it should be. ☺️🎄The past few days have been filled with a lot of catching up on festive zoom calls & raising toasts to the camera. 🥂 Connecting with people has been a welcome change of pace! Now I’m feeling ready to meet my inevitable end-of-year deadlines. 😆
.
.
Warmest wishes for the season, my friends! ❤️💛💙
Hi, I’m Heidi, the craft book author & maker beh Hi, I’m Heidi, the craft book author & maker behind Hands Occupied! 👋🏻 I’ve been enjoying making Reels a lot lately, but I wanted to bop in to share a regular photo & say hello. 🤓 
.
.
rather than giving you my bio right now, I have a question. I just got this new sweater & I can’t stop imaging how funny it would be to wear this to a knitting class ... is that bad? 🤣🤣🤣
.
.
Pictured: a blond woman with glasses wearing a sweater that reads “all your sweaters are ugly” standing in front of a Christmas tree.
Wet blocking, also called immersive blocking, is o Wet blocking, also called immersive blocking, is one of the most common methods for finishing a knitting project and helping ensure its final size and shape. Learn basic blocking for absolute beginners in an easy-to-follow (non-Reel!) video tutorial! Catch the tutorial on YouTube or the Hands Occupied Blog, link is in bio. 🧶 #handsoccupied #stopswatchandblockit #KPAmbassadorsDec20 #sponsored
Had to share this perfect capture of one of my fav Had to share this perfect capture of one of my favorite weird homemade Christmas ornaments: a simple macramé Santa face with beads for the eyes and nose! My Great-Grandma made it too. 🎄
.
Might have to try making a quickie Reel tutorial for this guy - I think it’s the perfect project for it, don’t you? 🎅🏼 #handsoccupied #macrame
Load More... Follow on Instagram

Copyright © 2021 / Foodie Pro Theme On Genesis Framework / Branding by Ink + Mortar
All Site & Shop Policies / Privacy Policy / Cookie Policy