Blowing out Easter eggs is easy. These instructions are from my mom, who made a set of blown out eggs when I was a kid. Maybe it was to preserve our amazing decorations for years, but more likely it was so the house didn’t stink if we couldn’t find all of her hidden eggs. Brace yourself for heightened salmonella awareness and a surprisingly easy how-to!
Supplies
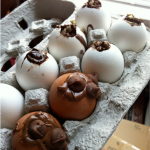
eggs, egg carton
pins/needles in varying widths
sink with drain
1 tbsp vinegar
cooking pot
wooden spoon
squirt bottle
Directions
Work this project over a sink  with a drain, but remember to plug it first! I accidentally lost a pin down my garbage disposal, and the husband wasn’t super psyched about having to dig around in egg waste for something sharp.
To start, gently tap your thinnest needle in to your egg, piercing the shell. I used a kitchen knife rather than any kind of hammer because it exerts less force and will help reduce the risk of smashing your eggs.

Take your next-thickest needle, and tap it in to the existing hole to make it larger. Repeat with your next-thickest needle. Once the opening is ready, grab a long needle and poke around inside your egg to pierce the yolk and separate the egg’s proteins. This will help you when you blow out the egg’s insides.

Poke a second hole in the opposite end of your egg. Make this one slightly larger than the first hole – this will be the end egg guts come out of. The bigger the hole, the faster this will go. Don’t worry about finding really thick needles to make the second hole. Make a small hole just like the first, but increase its size by chipping away at it from the inside with one of your pins.

Time to blow! Turning the larger hole toward the sink, blow in to the smaller one (see my lovely double-chinned face demoing this action above). I blew out about 14 eggs to yesterday, and their guts pretty much all came out in this order: clear, boogery gunk; liquid egg white; thicker cream-colored gunk; yolk. When you pass the first thick gunk and then the second thick cream-colored stuff, it’s all easy.

If your eggs are strictly for dyeing, you might want to consider keeping both openings as small as possible, but I’ll warn you. It will take substantially longer to blow out the guts, but they’ll look a lot more like real, unadulterated eggs if the holes are subtle.
The last step in the hollow eggs creation process, if you want to fill them with candy or chocolate, is to sanitize the shells. Salmonella may only kill a couple dozen people a year, but y’know, safety.
Submerge your hollow eggs in a mixture of 1 tablespoon vinegar and cold water. The eggs will float unless their openings are huge, OR you fill the eggs with cold water using a squirting device. Michael’s craft stores carry a bunch of candy-making supplies, including squirt-bottles.

Bring your pot of eggs to a boil and remove from heat. There will be some foam on the top that can be thrown away. Let the whole mess cool and blow out excess water from eggs. If you’re impatient like me, you can carefully remove each egg from the boiling water and carefully let the water drain down a partially plugged sink. In retrospect, I’m going to admit the impatient method isn’t totally worth it – I may have burned my face/lips and hands doing this. Let eggs dry overnight in carton.


Much easier to blow out the eggs using a nasal aspirator ( aka snot sucker). If you shake the egg up before blowing it out, it is also immensely easier.