• 0 items$0.00
  • Skip to primary navigation
  • Skip to main content
  • Skip to primary sidebar
  • Skip to footer

Hands Occupied

Colorful knitting, crochet, latch hook and macrame from craft book author & designer Heidi Gustad.

  • BLOG
    • Knitting
    • Crochet
    • Latch Hook
    • Macramé
    • Punch Needle
  • ABOUT
  • Shop
  • Nav Social Menu

    • Instagram
    • Pinterest
    • RSS
    • TikTok
    • YouTube

How-to: Card Catalog End Table

June 10, 2013 10 Comments

How-to: Card Catalog End Table at HandsOccupied.com

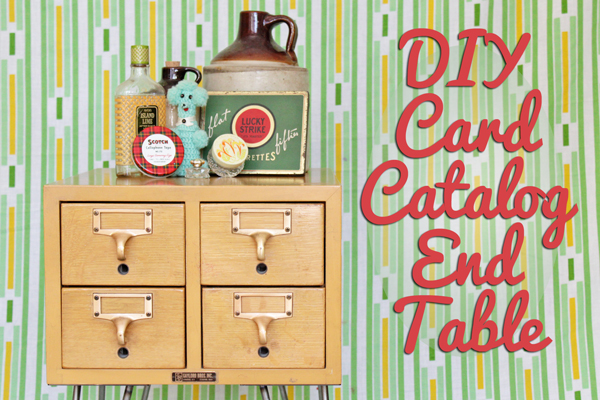
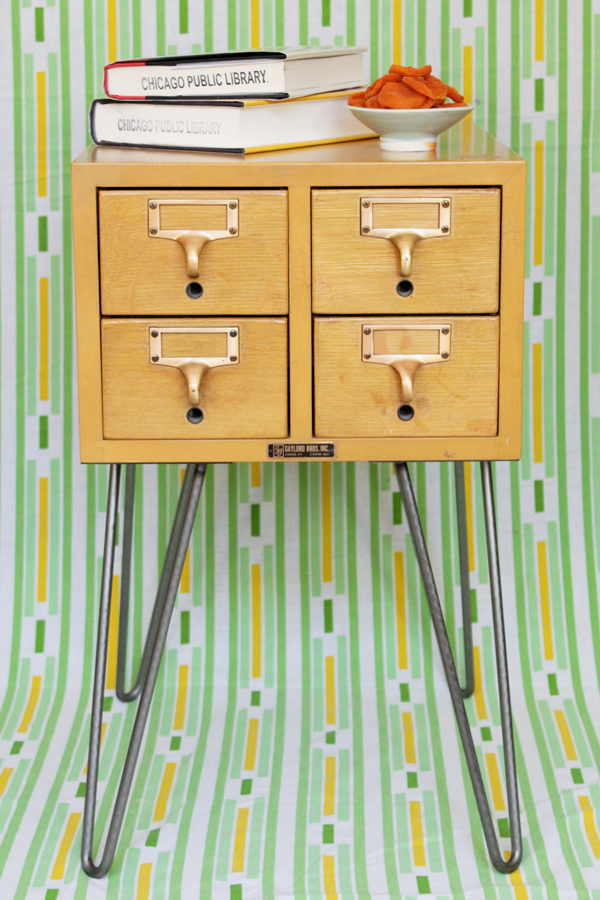
I love collecting vintage household items. They’re a really fun way to add surprising and unique flourishes to home decor. Several months back, I acquired a small set of card catalog drawers. They’re something I want to keep in good condition, so I hemmed and hawed for a long time before finally selecting and adding the hairpin table legs. With the help of my dad (a seasoned home DIY’er and son of a woodworker) on a recent visit, we attached the table legs in no time. Read on for the best tips for modifying your own potentially fragile vintage items.

Supplies

a small set of vintage card catalog drawers
marker
ruler
4 hairpin style table legs
enough wood screws to attach your legs (make sure they’re all the same size and type)
drill & drill bits
wood glue (optional)

Directions

The first step is deciding how tall you want the table to be, and measure the height of your set of drawers. Subtract the height of your drawers from how tall you want your table to be to determine how tall your table legs should be*. I found the best prices and selection of the hairpin style legs I used here.

*total desired table height – height of card catalog = leg height

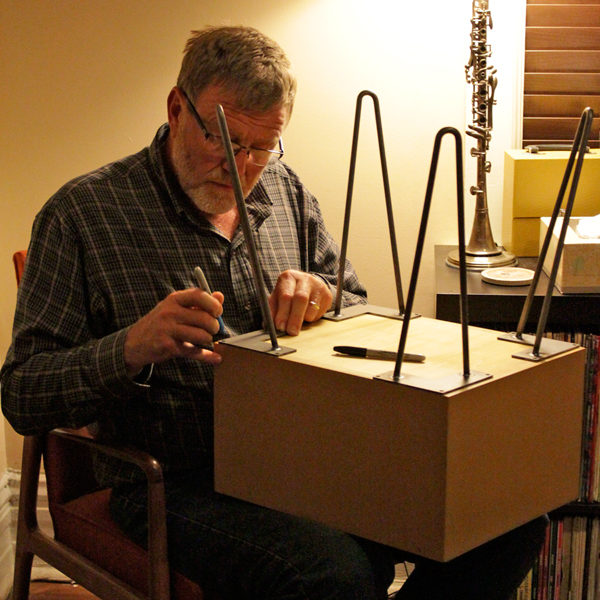
Begin constructing your table by removing all drawers from the card catalog, deciding on the placement of the legs, and marking the location. You can measure for precision or simply eyeball the best location, it’s up to you. My dad’s big tips for adding legs to card catalogs:

  • Determine as best you can how thick the wood is that you’re drilling the screws into. 
  • Don’t use screws that are too long (this is where knowing how thick the wood is comes in).
  • Don’t try to drill your screws in too close to the edge of the card catalog. If you accidentally screw them in at a slight angle, your screw could come out the outside of your card catalog, ruining its look.
  • Also avoid drilling a screw directly into where two pieces of wood come together. You could end up accidentally damaging your card catalog by wedging it apart. We ended up placing my table legs slightly in from the front and back edges but flush with the sides, as you can see somewhat below.

How-to: Card Catalog End Table at HandsOccupied.com

Set the legs aside. Using a drill bit that’s smaller than the wood screws you’ll attach the legs with, drill pilot holes for each screw you’ll be using to attach the legs. This helps avoid slippage when you’re putting in a screw, and it helps avoid damaging the wood.

How-to: Card Catalog End Table at HandsOccupied.com

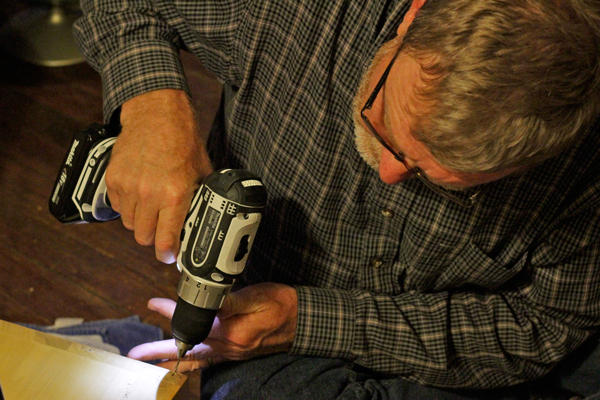
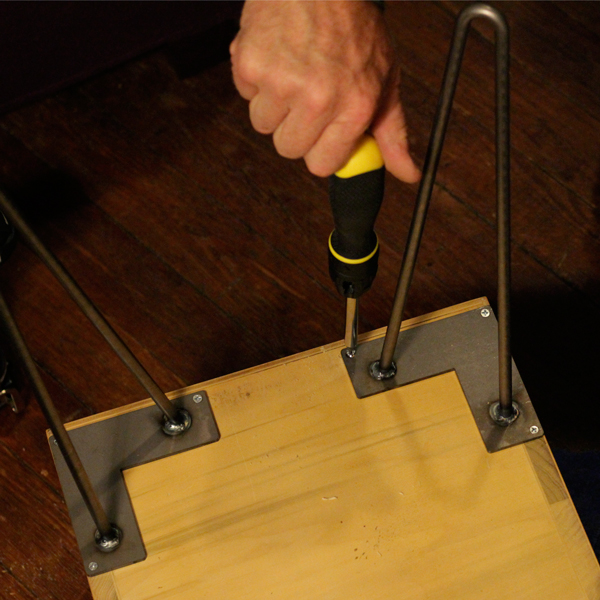
Place a leg over the pilot holes. (The hairpin legs are nice because you can see what you’re doing the whole time.) You can use a drill or handheld screwdriver to screw the legs to the card catalog. My dad preferred switching between the drill for the pilot holes and the handheld screwdriver since he opted not to drill all 12 pilot holes at once. He worked one leg at a time, so having to switch back and forth from a drill bit for the pilot holes to a screwdriver head for attaching the legs would have been impractical.

How-to: Card Catalog End Table at HandsOccupied.com

PS: If you find your legs getting loose down the road, carefully unscrew them a little bit, put a small dot of wood glue under the head of the screw, and screw it back in.

How-to: Card Catalog End Table at HandsOccupied.com

This tutorial was for a fairly straightforward project that many could figure out on their own. I hope sharing some tips from someone who knows their stuff, even on an easy project, is useful for you! 

Filed Under: Home Decor, How-to, Vintage Crafts Tagged With: card catalog, diy, end table, hairpin legs, home decor, midcentury, vintage

About Heidi

Heidi Gustad is a craft book author, designer & creator specializing in yarn crafts like knitting, crochet, latch hook & macramé. Her first book, Latch Hook: 12 Projects for the Modern Maker, is out now.

Previous Post: « Weekly Reader
Next Post: How I Decided on a Kia »

Reader Interactions

DID YOU LIKE THIS POST?
Visit similar articles...

  • Giant Valentine’s Day God’s EyeGiant Valentine’s Day God’s Eye
  • 6 Beautiful Vintage Holiday Decorations6 Beautiful Vintage Holiday Decorations
  • How-to: Giant LED Arrow SignHow-to: Giant LED Arrow Sign
  • How-to: DIY Wool Swiss Army BlanketHow-to: DIY Wool Swiss Army Blanket

DON’T MISS ANOTHER UPDATE

Comments

  1. Rachel | 52 Weeks Project

    June 10, 2013 at 2:45 pm

    I love this Heidi, thanks for sharing!!

    Reply
  2. Bulb to Blossom

    June 11, 2013 at 12:55 pm

    This is such a great idea! I love it!

    Reply
  3. marissa | Rae Gun Ramblings

    June 11, 2013 at 7:22 pm

    I seriously love this so so much! You don’t even know. Pinning and hoping to find some card catalog drawers

    Reply
  4. Kristina

    June 14, 2013 at 9:08 am

    This is the second time I’ve come back to this in two days because it’s so cool. Yesterday I wasted about 20 minutes googling inexpensive table legs. (Did you know there aren’t any?) So now I’m into making tables all of a sudden thanks to you. So thanks! To you!

    Reply
    • Heidi

      June 16, 2013 at 9:41 am

      Thanks! Yeah, table legs are crazy expensive. Did you see the link in the post to where I got the hairpin legs I used for this table? They weren’t the cheapest ever, but I spent forever googling to find that source. Book. Marked. ;)

      Reply
  5. Carol

    June 14, 2013 at 6:00 pm

    Great job with the presentation.

    Reply
  6. Laura Beth / Perched on a Whim

    June 19, 2013 at 10:47 am

    How charming! As a book lover, this is just too much. You’ve given me something to hunt for this summer: card catalog drawers.

    Reply
  7. Evan

    January 30, 2015 at 1:44 pm

    What type and length of screw did you use? I’ll be doing the exact same thing soon, but can’t figure out what screws will be short and strong enough.

    Reply
    • Heidi

      February 1, 2015 at 8:31 pm

      The wood of the card catalog I used is pretty thick, so we were able to use fairly long ones. I have no idea what type in particular they were, though. I’m sorry!

      Reply

Trackbacks

  1. Decorator in a Box says:
    June 18, 2013 at 8:51 am

    […] size catalogs available and not many larger options to hold their own.  Heidi from the blog Hands Occupied has solved this dilemma by simply adding some retro metal legs on the bottom to create a […]

    Reply

Leave a Reply to Rachel | 52 Weeks Project Cancel reply

Your email address will not be published. Required fields are marked *

This site uses Akismet to reduce spam. Learn how your comment data is processed.

Primary Sidebar

Heidi Gustad from Hands Occupied / Craft Book Author and Knitting, Crochet, Latch Hook and Macrame Designer

Hi! I’m Heidi (she/her/hers), a craft book author & pattern designer specializing in knitting, crochet, latch hook & macrame. Really anything with yarn! ❤️  My work combines vintage and modern design elements, featuring bold colors and graphic motifs.

EMAIL NEWSLETTER

Never miss a tutorial with these short & sweet monthly updates.

Find Me on Social Media

  • Instagram
  • Pinterest
  • TikTok
  • YouTube
Latch Hook by Heidi GustadDiscover Unique Items

Footer

INSTAGRAM

handsoccupied

Craft book author, designer & creator specializing in yarn crafts like knitting, crochet, latch hook & macramé
❤️ Email preferred

Heidi Gustad 🧶✂️
If only knitting a whole project took 39 seconds… 😮‍💨 
.
In this video, you can see how the Intarsia Flower Pillow pattern knits up - two flat panels, one with intarsia, both are blocked, and then they’re seamed. Find the pattern on @hi.ravelry & my website, just search Intarsia Flower Pillow. 🌸 
.
P.S. I’m really smiling in this video while seaming the pillow, so I guess I’m proving last week’s claim that I truly enjoy that sometimes-dreaded task. 😆🫣
In knitting, a Left Lifted Increase (LLI) lets you In knitting, a Left Lifted Increase (LLI) lets you add a stitch in between two columns of stitches that leans to the left. Similar to an M1L, LLIs allow you to increase nearly invisibly.
.
To learn more about lifted increases, including when to use them and how they differ from Make 1s, head to the 🔗 in my profle. 
.
Have you ever used lifted increases? I used M1’s almost exclusively for a long time when I needed to inc between stitches, but when I designed the Intarsia Flower Pillow pattern, I needed something that would allow me to increase a lot near my cast on, and M1’s resulted in edge curling. The more you know! 🌈 
.
Yarn: @lionbrandyarn Wool Ease from my Stash / Neddles: @boyeyarncrafts - Just remembered these are the needles I learned to knit on at age 8. 😂
.
#handsoccupied #knitting #learntoknit #howtoknit #sweaterknitting #knitinspiration #knittersofinstagram #liftedincreases
Last week I got to hang out with my family & helpe Last week I got to hang out with my family & helped babysit my red-headed niece and nephew. So here’s some plane knitting, and a couple pictures (shared with permission) of my babysitting adventures.
.
Lessons learned: 1️⃣ Trying to knit around 2 toddlers, 2 cats & 2 large dogs is pretty hard. 2️⃣ I learned during water color time that pink and black make “colorful black.” 🩷🖤 3️⃣ Toddlers do NOT care about your rainbow sorting of their toys. 4️⃣ Toddlers are very good at finding mischief in a very short amount of time, what a surprise. 😂
.
#handsoccupied #knitting #placesyoucanknit #knitters #knitinpublic #handmadelife #knitting_inspiration
Weaving in ends & seaming with mattress stitch are Weaving in ends & seaming with mattress stitch are both so useful for garment knitting! But for me, weaving in ends can feel like a chore while the latter feels like I’ve successfully done magic. 🧙🏻‍♀️ Does anybody else run into this phenomenon? Are you the opposite? Any theories as to why they feel different? 
.
In this video, I’m finishing my brand new Intarsia Flower Pillow. 🌸 I’m working with @universal_yarn Uni Merino & the pattern is available at the 🔗 in my b1o. 
.
#handsoccupied #intarsiaflowerpillow #intarsia #intarsiaknitting #knitting #colorwork #knitpillow #knittinginspiration #knittersofinstagram
I independently released a knitting pattern today, I independently released a knitting pattern today, my first in 5 years! The Intarsia Flower Pillow is a 16” (40cm) round pillow knit with an intentional combination of intarsia, stockinette, garter and seed stitch. This pillow has everything you need to level up your intarsia technique while also knitting something you can use. 
.
This pillow allows you to practice knitting intarsia while simultaneously increasing and decreasing. The Intarsia Flower Pillow pattern was designed to be a little knit-nerdy for learning and a little cute, arming you with many of the skills you'd need to knit an intarsia sweater. 
.
Intarsia Flower Pillow is available in the Hands Occupied Sh0p and on @hi.ravelry . You can read more about the pattern on the bl0g, the🔗 are where you’d think.
. 
YARN: @universal_yarn Uni Merino in Antiquity, Fjord and Conch / NEEDLES: US 2 (2.75 mm) / PATTERN: Intarsia Flower Pillow by Heidi Gustad
Load More... Follow on Instagram

Copyright © 2023 / Foodie Pro Theme On Genesis Framework / Branding by Ink + Mortar
All Site & Shop Policies / Privacy Policy / Cookie Policy