• 0 items$0.00
  • Skip to primary navigation
  • Skip to main content
  • Skip to primary sidebar
  • Skip to footer

Hands Occupied

Colorful knitting, crochet, latch hook and macrame from craft book author & designer Heidi Gustad.

  • BLOG
    • Knitting
    • Crochet
    • Latch Hook
    • Macramé
    • Punch Needle
  • ABOUT
  • Shop
  • Nav Social Menu

    • Instagram
    • Pinterest
    • RSS
    • TikTok
    • YouTube

How-to: Giant LED Arrow Sign

October 31, 2013 10 Comments

How-to: Giant LED Arrow Sign - Hands Occupied

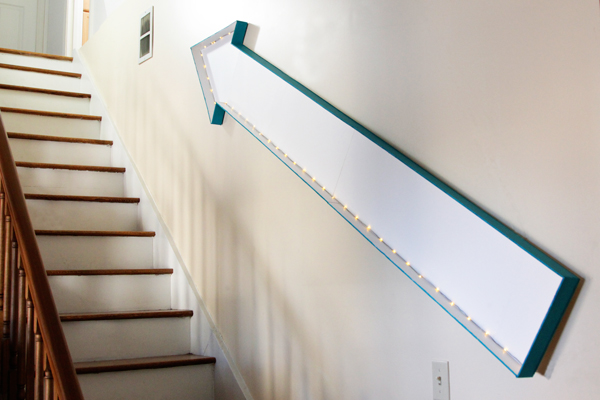
I’ve been wanting to add a ginormous vintage arrow sign to my living room for ages, but after some preliminary internet research, I realized that an actual salvaged arrow sign would cost a lot. Especially one that blinks, is powered by a battery pack, is lightweight and is also energy efficient. Oh yeah, those don’t exist. This kind of situation is precisely why I DIY –  I’m cheap, and I want the impossible. To the craft room!

Supplies

1 30×40 inch piece of foamcore
1 22×28 inch piece of foamcore (same thickness as the 30×40 piece)
x-acto knife
pencil
ruler
school or tacky glue
small straight pins with flat tips
acrylic paint
paint brush
toothpick or nail
enough LED string lights to fit along the perimeter of your sign

Directions

Before you begin, note that you can make this any size you want, but my instructions will be for how to make a 92 inch long sign.

Cut out the arrow

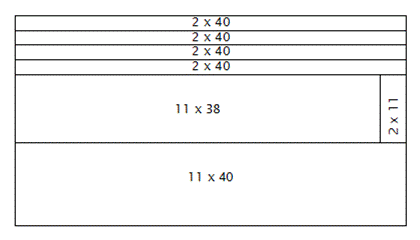
Using a pencil, ruler and x-acto knife, carefully measure and cut your large piece of foamcore into 7 rectangles: 11×40 (1), 11×38 (1), 2×11 (1), 2×40 (4). Those 7 rectangles perfectly add up to a 30×40 inch rectangle like this:

How-to: Giant LED Arrow Sign - Hands Occupied

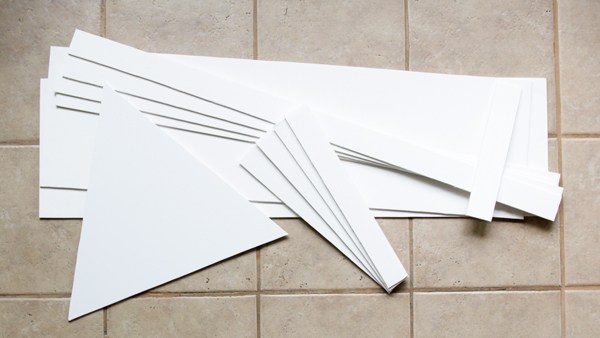
Then use your other piece of foamcore (I just used a scrap piece I had laying around) to make a triangle for the head of your arrow and 2 inch wide rectangles to edge it. I didn’t use any special geometry trick for the triangle, for what it’s worth. My triangle’s about 14 inches tall.

How-to: Giant LED Arrow Sign - Hands Occupied

Assemble the arrow

Assembling the arrow consists of gluing the 2-inch edge pieces all along the perimeter of your arrow. Draw a line of glue along the top of your foamcore where you want to attach a 2-inch edge piece.

How-to: Giant LED Arrow Sign - Hands Occupied

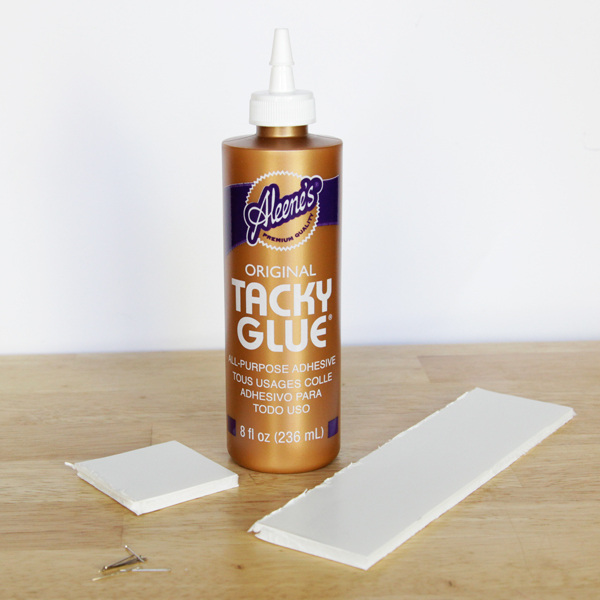
Place your edge piece onto the glue line.

How-to: Giant LED Arrow Sign - Hands Occupied

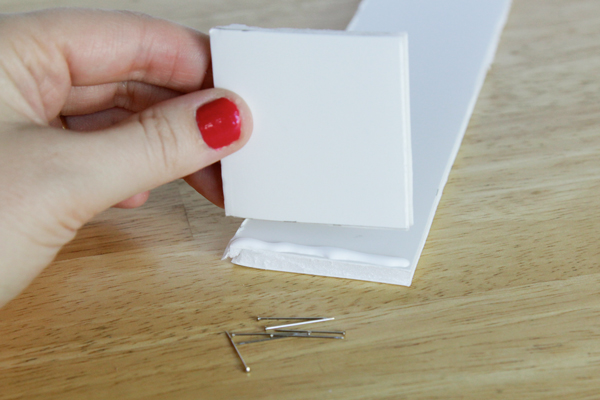
Secure with straight pins by pushing a few straight through the bottom of the foamcore, through the glue and into the 2-inch edge piece of foamcore. This step is almost like constructing your arrow with wood and nails instead of foamcore and straight pins.

How-to: Giant LED Arrow Sign - Hands Occupied

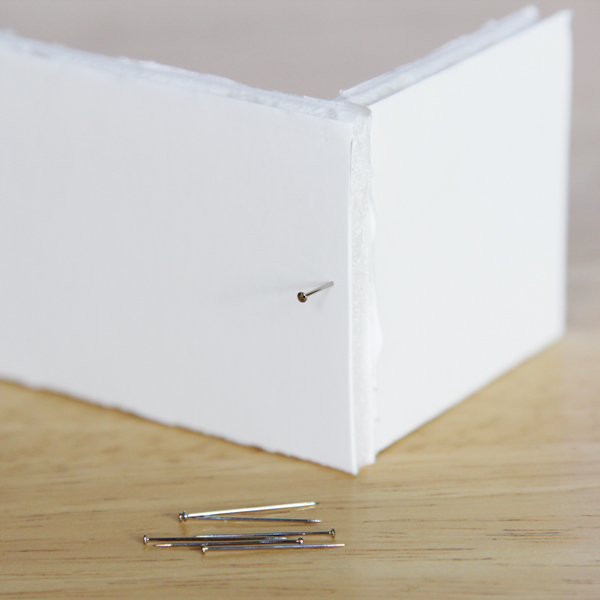
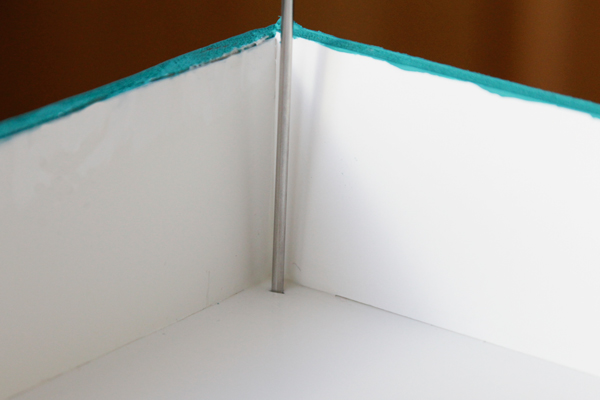
To form a corner, which you’ll do for the butt of the arrow and the arrow’s head, simply draw glue along the L-shaped corner where your foamcore comes together. Place the appropriate piece of foamcore, and then secure it in place on the two sides the glue were applied.

How-to: Giant LED Arrow Sign - Hands Occupied

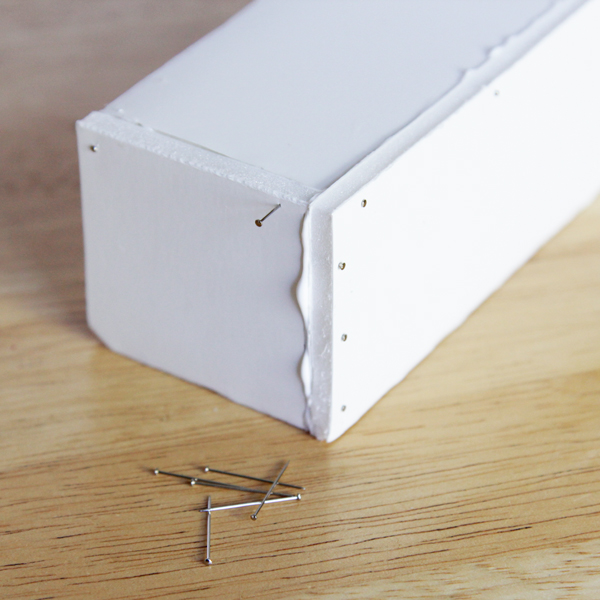
Since my arrow is so long, I had a couple places where the backing of the arrow and the sides needed to be glued and tacked together. The trick there is to run glue along the appropriate edges, place the foamcore, and then tack the pieces together with two pins, forming an X inside the foam core. Let all glue dry completely before the next phase.

How-to: Giant LED Arrow Sign - Hands Occupied

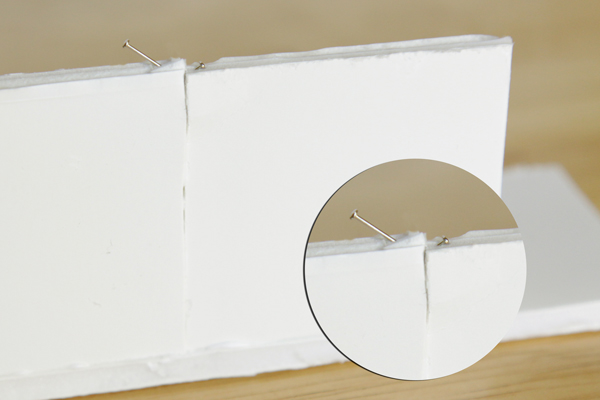
The pin pictured sticking out was later pushed in.

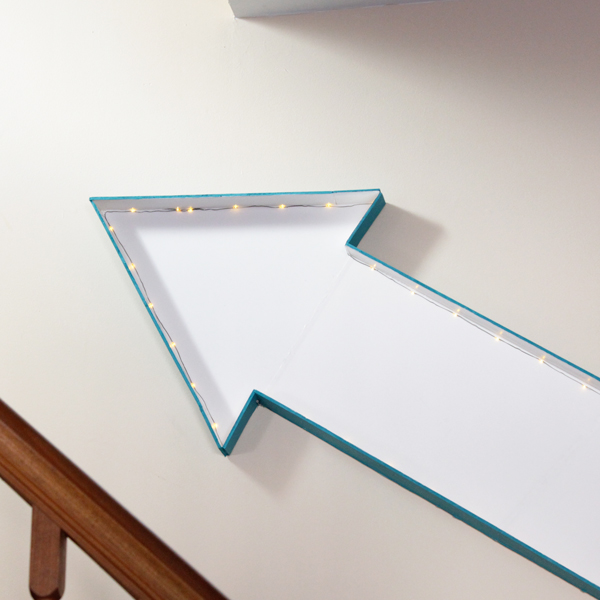
Painting & adding the lights

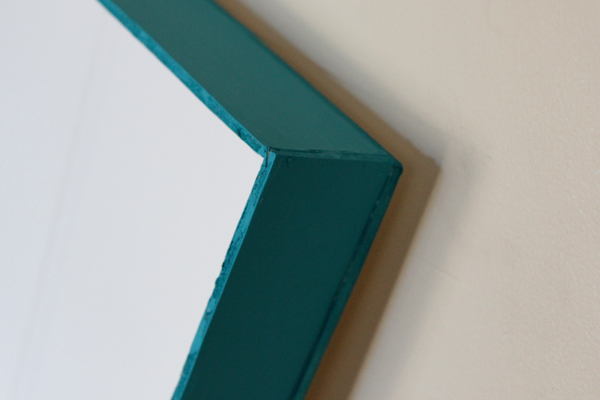
Paint all along the outside and top edge of the arrow, leaving the backing and inside edges white to reflect as much light as possible.

How-to: Giant LED Arrow Sign - Hands Occupied

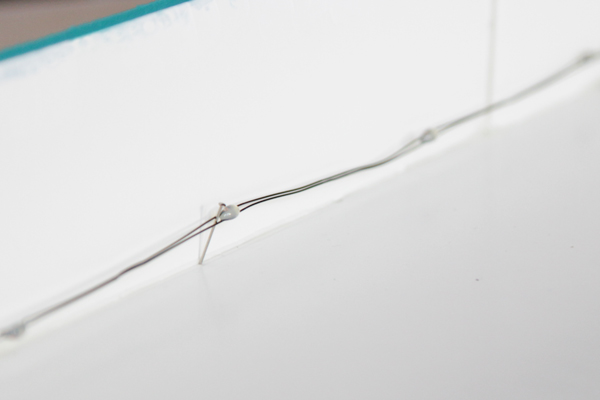
Poke a hole in the bottom corner of your arrow with a straight pin and use a nail or toothpick to enlarge the hole.

How-to: Giant LED Arrow Sign - Hands Occupied

Unwind your LEDs and feed them through the hole.

How-to: Giant LED Arrow Sign - Hands Occupied

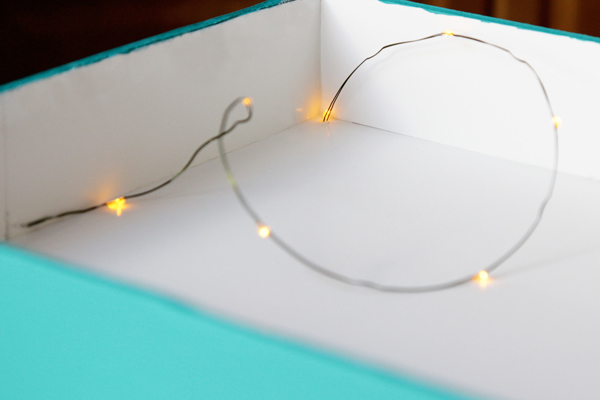
My arrow required two strands of the LEDs I purchased, so I fed both strands through the one hole.

How-to: Giant LED Arrow Sign - Hands Occupied

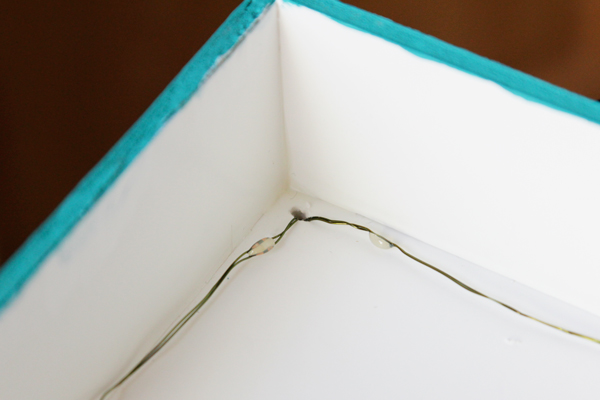
My LEDs came on a string of two fine wires, which made placing the lights simple. All I did was pin them into place with the same straight pins I assembled the arrow with. The sharp end of the pins stuck out the back, so I carefully bent down the pointy ends on the back side of my sign, making them flush with the back of the arrow.

How-to: Giant LED Arrow Sign - Hands Occupied

That’s it! All you have to do is hang your arrow on the wall. My LEDs are powered by AA batteries. The battery packs came with a slot for wall-mounting, so I have the battery packs mounted right next to my arrow for when I want to turn my sign on. How-to: Giant LED Arrow Sign - Hands Occupied

See the sign in action:

Look familiar? I originally designed this tutorial for BuzzFeed DIY. 

Filed Under: Home Decor, How-to Tagged With: battery, blinking sign, crafts, diy, energy efficient, home decor, LED, vintage, vintage arrow sign, vintage diy, vintage inspired

About Heidi

Heidi Gustad is a craft book author, designer & creator specializing in yarn crafts like knitting, crochet, latch hook & macramé. Her first book, Latch Hook: 12 Projects for the Modern Maker, is out now.

Previous Post: « Dia de los Muertos Inspiration
Next Post: Weekly Reader »

Reader Interactions

DID YOU LIKE THIS POST?
Visit similar articles...

  • How-to: Vintage-Inspired EarringsHow-to: Vintage-Inspired Earrings
  • DIY Light-Up Cuff BraceletDIY Light-Up Cuff Bracelet
  • Giant Valentine’s Day God’s EyeGiant Valentine’s Day God’s Eye
  • 6 Beautiful Vintage Holiday Decorations6 Beautiful Vintage Holiday Decorations

DON’T MISS ANOTHER UPDATE

Comments

  1. Adventures in Dressmaking

    October 31, 2013 at 11:18 pm

    This is such a cool idea, I’ve totally wanted to do this kind of thing for a while! This sounds easy! I’d love to do an ampersand, though, a little harder!!!

    Reply
  2. Chad

    November 1, 2013 at 2:41 pm

    This is a great idea. I should make one for my store.

    Reply
    • Heidi

      November 1, 2013 at 6:27 pm

      Thanks, Chad!

      Reply
  3. Dom

    November 5, 2013 at 12:37 am

    Heidi this is freakin awesome!!! great job! :)

    Dom.

    Reply
    • Heidi

      November 5, 2013 at 3:40 pm

      Thank you, Dom!

      Reply
  4. Ryan M

    November 7, 2013 at 10:24 am

    Where did you get the LEDs? This is absolutely going to be a Christmas gift this year.

    Reply
    • Heidi

      November 7, 2013 at 9:58 pm

      I got mine at Menards, but I found similar items when I searched Lowes, Home Depot, etc. :)

      Reply
  5. Sara Rivka Dahan

    November 7, 2013 at 11:10 am

    Fantastic project Heidi! Thanks so much for sharing on Craft Schooling sunday!

    Reply
    • Heidi

      November 7, 2013 at 9:59 pm

      Thanks again for hosting, Sara! :)

      Reply

Trackbacks

  1. DIY Giant LED Arrow Sign | DIY Weddings | CraftGossip.com says:
    November 4, 2013 at 1:08 pm

    […] This giant, blinking LED arrow is perfect to point the way to your wedding ceremony or reception venue! This would be especially fun for an evening event. After the big day, take it home and incorporate it into your quirky home decor. See the complete tutorial and a short video of the sign in action at Hands Occupied. […]

    Reply

Leave a Reply Cancel reply

Your email address will not be published. Required fields are marked *

This site uses Akismet to reduce spam. Learn how your comment data is processed.

Primary Sidebar

Heidi Gustad from Hands Occupied / Craft Book Author and Knitting, Crochet, Latch Hook and Macrame Designer

Hi! I’m Heidi (she/her/hers), a craft book author & pattern designer specializing in knitting, crochet, latch hook & macrame. Really anything with yarn! ❤️  My work combines vintage and modern design elements, featuring bold colors and graphic motifs.

EMAIL NEWSLETTER

Never miss a tutorial with these short & sweet monthly updates.

Find Me on Social Media

  • Instagram
  • Pinterest
  • TikTok
  • YouTube
Latch Hook by Heidi GustadDiscover Unique Items

Footer

INSTAGRAM

handsoccupied

Helping yarn crafters untangle various techniques on the internet since 2010
🧶 Really into intarsia
Stay up-to-date 💌 & shop the latest patterns ⤵️

Heidi Gustad 🧶 knitting & yarn crafts
This audio was me last summer while secretly desig This audio was me last summer while secretly designing the Spiral Hill Sweater Vest pattern behind the scenes. 😆 I very often design with primary colors, so trying to explain suddenly working with black, white and grey was awkward/kinda funny. 🩶
.
In case you missed it, this is my design from the new book ‘Disney Tim Burton’s Nightmare Before Christmas: The Official Knitting Guide to Halloween Town and Christmas Town,’ available now from @insighteditions & @tanisknits. We’re doing a knit along starting very soon, and we’ll be knitting this pattern! I’ve got weekly video tutorials planned for this educationally-focused knit along. This KAL is especially for you if you’re eager to work on your intarsia. 🧶
.
Full KAL details, yarn quantities & pattern information are available on my bl0g, the 🔗 is where you’d think. 
.
Yarn: @brooklyntweed Imbue Worsted
.
#nightmarebeforechristmasknittingbook #handsoccupied #spiralhillsweatervest #knitting #halloweenknitting #knitalong #kal #knitting_inspiration #intarsia #intarsiaknitting #learntoknit
Wow! I am floored by the awesome response to the S Wow! I am floored by the awesome response to the Spiral Hill Sweater Vest. Thank you. 🙏🏻❤️ If you love this pattern & didn’t know already, we are going to be doing a knit along (KAL) from October 1-29 featuring this spooky sweater vest & lots of tutorials, especially for the intarsia part. 
.
Later today my newsletter will be coming out with additional Knit Along details, so if you’re not already signed up, now is a great time - the 🔗 is in my b1o. 
.
Pictured: My Spiral Hill Sweater Vest pattern from the new Nightmare Before Christmas knitting book by @tanisknits. Model is wearing size 1 with 2” of positive ease, knit in @brooklyntweed Imbue Worsted. Vest images via @insighteditions 
.
#spiralhillsweatervest #handsoccupied #nightmarebeforechristmasknittingbook
At long last! I can share the Spiral Hill Sweater At long last! I can share the Spiral Hill Sweater Vest, my contribution to the new book Disney Tim Burton’s Nightmare Before Christmas: The Official Knitting Guide to Halloween Town and Christmas Town, out now! 🎃💀 
.
I’m hosting a knit along (KAL) October 1-29 for anyone who’d like to knit this vest along with a group & learn a little about intarsia while we’re at it. I’ve got weekly tutorials planned to help you knit this worsted weight sweater vest, and there’s a prize package giveaway at the end for KAL participants too. Details are on my site - you know where to find the 🔗 I think. 😉
.
Book by @tanisknits 
Publisher @insighteditions 
Yarn @brooklyntweed Imbue 
Find it wherever fine books are sold. 
.
#handsoccupied #nightmarebeforechristmas #intarsia #sweatervest #knittingpattern #knittingbook #spiralhill #knitting_inspiration #knitting
Since there was some interest in stills of my WIPs Since there was some interest in stills of my WIPs closet after this weekend’s quick tutorial, here are few. ✂️ The tutorial is one post back in my feed as a video.
.
As you can see, I didn’t worry about the wire hangers all being perfectly uniform, but it doesn’t matter to me. Also, this closet holds a lot! Despite that, it is already at capacity. Since the hanging bags don’t appear to be recyclable, I want to reuse them as long as possible. Who knows, maybe this will be a way to limit my WIPs? 😅
.
P.s. In the third photo you can see how I use this system to store the original swatches, scraps, yarn ball bands, & notes from a design project all together. 
.
#handsoccupied #wips #craftstorage #yarnstorage #yarncrafts #knitting_inspiration #craftstudio #craftroom #craftcloset
How to convert a closet into WIPs storage with jus How to convert a closet into WIPs storage with just a few supplies ✂️
.
When I was a librarian, we would use these hanging bags to circulate books with audiobook CDs. They came to mind when I wanted to develop a filing cabinet-like system for my differently-sized WIPs. To fit in my studio closet, a standard bedroom closet, they just needed custom hangers. 🤙🏻 
.
HOW TO MAKE THE HANGERS
1. Carefully cut approx. a 9” (23 cm) length of flexible 3 mm aluminum wire.
2. Near the end of a large knitting needle or dowel, wrap the wire around it as you would a twist tie. 
3. Bend the other end into a hook shape, perpendicular to the circle shape you just created. 
4. Hang like a hanger in a closet, as shown. 
.
#handsoccupied #handmadelife #knitting_inspiration #craftcloset #craftroom #craftroomorganization #craftroomstorage #craftroomdecor #crocheter #latchhook #knittersofinstagram #wip #wips #hangingstorage
Load More... Follow on Instagram

Copyright © 2023 / Foodie Pro Theme On Genesis Framework / Branding by Ink + Mortar
All Site & Shop Policies / Privacy Policy / Cookie Policy