• 0 items$0.00
  • Skip to primary navigation
  • Skip to main content
  • Skip to primary sidebar
  • Skip to footer

Hands Occupied

Colorful knitting, crochet, latch hook and macrame from craft book author & designer Heidi Gustad.

  • BLOG
    • Knitting
    • Crochet
    • Latch Hook
    • Macramé
    • Punch Needle
  • ABOUT
  • Shop
  • Nav Social Menu

    • Instagram
    • Pinterest
    • RSS
    • TikTok
    • YouTube

How-to: Chocolate Peppermint Blossoms

December 2, 2013 1 Comment

How-to: Chocolate Peppermint Blossoms | Hands Occupied

Most people I know are familiar with the delicious cookie known as peanut butter blossoms. When I found out I’d be working with Hershey’s to let folks know about their new Peppermint Bark Bells I immediately wanted to see if they could be used to make a chocolate mint take on the beloved peanut butter blossoms. They totally can! I’m more of a mint gal than a peanut butter one, especially around the holidays, so I’m excited about chomping more than a few of these this year. ;)

Chocolate Peppermint Blossoms Recipe

Ingredients

2 packages Hershey’s Peppermint Bark Bells (only available at Target)
1.5 cups all-purpose flour
1/2 cup Hershey’s cocoa
1/2 tsp baking soda
1/4 tsp salt
1/2 cup (1 stick) butter, softened
1/2 cup granulated sugar, plus some extra
3/4 cup light brown sugar, packed
1 tsp vanilla extract
2 eggs
1 cup Hershey’s  Kisses Mini Kisses, chopped

Directions

Heat oven to 350 F. Unwrap all of your Peppermint Bark Bells and put them in the freezer about 30 minutes before baking your cookies.

In a medium mixing bowl, stir together flour, cocoa, baking soda and salt. Beat butter, brown sugar, granulated sugar and vanilla extract in a large mixing bowl. Add eggs to butter mixture, and beat well. Gradually add the flour mixture, blending well. Stir in the chopped Mini Kisses.

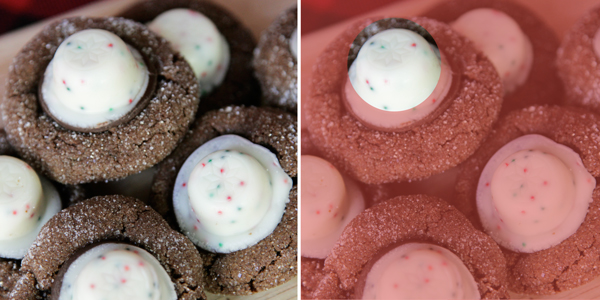
Shape dough into 1 inch balls, roll in granulated sugar and place on a greased cookie sheet. Bake 7 to 9 minutes or until lightly browned. Remove from oven and place the cookies on a wire cooling rack. Then, press a cooled Peppermint Bark Bell into the center of each cookie. The cookie will crack around the edges. Let cool completely until the candies, which will have melted a bit at the bottom, have re-hardened.

Makes about 3.5 dozen cookies.

–

The big difference between using the full size Hershey’s Kisses in the peanut butter blossoms and using the Bells with these is that the Bells have a lower melting point than the Kisses. That’s why they should be put in the freezer for a while before they’re pushed into the warm cookies. I really recommend moving the cookies from the cookie sheet to the cooling rack and only then pressing the Bells into the cookies. Then just leave ’em be until they candies have again solidified. This technique is what produced the most pleasing aesthetic result for me, but of course, cookie are about way more than being pretty!

The recipe for the chocolate cookie base of these blossoms, ironically enough, is an adaptation of a “Holiday Double Chocolate Cookies” recipe cut from the package of Hershey’s candies in the 80s or 90s. I found it taped to the pages of my mom’s recipe book on a recent visit home. What a coincidence, right?

How-to: Chocolate Peppermint Blossoms | Hands Occupied

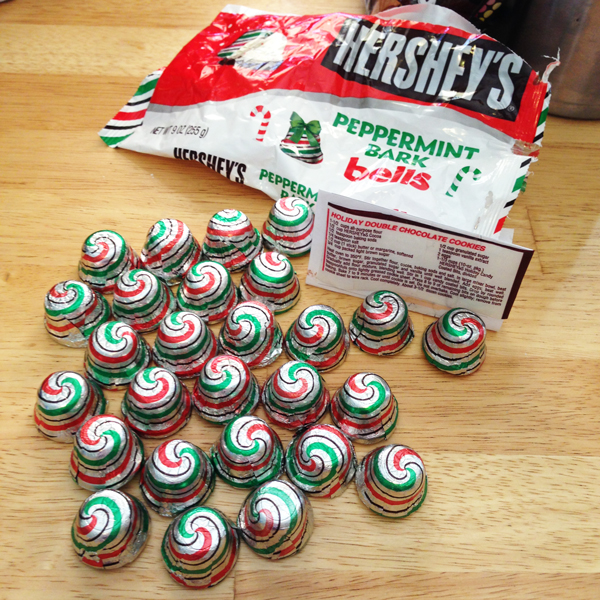
Once of my favorite things about these candies that this recipe does a great job of showing off, is the poinsettia shape stamped into the top of each candy. While you’ll need to unwrap one bell per candy (just like for peanut butter blossoms), you get the payoff of having a cute holiday shape on top of each cookie.

How-to: Chocolate Peppermint Blossoms | Hands Occupied

The candy used in this post was provided by Hershey’s.

Filed Under: Baking, Christmas, Giveaways, Reviews & Sponsored, How-to, Recipes Tagged With: baking, chocolate peppermint blossoms, christmas recipe, cookie recipe, cookies, delicious recipe, holiday recipe, peanut butter blossoms, recipe

About Heidi

Heidi Gustad is a craft book author, designer & creator specializing in yarn crafts like knitting, crochet, latch hook & macramé. Her first book, Latch Hook: 12 Projects for the Modern Maker, is out now.

Previous Post: « Weekly Reader
Next Post: How to Survive a Long Road Trip »

Reader Interactions

DID YOU LIKE THIS POST?
Visit similar articles...

  • Sugar Cookies & ButterfrostingSugar Cookies & Butterfrosting
  • International Talk Like a Pirate Day // Project InspirationInternational Talk Like a Pirate Day // Project Inspiration
  • Weekly ReaderWeekly Reader
  • 50 Great DIY Gift Ideas50 Great DIY Gift Ideas

DON’T MISS ANOTHER UPDATE

Comments

  1. Rachel | 52 Weeks Project

    December 2, 2013 at 6:08 pm

    Be my neighbor, these look awesome!

    Reply

Leave a Reply Cancel reply

Your email address will not be published. Required fields are marked *

This site uses Akismet to reduce spam. Learn how your comment data is processed.

Primary Sidebar

Heidi Gustad from Hands Occupied / Craft Book Author and Knitting, Crochet, Latch Hook and Macrame Designer

Hi! I’m Heidi (she/her/hers), a craft book author & pattern designer specializing in knitting, crochet, latch hook & macrame. Really anything with yarn! ❤️  My work combines vintage and modern design elements, featuring bold colors and graphic motifs.

EMAIL NEWSLETTER

Never miss a tutorial with these short & sweet monthly updates.

Find Me on Social Media

  • Instagram
  • Pinterest
  • TikTok
  • YouTube
Latch Hook by Heidi GustadDiscover Unique Items

Footer

INSTAGRAM

handsoccupied

Helping yarn crafters untangle various techniques on the internet since 2010
🧶 Really into intarsia
Stay up-to-date 💌 & shop the latest patterns ⤵️

Heidi Gustad 🧶 knitting & yarn crafts
This audio was me last summer while secretly desig This audio was me last summer while secretly designing the Spiral Hill Sweater Vest pattern behind the scenes. 😆 I very often design with primary colors, so trying to explain suddenly working with black, white and grey was awkward/kinda funny. 🩶
.
In case you missed it, this is my design from the new book ‘Disney Tim Burton’s Nightmare Before Christmas: The Official Knitting Guide to Halloween Town and Christmas Town,’ available now from @insighteditions & @tanisknits. We’re doing a knit along starting very soon, and we’ll be knitting this pattern! I’ve got weekly video tutorials planned for this educationally-focused knit along. This KAL is especially for you if you’re eager to work on your intarsia. 🧶
.
Full KAL details, yarn quantities & pattern information are available on my bl0g, the 🔗 is where you’d think. 
.
Yarn: @brooklyntweed Imbue Worsted
.
#nightmarebeforechristmasknittingbook #handsoccupied #spiralhillsweatervest #knitting #halloweenknitting #knitalong #kal #knitting_inspiration #intarsia #intarsiaknitting #learntoknit
Wow! I am floored by the awesome response to the S Wow! I am floored by the awesome response to the Spiral Hill Sweater Vest. Thank you. 🙏🏻❤️ If you love this pattern & didn’t know already, we are going to be doing a knit along (KAL) from October 1-29 featuring this spooky sweater vest & lots of tutorials, especially for the intarsia part. 
.
Later today my newsletter will be coming out with additional Knit Along details, so if you’re not already signed up, now is a great time - the 🔗 is in my b1o. 
.
Pictured: My Spiral Hill Sweater Vest pattern from the new Nightmare Before Christmas knitting book by @tanisknits. Model is wearing size 1 with 2” of positive ease, knit in @brooklyntweed Imbue Worsted. Vest images via @insighteditions 
.
#spiralhillsweatervest #handsoccupied #nightmarebeforechristmasknittingbook
At long last! I can share the Spiral Hill Sweater At long last! I can share the Spiral Hill Sweater Vest, my contribution to the new book Disney Tim Burton’s Nightmare Before Christmas: The Official Knitting Guide to Halloween Town and Christmas Town, out now! 🎃💀 
.
I’m hosting a knit along (KAL) October 1-29 for anyone who’d like to knit this vest along with a group & learn a little about intarsia while we’re at it. I’ve got weekly tutorials planned to help you knit this worsted weight sweater vest, and there’s a prize package giveaway at the end for KAL participants too. Details are on my site - you know where to find the 🔗 I think. 😉
.
Book by @tanisknits 
Publisher @insighteditions 
Yarn @brooklyntweed Imbue 
Find it wherever fine books are sold. 
.
#handsoccupied #nightmarebeforechristmas #intarsia #sweatervest #knittingpattern #knittingbook #spiralhill #knitting_inspiration #knitting
Since there was some interest in stills of my WIPs Since there was some interest in stills of my WIPs closet after this weekend’s quick tutorial, here are few. ✂️ The tutorial is one post back in my feed as a video.
.
As you can see, I didn’t worry about the wire hangers all being perfectly uniform, but it doesn’t matter to me. Also, this closet holds a lot! Despite that, it is already at capacity. Since the hanging bags don’t appear to be recyclable, I want to reuse them as long as possible. Who knows, maybe this will be a way to limit my WIPs? 😅
.
P.s. In the third photo you can see how I use this system to store the original swatches, scraps, yarn ball bands, & notes from a design project all together. 
.
#handsoccupied #wips #craftstorage #yarnstorage #yarncrafts #knitting_inspiration #craftstudio #craftroom #craftcloset
How to convert a closet into WIPs storage with jus How to convert a closet into WIPs storage with just a few supplies ✂️
.
When I was a librarian, we would use these hanging bags to circulate books with audiobook CDs. They came to mind when I wanted to develop a filing cabinet-like system for my differently-sized WIPs. To fit in my studio closet, a standard bedroom closet, they just needed custom hangers. 🤙🏻 
.
HOW TO MAKE THE HANGERS
1. Carefully cut approx. a 9” (23 cm) length of flexible 3 mm aluminum wire.
2. Near the end of a large knitting needle or dowel, wrap the wire around it as you would a twist tie. 
3. Bend the other end into a hook shape, perpendicular to the circle shape you just created. 
4. Hang like a hanger in a closet, as shown. 
.
#handsoccupied #handmadelife #knitting_inspiration #craftcloset #craftroom #craftroomorganization #craftroomstorage #craftroomdecor #crocheter #latchhook #knittersofinstagram #wip #wips #hangingstorage
Load More... Follow on Instagram

Copyright © 2023 / Foodie Pro Theme On Genesis Framework / Branding by Ink + Mortar
All Site & Shop Policies / Privacy Policy / Cookie Policy