• 0 items$0.00
  • Skip to primary navigation
  • Skip to main content
  • Skip to primary sidebar
  • Skip to footer

Hands Occupied

Colorful knitting, crochet, latch hook and macrame from craft book author & designer Heidi Gustad.

  • BLOG
    • Knitting
    • Crochet
    • Latch Hook
    • Macramé
    • Punch Needle
  • ABOUT
  • Shop
  • Nav Social Menu

    • Instagram
    • Pinterest
    • RSS
    • YouTube

How-to: DIY Popcorn Bar

February 25, 2013 2 Comments

How-to: DIY Popcorn Bar | HandsOccupied.com

Two years ago next week, I married my fantastic husband. Planning my wedding was the process that led me to launching this site and feeling like my creations were good enough to share with the world. I mean, I also got married to a truly incredible person as a result, so there’s that too!

The biggest thing I learned from my own David Tutera Bridal Collection, I told myself I wanted it to be fun. A DIY snack bar is an easy project for brides-to-be at any skill level to infuse their celebrations with a little bit of handmade flair. And btw, you can totally make a popcorn bar like this for any party, not just a wedding.

Supplies

David Tutera Swirl Print Vellum Wrap Shades (they come in 12-packs)
scissors
clear packing tape
large sheets of tissue paper
Photo & Craft Storage Boxes (as many as you need for a nice display)
David Tutera Candy Scoop Set
popcorn in desired flavors
extra large bowls for popcorn refills (optional)
cardstock
pen or a thin marker

Directions

The item that immediately caught my attention in the Tutera collection was his vellum lampshades designed to be placed on a wine glass with a tea light inside, creating small lamps. Instead of using these as lampshades, I thought it would be cool to flip them over for use as serving cones for a popcorn bar. You can buy ready-made paper cones, but they’re not necessarily aesthetically appropriate for a wedding or fancier shindig.

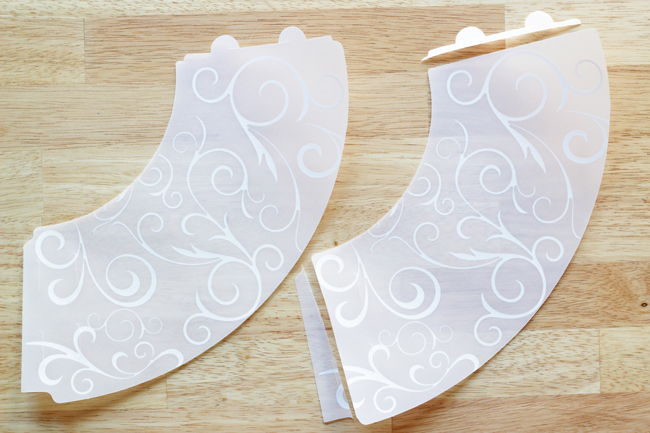
Begin by cutting the ends of each vellum shade as shown. You’re cutting off the notches that would have slid together to form the shade in order to make it easily slide into a cone shape.

How-to: DIY Popcorn Bar | HandsOccupied.com

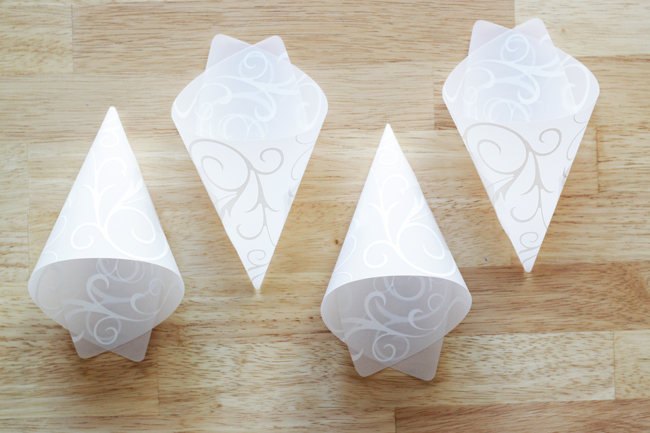
Wrap each shade into a cone. Take a look at the animation below to see the best way to tighten up the tip of the cone so it comes to a nice point. Secure with a small strip of packing tape.

How-to: DIY Popcorn Bar | HandsOccupied.com

Make note of how much overlap there is on each of your shades. Try to make each cone approximately the same so they have a uniform look in addition to holding the same amount of food.

How-to: DIY Popcorn Bar | HandsOccupied.com

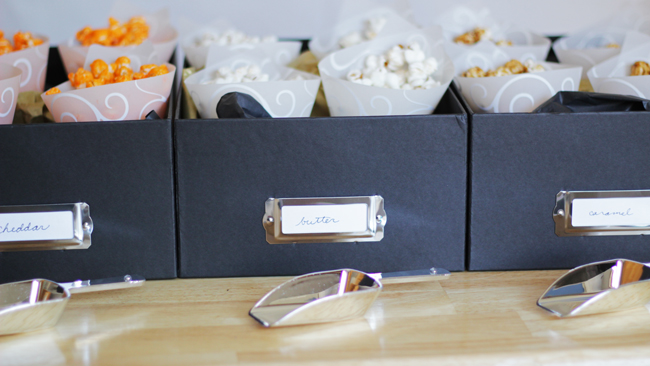
Create a label for each of your storage boxes by cutting some cardstock to a size that will fit in each box’s label space. Label each box to indicate what popcorn flavors are in each box and slide the labels into place. These boxes are designed so the labels won’t slide out.

How-to: DIY Popcorn Bar | HandsOccupied.com

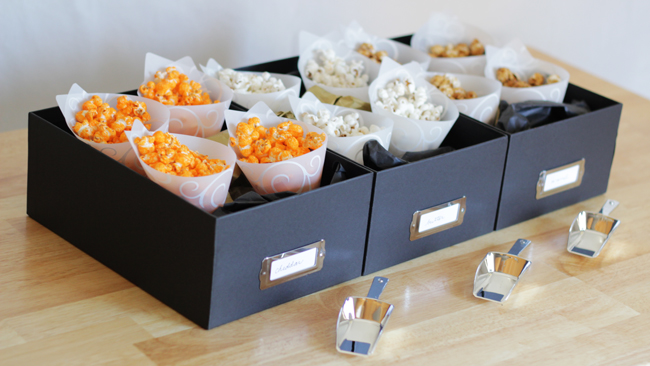
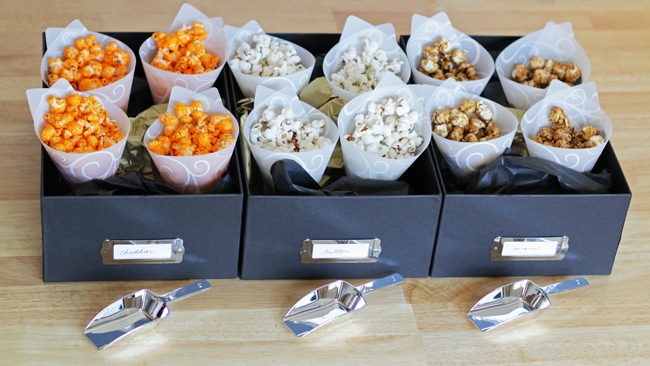
Next, place three large, rumpled pieces of tissue paper in each storage box and arrange your cones in between each piece of tissue paper. If your cones are tippy, add more rumpled tissue paper to the boxes for extra support. When you know your cones won’t tip over, fill each with popcorn and arrange them in each box to serve.

How-to: DIY Popcorn Bar | HandsOccupied.com

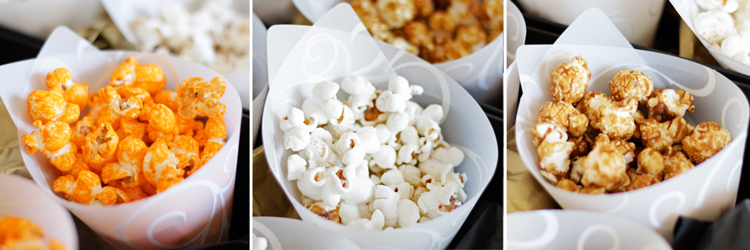
Keep some of the candy scoops next to each popcorn flavor and, if you want an option for refills at your popcorn bar, incorporate large bowls of extra popcorn with your bar so guests may get more snacks or mix and match flavors as they wish. Being a Chicago gal, I’m kinda partial to mixing cheddar and caramel popcorn, a.k.a. Chicago Mix popcorn, for a savory and sweet treat.

How-to: DIY Popcorn Bar | HandsOccupied.com

Want to learn more about David Tutera’s wedding product line? Follow him or Darice Crafts, the company behind his line, on social media:

Become a fan of Darice on Facebook
@Darice_Crafts on Twitter
David Tutera DIY Wedding on Pinterest
Follow @DavidTutera on Twitter

I wrote this post as part of a sponsored campaign with Darice and The Blueprint Social. The opinions in this post are my own.

Filed Under: DIY Wedding, Giveaways, Reviews & Sponsored, How-to, Parties Tagged With: bridal, butter, caramel, cheese, david tutera, diy, diy wedding, How-to, my fair wedding, parties, party, popcorn bar, snacks

About Heidi

Heidi Gustad is a craft book author & content creator in love with primary colors & vintage vibes. She specializes in knitting, crochet, latch hook and macramé, and her first book, Latch Hook: 12 Projects for the Modern Maker, is out now!

Previous Post: « Blue Buddha Boutique Giveaway!
Next Post: Blue Buddha Boutique Jewelry Kit Winner! »

Reader Interactions

DID YOU LIKE THIS POST?
Visit similar articles...

  • Attention, DIY Brides & Handmade Hostesses!Attention, DIY Brides & Handmade Hostesses!
  • How-to: Make a Perfect Paper PinwheelHow-to: Make a Perfect Paper Pinwheel
  • How-to: Bronze Laurel HeadbandHow-to: Bronze Laurel Headband
  • Top 10 DIYs of 2013Top 10 DIYs of 2013

DON’T MISS ANOTHER UPDATE

Trackbacks

  1. 10 Easy Crafts For Outdoor Summer Parties - Interior Decorating, Home Design, Room Ideas says:
    July 18, 2013 at 11:36 am

    […] A popcorn bar is something everyone would enjoy. To make it you need scissors, packing tape, sheets of tissue paper, storage boxes, cardstock and a pen. You can make the serving cones out of vellum lampshades. You can also use paper. Make labels for each one and place tissue paper in the boxes. Then arrange them all inside.{found on handsoccupied}. […]

    Reply
  2. Over 100 DIY Wedding Ideas - The Ultimate List - * THE COUNTRY CHIC COTTAGE (DIY, Home Decor, Crafts, Farmhouse) says:
    January 15, 2015 at 9:20 am

    […] Napkin Rings   Crocheted Hearts on Napkins    Handstamped Clay Napkin Rings   DIY Popcorn Bar   DIY Candy Buffet Table     Tutorials for Making Card Boxes   Vintage Train […]

    Reply

Leave a Reply Cancel reply

Your email address will not be published. Required fields are marked *

This site uses Akismet to reduce spam. Learn how your comment data is processed.

Primary Sidebar

Heidi Gustad from Hands Occupied / Craft Book Author and Knitting, Crochet, Latch Hook and Macrame Designer

Hi! I’m Heidi (she/her/hers), a craft book author & pattern designer specializing in knitting, crochet, latch hook & macrame. Really anything with yarn! ❤️  My work combines vintage and modern design elements, featuring bold colors and graphic motifs.

UPDATES BY EMAIL

Monthly highlights sent to your inbox.

Find Me Elsewhere, If You’re There

  • Instagram
  • Pinterest
  • YouTube
Latch Hook by Heidi GustadDiscover Unique Items

Footer

INSTAGRAM

handsoccupied

Craft book author & pattern designer ❤️💛💙
knitting, crochet, latch hook & macramé
.
Please email for pattern support. 🧶

Heidi Gustad 🧶✂️
How to to knit throwing (a.k.a. English) style . How to to knit throwing (a.k.a. English) style 
.
In knitting, there are a few common knitting styles. Most often you’re going to encounter continental style and English (throwing) style on your knitting journey. I recently had an old video teaching continental style get a lot of views. Based on the comments, it was clear the people wanted to also see a throwing tutorial, so here you go! 🧶
.
Please note that there is a LOT of variation in knitting styles, and one isn’t necessarily better than another. Most often, I’ve found it comes down to two things: how you were taught and whether or not you’re really into colorwork knitting (which can involve a mix of styles). 
.
Longer-term knitters who’ve made it this far: do you prefer one over the other? And why? 
.
#handsoccupied #englishknitting #learntoknit #knitting #howtoknit #knittersofinstagram #knitting_inspiration
How to do a one-step provisional knitting cast on How to do a one-step provisional knitting cast on / a.k.a. crochet provisional cast on, scrap yarn cast on
.
I read recently that tiktok and Instagram are being used as search engines more and more. 🤔 I thought since I’m going to all the work of making tutorials on YouTube, I should experiment with making a quick version of them for other platforms. There are obvious teaching limitations to vertical video, short-form content like this, but I think I covered the gist of this cast on in a minute. The YouTube version also covers how to unzip this cast on because there was time for it 👍🏻 L1nk is in my profile. 
.
I’m very much looking for feedback as I continue to make instructional knitting & craft videos. Sometimes good tutorials are hard to find, and (ideally polite) feedback helps me improve. 
.

#handsoccupied #provisionalcaston #knitting #knititngtutorial #knittersofinstagram #crochethook #knittingtutorial
For the first time in a long time, there’s a new For the first time in a long time, there’s a new tutorial from Hands Occupied! 🎉 The video is live on YouTube & the blog. 
.
The post covers what provisional cast ons are & how they differ, and the video covers how to work a one-step provisional cast on using scrap yarn and a crochet hook. (This is a great one to save for future reference.)
.
I learned several names for this method while researching this video & post. Crochet provisional cast on, one-step cast on, scrap yarn cast on - if you know even more names for this technique, please share! 
.
#handsoccupied #provisionalcaston #knitting #scrapyarn #crochethook
Working on a sample for some upcoming videos. It’s an overcast day with intermittent sunshine & I have a scruffy little sidecar. 🐶 Can’t complain! 
.
What’s on your needles this week? 
.
Yarn: @debbieblissknits Cashmerino Aran 
.
#handsoccupied #knitting #knittinglife
Peg boards and craft room organization go together Peg boards and craft room organization go together like peanut butter and jelly. So, as you can see, do latch hook tools and screwdriver organizers! 🪛 
.
I think this trick translates to any tool with a thick handle, so leather working tools, punch needles, print making tools, etc. should work! What other tools am I, a needlecrafter, blanking on right now? 
.
#craftorganization #handsoccupied #latchhook #latchhooking
Load More... Follow on Instagram

Copyright © 2023 / Foodie Pro Theme On Genesis Framework / Branding by Ink + Mortar
All Site & Shop Policies / Privacy Policy / Cookie Policy