• 0 items$0.00
  • Skip to primary navigation
  • Skip to main content
  • Skip to primary sidebar
  • Skip to footer

Hands Occupied

Colorful knitting, crochet, latch hook and macrame from craft book author & designer Heidi Gustad.

  • BLOG
    • Knitting
    • Crochet
    • Latch Hook
    • Macramé
    • Punch Needle
  • ABOUT
  • Shop
  • Nav Social Menu

    • Instagram
    • Pinterest
    • RSS
    • TikTok
    • YouTube

How-to: Make a Perfect Paper Pinwheel

December 18, 2012 2 Comments

How-to: Make the Perfect Pinwheel | HandsOccupied.com

Pinwheels are a great way to add some vintagey flair to a Christmas present, birthday party or wedding decor, and they’re actually really easy to make. In today’s post, I want to share how I get mine folded just right every time.

Supplies

12″ scrapbooking paper/cardstock

paper scoring tool or a ruler and pencil

heavy duty packing tape

double sided tape

scissors

paper cutter (optional)

Directions

To achieve the perfect pinwheel, I always use my paper scoring tool (it was only $12 at JoAnn’s) and a paper cutter. If you’re really careful, you can use a pencil, ruler, and scissors in place of these tools. It will take longer, but it’s an alternative to buying specialized devices. All of the instructions in this tutorial will refer to the scoring tool, just bear that in mind. 

How-to: Make the Perfect Pinwheel | HandsOccupied.com

Cut your paper exactly in half by scoring it at the 6 inch point and cutting it with a scissors or paper cutter.

How-to: Make the Perfect Pinwheel | HandsOccupied.com

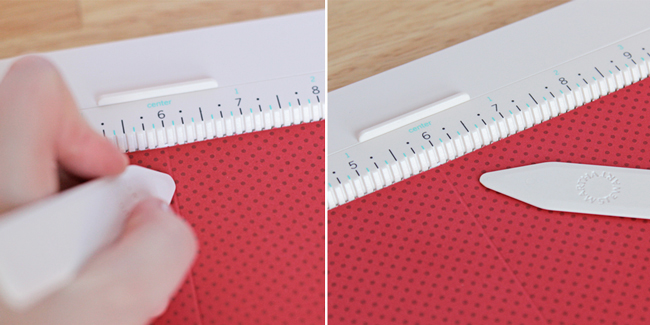
^^It was really hard to make the scoring lines visible in the pictures. Sorry about how saturated they are!^^

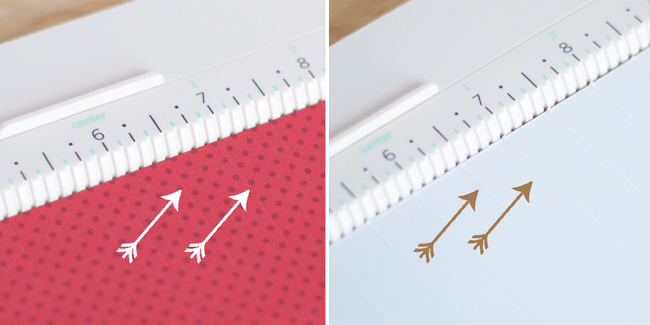
Then, cut one of those halves in half again at the 3 inch mark.

How-to: Make the Perfect Pinwheel | HandsOccupied.com

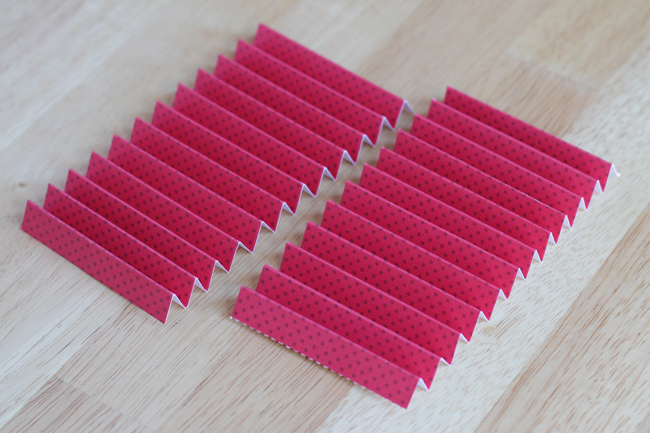
Then, score all all the way down the long (12 inch) side of each 3 inch wide piece of paper. Make a mark every half an inch.

How-to: Make the Perfect Pinwheel | HandsOccupied.com

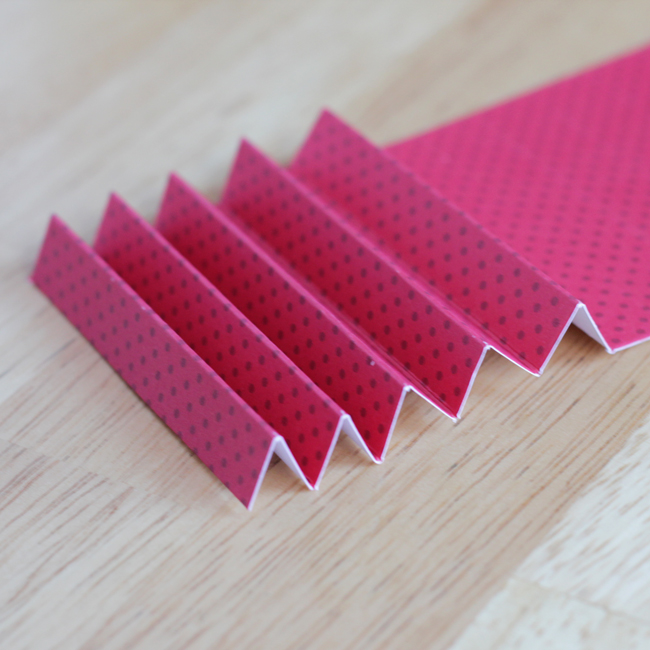
Fold both pieces of paper accordion style, beginning as shown, with the colorful side folded back to start.

How-to: Make the Perfect Pinwheel | HandsOccupied.com How-to: Make the Perfect Pinwheel | HandsOccupied.com

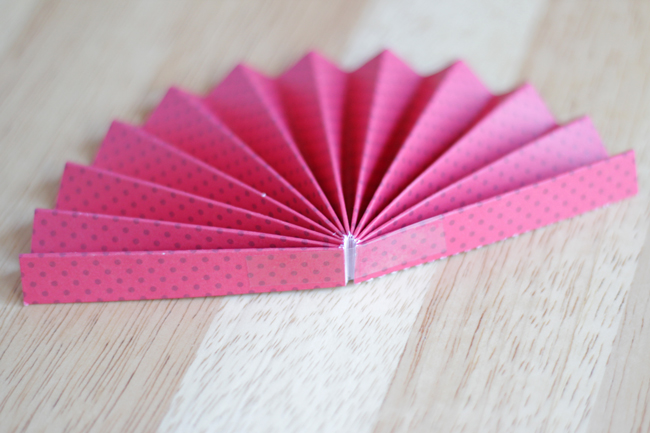
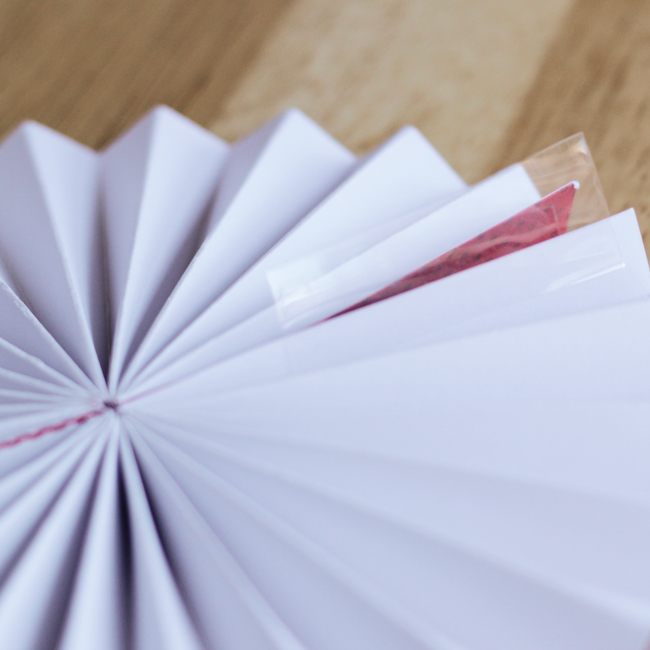
Cut four thin strips of packing tape and stick them someplace handy. Fold each accordioned piece of paper into a fan shape and secure with packing tape.

How-to: Make the Perfect Pinwheel | HandsOccupied.com

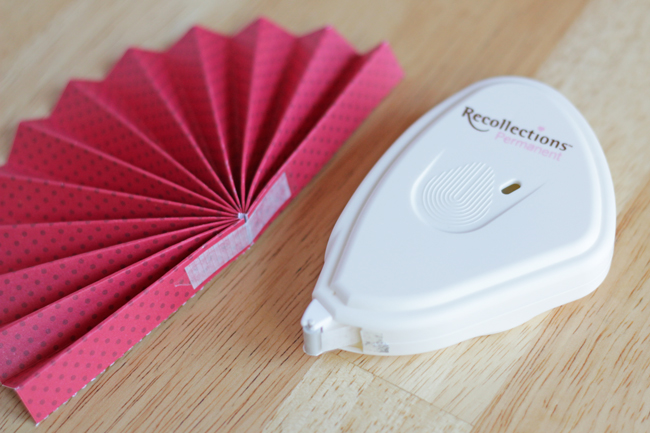
Then, use double sided tape (I prefer to use the double sided tape that comes on a roller) to stick the centers of each fan together. Flip the pinwheel over.

How-to: Make the Perfect Pinwheel | HandsOccupied.com

How-to: Make the Perfect Pinwheel | HandsOccupied.com

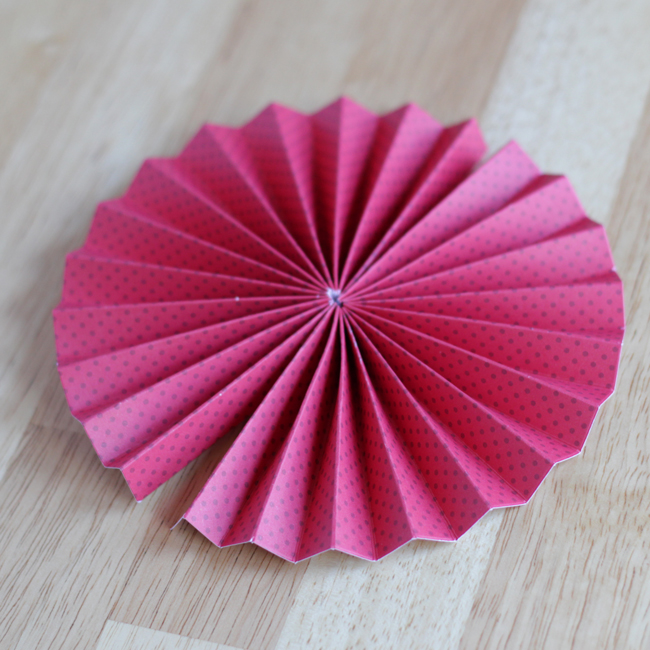
Place a thin piece of packing tape as shown below. Fold the tape over the gap between each fan piece and tape to secure the edges of each fan together. Repeat on the other seam of the pinwheel.

How-to: Make the Perfect Pinwheel | HandsOccupied.com

How-to: Make the Perfect Pinwheel | HandsOccupied.com

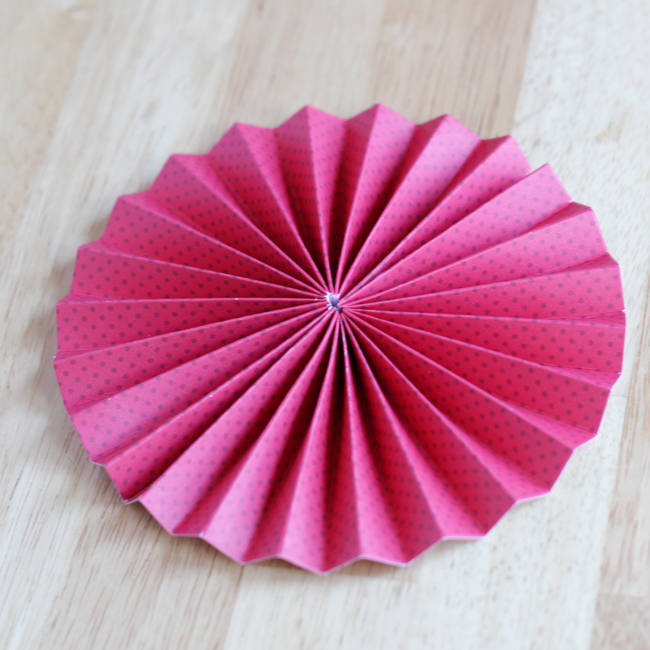
Ta da! Knowing how to make a good pinwheel comes in more handy than you’d think. Here are a few projects I’ve done using pinwheels:

How-to: Wedding Fascinator | HandsOccupied.com

ribbon pinwheel wedding fascinator

Peppermint Schnapps Swirl Cupcakes | HandsOccupied.com

peppermint pinwheel decorations for a party

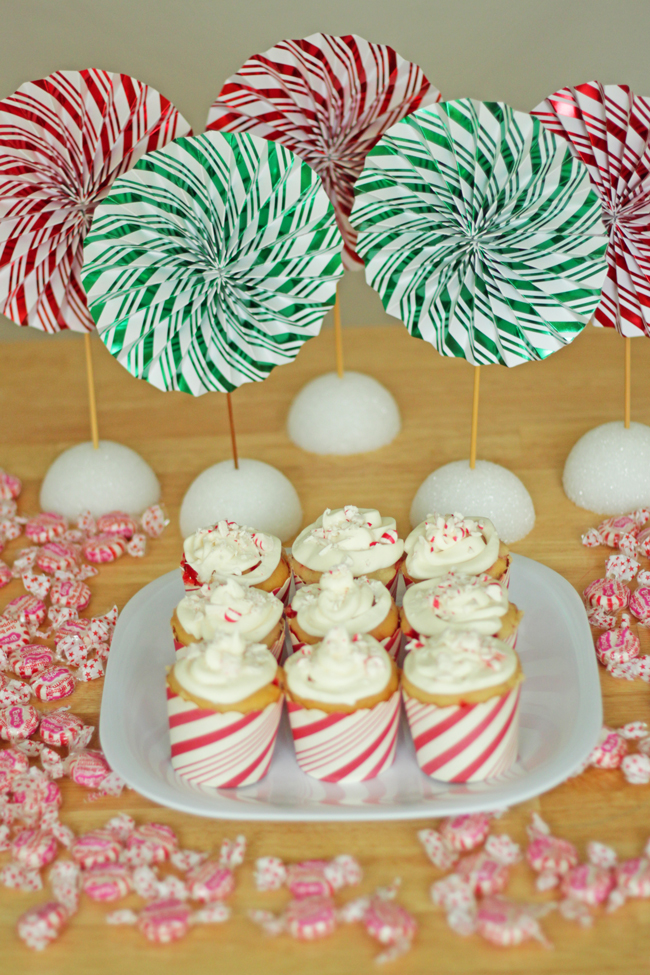
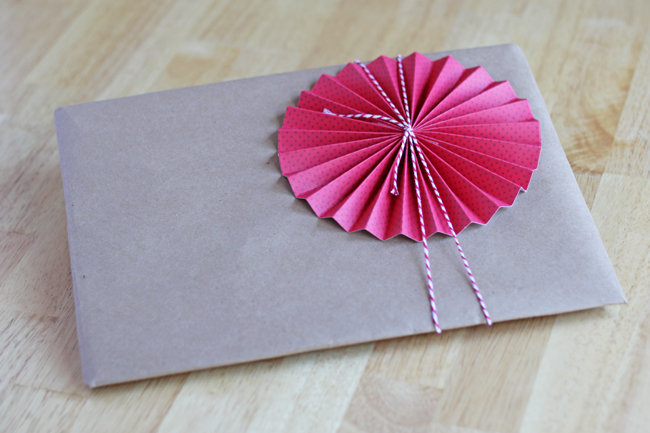
The picture at the top of this post shows how I wrapped a Christmas present using the pinwheel from the tutorial photos, adding just a bit of baker’s twine to secure the pinwheel accent!


Filed Under: DIY Wedding, How-to, Parties Tagged With: decor, diy, How-to, paper crafts, parties, pinwheel, wedding

About Heidi

Heidi Gustad is a craft book author, designer & creator specializing in yarn crafts like knitting, crochet, latch hook & macramé. Her first book, Latch Hook: 12 Projects for the Modern Maker, is out now.

Previous Post: « Gifts for the Foxy Lady
Next Post: Cookie Smackdown Giveaway – Vote for me! »

Reader Interactions

DID YOU LIKE THIS POST?
Visit similar articles...

  • Attention, DIY Brides & Handmade Hostesses!Attention, DIY Brides & Handmade Hostesses!
  • How-to: Bat Place CardsHow-to: Bat Place Cards
  • How-to: DIY Popcorn BarHow-to: DIY Popcorn Bar
  • How-to: Black & Gold Wedding Table NumbersHow-to: Black & Gold Wedding Table Numbers

DON’T MISS ANOTHER UPDATE

Comments

  1. jackie mabbott

    December 10, 2013 at 10:47 am

    absolutely lovely, and so well explained, thank you.

    Reply

Trackbacks

  1. Bone Folder v. Scoring Board | WhimseyboxWhimseybox says:
    January 10, 2014 at 11:00 am

    […] Paper Pinwheels via Hands Occupied […]

    Reply

Leave a Reply Cancel reply

Your email address will not be published. Required fields are marked *

This site uses Akismet to reduce spam. Learn how your comment data is processed.

Primary Sidebar

Heidi Gustad from Hands Occupied / Craft Book Author and Knitting, Crochet, Latch Hook and Macrame Designer

Hi! I’m Heidi (she/her/hers), a craft book author & pattern designer specializing in knitting, crochet, latch hook & macrame. Really anything with yarn! ❤️  My work combines vintage and modern design elements, featuring bold colors and graphic motifs.

EMAIL NEWSLETTER

Never miss a tutorial with these short & sweet monthly updates.

Find Me on Social Media

  • Instagram
  • Pinterest
  • TikTok
  • YouTube
Latch Hook by Heidi GustadDiscover Unique Items

Footer

INSTAGRAM

handsoccupied

Craft book author, designer & creator specializing in yarn crafts like knitting, crochet, latch hook & macramé
❤️ Email preferred

Heidi Gustad 🧶✂️
Nobody panic. This is just the back of an (admitte Nobody panic. This is just the back of an (admittedly insane) intarsia project. One day, this will be a seamed sweater, but today is not that day. 🧶 
.
Have a good weekend, everyone! 
.
Yarn: @universal_yarn’s Fibra Natura Cobblestone in Antarctica & Dragon’s Breath 
.
#handsoccupied #intarsia #intarsiaknitting #wip #knitting
Here’s how to work a Norwegian purl stitch for e Here’s how to work a Norwegian purl stitch for easier continental style knitting. With this purling method, the working yarn says tensioned (held) at the back of your knitting at all times. For many knitters, always holding the yarn at the back helps with tension issues, as well as feeling a little more comfortable. 
.
Have you ever encountered this style of purling before? If you’ve tried it, have you found it helps with your purl tension and knitting speed? I’m curious.
.
For a written tutorial, visit handsoccupied-dot-com. For video, you guessed it, You2be. Both of these platforms allow for longer, more in-depth versions of this tutorial, including full transcripts, alt text & the ability to pause, slow down or speed up at will. (Like if you really want to learn this, I recommend using a platform that doesn’t keep your hands occupied. Thinking of putting this in all my captions these days tbh - shout out to you if you made it this far. 🙌🏻😂)
.
#handsoccupied #learntoknit #continentalknitting #howtoknit #norwegianpurl #norwegianknitting #knit #knitting #knitter #knittersofinstagram #knittinghack  #handknitting #handknit #norwegianpurling
Have you ever tried this style of purl? . All thi Have you ever tried this style of purl? 
.
All this recent talk about throwing vs. continental style knitting made it clear many people struggle with purling in continental knitting. Turns out that Norway may have the answer! In Norwegian purling, the working yarn stays tensioned at the back at all times, helping with speed and tension. 🤯
. 
Head to the bl0g (🔗 in bi0) for a more in-depth look at how to work a Norwegian purl stitch, including a photo tutorial with animated GIF & a video tutorial. Wrapping your mind around how to work a stitch you’re familiar with in a totally new way can be confusing, so I tried to give a few options for clarity. 🤙🏻 Video is also on You2be. 
.
#handsoccupied #norwegianpurl #norwegianknitting #norwegianpurling #continentalknitting #howtoknit #learntoknit #knitterofinstagram #knitters
It’s been a hot second since I showed my face or It’s been a hot second since I showed my face or reintroduced myself, so here goes! I’m Heidi Gustad, a craft book author, pattern designer, and tutorial creator who specializes in yarn crafts. Lately, I’ve been focused on releasing quality knitting videos and related blog posts to help teach things like the difference between provisional cast ons and how to fix common knitting mistakes. Next week I’m shooting requested crochet and latch hook videos, so h👀kers, your time is coming! And if you ever have tutorial requests, please let me know. ☺️
. 
TLDR: I’m Heidi. I design & teach yarn crafts. You can find tutorials on my blog (est. 2010) & You2be. I also have several knitting & crochet patterns + a book about latch hook available. / All of these can be found on my website, the 🔗 is where you’d think. 
.
#handsoccupied #fridayintroduction #heidigustad #knitting #knitter #knittersofinstagram #yarncrafts #latchhookbook
Are you a picker or a thrower? Do you knit Contine Are you a picker or a thrower? Do you knit Continental or English Style? Here’s a quick overview of the differences between the two most common knitting styles, including a side by side comparison. (A good one to save for future reference. 👍🏻) 
.
There’s more on the differences between picking and throwing in my latest blog post & You 2ube video - the l1nk is where you’d think!
.
#handsoccupied #learntoknit #knittingstyles #howtoknit #knittersofinstagram #knitter
Load More... Follow on Instagram

Copyright © 2023 / Foodie Pro Theme On Genesis Framework / Branding by Ink + Mortar
All Site & Shop Policies / Privacy Policy / Cookie Policy