• 0 items$0.00
  • Skip to primary navigation
  • Skip to main content
  • Skip to primary sidebar
  • Skip to footer

Hands Occupied

Colorful knitting, crochet, latch hook and macrame from craft book author & designer Heidi Gustad.

  • BLOG
    • Knitting
    • Crochet
    • Latch Hook
    • Macramé
    • Punch Needle
  • ABOUT
  • Shop
  • Nav Social Menu

    • Instagram
    • Pinterest
    • RSS
    • TikTok
    • YouTube

How-to: Felt Horsie Finger Puppet

May 16, 2012 Leave a Comment

Planning my dear husband’s 30th birthday party (see this post & this post for context) has got me all preoccupied with all things rustic. In brainstorming ideas for his whiskey-themed party, I had an idea for a felt horse pencil topper and/or finger puppet. Here’s what I came up with!

Suppies

pencil
a sheet of horse-colored felt
thread
needle
really sharp scissors
freezer paper
iron
clipboard

Directions

Fold a sheet of freezer paper in half, waxed side in. Draw or trace a horse head shape onto one of the non-waxed sides of the freezer paper.

Using a clipboard, trace the design onto the other non-wax side of the freezer paper.

Loosely cut around the horse shapes. Iron the two shapes, waxed side down, to your felt. The horse head shapes should be mirror images.

Cut exactly along the horse head shape (right through the freezer paper and felt) using a really sharp scissors.

Next, cut a rectangle of felt approximately one centimeter wide and long enough to reach all the way around the horse head shape. Mine was about 8 inches long, which was too long. If it’s too long, you can trim the excess felt later like I did.

Thread your needle and tie a knot. Leaving the freezer paper on the horse head shape (to give the puppet some structure), begin sewing the rectangle to the horse head using a whip stitch.

As you work your way around the curves, try to keep the rectangle piece perpendicular to the horse head piece. This will lead to some temporary folds in the rectangle as shown below.

Once you’ve sewn around one side, trim any excess length from the rectangle.

Use a basting stitch to attach the second horse head shape (freezer paper and all) to the rectangle piece. This helps your horse head line up straight.

Whip stitch the horse head shape into place like you did on the other side. Then, remove the basting thread.

Using some of your felt scraps, cut out two evenly-sized diamond shapes. If you cut it out of freezer paper, remove the freezer paper before the next step.

Fold the diamond in half into a triangle and whip stitch it into place.

When you’re all the way around the long sides of the triangle, you can leave the sewing thread in place rather than knotting it and breaking it off. You’ll use it to attach it to the horse head.

I didn’t use any particular stitch to attach the ears, but you need to fold them in half as you sew them to get the right horse ear look in your puppet. This is what my first stitches looked like:

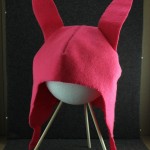
Check out my finished puppet. I plan on adding some batting to make it into a plushie pencil topper.

Filed Under: Embroidery, How-to Tagged With: diy, felt, finger puppet, horse, How-to, pencil topper

About Heidi

Heidi Gustad is a craft book author, designer & creator specializing in yarn crafts like knitting, crochet, latch hook & macramé. Her first book, Latch Hook: 12 Projects for the Modern Maker, is out now.

Previous Post: « How-to: Stencil with Freezer Paper
Next Post: How-to: Make a Custom Card Game // WHISKEY PIT! »

Reader Interactions

DID YOU LIKE THIS POST?
Visit similar articles...

  • How-to: Louise Hat from Bob’s BurgersHow-to: Louise Hat from Bob’s Burgers
  • Attention, DIY Brides & Handmade Hostesses!Attention, DIY Brides & Handmade Hostesses!
  • Top 10 DIYs of 2013Top 10 DIYs of 2013
  • Weekly ReaderWeekly Reader

DON’T MISS ANOTHER UPDATE

Leave a Reply Cancel reply

Your email address will not be published. Required fields are marked *

This site uses Akismet to reduce spam. Learn how your comment data is processed.

Primary Sidebar

Heidi Gustad from Hands Occupied / Craft Book Author and Knitting, Crochet, Latch Hook and Macrame Designer

Hi! I’m Heidi (she/her/hers), a craft book author & pattern designer specializing in knitting, crochet, latch hook & macrame. Really anything with yarn! ❤️  My work combines vintage and modern design elements, featuring bold colors and graphic motifs.

EMAIL NEWSLETTER

Never miss a tutorial with these short & sweet monthly updates.

Find Me on Social Media

  • Instagram
  • Pinterest
  • TikTok
  • YouTube
Latch Hook by Heidi GustadDiscover Unique Items

Footer

INSTAGRAM

handsoccupied

Craft book author, designer & creator specializing in yarn crafts like knitting, crochet, latch hook & macramé
❤️ Email preferred

Heidi Gustad 🧶✂️
Nobody panic. This is just the back of an (admitte Nobody panic. This is just the back of an (admittedly insane) intarsia project. One day, this will be a seamed sweater, but today is not that day. 🧶 
.
Have a good weekend, everyone! 
.
Yarn: @universal_yarn’s Fibra Natura Cobblestone in Antarctica & Dragon’s Breath 
.
#handsoccupied #intarsia #intarsiaknitting #wip #knitting
Here’s how to work a Norwegian purl stitch for e Here’s how to work a Norwegian purl stitch for easier continental style knitting. With this purling method, the working yarn says tensioned (held) at the back of your knitting at all times. For many knitters, always holding the yarn at the back helps with tension issues, as well as feeling a little more comfortable. 
.
Have you ever encountered this style of purling before? If you’ve tried it, have you found it helps with your purl tension and knitting speed? I’m curious.
.
For a written tutorial, visit handsoccupied-dot-com. For video, you guessed it, You2be. Both of these platforms allow for longer, more in-depth versions of this tutorial, including full transcripts, alt text & the ability to pause, slow down or speed up at will. (Like if you really want to learn this, I recommend using a platform that doesn’t keep your hands occupied. Thinking of putting this in all my captions these days tbh - shout out to you if you made it this far. 🙌🏻😂)
.
#handsoccupied #learntoknit #continentalknitting #howtoknit #norwegianpurl #norwegianknitting #knit #knitting #knitter #knittersofinstagram #knittinghack  #handknitting #handknit #norwegianpurling
Have you ever tried this style of purl? . All thi Have you ever tried this style of purl? 
.
All this recent talk about throwing vs. continental style knitting made it clear many people struggle with purling in continental knitting. Turns out that Norway may have the answer! In Norwegian purling, the working yarn stays tensioned at the back at all times, helping with speed and tension. 🤯
. 
Head to the bl0g (🔗 in bi0) for a more in-depth look at how to work a Norwegian purl stitch, including a photo tutorial with animated GIF & a video tutorial. Wrapping your mind around how to work a stitch you’re familiar with in a totally new way can be confusing, so I tried to give a few options for clarity. 🤙🏻 Video is also on You2be. 
.
#handsoccupied #norwegianpurl #norwegianknitting #norwegianpurling #continentalknitting #howtoknit #learntoknit #knitterofinstagram #knitters
It’s been a hot second since I showed my face or It’s been a hot second since I showed my face or reintroduced myself, so here goes! I’m Heidi Gustad, a craft book author, pattern designer, and tutorial creator who specializes in yarn crafts. Lately, I’ve been focused on releasing quality knitting videos and related blog posts to help teach things like the difference between provisional cast ons and how to fix common knitting mistakes. Next week I’m shooting requested crochet and latch hook videos, so h👀kers, your time is coming! And if you ever have tutorial requests, please let me know. ☺️
. 
TLDR: I’m Heidi. I design & teach yarn crafts. You can find tutorials on my blog (est. 2010) & You2be. I also have several knitting & crochet patterns + a book about latch hook available. / All of these can be found on my website, the 🔗 is where you’d think. 
.
#handsoccupied #fridayintroduction #heidigustad #knitting #knitter #knittersofinstagram #yarncrafts #latchhookbook
Are you a picker or a thrower? Do you knit Contine Are you a picker or a thrower? Do you knit Continental or English Style? Here’s a quick overview of the differences between the two most common knitting styles, including a side by side comparison. (A good one to save for future reference. 👍🏻) 
.
There’s more on the differences between picking and throwing in my latest blog post & You 2ube video - the l1nk is where you’d think!
.
#handsoccupied #learntoknit #knittingstyles #howtoknit #knittersofinstagram #knitter
Load More... Follow on Instagram

Copyright © 2023 / Foodie Pro Theme On Genesis Framework / Branding by Ink + Mortar
All Site & Shop Policies / Privacy Policy / Cookie Policy