• 0 items$0.00
  • Skip to primary navigation
  • Skip to main content
  • Skip to primary sidebar
  • Skip to footer

Hands Occupied

Colorful knitting, crochet, latch hook and macrame from craft book author & designer Heidi Gustad.

  • BLOG
    • Knitting
    • Crochet
    • Latch Hook
    • Macramé
    • Punch Needle
  • ABOUT
  • Shop
  • Nav Social Menu

    • Instagram
    • Pinterest
    • RSS
    • TikTok
    • YouTube

How-to: Louise Hat from Bob’s Burgers

April 27, 2011 24 Comments

How-to: Louise Hat from Bob's Burgers at handsoccupied.com

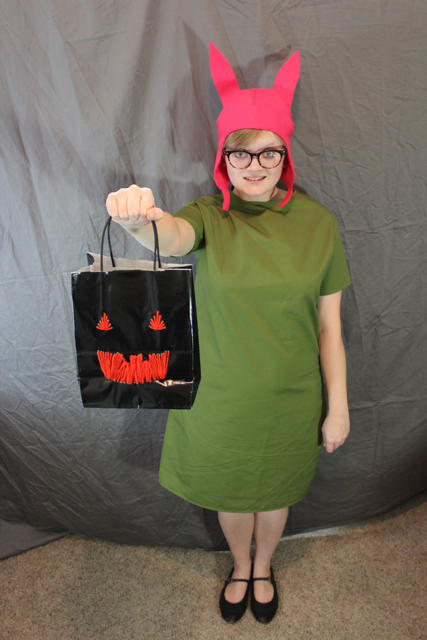
In last week’s Inspiration Thursday post, I shared some pics related to Bob’s Burgers, a.k.a. my new favorite show. Today, I wanted to show you guys how to make your own.


Supplies

1 yard bright pink felt
matching thread
freezer paper
scissors
pencil
ruler and fabric tape measure
iron

 aviator cap tutorial above by Christophine on DeviantART

Directions

How-to: Louise Hat from Bob's Burgers at handsoccupied.com Using the aviator cap tutorial above by Christophine on DeviantART as a guide, draw out a pattern for your hat on the unwaxed size of a large piece of freezer paper. Since I worked with felt, I opted not to add seam allowance, and to reduce the total amount of seams (and lumpiness) of the hat, I included the four triangle pieces in my headband piece, as shown.

Also on the same piece of freezer paper, draw your bunny ears. My pattern was 2″ wide by 7″ long. The tapering of the ears begins 3″ from the end. The reason I drew four ear patterns is because everything on this hat is two layers thick. For cutting the second layer of non-ear felt out, I just used the same pattern piece twice.

Once you’ve drawn up your pattern, iron it to the wrong side of your felt. Cut through the fabric and freezer paper simultaneously. Since you’re working with felt, precise cutting is important.

How-to: Louise Hat from Bob's Burgers at handsoccupied.com

It’s obvious in the pictures, but I drew hard, geometric lines when I created my hat pattern. I added in curves to my cut-out ear pattern pieces after the initial trim by smoothing out the sharp angles. For the bunny ears part of the hat, I cut away inside of the pattern lines. For the head-hugging part of the hat, which I’m calling the crown (it looks like a crown when it’s cut out), I added the curves beyond the straight lines of the pattern. Since it’s hard to make those precise, I laid my two crown pieces over each other and trimmed them to match up.

How-to: Louise Hat from Bob's Burgers at handsoccupied.com

Put wrong sides of each piece of ear felt together. Whip stitch all the way around each ear and set them aside. Whip stitch the left and right ends of the crown together, again with wrong sides facing, and then whip stitch the middle “V” of the crown. You don’t want to sew the left and right V’s yet – save those for when you’re attaching the ears to the hat.

How-to: Louise Hat from Bob's Burgers at handsoccupied.com

Fold the whole crown piece in half and whip stitch the two ends together, forming a ring. Now you can try your hat on to see how it fits.

How-to: Louise Hat from Bob's Burgers at handsoccupied.com

How-to: Louise Hat from Bob's Burgers at handsoccupied.com

When you’re happy with the fit, whip stitch the center V together to form the front seam of the hat. Now, it’s time to attach your ears. Make sure your hat is inside out. It took me a few tries to get the placement right, but to get the ears to stick straight up out of the hat like Louise’s, you need to sew them in perpendicular to your hat. To do this, you’ll need to evenly place your ears and then whip stitch across the two V’s that have yet to be sewn, in addition to the ears. When you finish sewing and turn the hat right-side out, the ears will point straight upwards.

How-to: Louise Hat from Bob's Burgers at handsoccupied.com

The last step in this process is to try your hat on and decide where you want to cut away at your hat to form an opening for your face, and to determine the length and shape of your ear flaps. Carefully cut away at your hat and whip stitch all the way around the bottom of the hat and ear flaps to complete your Louise hat.

How-to: Louise Hat from Bob's Burgers at handsoccupied.com

Want to make a dress to go with your Louise hat for the full Louise Belcher effect? I’ve got a tutorial for that. How-to: Louise Hat from Bob's Burgers at handsoccupied.com

Filed Under: Halloween, How-to, Sewing Tagged With: bob's burgers, diy, felt, hat, How-to, louise, Sewing

About Heidi

Heidi Gustad is a craft book author, designer & creator specializing in yarn crafts like knitting, crochet, latch hook & macramé. Her first book, Latch Hook: 12 Projects for the Modern Maker, is out now.

Previous Post: « (Not) Vegan Vittles: Bluth Bananas
Next Post: Exciting News & A Stash-Busting Yoga Bag »

Reader Interactions

DID YOU LIKE THIS POST?
Visit similar articles...

  • How-to: Felt Horsie Finger PuppetHow-to: Felt Horsie Finger Puppet
  • How-to: Kermit CollarHow-to: Kermit Collar
  • How-to: Felt Thanksgiving WreathHow-to: Felt Thanksgiving Wreath
  • How-to: Louise Dress from Bob’s BurgersHow-to: Louise Dress from Bob’s Burgers

DON’T MISS ANOTHER UPDATE

Comments

  1. Matilda

    October 10, 2013 at 1:01 am

    OMg! thanks so much!

    Reply
  2. Pearl

    October 15, 2013 at 6:56 pm

    I’m still unclear on how to sew the ears in properly to prevent them from flopping over. I am a visual learner, I’m hoping you might have pictures of that.

    Reply
    • Heidi

      October 15, 2013 at 9:38 pm

      You need to leave the freezer paper inside each ear piece. I wish I had more pictures, but I don’t! Sorry!

      Reply
    • SallyF

      October 23, 2016 at 2:35 pm

      Louise’s ears do flop, at least one of them does. Line them with interfacing or fabric stabilizer. Well 2 years ago, but maybe someone is looking to do this, BB’s is more popular than ever!

      Reply
  3. jessica

    October 21, 2013 at 7:46 pm

    I don’t see the step where you sew on the “headband” piece. When and where is that sew on?

    Reply
    • Heidi

      October 21, 2013 at 8:30 pm

      I combined the “headband” piece and the “top x4” pieces into one “crown” piece. It was easier than having a bunch of seams all over the place. (Let me know if that helps!)

      Reply
  4. jessica

    October 22, 2013 at 2:47 pm

    It turned out a little different but it will be okay, thanks for your help! I just struggled with what measurements to use for the pieces.

    Reply
    • Heidi

      October 23, 2013 at 4:33 pm

      That’s great news! :) Congrats!!!

      Reply
  5. Melissa

    October 23, 2013 at 10:57 am

    With the ‘headband’ piece did you make it a little taller than the 2-3″ specified in the pattern for the aviator hat?

    Reply
    • Heidi

      October 23, 2013 at 4:31 pm

      I think I ended up making it a little shorter, but that’s because I have a tiny, tiny head!

      Reply
  6. Josette

    October 24, 2013 at 3:11 pm

    Wondering the size of the triangles, for the top of the hat, in inches??? I’m having trouble with the proportions…
    Thanks!

    Reply
    • Heidi

      October 24, 2013 at 6:02 pm

      It varies depending on the size of your head. Check out the diagram at the top of the post for how to measure your head for the correct triangle size.

      Reply
  7. Allyson

    October 24, 2013 at 9:12 pm

    Hi! This may have an obvious answer I am missing: did you trace and cut out pieces for the ear flaps? Or did you incorporate them into the crown like the triangles?

    Thanks for the awesome tutorial!

    Reply
    • Heidi

      October 24, 2013 at 10:13 pm

      I’m glad you like it! The ears are separate pieces that I drew myself and then sewed into the crown: https://handsoccupied.com/wp-content/uploads/2011/04/earsattached042611.png

      Reply
  8. Christina

    October 25, 2013 at 10:48 am

    Hello Heidi,

    Thank you for the tutorial! It was great, however I am still confused about the ear flaps (as Allyson mentioned above). I am not talking about the actual ears that are sewn into the top of the crown, but the ear flaps that go over our actual ears, as aviator hats typically do.They are apart of the pattern above, however I seem to have missed how they are included into the Louise hat.

    Reply
    • Heidi

      October 25, 2013 at 8:39 pm

      Thanks, Christina! (Sorry Allyson, I totally misunderstood your question – my bad!) I ended up not needing to make my ear flaps separately since the crown part of the hat was so huge on me. I just cut out space for my face from the too-long hat, creating the shape of the built-in ear flaps.

      Reply
  9. Erin

    October 26, 2013 at 1:17 am

    Geez Louise what a great tutorial. Mine didn’t end up having the aviator ear flap thing going, as I measured the “crown” part pretty dead on. I didn’t add ear flaps mostly because the hat fit well, and I was doing it last last last minute in the middle of the night and I was sleepy. :) Still cute and pulls Louise off. Thanks!

    Reply
  10. Kristina Velis

    January 25, 2017 at 3:08 pm

    Had lots of fun making the hat going to wear it to comic con!! :)

    Reply
  11. Gabrielle Augustitus

    October 27, 2017 at 6:32 am

    I would like to download to pattern

    Reply
    • Heidi

      October 28, 2017 at 1:15 pm

      Unfortunately, there isn’t a pattern to download. You’ll need to measure your head and follow the instructions as described for the hat to fit its best.

      Reply
  12. Tiffany

    April 5, 2021 at 2:10 pm

    So cute! I was wondering if it can be made with fleece…?

    Reply
    • Heidi

      April 5, 2021 at 4:36 pm

      I definitely think so, but a polar fleece version will likely require the addition of seams and seam allowance. 👍🏻

      Reply

Trackbacks

  1. Tony Abbott’s Daughters, The Hideous Skywhale, And Eleven Other Costumes That Will Win Halloween | Junkee says:
    October 29, 2013 at 11:26 pm

    […] Pink bunny ears hat: $49.95, from My Party Shirt — or, make one yourself […]

    Reply
  2. Hobbit Holes, And Other Fun Pop Culture Projects says:
    May 30, 2014 at 12:58 pm

    […] 4. Louise’s Bunny Hat from Bob’s Burgers […]

    Reply

Leave a Reply Cancel reply

Your email address will not be published. Required fields are marked *

This site uses Akismet to reduce spam. Learn how your comment data is processed.

Primary Sidebar

Heidi Gustad from Hands Occupied / Craft Book Author and Knitting, Crochet, Latch Hook and Macrame Designer

Hi! I’m Heidi (she/her/hers), a craft book author & pattern designer specializing in knitting, crochet, latch hook & macrame. Really anything with yarn! ❤️  My work combines vintage and modern design elements, featuring bold colors and graphic motifs.

EMAIL NEWSLETTER

Never miss a tutorial with these short & sweet monthly updates.

Find Me on Social Media

  • Instagram
  • Pinterest
  • TikTok
  • YouTube
Latch Hook by Heidi GustadDiscover Unique Items

Footer

INSTAGRAM

handsoccupied

Craft book author & pattern designer ❤️💛💙
knitting, crochet, latch hook & macramé
.
Please email for pattern support. 🧶

Heidi Gustad 🧶✂️
It’s been a hot second since I showed my face or It’s been a hot second since I showed my face or reintroduced myself, so here goes! I’m Heidi Gustad, a craft book author, pattern designer, and tutorial creator who specializes in yarn crafts. Lately, I’ve been focused on releasing quality knitting videos and related blog posts to help teach things like the difference between provisional cast ons and how to fix common knitting mistakes. Next week I’m shooting requested crochet and latch hook videos, so h👀kers, your time is coming! And if you ever have tutorial requests, please let me know. ☺️
. 
TLDR: I’m Heidi. I design & teach yarn crafts. You can find tutorials on my blog (est. 2010) & You2be. I also have several knitting & crochet patterns + a book about latch hook available. / All of these can be found on my website, the 🔗 is where you’d think. 
.
#handsoccupied #fridayintroduction #heidigustad #knitting #knitter #knittersofinstagram #yarncrafts #latchhookbook
Are you a picker or a thrower? Do you knit Contine Are you a picker or a thrower? Do you knit Continental or English Style? Here’s a quick overview of the differences between the two most common knitting styles, including a side by side comparison. (A good one to save for future reference. 👍🏻) 
.
There’s more on the differences between picking and throwing in my latest blog post & You 2ube video - the l1nk is where you’d think!
.
#handsoccupied #learntoknit #knittingstyles #howtoknit #knittersofinstagram #knitter
Spent time with family this weekend down South. Go Spent time with family this weekend down South. Got some stitching in & felt spring for a minute, which was lovely. ☀️ 
.
I’ll be catching up on comments, etc. tomorrow. 
.
#handsoccupied #travelknitting #planeknitting
Which way do you knit? Picking, throwing, Portugue Which way do you knit? Picking, throwing, Portuguese, Shetland… how about lever style? 
.
Today on the blog, we’re defining & comparing the two most common knitting styles: continental and throwing. They’re each known by a few names, and odds are one of them really is your grandmother’s knitting style (if she’s a western knitter that is). There’s a new video to help demonstrate the differences too. Another good one to save & share! 😉 
.
#handsoccupied #continentalknitting #englishknitting #americanknitting #howtoknit
This past weekend, my husband and I visited family This past weekend, my husband and I visited family out of state. Here’s what I packed to keep my hands occupied for the drive. 😉 
.
I try my hardest to be realistic about how much knitting I’m going to get done vs. the effort of schlepping my WIP(s) and yarn around. I definitely almost brought double this amount of yarn, which would have been hilariously unnecessary for a weekend trip. Why am I like this? 😆 Do you also struggle with overpacking when it comes to crafts? 
.
#handsoccupied #travelknitting #knitting #knitter #knittersofinstagram #knitting_inspiration
Load More... Follow on Instagram

Copyright © 2023 / Foodie Pro Theme On Genesis Framework / Branding by Ink + Mortar
All Site & Shop Policies / Privacy Policy / Cookie Policy