• 0 items$0.00
  • Skip to primary navigation
  • Skip to main content
  • Skip to primary sidebar
  • Skip to footer

Hands Occupied

Colorful knitting, crochet, latch hook and macrame from craft book author & designer Heidi Gustad.

  • BLOG
    • Knitting
    • Crochet
    • Latch Hook
    • Macramé
    • Punch Needle
  • ABOUT
  • Shop
  • Nav Social Menu

    • Instagram
    • Pinterest
    • RSS
    • TikTok
    • YouTube

How-to: Pawnee Goddess Costume

October 25, 2011 3 Comments

How-to: Pawnee Goddess Costume  - Hands Occupied

For those of you who love the show Parks and Recreation as much as I do, you’ll have seen the most recent episode, all about gendered scouting groups in the fictional town of Pawnee, Indiana. If you’re interested in watching the episode, you can catch it online here.

The episode is fantastic, and the design of the Pawnee Goddess and Pawnee Rangers costumes rules. I was so in love with them, in fact, that I decided to make my husband and I a set for Halloween! In a couple days, I’ll show you how my husband’s and the doggie costumes I’ve whipped up to go along with our Parks and Rec theme turned out!

Supplies

lavender t-shirt

hunter green bandanna

2 1/2 yards of wide yellow ric rac

1 1/2 yards royal purple fabric

yellow star patches

a variety of other iron-on patches of your choosing

newspaper or tissue paper

straight pins

sewing machine

iron

ironing board or towel

yellow thread

royal purple thread

Directions

Lay your t-shirt on some of your news- or tissue paper. Trace the shape of the shirt except for the sleeves on to the paper, creating a pattern for the back panel of your soon-to-be Pawnee Goddess vest.

How-to: Pawnee Goddess Costume  - Hands Occupied

How-to: Pawnee Goddess Costume  - Hands Occupied

How-to: Pawnee Goddess Costume  - Hands Occupied

Eyeball the curve of the sleeves as best you can, connecting the would-be armpit to the shoulder.

How-to: Pawnee Goddess Costume  - Hands Occupied

Fold your paper in half and trace the curve drawn on to the other half of the pattern. Cut the pattern out.

How-to: Pawnee Goddess Costume  - Hands Occupied

Pin the pattern to your purple fabric and cut out the shape, adding 1/2″ of seam allowance to all sides.

How-to: Pawnee Goddess Costume  - Hands Occupied

How-to: Pawnee Goddess Costume  - Hands Occupied

Unpin the pattern piece from your fabric, cut it in half, and cut out the two front panels of your vest, again adding 1/2″ of seam allowance.

How-to: Pawnee Goddess Costume  - Hands Occupied

How-to: Pawnee Goddess Costume  - Hands Occupied

Pin down your 1/2″ of seam allowance on all but the two sides shown on both front panels of the vest. The two sides that don’t need pinned down (hemmed) will be sewn together to create the vest. Sew what’s been pinned.

How-to: Pawnee Goddess Costume  - Hands Occupied

How-to: Pawnee Goddess Costume  - Hands Occupied

How-to: Pawnee Goddess Costume  - Hands Occupied

Pin and sew the arm holes, head hole, and hem of the vest for the back panel.

How-to: Pawnee Goddess Costume  - Hands Occupied

Pin all panels together, carefully lining up the shoulder and side seams. Sew the shoulder and side seams. Turn your vest inside out!

How-to: Pawnee Goddess Costume  - Hands Occupied

How-to: Pawnee Goddess Costume  - Hands Occupied

It was at this point that I realized I needed to change the “neckline” of my vest. Turn your vest wrong side out and pin down the front opening of the vest. It will look like lapels, like this:

How-to: Pawnee Goddess Costume  - Hands Occupied

Sew along the folded edge to create the proper neckline on your vest.

Next, pin your ric rac along the edges of the right side of your vest, down the front opening and around the back of the vest. When you reach a corner, fold the ric rac over and pin it down, as shown in the second picture below.

How-to: Pawnee Goddess Costume  - Hands Occupied

How-to: Pawnee Goddess Costume  - Hands Occupied

Your finished vest will look like this before you add patches:

How-to: Pawnee Goddess Costume  - Hands Occupied

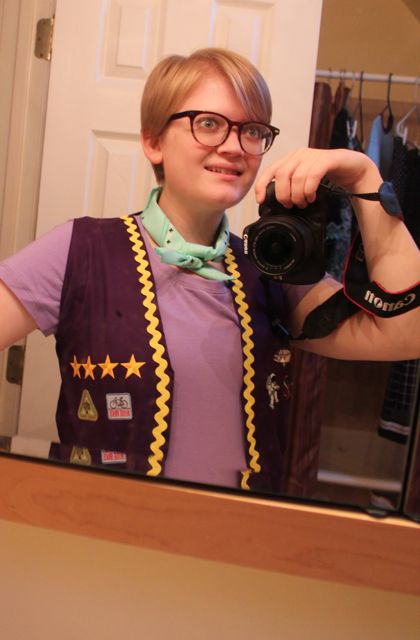
Now, unwrap your iron on patches and have fun placing them as you see fit. The gold stars and Pawnee Goddess badge on Leslie Knope’s vest go on the left breast. (See?)

How-to: Pawnee Goddess Costume  - Hands Occupied

How-to: Pawnee Goddess Costume  - Hands Occupied

How-to: Pawnee Goddess Costume  - Hands Occupied

Once you’re excited about the placement, heat up your iron based on the patches’ package directions. Place your bandanna over the patches and iron the patches in place.

How-to: Pawnee Goddess Costume  - Hands Occupied

Turn your vest inside out, and iron the patches from the back to secure.

How-to: Pawnee Goddess Costume  - Hands Occupied

Since my iron was hot, I also ironed the packaging wrinkles out of my bandanna. To get the right bandanna look for the costume, I folded mine in to a triangle.

How-to: Pawnee Goddess Costume  - Hands Occupied

How-to: Pawnee Goddess Costume  - Hands Occupied

Then, I rolled it from the fold side toward the opposite corner.

How-to: Pawnee Goddess Costume  - Hands Occupied

Finally, try the whole getup on! Put on the lavender t-shirt, vest, and the bandanna loosely tied around your neck. Forgive the weird self-portrait, but I had to try for my best Leslie Knope impersonation while in this costume!

How-to: Pawnee Goddess Costume  - Hands Occupied

If you’ll notice, I haven’t made my Pawnee Goddess seal badge yet, but I’ll post a tutorial if I have the chance to get mine made my Halloween!

PS: My full disclosure embarrassing moment of this post: The only lavender t-shirt Jo-Ann Fabrics carried when I visited their Chicago store was totally a maternity shirt. It’s basically just long and stretchy. I’ll be the first to say “LOL” at myself in this situation. Oh well. Happy Halloween!

Filed Under: Halloween, How-to, Sewing Tagged With: costumes, halloween, leslie knope, parks and recreation, pawnee goddess, scouting, scouts

About Heidi

Heidi Gustad (she/her) is a craft book author & designer specializing in yarn crafts. Her work combines vintage and modern design elements, prioritizing color and graphic motifs. Her first book, Latch Hook: 12 Projects for the Modern Maker, is out now.

Previous Post: « How-to: Brain Cupcakes!
Next Post: How-to: Pawnee Ranger Costume »

Reader Interactions

DID YOU LIKE THIS POST?
Visit similar articles...

  • How-to: Pawnee Ranger CostumeHow-to: Pawnee Ranger Costume
  • Halloween 2013 Project RoundupHalloween 2013 Project Roundup
  • Halloween 2012 In PicturesHalloween 2012 In Pictures
  • How-to: DIY Ruby SlippersHow-to: DIY Ruby Slippers

Comments

  1. Becca

    October 12, 2015 at 4:40 pm

    This is an awesome tutorial thank you for making it! I was just wondering where you got all your iron on patches?

    Reply
    • Heidi

      October 13, 2015 at 4:16 pm

      Just at the craft store, they kinda randomly had a bunch I was able to use!

      Reply

Trackbacks

  1. Halloween Costumes for Girls | Ph.D.s and Pigtails says:
    October 2, 2013 at 10:16 am

    […] could write up my own tutorial, but a really good one already exists. Check out the Hands Occupied Pawnee Goddess Costume and this tutorial on how to make a Pawnee Goddess badge. I will note that while the tutorial does a […]

    Reply

Leave a Reply Cancel reply

Your email address will not be published. Required fields are marked *

This site uses Akismet to reduce spam. Learn how your comment data is processed.

Primary Sidebar

Heidi Gustad from Hands Occupied / Craft Book Author and Knitting, Crochet, Latch Hook and Macrame Designer

Hi! I’m Heidi (she/her/hers), and I’ve been helping yarn crafters untangle various techniques on the internet since 2010. I got my start here, as a blogger, and since then I’ve shared more than a few tutorials here and on YouTube as I’ve grown as a pattern designer. 🧶 

learn more / work with me

Find Me on Social Media

  • Instagram
  • Pinterest
  • TikTok
  • YouTube
Latch Hook by Heidi Gustad

Footer

INSTAGRAM

Heidi Gustad 🧶 knitting & yarn crafts

handsoccupied

Knitting & yarn crafts designer 🧶
.
Stay up-to-date 💌 & shop new patterns ⤵️

POV: Showing you how my new Bevelled Tank pattern POV: Showing you how my new Bevelled Tank pattern fits with no ease vs. 4” of positive ease. There’s a bit more length to the cotton (brighter color) sample, but both are cropped and feature shoulder seams designed to sit an inch back onto the shoulder instead of on top, giving it a little swing. Length is easily adjustable for folks looking for less of a crop. 
.
Pattern: Bevelled Tank by @handsoccupied for @pompommag x @hobbii_yarn summer 2024. Available for free from Hobbii at the 🔗 in my profile.
Yarn pictured: @kelbournewoolens Skipper and Camper. 
Dress form is adjusted to a 36” chest and ~5’3”ish in height. 
Human has a 40” chest and is 5’5”.
Both skirts are vintage.
.
#pompomxhobbiisummer2024 #handsoccupied #intarsia #handmade #knitting #colorwork
Let’s talk about fit and ease! . During the Beve Let’s talk about fit and ease!
.
During the Bevelled Tank design process for @pompommag, I knit 2 samples using 2 different @KelbourneWoolens yarns. One was in Skipper (100% cotton, second photo) and the other was in Camper (100% 2 ply wool). The Skipper sample was knit for a 36” bust, which measures in at 40” with 4” of positive ease. And I knit the Camper Sample for my 40” bust with a 44” finished measurement. (BTW, I’m 5’5” for folks that find that measurement helpful in visualizing fit.)
.
Based on the size chart for the Bevelled Tank, that means I knit one size 3 sample and one size 4. As designed, I conveniently fit a size 4 as intended with 4” of positive ease. When I wear the 3, there is no ease at all because the garment and my body are both 40” in size. Comparing the 2 garments, you can see how the fiber content (cotton vs. wool) and fit (no ease vs. 4” of positive ease) makes a difference in the look and feel of the finished garment. 
.
These samples are a great way to compare what ease looks like on different bodies. While I can fit both a size 3 and 4, the garment with no ease feels more like pajamas or a bralette when I wear it. On the other hand, when I wear the one with 4” of positive ease, I feel comfortable enough to wear it to work, even as a crop top. Plus, it leaves me with enough room to layer it with a nice button down if I’m not feeling the cropped look one day. 
.
I’m curious - how would you style this tank? Would you modify it with a few stockinette rows for added length? I’m so curious now that this pattern is finally out in the world. :) 
.
#pompomxhobbiisummer2024 #bevelledtank #handsoccupied #knitting #intarisa #handmade #kelbournewoolens #croppedsweater #summerknits
After a 6 month hiatus, I am happy to say I’m ba After a 6 month hiatus, I am happy to say I’m back with a brand new pattern in 9 sizes, and it’s FREE as part of @pompommag x @hobbii_yarn’s summer design collection! (Link is in my bio.)
.
In my December newsletter, I announced that I was soliciting test knitters for a pattern that had originally been selected for the summer ’24 issue of Pom Pom Quarterly magazine. However, the magazine ceased publication after its spring ’24 issue, leaving in-progress designs unpublished. (It happens.) As a result, I’d begun the long process of editing, testing, and photographing the pattern for independent release through the Hands Occupied pattern shop and Ravelry.
.
Before I was done with that process, Pom Pom Quarterly’s former editors reached out with an exciting proposal for the pattern. Post-magazine, they’ve begun to partner with yarn companies to produce high quality pattern collections. They wanted to include designs from the would-be current issue of Pom Pom Quarterly in a new collection for Hobbii yarn, including my Bevelled Tank. I worked with the same technical editors I would have for the magazine on this one, and as you can see from the photos, Pom Pom’s team did an amazing job of styling the garment to the beautiful standards they’re known for.
.
You can learn more about the pattern on my blog and get the free pattern from Hobbii yarn - links to both in my profile. I’ll post sizing info in the comments for quick reference too. 🧶
.
#pompomxhobbiisummer2024 #knitting #intarsia #sponsored #colorworkknitting 
.
Photos: @dianascarrunz 
Model: @angel.jade_
Here’s a nice throwback for you: my take on a vi Here’s a nice throwback for you: my take on a vintage knitting pattern from 1938 called the Fernlace Pullover. A pattern so nice, I knit it twice.
.
Yellow version 💛: knit with Despondent Dyes’ Vintage Vixen Sport after attending a @squidneyknits vintage knitting retreat in 2019 & learning *so much*. Paired with a self-drafted circle skirt pattern. 
.
Blue version 💙: knit with @eweeweyarns Ewe So Sporty in Sky Blue. Paired with the 1940s Boardwalk Duet sewing pattern from @decades_of_style 
.
Head to my stories for 🔗🔗 to the handmade wardrobe blog posts I wrote about each take on the Fernlace Pullover, working with a vintage pattern, where to find vintage patterns (including the one I used), & some thoughts on sizing. 
.
Image descriptions available in alt text. 
.
#handsoccupied #handmadewardrobe #fernlacepullover #vintageknitting #vintageknittingpatterns #knitting_inspiration
Frogging is a word in the knitting world that mean Frogging is a word in the knitting world that means to rip out your knitting. It’s called frogging because frogs say “ribbit,” and when you’re tearing out your knitting, you will “rip it” out, and that sounds like ribbit. No really. 🐸 Did you know this fun fact? 
.
P.S. I did like this design concept, but to make the pattern more knitter friendly as well as more wearable, I am making some tweaks to the construction. Excited to share when it’s ready! 🥰🧶
.
Yarn: @blueskyfibers Woolstok North in Morning Frost & Highland Fleece 
.
#handsoccupied #knitting #frogging #blueskyfibers #knittersofinstagram #blueskymakers #knittingvocabulary #bsfmakers #knitdesign
Load More... Follow on Instagram

Copyright © 2025 / Foodie Pro Theme On Genesis Framework / Branding by Ink + Mortar
All Site & Shop Policies / Privacy Policy / Cookie Policy