• 0 items$0.00
  • Skip to primary navigation
  • Skip to main content
  • Skip to primary sidebar
  • Skip to footer

Hands Occupied

Colorful knitting, crochet, latch hook and macrame from craft book author & designer Heidi Gustad.

  • BLOG
    • Knitting
    • Crochet
    • Latch Hook
    • Macramé
    • Punch Needle
  • ABOUT
  • Shop
  • Nav Social Menu

    • Instagram
    • Pinterest
    • RSS
    • YouTube

How-to: Test Tube Garden

February 20, 2012 Leave a Comment

This winter has marked the most improvement in my epic quest to stop failing at gardening. One of the 25 goals I want to accomplish before I’m 25 is to grow a successful vegetable garden, so I decided indoor gardening was a good place to start:

How-to: Grow a little indoor garden / Gardening 101

How-to: Indoor Herb Garden

How-to: My Zen Bathroom

My outdoor gardens yielded almost nothing last summer, which started to light the fire of frustration (sorry, that phrase  sounds so dramatic) in me about gardening. I decided to try out indoor gardening in the fall on a small scale and failed there too. The herb garden and little garden I planted and blogged about ended up failing. The herb garden was okay for awhile, but the plants I used were all transplants from the summer. Some of them are currently dormant for the winter, and others died. Nothing ever sprouted in the “little garden.” Boo.

Anyway, around Christmas I decided to experiment with a few different garden ideas this go around. The first of these ideas was to use a rack of test tubes as a seed starter planter.

Supplies

a test tube rack

potting soil

spoon

chop stick

some rocks

seeds of your choice

lamp

plant bulb with appropriate wattage for the lamp you’re using

Directions

First, you need to get your hands on a test tube rack! I visited Chicago’s American Science & Surplus Store and found exactly what I was looking for. Lucky for you, they sell these on the internet. Don’t forget to buy enough tubes in the appropriate sizes too.

To do this project, I grabbed my handy dandy Martha Stewart-inspired indoor gardening kit (learn how to assemble your own here), since it includes all of the necessary supplies. To get started, carefully put a couple small pebbles in the bottom of each tube, and then spoon potting soil over it.

Use a chop stick to help the dirt find its way down the tube, but don’t compact it. It’s hard for seeds to grow in overly tight soil.

When you’ve got enough soil to plant your seeds, read the planting directions on your seed packets. Add one or two seeds to the soil before topping them with the package-directed amount of soil. If the package calls for firming the soil, use the fat end of the chopstick you used to put soil in the tubes.

Fillling the tubes takes a little while since the openings of the tubes are so small. The whole fill and plant process looks something like this:

To really give the seeds their best chance, set up your plant light so it points right at the test tubes, and expose your tubes to light for several hours a day. Since the tube openings are so small, an eye dropper or spray bottle are a good idea for watering. Using a cup or watering can is dangerous because easy to over water the plants that way. Then it’s time to wait for the seeds to sprout!

—

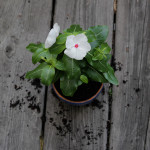
In an exciting turn of events, I finally had success with this garden. Maybe it’s because I used healthy soil and plant lights, in addition to paying close attention to seed packet instructions and watering an appropriate amount.

Look how well my baby plants are doing! When it’s time for me to transplant the seedlings, I’ll update you guys on how to transfer plants from the tubes to a bigger garden.


Filed Under: Home Decor, How-to Tagged With: diy, gardening, science, seed starting, seeds, test tube

About Heidi

Heidi Gustad is a craft book author & content creator in love with primary colors & vintage vibes. She specializes in knitting, crochet, latch hook and macramé, and her first book, Latch Hook: 12 Projects for the Modern Maker, is out now!

Previous Post: « How-to: Swedish Heart Purse
Next Post: How-to: Make a Faux Copper Gutter Garden »

Reader Interactions

DID YOU LIKE THIS POST?
Visit similar articles...

  • O (mini) Christmas TreeO (mini) Christmas Tree
  • How-to: Transplant a Potted PlantHow-to: Transplant a Potted Plant
  • How-to: Uncle Sam PlanterHow-to: Uncle Sam Planter
  • How-to: Maintain an Indoor Gutter GardenHow-to: Maintain an Indoor Gutter Garden

DON’T MISS ANOTHER UPDATE

Leave a Reply Cancel reply

Your email address will not be published. Required fields are marked *

This site uses Akismet to reduce spam. Learn how your comment data is processed.

Primary Sidebar

Heidi Gustad from Hands Occupied / Craft Book Author and Knitting, Crochet, Latch Hook and Macrame Designer

Hi! I’m Heidi (she/her/hers), a craft book author & pattern designer specializing in knitting, crochet, latch hook & macrame. Really anything with yarn! ❤️  My work combines vintage and modern design elements, featuring bold colors and graphic motifs.

UPDATES BY EMAIL

Monthly highlights sent to your inbox.

Find Me Elsewhere, If You’re There

  • Instagram
  • Pinterest
  • YouTube
Latch Hook by Heidi GustadDiscover Unique Items

Footer

INSTAGRAM

handsoccupied

Craft book author & pattern designer ❤️💛💙
knitting, crochet, latch hook & macramé
.
Please email for pattern support. 🧶

Heidi Gustad 🧶✂️
How to to knit throwing (a.k.a. English) style . How to to knit throwing (a.k.a. English) style 
.
In knitting, there are a few common knitting styles. Most often you’re going to encounter continental style and English (throwing) style on your knitting journey. I recently had an old video teaching continental style get a lot of views. Based on the comments, it was clear the people wanted to also see a throwing tutorial, so here you go! 🧶
.
Please note that there is a LOT of variation in knitting styles, and one isn’t necessarily better than another. Most often, I’ve found it comes down to two things: how you were taught and whether or not you’re really into colorwork knitting (which can involve a mix of styles). 
.
Longer-term knitters who’ve made it this far: do you prefer one over the other? And why? 
.
#handsoccupied #englishknitting #learntoknit #knitting #howtoknit #knittersofinstagram #knitting_inspiration
How to do a one-step provisional knitting cast on How to do a one-step provisional knitting cast on / a.k.a. crochet provisional cast on, scrap yarn cast on
.
I read recently that tiktok and Instagram are being used as search engines more and more. 🤔 I thought since I’m going to all the work of making tutorials on YouTube, I should experiment with making a quick version of them for other platforms. There are obvious teaching limitations to vertical video, short-form content like this, but I think I covered the gist of this cast on in a minute. The YouTube version also covers how to unzip this cast on because there was time for it 👍🏻 L1nk is in my profile. 
.
I’m very much looking for feedback as I continue to make instructional knitting & craft videos. Sometimes good tutorials are hard to find, and (ideally polite) feedback helps me improve. 
.

#handsoccupied #provisionalcaston #knitting #knititngtutorial #knittersofinstagram #crochethook #knittingtutorial
For the first time in a long time, there’s a new For the first time in a long time, there’s a new tutorial from Hands Occupied! 🎉 The video is live on YouTube & the blog. 
.
The post covers what provisional cast ons are & how they differ, and the video covers how to work a one-step provisional cast on using scrap yarn and a crochet hook. (This is a great one to save for future reference.)
.
I learned several names for this method while researching this video & post. Crochet provisional cast on, one-step cast on, scrap yarn cast on - if you know even more names for this technique, please share! 
.
#handsoccupied #provisionalcaston #knitting #scrapyarn #crochethook
Working on a sample for some upcoming videos. It’s an overcast day with intermittent sunshine & I have a scruffy little sidecar. 🐶 Can’t complain! 
.
What’s on your needles this week? 
.
Yarn: @debbieblissknits Cashmerino Aran 
.
#handsoccupied #knitting #knittinglife
Peg boards and craft room organization go together Peg boards and craft room organization go together like peanut butter and jelly. So, as you can see, do latch hook tools and screwdriver organizers! 🪛 
.
I think this trick translates to any tool with a thick handle, so leather working tools, punch needles, print making tools, etc. should work! What other tools am I, a needlecrafter, blanking on right now? 
.
#craftorganization #handsoccupied #latchhook #latchhooking
Load More... Follow on Instagram

Copyright © 2023 / Foodie Pro Theme On Genesis Framework / Branding by Ink + Mortar
All Site & Shop Policies / Privacy Policy / Cookie Policy