• 0 items$0.00
  • Skip to primary navigation
  • Skip to main content
  • Skip to primary sidebar
  • Skip to footer

Hands Occupied

Colorful knitting, crochet, latch hook and macrame from craft book author & designer Heidi Gustad.

  • BLOG
    • Knitting
    • Crochet
    • Latch Hook
    • Macramé
    • Punch Needle
  • ABOUT
  • Shop
  • Nav Social Menu

    • Instagram
    • Pinterest
    • RSS
    • TikTok
    • YouTube

How-to: Transplant a Potted Plant

July 3, 2013 1 Comment

This post brought to you by Miracle-Gro. All opinions are 100% mine.

How-to: Transplant a Potted Plant - HandsOccupied.com If you find yourself invited to a cookout next week, you might want to come prepared with a hostess gift. If you want something that comes together lickety split, give a potted flower a try! If you’re looking to get into gardening for the very first time, you should check out The Gro Project for great resources to help you get started. 

Supplies

small terra cotta pot
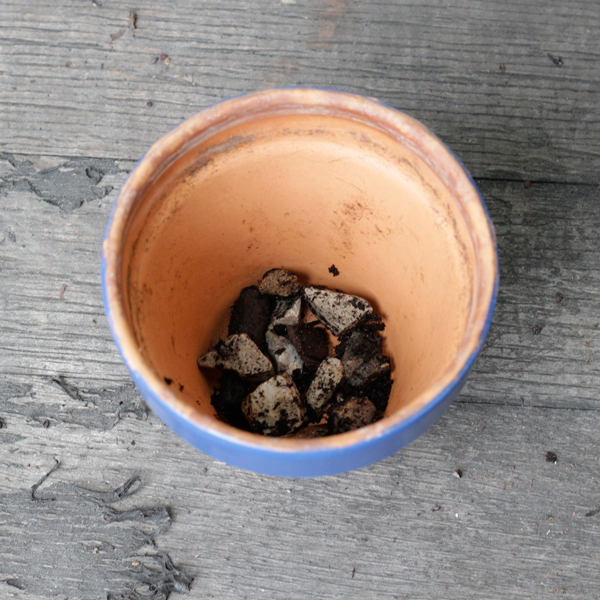
small rocks

Miracle-Gro Moisture Control Potting Mix

Miracle-Gro Shake ‘n Feed Plus Moisture Control All Purpose Plant  Food

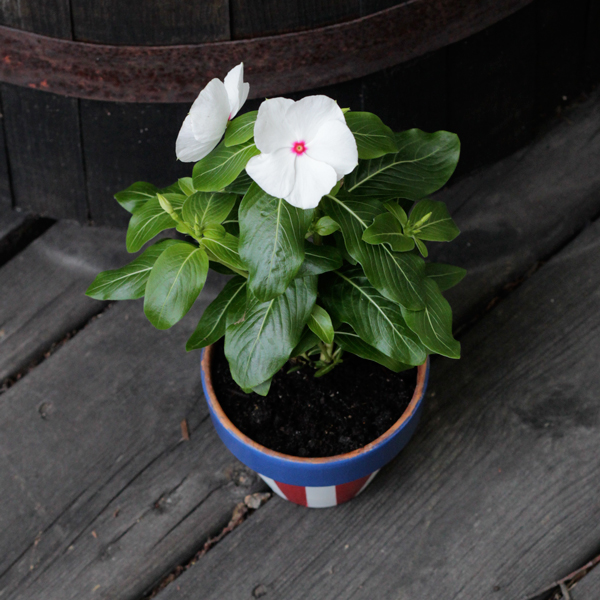
small flowering plant

Directions

Line the bottom of your pot with some pebbles to ensure proper drainage. Potted plants like to get a drink of water, but they need some breathing room too. Watering a plant without enough drainage is kind of like giving a person a bottomless glass of water and telling them to drink it in one sitting. It would never survive.

How-to: Transplant a Potted Plant - HandsOccupied.com

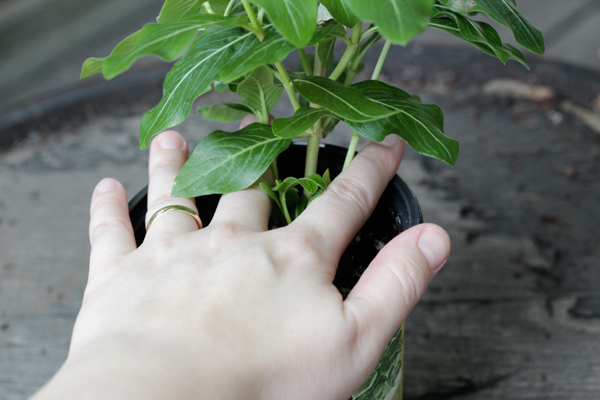
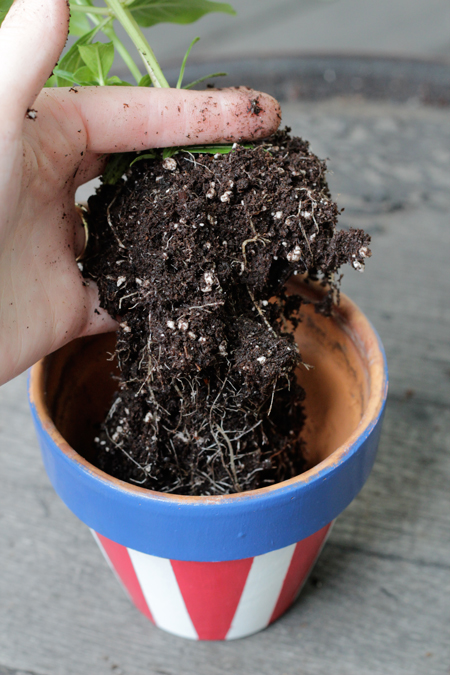
Next, grab your flowering plant. Gently remove it from its store container by placing your hand over the top of the soil surrounding the plant and tipping it upside down. Some plants will pop right out, and others might need coaxing. Don’t grab your plant by the stem and yank (ever). A combination of massaging the container the plant came in and mild shaking do the trick for me.

How-to: Transplant a Potted Plant - HandsOccupied.com

When your plant is out of its store container, you’ll want to give it a fresh start by breaking up the container-shaped soil it’s in, removing about a third of the soil it came with. Don’t worry about tossing the soil – store bought plants’ soil can be chock full of excess fertilizer, bacteria, or mineral salts. If you’re having trouble removing the soil, you can use a chopstick or twig to carefully poke around in the roots to loosen the soil. Be careful not to rip apart the roots too much. Some plants do have really thick roots up and down the sides and bottom of the container they come in. In that case, you can be significantly more aggressive in loosening the roots and soil.

How-to: Transplant a Potted Plant - HandsOccupied.com

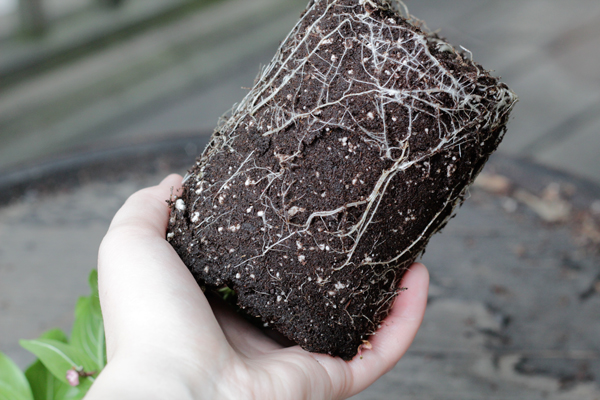
Really, the ultimate goal is to give your plant a fresh start in a healthy environment, spreading out the roots and removing some of the store soil before transferring the plant is the way to accomplish this. Speaking of happy potted plants, another way to avoid overwatering is to use the right potting soil. Miracle-Gro’s Moisture Control® Potting Mix is an additional step in the right direction. Add some potting soil on top of your layer of rocks, just enough so that when you hold your plant over your pot,  the roots are just touching the top of this first layer of soil.

How-to: Transplant a Potted Plant - HandsOccupied.com

Set your plant in the pot, centering it, and add potting soil around it until the roots are nice and covered. Even out the soil with your fingers, but don’t pack the soil down too tight. Overpacking the soil makes it harder for your plant’s roots to grow.

How-to: Transplant a Potted Plant - HandsOccupied.com

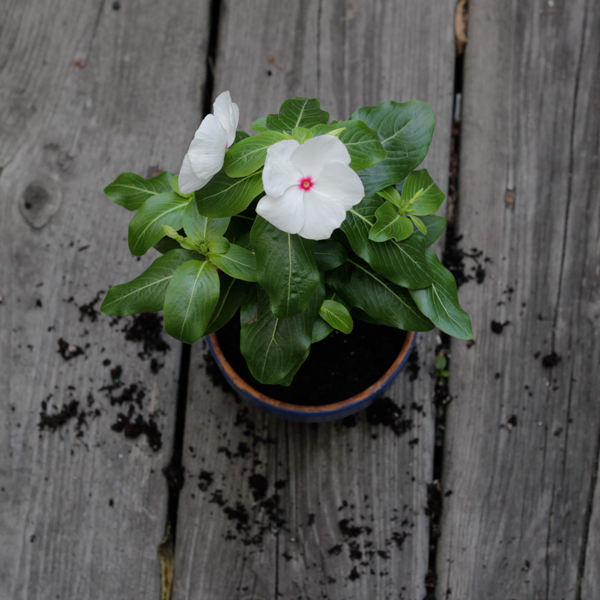
When you’re all potted, add a little sprinkle of Miracle-Gro’s Shake ‘n Feed Plus Moisture Control All Purpose Plant Food to get your plant the nutrients it needs, then water your plant well and let it drain.

Don’t forget – if you’re a newbie gardener, check out The Gro Project for more beginner gardening projects. You can also find fun garden projects on Miracle-Gro’s Pinterest page. 

Visit Sponsor's Site

Filed Under: Giveaways, Reviews & Sponsored, How-to Tagged With: diy, flowers, gardening, miracle-gro, plants, sponsored, tips

About Heidi

Heidi Gustad is a craft book author, designer & creator specializing in yarn crafts like knitting, crochet, latch hook & macramé. Her first book, Latch Hook: 12 Projects for the Modern Maker, is out now.

Previous Post: « How-to: Uncle Sam Planter
Next Post: Weekly Reader »

Reader Interactions

DID YOU LIKE THIS POST?
Visit similar articles...

  • How-to: Cinder Block PlantersHow-to: Cinder Block Planters
  • Attention, DIY Brides & Handmade Hostesses!Attention, DIY Brides & Handmade Hostesses!
  • Weekly ReaderWeekly Reader
  • Simple Ribbon Vase DIYSimple Ribbon Vase DIY

DON’T MISS ANOTHER UPDATE

Comments

  1. Carol

    July 7, 2013 at 1:12 pm

    Hint – If your worried about soil falling out of your drainage hole, place a piece of coffee filter in the bottom of your pot before you add the pebbles.

    Reply

Leave a Reply Cancel reply

Your email address will not be published. Required fields are marked *

This site uses Akismet to reduce spam. Learn how your comment data is processed.

Primary Sidebar

Heidi Gustad from Hands Occupied / Craft Book Author and Knitting, Crochet, Latch Hook and Macrame Designer

Hi! I’m Heidi (she/her/hers), a craft book author & pattern designer specializing in knitting, crochet, latch hook & macrame. Really anything with yarn! ❤️  My work combines vintage and modern design elements, featuring bold colors and graphic motifs.

EMAIL NEWSLETTER

Never miss a tutorial with these short & sweet monthly updates.

Find Me on Social Media

  • Instagram
  • Pinterest
  • TikTok
  • YouTube
Latch Hook by Heidi GustadDiscover Unique Items

Footer

INSTAGRAM

handsoccupied

Craft book author, designer & creator specializing in yarn crafts like knitting, crochet, latch hook & macramé
❤️ Email preferred

Heidi Gustad 🧶✂️
Lol what have I done? 😅🫣😂 Only the back, Lol what have I done? 😅🫣😂 Only the back, sleeves & collar to go! 
.
#handsoccupied #intarsia #knitting #knittersofinstagram #handknitting #seamedsweater #wip #wipwednesday #knitlove
Nobody panic. This is just the back of an (admitte Nobody panic. This is just the back of an (admittedly insane) intarsia project. One day, this will be a seamed sweater, but today is not that day. 🧶 
.
Have a good weekend, everyone! 
.
Yarn: @universal_yarn’s Fibra Natura Cobblestone in Antarctica & Dragon’s Breath 
.
#handsoccupied #intarsia #intarsiaknitting #wip #knitting
Here’s how to work a Norwegian purl stitch for e Here’s how to work a Norwegian purl stitch for easier continental style knitting. With this purling method, the working yarn says tensioned (held) at the back of your knitting at all times. For many knitters, always holding the yarn at the back helps with tension issues, as well as feeling a little more comfortable. 
.
Have you ever encountered this style of purling before? If you’ve tried it, have you found it helps with your purl tension and knitting speed? I’m curious.
.
For a written tutorial, visit handsoccupied-dot-com. For video, you guessed it, You2be. Both of these platforms allow for longer, more in-depth versions of this tutorial, including full transcripts, alt text & the ability to pause, slow down or speed up at will. (Like if you really want to learn this, I recommend using a platform that doesn’t keep your hands occupied. Thinking of putting this in all my captions these days tbh - shout out to you if you made it this far. 🙌🏻😂)
.
#handsoccupied #learntoknit #continentalknitting #howtoknit #norwegianpurl #norwegianknitting #knit #knitting #knitter #knittersofinstagram #knittinghack  #handknitting #handknit #norwegianpurling
Have you ever tried this style of purl? . All thi Have you ever tried this style of purl? 
.
All this recent talk about throwing vs. continental style knitting made it clear many people struggle with purling in continental knitting. Turns out that Norway may have the answer! In Norwegian purling, the working yarn stays tensioned at the back at all times, helping with speed and tension. 🤯
. 
Head to the bl0g (🔗 in bi0) for a more in-depth look at how to work a Norwegian purl stitch, including a photo tutorial with animated GIF & a video tutorial. Wrapping your mind around how to work a stitch you’re familiar with in a totally new way can be confusing, so I tried to give a few options for clarity. 🤙🏻 Video is also on You2be. 
.
#handsoccupied #norwegianpurl #norwegianknitting #norwegianpurling #continentalknitting #howtoknit #learntoknit #knitterofinstagram #knitters
It’s been a hot second since I showed my face or It’s been a hot second since I showed my face or reintroduced myself, so here goes! I’m Heidi Gustad, a craft book author, pattern designer, and tutorial creator who specializes in yarn crafts. Lately, I’ve been focused on releasing quality knitting videos and related blog posts to help teach things like the difference between provisional cast ons and how to fix common knitting mistakes. Next week I’m shooting requested crochet and latch hook videos, so h👀kers, your time is coming! And if you ever have tutorial requests, please let me know. ☺️
. 
TLDR: I’m Heidi. I design & teach yarn crafts. You can find tutorials on my blog (est. 2010) & You2be. I also have several knitting & crochet patterns + a book about latch hook available. / All of these can be found on my website, the 🔗 is where you’d think. 
.
#handsoccupied #fridayintroduction #heidigustad #knitting #knitter #knittersofinstagram #yarncrafts #latchhookbook
Load More... Follow on Instagram

Copyright © 2023 / Foodie Pro Theme On Genesis Framework / Branding by Ink + Mortar
All Site & Shop Policies / Privacy Policy / Cookie Policy