• 0 items$0.00
  • Skip to primary navigation
  • Skip to main content
  • Skip to primary sidebar
  • Skip to footer

Hands Occupied

Colorful knitting, crochet, latch hook and macrame from craft book author & designer Heidi Gustad.

  • BLOG
    • Knitting
    • Crochet
    • Latch Hook
    • Macramé
    • Punch Needle
  • ABOUT
  • Shop
  • Nav Social Menu

    • Instagram
    • Pinterest
    • RSS
    • TikTok
    • YouTube

Knitting Needle Case DIY

March 26, 2014 5 Comments

Knitting Needle (or Pencil) Case DIY

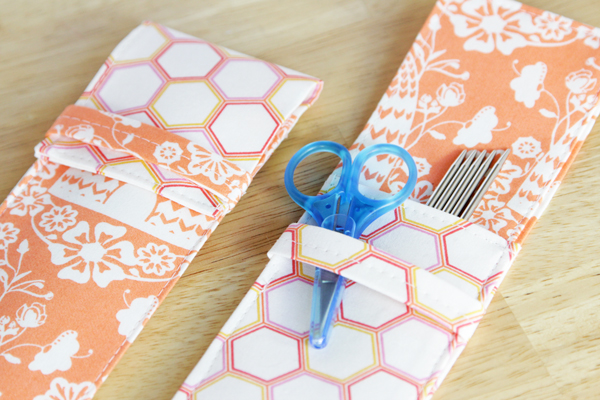
These fun little knitting needle pouches can also be used as a pencil case or, of course, as a crochet hook case. Sometimes sewing offers a fun distraction to all of the knitting and crochet I spend my time doing. It’s a fun exercise taking something larger and sculpting it into something smaller, whereas knitting and crochet have you taking a string and building it into something larger. Maybe not everyone thinks of sewing vs. knitting/crochet like this, but it’s how my brain works. :)

Knitting Needle (or Pencil) Case DIY

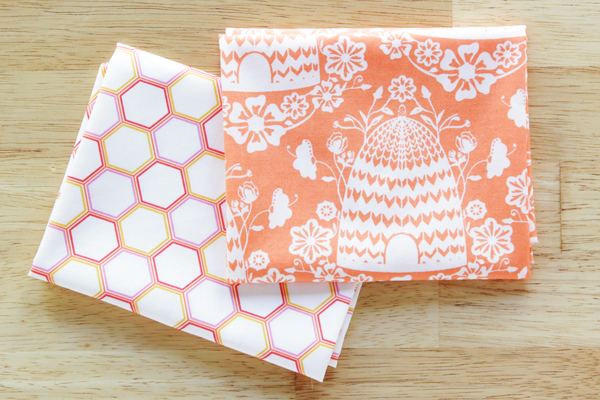
Now, I must take a minute to tell you about the fantastic fabric I used for this project. It’s part of a really beautiful line designed by the blogfamous Bonnie of Going Home to Roost. Her line is called Sweet as Honey, and it features deer, flowers and (my favorite) bees. I picked just two of my fave fabrics from the line for this easy contrasting needle case, but the full fabric line has a bunch of other inspiring designs to try too.
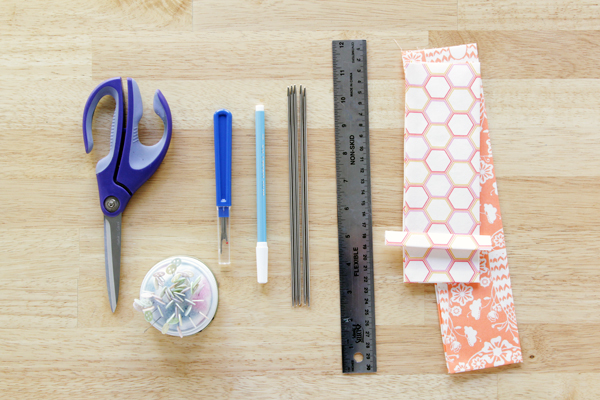
Supplies

2 fat quarters of fabric
iron
sewing machine
pencils and/or double pointed knitting needles
straight pins
white thread
plain sewing needle
ruler
scissors
lightweight fusible interfacing

Knitting Needle (or Pencil) Case DIY

Directions

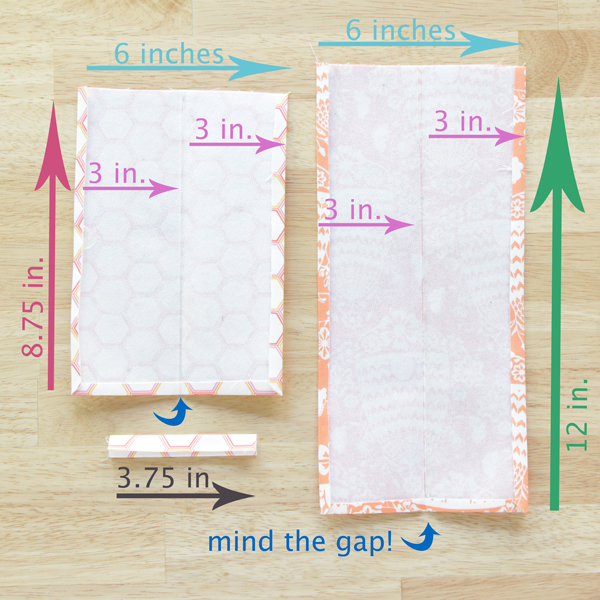
You’ll start by cutting four pieces of lightweight fusible interfacing, all 12 inches by 3 inches. Iron two of the rectangles very close to each other (12 inch sides nearly touching) on each of your two fat quarters. Cut out each 12 by 6 rectangle, right along the edge of the interfacing. Just don’t cut the interfacing rectangles apart – each rectangle will be 12 by (slightly more than) 6 inches.

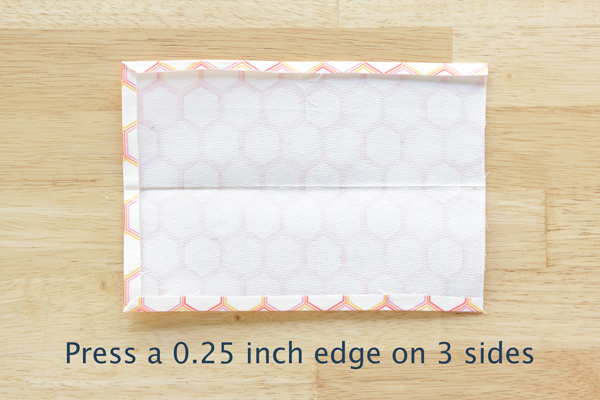
On one of your cut out pieces, use your iron to press a quarter inch edge on the two long sides and one short side.

Knitting Needle (or Pencil) Case DIY

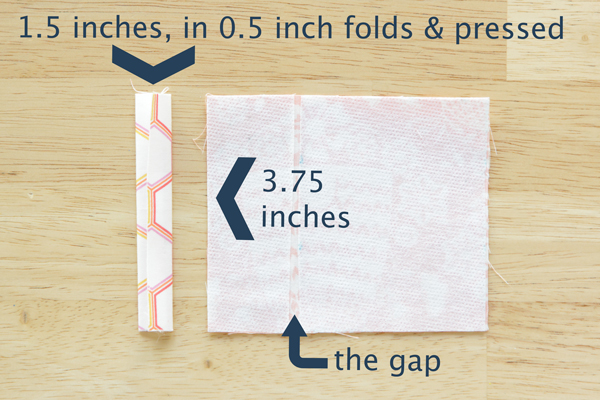
Cut off 3.75 inches from one end of your second rectangle and press another quarter inch edge on the two long and one short side of it.

Knitting Needle (or Pencil) Case DIY

Grab the 3.75 inch piece you cut off from your second rectangle. Cut off 1.5 inches from one end of it.  Knitting Needle (or Pencil) Case DIY

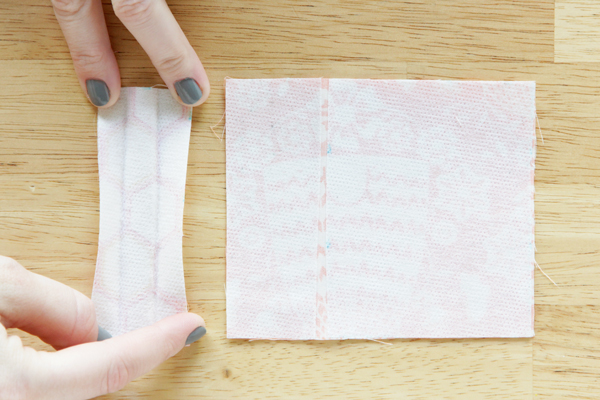
Fold the 1.5 by 3.75 inch into even thirds and iron down. (This will soon be the piece of your needle case that holds down the top flap.)

Knitting Needle (or Pencil) Case DIY

This next graphic is a little cray, my apologies, but I wanted to share the dimensions of what you should have at this point. Just double check this all before you start sewing. :)

Knitting Needle (or Pencil) Case DIY

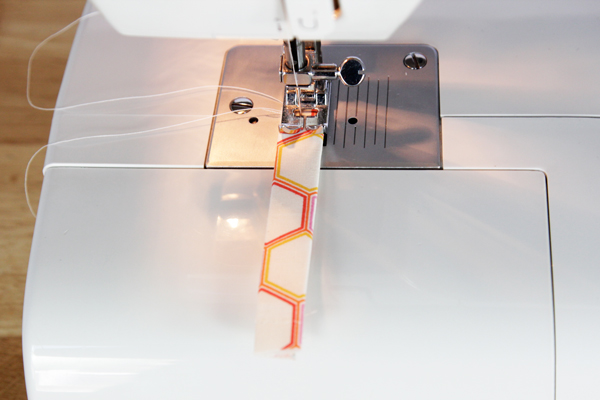
Sew a line straight across the small piece.

Knitting Needle (or Pencil) Case DIY

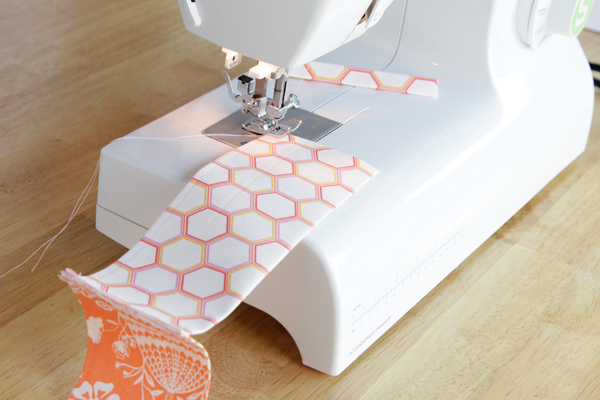
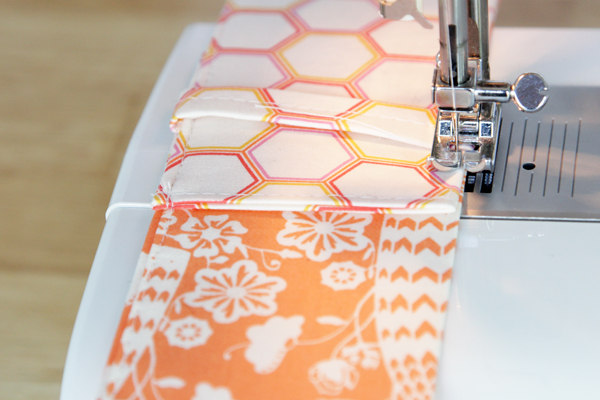
Fold your rectangles in half so the interfacing sides touch. Figure out which sides of the pouch you want facing outward on your finished case. Place them facing each other, raw edges of fabric together. Sew across the raw edge with your sewing machine, forming the bottom seam of your case.

Sew across the other end of the smaller rectangle.

Knitting Needle (or Pencil) Case DIY

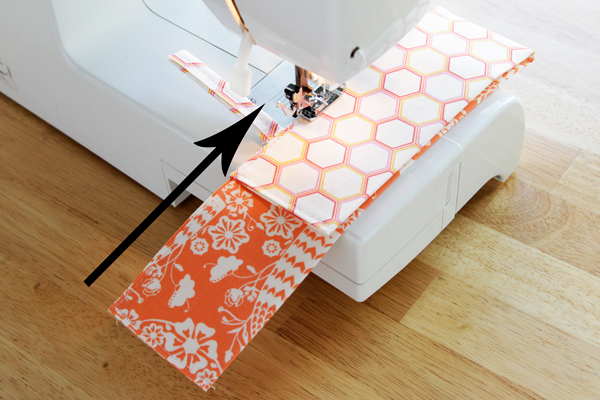
Fold your case over the seam on the raw edge. Place the tiny rectangle piece about an inch or inch-and-a-half from the top of the smaller rectangle. (Bonus points if your tiny rectangle is placed so it lines up with the front panel’s pattern.) Sew all the way from the top of the longer rectangle down to that folded over hem, securing the tiny rectangle with backstitching to make it strong.

Knitting Needle (or Pencil) Case DIY

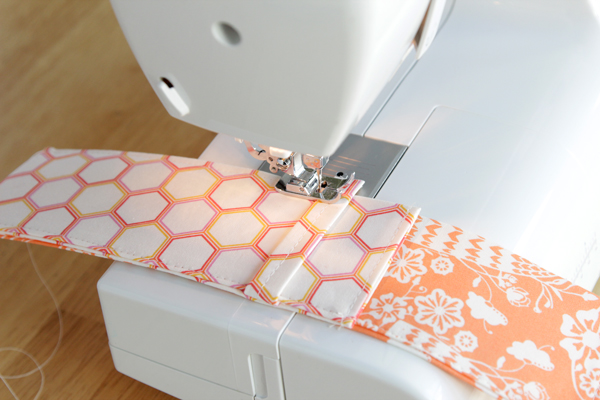
Sew along the other side of the case, stopping right before where the tiny rectangle should be.

Knitting Needle (or Pencil) Case DIY  
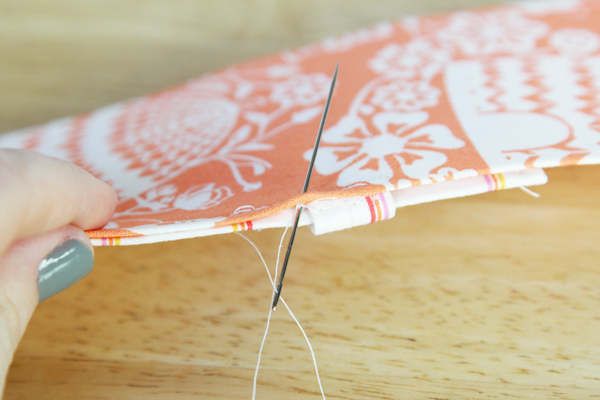
Hand sew the tiny rectangle into place between the front and back layers of the case.

Knitting Needle (or Pencil) Case DIY

Sew from the other side of now-secure tiny rectangle all the way to the end of the case. Sew across the top short edge and trim all stray threads to finish.

Knitting Needle (or Pencil) Case DIY

That’s it! Sorry for the long tutorial, but I didn’t want to forget anything! I made two cases in preparation for this post, one with the honeycomb pattern as the front panel, and one with it as the back panel.

Knitting Needle (or Pencil) Case DIY at Hands Occupied

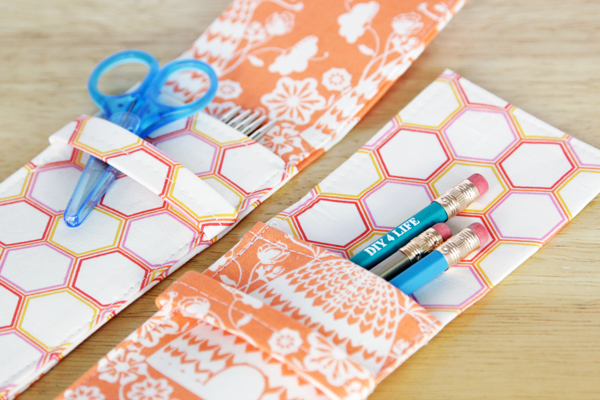
Aren’t they sweet? :)

Since this is a blog tour, I should mention that I was provided with samples of the fabric featured today. You should check out yesterday’s hostess Very Shannon’s project, and tomorrow, you should check out Knack Studio‘s. 

PS: Shout out to Whimseybox for the fun pencils I used in for my photo shoot for this project! Thanks, ladies ;) 

Filed Under: Giveaways, Reviews & Sponsored, How-to, Knitting & Crochet, Sewing Tagged With: blog tour, case, craft, crochet hook, diy, going home to roost, hexie, honeycomb, knitting needle case, pencil case, sew, Sewing, sweet as honey

About Heidi

Heidi Gustad is a craft book author, designer & creator specializing in yarn crafts like knitting, crochet, latch hook & macramé. Her first book, Latch Hook: 12 Projects for the Modern Maker, is out now.

Previous Post: « Fun-mazing Jewelry DIYs
Next Post: Weekly Reader »

Reader Interactions

DID YOU LIKE THIS POST?
Visit similar articles...

  • How-to: Toothpick-Stamped Place MatsHow-to: Toothpick-Stamped Place Mats
  • How-to: Back Seat Pet Protector How-to: Back Seat Pet Protector
  • Weekly ReaderWeekly Reader
  • Simplicity 1803: Just the Skirt / Handmade WardrobeSimplicity 1803: Just the Skirt / Handmade Wardrobe

DON’T MISS ANOTHER UPDATE

Comments

  1. Maxine Ramey

    March 26, 2014 at 9:22 am

    I love these…I need to make a couple for my knitting bff!

    Reply
  2. bonnie christine

    March 26, 2014 at 10:42 am

    heidi, these are so cute! knitting and sewing go together so well, don’t they? honored to have you on the tour with us! xox, bonnie

    Reply
  3. Sue Bennett

    March 26, 2014 at 11:32 am

    What a wonderful project. Thanks for sharing it with us.

    Reply
  4. Anne

    April 28, 2014 at 10:11 am

    Awesome little pouch!! I’ve got a Craft Gossip post scheduled for this evening that links to your tutorial:
    http://sewing.craftgossip.com/tutorial-knitting-needle-or-pencil-pouch/2014/04/28/
    –Anne

    Reply
    • Heidi

      April 28, 2014 at 5:56 pm

      Thanks, Anne!

      Reply

Leave a Reply Cancel reply

Your email address will not be published. Required fields are marked *

This site uses Akismet to reduce spam. Learn how your comment data is processed.

Primary Sidebar

Heidi Gustad from Hands Occupied / Craft Book Author and Knitting, Crochet, Latch Hook and Macrame Designer

Hi! I’m Heidi (she/her/hers), a craft book author & pattern designer specializing in knitting, crochet, latch hook & macrame. Really anything with yarn! ❤️  My work combines vintage and modern design elements, featuring bold colors and graphic motifs.

EMAIL NEWSLETTER

Never miss a tutorial with these short & sweet monthly updates.

Find Me on Social Media

  • Instagram
  • Pinterest
  • TikTok
  • YouTube
Latch Hook by Heidi GustadDiscover Unique Items

Footer

INSTAGRAM

handsoccupied

Craft book author, designer & creator specializing in yarn crafts like knitting, crochet, latch hook & macramé
❤️ Email preferred

Heidi Gustad 🧶✂️
Weekend knitting design aftermath. Remember kids, Weekend knitting design aftermath. Remember kids, it’s always good to stop, swatch and block it. 🧶
.
#stopswatchandblockit #handsoccupied
Learn how to do the magic loop method for knitting Learn how to do the magic loop method for knitting in the round in 90 seconds. / Using the magic loop allows knitters to work in the round with a single, long circular needle at a range of circumferences. 
.
For a longer, full-width & more detailed overview of magic loop knitting, check out my u2be & b1og, the 🔗🔗 are where you’d think. 🧶
.
#handsoccupied #magicloop #knitting #howtoknit #learntoknit #knitter #knittinginspiration #knittinginstagram #knittingintheround
Since it won’t be clean for long, swipe to see w Since it won’t be clean for long, swipe to see what my home studio looks like these days. Nothing will ever quite be like the old Hands Occupied Studio, but I’m pretty pleased with how I shoehorned everything in this space. Function over form + a layer of yarn cuteness-meets-chaos is how I’d describe my creative space needs. 😆 When I was still renting the studio, those needs included “doesn’t rain suspicious brown water from a crack in the ceiling for a year,” so this is an improvement! 😆
.
For a time lapse of the studio organizing and tszuj-ing process, scroll down a couple posts on my feed. (There’s also a video or two featuring the old studio if you’re curious.) Happy June, friends! 
.
#handsoccupied #handsoccupiedstudio #knitdesigner #craftdesign #yarncrafts #latchhook #makerlife #heidigustad #chicagocrafter
Who doesn’t love magic loop knitting? Who doesn’t know what it is? How about when circular needles were invented?
.
In todays new bl0g post + video tutorial, you’ll learn about the magic loop method for knitting in the round, how to do it and why to use it, and when it came to be. The 🔗 is in my b1o. 🧶 
.
#handsoccupied #magicloop #knitting #howtoknit #knittinginspiration #knittingintheround
Finally organizing & putting the finishing touches Finally organizing & putting the finishing touches on my home studio. After losing my studio space last fall, it’s feels really great to *occupy* this new space all the way. 😉
.
I started by removing general clutter & returning straggler supplies from various WIPs, videos & design deadlines to their homes. Next, I hung a third peg board in the space - this one is mostly for display and less for organizing tools or projects. For the first time ever, I’m displaying projects from my book, plus a couple other faves. (The best thing about designing more yarn crafts besides knit & crochet is that I have some really fun -and delightfully pettable 😆- samples around.) I finished by adding a square dowel to my small supply storage tower to keep it from tipping over, plus re-arranging and de-cluttering the closet. 
.
This cleaner space already has me feeling so much more creative and less overwhelmed. Now to find a safe spot in the basement for the tower of project samples in Rubbermaid tubs I liberated from my WIPs closet. Also why are there five?! 
.
Here’s to keeping it clean for a few weeks! 🧶 
.
#handsocupied #handsoccupiedstudio #craftroom #craftroomorganization #craftroomstorage #yarncraft #knitter #crocheter #latchhook #latchhookbook
Load More... Follow on Instagram

Copyright © 2023 / Foodie Pro Theme On Genesis Framework / Branding by Ink + Mortar
All Site & Shop Policies / Privacy Policy / Cookie Policy