• 0 items$0.00
  • Skip to primary navigation
  • Skip to main content
  • Skip to primary sidebar
  • Skip to footer

Hands Occupied

Contemporary yarn crafts by Heidi Gustad. Knitting, crochet, latch hook and macrame.

  • BLOG
    • Knitting
    • Crochet
    • Latch Hook
    • Macramé
  • ABOUT
  • Shop
  • Studio
  • Nav Social Menu

    • Facebook
    • Instagram
    • Pinterest
    • RSS
    • Twitter
    • YouTube

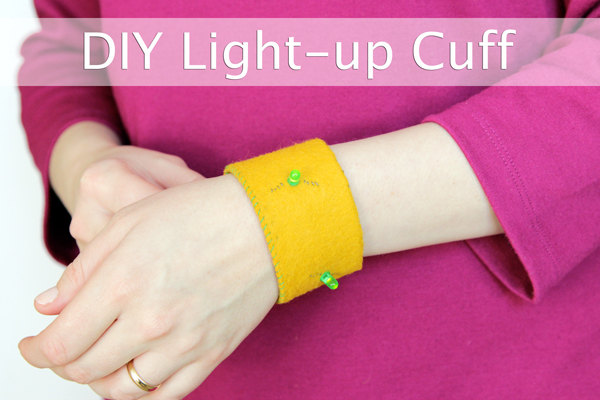
DIY Light-Up Cuff Bracelet

February 24, 2014 4 Comments


DIY Light-up Cuff Bracelet at Hands Occupied

Etextiles are pretty cool, but somehow actually attempting an electronics project didn’t happen until this week. I’m so glad I finally took a workshop because etextiles are SO COOL. And not nearly as scary as I thought. Not by a long shot. Today’s tutorial covers the very basics of working with LED bulbs and creating a simple circuit with conductive thread to make a bracelet that lights up when you wear it.

I’ll reiterate that I’m a newbie at this, so I recommend also taking a look at these related projects before you begin if you’ve never tried extextiles: Make / Instructables. These sites’ instructions go more into the science I don’t feel qualified to attempt explaining. :) 

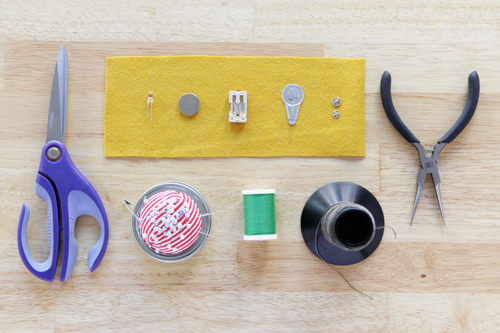
Supplies

3V watch-style battery
battery holder
conductive thread
3 LED bulbs
felt
regular thread
snap closure
needle
needle threader (optional)
scissors
needle nose pliers
DIY Light-up Cuff Bracelet

Directions

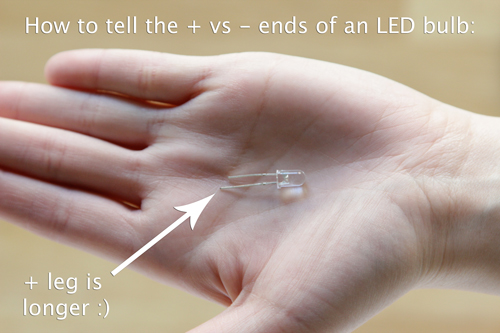
The first thing to learn when working with LEDs is the anatomy of a single bulb. There’s a long and a short wire attached to individual LEDs, and the long one is positive and the short one is negative. (Learn more about how LEDs work here.)
DIY Light-up Cuff Bracelet

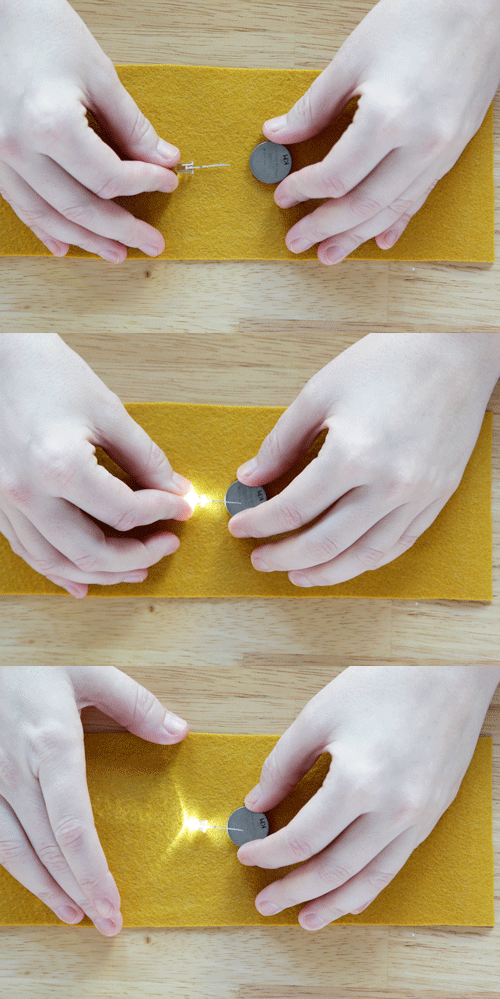
Test each of your LEDs by placing the + side on the + side of your battery and the – side on the – side of your battery. You just want to ensure they work before you begin.
DIY Light-up Cuff Bracelet

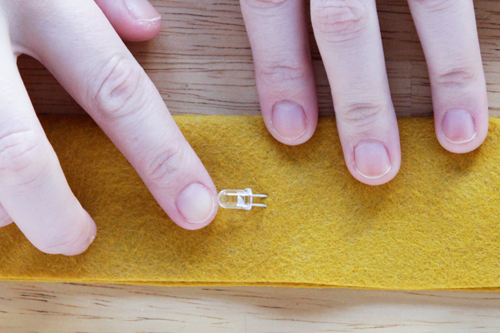
Cut a piece of felt into a 9.5 x 3.5 inch rectangle. Fold the rectangle in half lengthwise, and punch the LED’s legs through the very center of one of the layers of felt.
DIY Light-up Cuff Bracelet

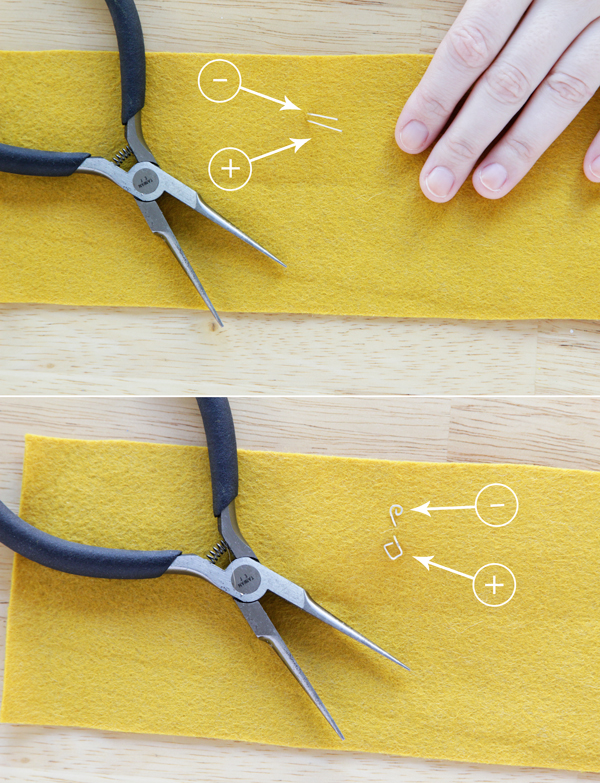
Open your folded felt rectangle back up, and using your needle nose pliers, bend the longer leg of your LED at right angles and the shorter leg into a spiral. Fold the legs so they lay flat against the felt, as shown. I found it helpful to have all my – ends pointing to the nearest raw edge of the felt rectangle, and the + ends, the other edge.
DIY Light-up Cuff Bracelet

Sew your snaps to each end of your cuff using regular thread (there are more pictures of where I place mine in pictures below – I forgot to take some as I worked on the cuff, my apologies!). Thread your needle with conductive thread, and sew all of the – ends of the LEDs together. Then sew all of the + ends together in addition to sewing one of the snaps to the +’s.

Lost? Confused? Instructables has some great tips for making a similar project.
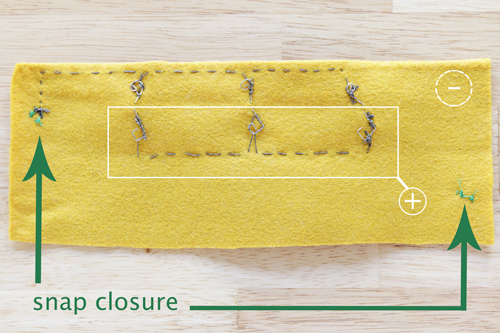
DIY Light-up Cuff Bracelet

Here’s what the other side of my in-progress cuff looked like. Notice the placement of my snaps. :)
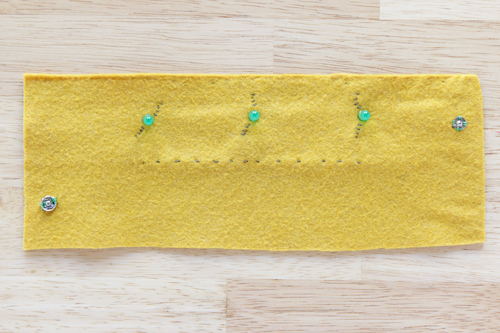
DIY Light-up Cuff Bracelet

A close-up of the conductive thread making an appearance on the outside of my cuff. I kept it as subtle as possible, but that’s the challenge of working with extextiles – making them look good! The dashes of thread are visible here because they’re wrapped around the legs of the LED.
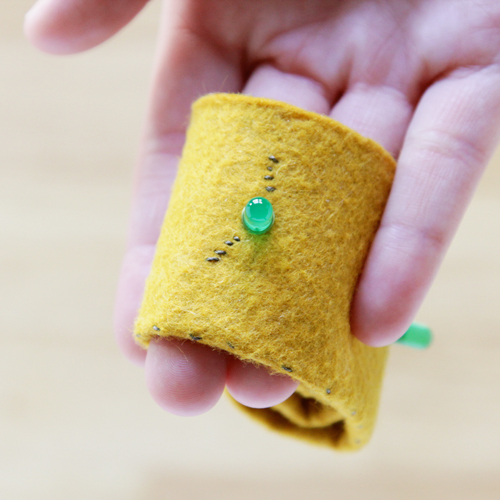
DIY Light-up Cuff Bracelet

Slip your battery into its holder, making sure to put it in right side up (look for a + or –  before sliding in the battery). Sew the + end of the battery pack to the last + LED leg on one end.
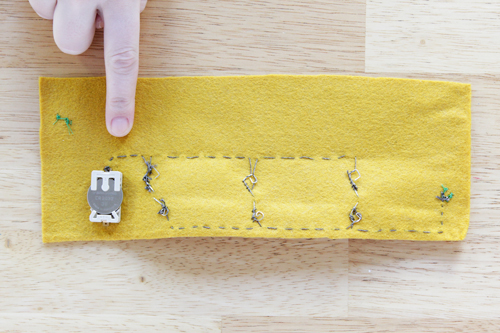
DIY Light-up Cuff Bracelet

The last connection to be made to get your lights to illuminate are the second end of the battery holder to the snap that hasn’t yet had conductive thread sewn through it. Before you do that sewing, you’ve another step to do.
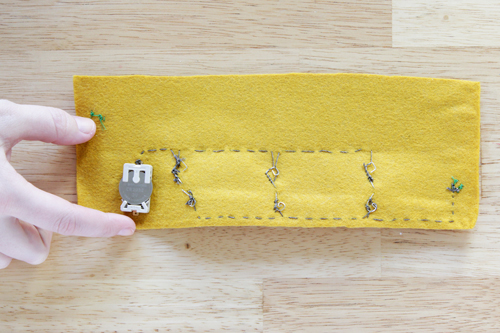
DIY Light-up Cuff Bracelet

Fold your rectangle lengthwise. Using regular thread, whip stitch along the short edge of the non-battery end of the bracelet and then the long side, stopping just before the battery holder.
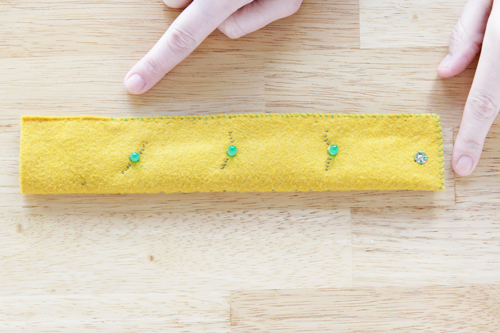
DIY Light-up Cuff Bracelet

Mostly sewing up the bracelet will help you sew the snap to the battery pack.
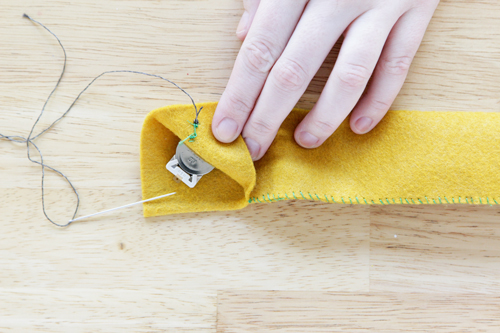
DIY Light-up Cuff Bracelet

Here’s how I sewed the battery & snap, despite the battery being on one side of the felt and the snap being on the other.
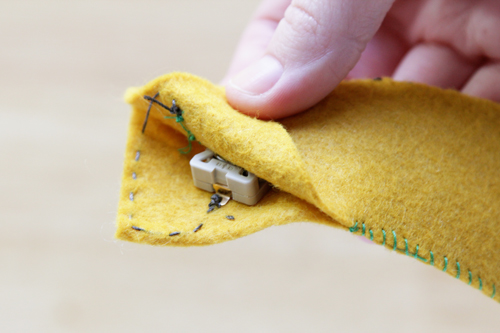
DIY Light-up Cuff Bracelet

At this point you can test your bracelet to see if it lights up by touching the snaps together. If your circuit was sewn correctly, you should be all set. If not, you’ll need to backtrack, locate the issue and try again. My first LED bracelet took me a few tries to get right!
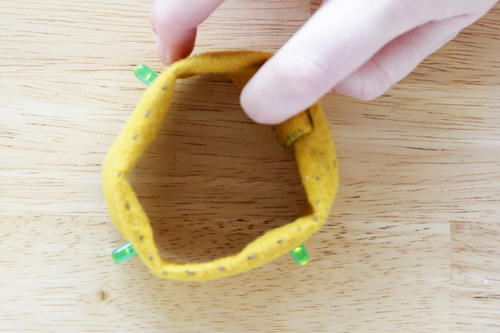
DIY Light-up Cuff Bracelet

When you know your bracelet is functioning properly, you can whip stitch around the last of the open ends.
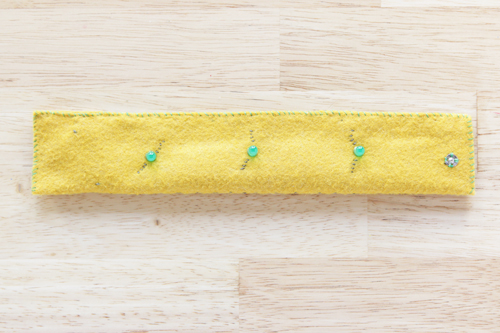
DIY Light-up Cuff Bracelet

I like to leave a little slot for replacing the battery as needed. It’s a pretty simple little bit of construction, but useful!
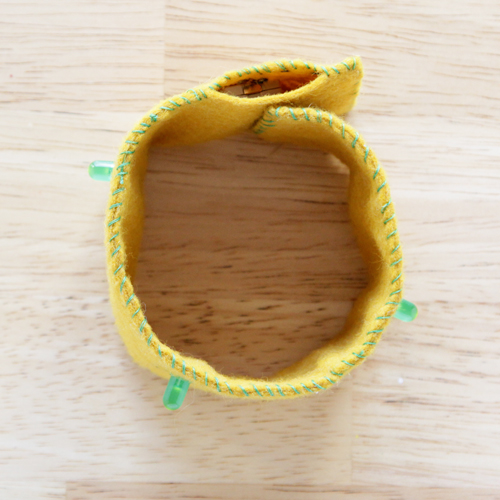
DIY Light-up Cuff Bracelet

So, what do you think? Thumbs up? Too crazy for you? Or does this now seem doable? Maybe in a few years or after a few beers (for courage ;)) ?
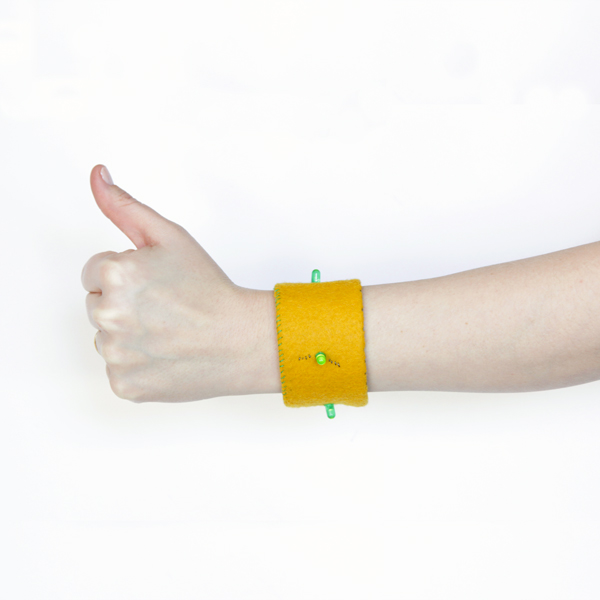
DIY Light-up Cuff Bracelet at Hands Occupied

Filed Under: DIY Style, Embroidery, How-to Tagged With: bracelet, crafts, cuff bracelet, diy, etextiles, LED, led bracelet, Sewing, simple circuit, style, wearable technology

About Heidi

Heidi Gustad is a craft book author & content creator in love with primary colors & vintage vibes. She specializes in knitting, crochet, latch hook and macramé, and her first book, Latch Hook: 12 Projects for the Modern Maker, is out now!

Previous Post: « Weekly Reader
Next Post: DIY FYI: Threading a Needle »

Reader Interactions

DID YOU LIKE THIS POST?
Visit similar articles...

  • O (mini) Christmas TreeO (mini) Christmas Tree
  • How-to: Back Seat Pet Protector How-to: Back Seat Pet Protector
  • How-to: Giant LED Arrow SignHow-to: Giant LED Arrow Sign
  • Weekly ReaderWeekly Reader

DON’T MISS ANOTHER UPDATE

Comments

  1. Allison @ Dream a Little Bigger

    February 24, 2014 at 3:24 pm

    Oh my gosh, this is Amazing! I want to do this, like, yesterday. Thanks for all of the pics, too. This looks totally doable :)

    Reply
    • Heidi

      February 24, 2014 at 4:00 pm

      Right? I had been so scared of LEDs and then I took at class at my library (which has a maker space because Chicago is the BEST ;) ). So easy. Just lining up the +s & -s correctly is the trick! :)

      Reply
  2. Louise

    January 27, 2018 at 10:22 pm

    Thanks very much! I want to attach LEDs to an 18″-doll sweater or tee; I’m imagining a simple outline design. Any suggestions or sources?

    Reply
    • Heidi

      February 1, 2018 at 9:08 am

      When I did this LED project with my library teens, I ended up getting most of my supplies on Amazon (for grant billing purposes that are beyond my comprehension, ha). At Christmas this year, I made my father-in-law a solar powered LED stocking, and the biggest issue I ran into was finding quality supplies. That’s the biggest thing to watch out for – low quality supplies that break too easily.

      I hope this helps! If you want to discuss this more in-depth, feel free to email me at handsoccupied-at-gmail-dot-com.

      Reply

Leave a Reply to Louise Cancel reply

Your email address will not be published. Required fields are marked *

This site uses Akismet to reduce spam. Learn how your comment data is processed.

Primary Sidebar

Heidi Gustad from Hands Occupied / Craft Book Author and Knitting, Crochet, Latch Hook and Macrame Designer

Hi! I’m Heidi, an author, yarn craft designer and content creator specializing in knitting, crochet, latch hook & macrame. My work unapologetically features primary colors and vintage-meets-modern style. My first book, Latch Hook: 12 Projects for the Modern Maker, is now available!

Professionally I’m most known for: advanced intarsia knitting design & modern latch hook design.

work with heidi

UPDATES BY EMAIL

Get a free pattern + biweekly updates sent to your inbox.

Let’s be friends!

  • Facebook
  • Instagram
  • Pinterest
  • Twitter
  • YouTube
Latch Hook by Heidi Gustad

Footer

INSTAGRAM

handsoccupied

Craft book author & content creator in love with primary colors & vintage vibes. / #latchhookbook out now!
.
knitting, crochet, latch hook & macramé

Heidi Gustad 🧶✂️
A new YouTube tutorial is live today covering how A new YouTube tutorial is live today covering how to knit the Little Butterfly Stitch (aka Bowknot Stitch). It adds so much cute character to simple stockinette. Only a little funky to knit, and it packs a huge visual punch! 🦋 
.
Find the video & written stitch pattern on the blog and YouTube, links are in bio. 
.
#kpambassadorsfeb21 #sponsored
.
Yarn: @kelbournewoolens Germantown in Baby Blue via @knit_picks. Needles: Prism Interchangeables, also from Knit Picks. 
.
Pictured: a light blue swatch of Little Butterfly Stitch knitting on a pink background. A skein of yarn and a few stitches of knitting are nearby.
“You’re telling me words can be pronounced in “You’re telling me words can be pronounced in different ways and mean the same things?!” 👀 Posting this here, just to make it clear: when anyone says skayne, skeen, or skyne, it can be safely assumed we’re talking about a bundle o’ yarn,  a SKEIN. It’s not necessary to shame someone for using a word that is known to have MULTIPLE common pronunciations. 🧶
.
.
Can you plz comment sharing how you say SKEIN and where you learned it? The OED happens to say SKAYNE, but it’s not a personal attack if someone says SKEEN and you say SKYNE or even Saskatoon. I’m legitimately curious. We don’t all knit or crochet the same way, and craft evolves a bit like language - it is passed on. There is so much value in having conversations about & embracing these variations! ✌🏻
.
Pictured: A blond woman holds a skein of mustard yellow yarn up to her head like a phone, looking shocked. She’s wearing glasses & a knit sweater. 
.
#handsoccupied #heidigustad #skein #yarn #yarncraft #knit #crochet #yarnaddict #knitincolor #soldotnacrop #language #englishisweird #oed #oxfordenglishdictionary
Sometimes my weekend projects involve hair rather Sometimes my weekend projects involve hair rather than yarn. Here’s the latest mediocre-but-improving result of my slow quest to learn to set vintage inspired curls. 💇🏼‍♀️ I’m hoping to be able to wash my hair less using a regular vintage set, but we’ll see if it ends up being practical. 😆 Hair frustrates me so much more than crafts! 
.
Do you also style your hair using vintage methods? If you have any tips for vintage hair styling or good resources to share, please do!
I suppose this is one way to decide what yarn colo I suppose this is one way to decide what yarn color suits your pooch. 😆 Navy really might be Woodrow‘s color - what do you think? 
.
Pictured: A medium sized, brown, senior dog asleep on a green bed. For some reason a donut ball of navy wool yarn sits on his head.
The first stitch tutorial of the new year is live The first stitch tutorial of the new year is live on YouTube! Diamond Brocade is a great knit+purl only stitch for beginners or anyone wanting a classic look for their knitting project. Find the video with a written stitch pattern on the blog or head directly to the video on YouTube. Both are linked in bio. ✌🏻 
#kpambassadorsfeb21 #sponsored
Load More... Follow on Instagram

Copyright © 2021 / Foodie Pro Theme On Genesis Framework / Branding by Ink + Mortar
All Site & Shop Policies / Privacy Policy / Cookie Policy