• 0 items$0.00
  • Skip to primary navigation
  • Skip to main content
  • Skip to primary sidebar
  • Skip to footer

Hands Occupied

Colorful knitting, crochet, latch hook and macrame from craft book author & designer Heidi Gustad.

  • BLOG
    • Knitting
    • Crochet
    • Latch Hook
    • Macramé
    • Punch Needle
  • ABOUT
  • Shop
  • Nav Social Menu

    • Instagram
    • Pinterest
    • RSS
    • TikTok
    • YouTube

DIY Pencil Clutch

August 25, 2014 19 Comments

DIY Pencil Clutch - Get the tutorial at handsoccupied.com

Around this time of year as a kid, I’d organize all of my school supplies. I’d sit on the floor three-hole punching and reinforcing my 5 for $1 folders with packing tape and covering them in drawings related to the subject I’d decided they were for. My notebooks, of course, would color-correspond with their folders. And then I’d set up a sweet binder with all my folders and class schedule. It was so dope.

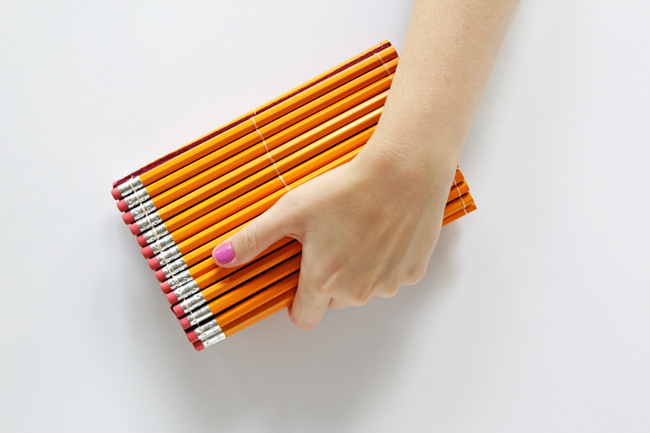
All that is to say, I’m now a professional librarian, and my alarming level of nerd love for school supplies has yet to wane. A couple years ago, I made a clutch using rulers and felt that I am still pretty excited about and use all the time. Since I can’t get enough of all things bookish, I recently got the notion in my head to take the school supply clutch concept to the next level with pencils and a slightly different structure, and I think I might love this one even more!
DIY Pencil Clutch - Get the tutorial at handsoccupied.com

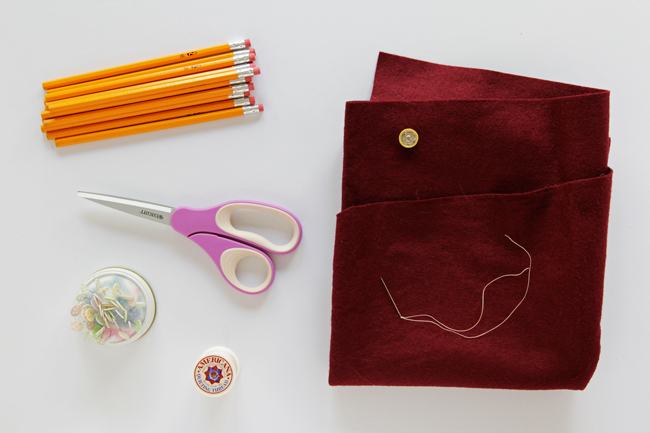
Supplies

30 pencils
quilting thread
1/4 yd. wool felt
sewing needle
scissors
straight pins
snap closure
DIY Pencil Clutch - Get the tutorial at handsoccupied.com

Directions

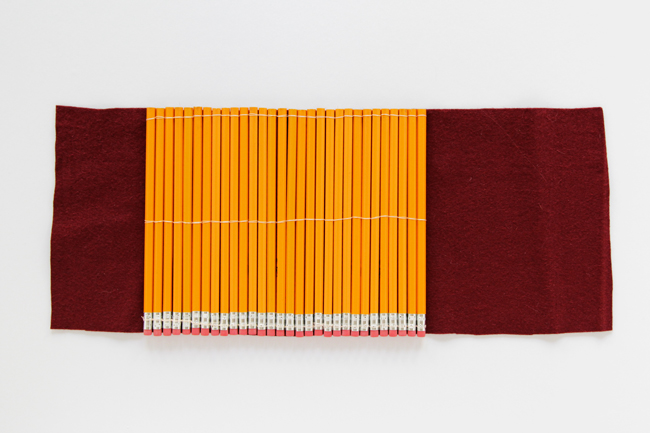
Cut out a felt rectangle that is 18 inches by 7.5 inches. Sew 30 pencils one by one, over the center of the felt rectangle (I know, I didn’t center mine, but I recommend it from experience, ha!).
DIY Pencil Clutch - Get the tutorial at handsoccupied.com

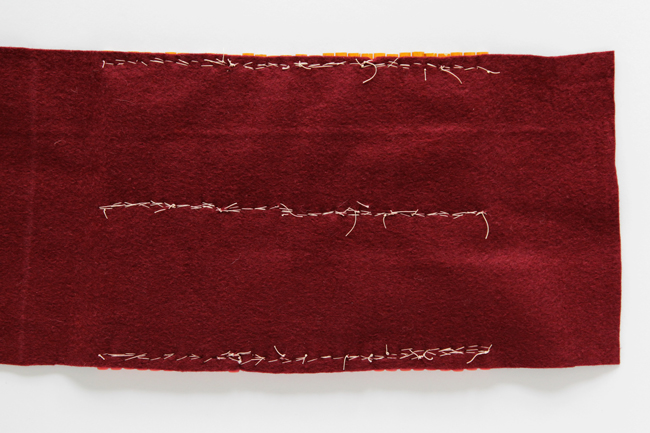
I attached my pencils by tightly sewing twice around each end of the pencil as well as the center of the pencils, and sewing the pencils together by sliding the needle under the previous pencil’s threads as I went. Another alteration I recommend from the pictures here is not sewing the pencils down so close to the ends. If you sew around your pencils about 3/4 of an inch from the ends of the pencil, plus right down the center, they’ll be more secure. :)
DIY Pencil Clutch - Get the tutorial at handsoccupied.com

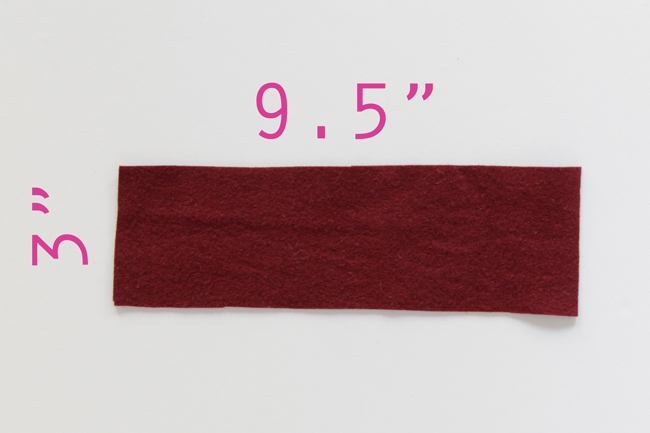
Once your pencils are secure, the hardest part of the clutch is over! Next cut out two rectangles of felt that are 9.5 inches by 3 inches.
DIY Pencil Clutch - Get the tutorial at handsoccupied.com

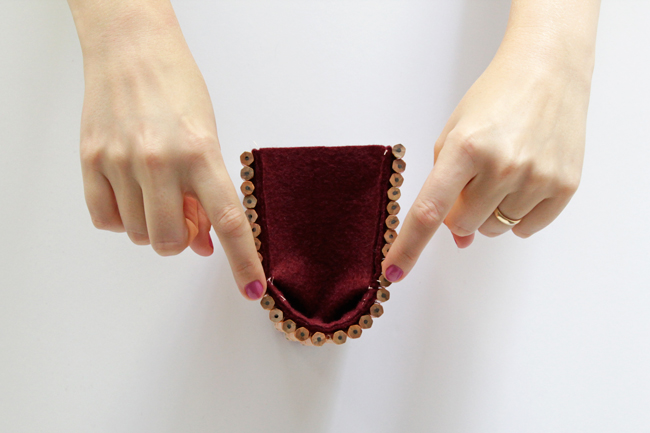
Fold in the pencil-free ends of the felt and sew them down with a running stitch along the eraser edge and the pencil end edge. Then fold one 9.5×3 inch rectangle exactly in half and pin to keep the fold. Center the folded rectangle on one of your running stitch edges of the soon-to-be clutch. Sew the folded end of the rectangle flush to the edge of your clutch, again with a running stitch.
DIY Pencil Clutch - Get the tutorial at handsoccupied.com

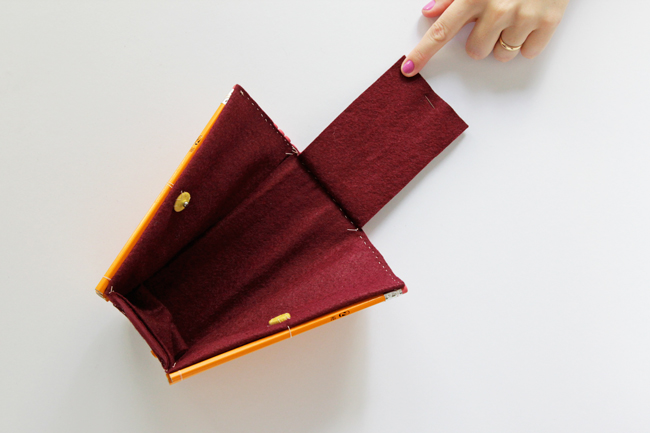
In this photo I’m pointing out how that sewed edge looks on my finished clutch, for your reference.
DIY Pencil Clutch - Get the tutorial at handsoccupied.com

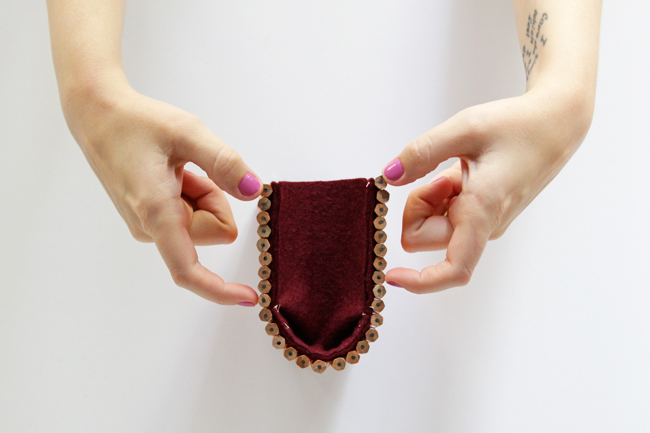
Then align the non-creased end of your folded rectangle with the top of your clutch. sew each edge down from the top of the clutch, stopping when you run into the sewn down, folded edge of your rectangle. This picture should help you visualize what I mean.
DIY Pencil Clutch - Get the tutorial at handsoccupied.com

Yes, there’s supposed to be a little bit of a fold where the tall edges of the rectangle meet the folded edge. This allows the clutch to open nicely and accommodate more stuff.

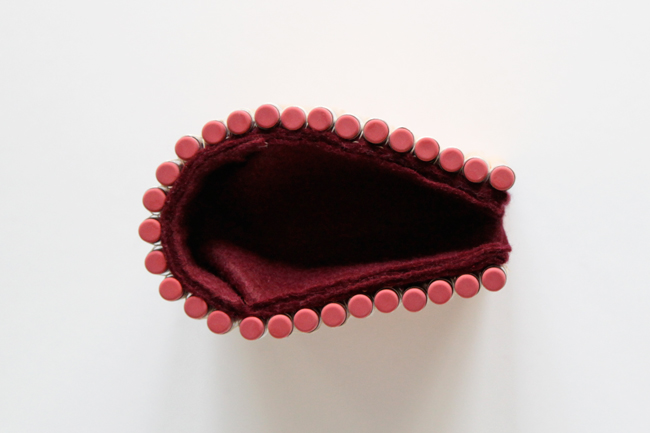
Next, sew on your clutch’s snap closure, and repeat the process of sewing the small rectangle onto the other side of your clutch.
DIY Pencil Clutch - Get the tutorial at handsoccupied.com

At this point, if you’ve got any felt sticking out past the edges or top of your clutch, feel free to trim it for a crisper look.
DIY Pencil Clutch - Get the tutorial at handsoccupied.com

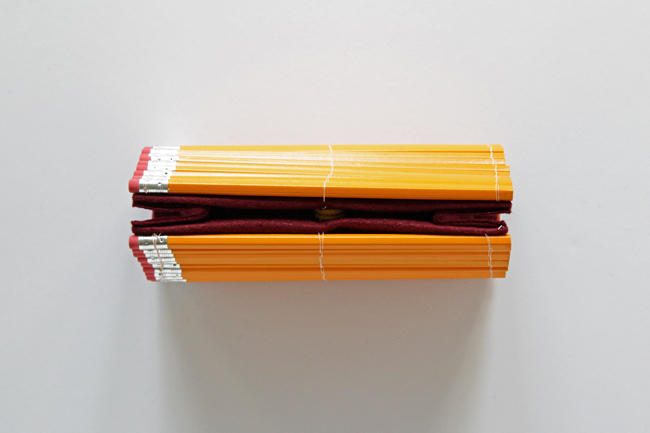
Ta da! Another bookish clutch to add to your fall wardrobe! I’ve taken this rad little clutch out to dinner a couple times since finishing it, and it totally works. The only flaw is that I sewed the eraser and writing ends of the pencil down too close to the edge, so occasionally a pencil will pop out of its thread. A popped-out pencil is fixable, but it’s easier to prevent the popping in the first place. That’s why I recommend sewing them down 3/4 of an inch from each end. It’s more secure that way. :)
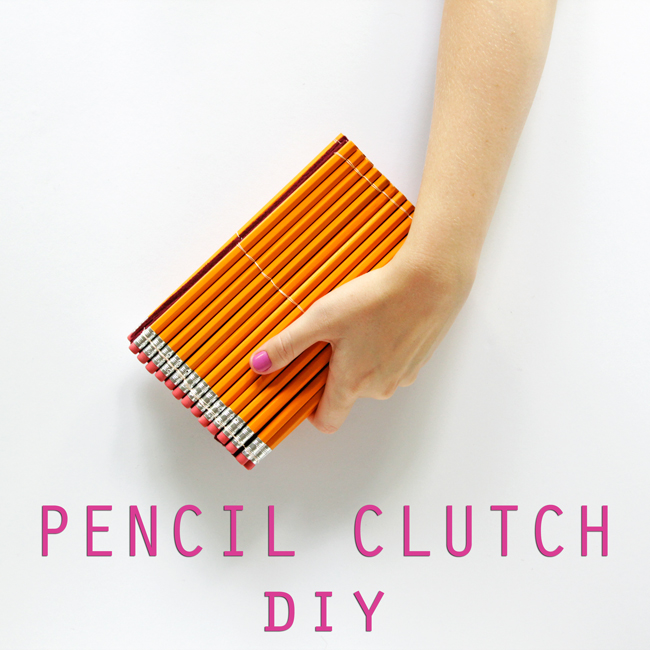
DIY Pencil Clutch - Get the tutorial at handsoccupied.com

What do you think? Too wacky? Do you love it? I think this goes really well with some of my funkier, bright dresses, and holds the perfect amount of stuff for an evening out.

PS: If you like this clutch, here’s a shot of the ruler clutch I mentioned at the top of this post. You can click the image below to go to that tutorial.
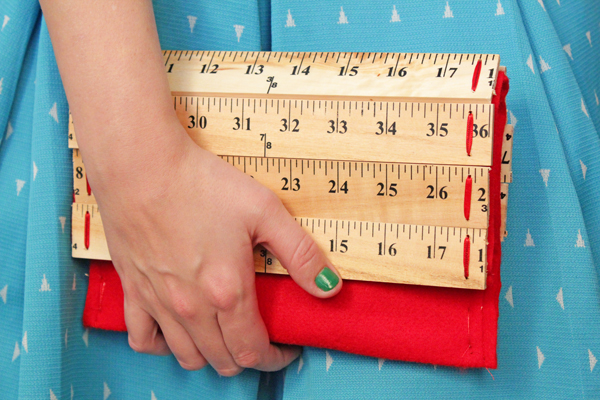
How-to: Ruler Clutch Purse | HandsOccupied.com

Filed Under: Back to School, DIY Style, How-to Tagged With: accessories, back-to-school, clutch, crafts, diy clutch, pencil clutch, pencils, purse

About Heidi

Heidi Gustad is a craft book author, designer & creator specializing in yarn crafts like knitting, crochet, latch hook & macramé. Her first book, Latch Hook: 12 Projects for the Modern Maker, is out now.

Previous Post: « Picks of the Week
Next Post: How to Knit an Afghan for Under $35 »

Reader Interactions

DID YOU LIKE THIS POST?
Visit similar articles...

  • Style this DIY: Louise Belcher HatStyle this DIY: Louise Belcher Hat
  • How-to: Duck Tape Tablet Case & Foldover ClutchHow-to: Duck Tape Tablet Case & Foldover Clutch
  • Top 12 of 2012 Top 12 of 2012
  • How-to: Knit Puffball ClutchHow-to: Knit Puffball Clutch

DON’T MISS ANOTHER UPDATE

Comments

  1. Elba Valverde

    August 25, 2014 at 2:58 pm

    Such a clever idea and how fun!

    Reply
  2. evelyn

    August 25, 2014 at 5:02 pm

    amazing!!! I’ve always had warm cuddly feelings about school and office supplies, and I can’t wait to make this clutch. I may start stitching yellow pencils everywhere…

    Reply
  3. Morena

    August 25, 2014 at 5:37 pm

    This is SERIOUSLY cute! I want one!

    Reply
  4. Alexis @ Persia Lou

    August 26, 2014 at 11:01 am

    Oh my goodness! This is the cutest thing ever. My absolute favorite back to school project I’ve seen this year. I would love, love, love if you came by and linked up with us at The Makers link party over on my blog. :)

    Reply
  5. Sky Turtle

    September 6, 2014 at 1:00 pm

    Nice! I really like it!

    Reply
  6. Christel

    September 12, 2014 at 3:00 am

    This is such a mad idea, I love it. thanks for sharing.
    Christel

    Reply
  7. Kim // Yellow Brick Home

    September 12, 2014 at 4:27 pm

    Okay, you are the cutest!

    Reply
  8. Riva

    September 13, 2014 at 5:11 pm

    Oh my gosh! this is soooooooo cute!

    Reply
  9. Lia

    September 18, 2014 at 8:48 pm

    This is brilliant & cute!

    Reply
    • Heidi

      September 18, 2014 at 10:08 pm

      Thanks, lovely!

      Reply
  10. Leah

    August 19, 2015 at 10:08 pm

    Adorable… I wanted to be a librarian, but didn’t have the way to get the Masters. However, they didn’t have cool color coordinated stuff when I was a kiddo so I couldn’t have done what you used to do. Think of me as probably closer to your mother’s age…

    I love this clutch! I may just have to make it, but not with yellow pencils… I’ll have to see what color I can find – or colors… I like colors!

    Reply
  11. Atiqah

    August 25, 2015 at 3:03 pm

    First of all, this is so cute and it is to-die-for. I’d like to make it, as the idea and the look of it is just purely amazing, however, have you done a smaller sized clutch like this? I would like to make a smaller clutch and I don’t know what measurements would work, especially, as I’ve never tried this before. If you could help me, that would be great!

    Reply
    • Heidi

      August 25, 2015 at 5:47 pm

      I haven’t done a smaller clutch like this with pencils, but the techniques I used in making my ruler clutch (mostly sawing the yardsticks smaller) might come in useful!

      Reply
      • Atiqah

        August 25, 2015 at 10:50 pm

        Thanks for the tip! I’ll check out your ruler clutch!

        Reply
  12. Cat T

    February 21, 2016 at 5:09 am

    Very creative! Don’t forget all you crafty people, that these cheap school supplies can be used internally for structure to your projects as well. Need a little stiffener across the bottom of a purse or bag, make a false bottom sleeve (or even an insert that just lifts out) where it can slide in, and make it removable for washing. “Back to school” season in August brings around those penny to 50 cent items like these.

    Reply
  13. Jenny

    May 19, 2016 at 1:58 am

    May I know how thick is the felt that u use? I worry if it’s too thin it doesn’t hold the shape and if it’s too thick, it’ll be too clumsy! I am so gonna make this, it’s so cute!

    Reply
    • Heidi

      May 23, 2016 at 8:25 am

      It’s more about the content of the felt. 100% wool felt is way stronger than acrylic. I used the standard 100% wool felt available at Joann, my local big box fabric store. Hope this helps!

      Reply

Trackbacks

  1. 5 DIY’s to Try: Back to School Edition | francois et moi says:
    August 27, 2014 at 6:45 am

    […] pencil clutch. How clever are […]

    Reply
  2. Mr. Kate | Top 11 Back to School DIYs says:
    August 18, 2015 at 5:02 am

    […] Hands Occupied did an amazing job with this DIY Pencil Clutch which I think would make a very metal pencil/pen case for your […]

    Reply

Leave a Reply Cancel reply

Your email address will not be published. Required fields are marked *

This site uses Akismet to reduce spam. Learn how your comment data is processed.

Primary Sidebar

Heidi Gustad from Hands Occupied / Craft Book Author and Knitting, Crochet, Latch Hook and Macrame Designer

Hi! I’m Heidi (she/her/hers), a craft book author & pattern designer specializing in knitting, crochet, latch hook & macrame. Really anything with yarn! ❤️  My work combines vintage and modern design elements, featuring bold colors and graphic motifs.

EMAIL NEWSLETTER

Never miss a tutorial with these short & sweet monthly updates.

Find Me on Social Media

  • Instagram
  • Pinterest
  • TikTok
  • YouTube
Latch Hook by Heidi GustadDiscover Unique Items

Footer

INSTAGRAM

handsoccupied

Craft book author, designer & creator specializing in yarn crafts like knitting, crochet, latch hook & macramé
❤️ Email preferred

Heidi Gustad 🧶✂️
Here’s how to work a Norwegian purl stitch for e Here’s how to work a Norwegian purl stitch for easier continental style knitting. With this purling method, the working yarn says tensioned (held) at the back of your knitting at all times. For many knitters, always holding the yarn at the back helps with tension issues, as well as feeling a little more comfortable. 
.
Have you ever encountered this style of purling before? If you’ve tried it, have you found it helps with your purl tension and knitting speed? I’m curious.
.
For a written tutorial, visit handsoccupied-dot-com. For video, you guessed it, You2be. Both of these platforms allow for longer, more in-depth versions of this tutorial, including full transcripts, alt text & the ability to pause, slow down or speed up at will. (Like if you really want to learn this, I recommend using a platform that doesn’t keep your hands occupied. Thinking of putting this in all my captions these days tbh - shout out to you if you made it this far. 🙌🏻😂)
.
#handsoccupied #learntoknit #continentalknitting #howtoknit #norwegianpurl #norwegianknitting #knit #knitting #knitter #knittersofinstagram #knittinghack  #handknitting #handknit #norwegianpurling
Have you ever tried this style of purl? . All thi Have you ever tried this style of purl? 
.
All this recent talk about throwing vs. continental style knitting made it clear many people struggle with purling in continental knitting. Turns out that Norway may have the answer! In Norwegian purling, the working yarn stays tensioned at the back at all times, helping with speed and tension. 🤯
. 
Head to the bl0g (🔗 in bi0) for a more in-depth look at how to work a Norwegian purl stitch, including a photo tutorial with animated GIF & a video tutorial. Wrapping your mind around how to work a stitch you’re familiar with in a totally new way can be confusing, so I tried to give a few options for clarity. 🤙🏻 Video is also on You2be. 
.
#handsoccupied #norwegianpurl #norwegianknitting #norwegianpurling #continentalknitting #howtoknit #learntoknit #knitterofinstagram #knitters
It’s been a hot second since I showed my face or It’s been a hot second since I showed my face or reintroduced myself, so here goes! I’m Heidi Gustad, a craft book author, pattern designer, and tutorial creator who specializes in yarn crafts. Lately, I’ve been focused on releasing quality knitting videos and related blog posts to help teach things like the difference between provisional cast ons and how to fix common knitting mistakes. Next week I’m shooting requested crochet and latch hook videos, so h👀kers, your time is coming! And if you ever have tutorial requests, please let me know. ☺️
. 
TLDR: I’m Heidi. I design & teach yarn crafts. You can find tutorials on my blog (est. 2010) & You2be. I also have several knitting & crochet patterns + a book about latch hook available. / All of these can be found on my website, the 🔗 is where you’d think. 
.
#handsoccupied #fridayintroduction #heidigustad #knitting #knitter #knittersofinstagram #yarncrafts #latchhookbook
Are you a picker or a thrower? Do you knit Contine Are you a picker or a thrower? Do you knit Continental or English Style? Here’s a quick overview of the differences between the two most common knitting styles, including a side by side comparison. (A good one to save for future reference. 👍🏻) 
.
There’s more on the differences between picking and throwing in my latest blog post & You 2ube video - the l1nk is where you’d think!
.
#handsoccupied #learntoknit #knittingstyles #howtoknit #knittersofinstagram #knitter
Spent time with family this weekend down South. Go Spent time with family this weekend down South. Got some stitching in & felt spring for a minute, which was lovely. ☀️ 
.
I’ll be catching up on comments, etc. tomorrow. 
.
#handsoccupied #travelknitting #planeknitting
Load More... Follow on Instagram

Copyright © 2023 / Foodie Pro Theme On Genesis Framework / Branding by Ink + Mortar
All Site & Shop Policies / Privacy Policy / Cookie Policy