• 0 items$0.00
  • Skip to primary navigation
  • Skip to main content
  • Skip to primary sidebar
  • Skip to footer

Hands Occupied

Colorful knitting, crochet, latch hook and macrame from craft book author & designer Heidi Gustad.

  • BLOG
    • Knitting
    • Crochet
    • Latch Hook
    • Macramé
    • Punch Needle
  • ABOUT
  • Shop
  • Nav Social Menu

    • Instagram
    • Pinterest
    • RSS
    • TikTok
    • YouTube

How-to: Black & Gold Wedding Table Numbers

January 7, 2013 Leave a Comment

How-to: Black & Gold Wedding Table Numbers - HandsOccupied.com

photo credit: Luke Hartley

I’m such a sucker for saccharine wedding stuff, it’s almost embarrassing if you’re someone who knows how un-emotional I am. This past weekend was great for tapping into this guilty pleasure of mine because it was spent helping a cousin celebrate her wedding. Among all of the usual wonderful weddingy things going on and family to visit with, I was recruited to make the table numbers & help set up the reception. Today, I want to share how I made her table numbers.

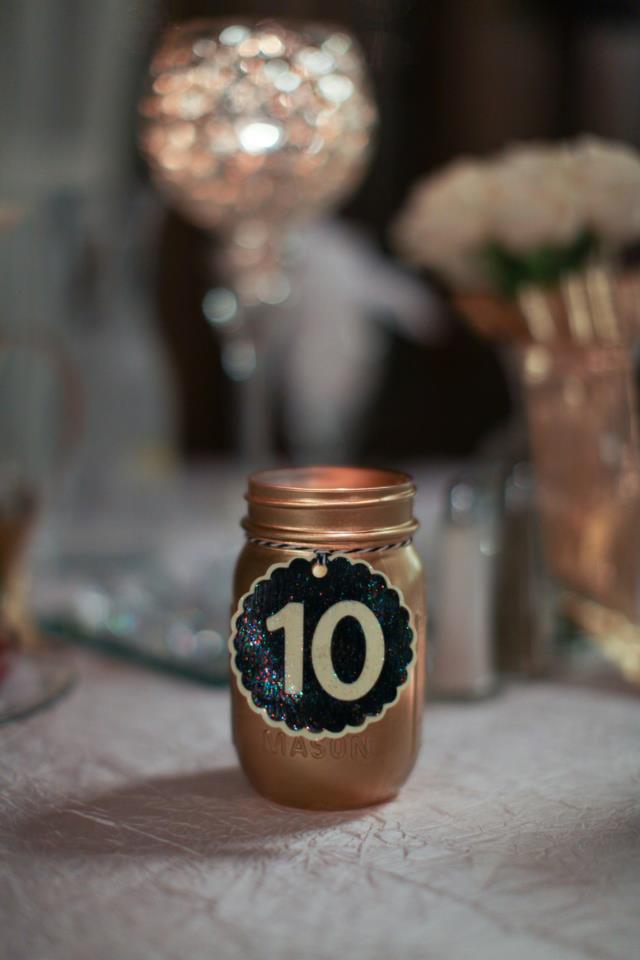
In talking with the bride, she explained the theme she had in mind and we set up a collaborative Pinterest board to help her save ideas for me to mull over. The colors were gold, black and white, and the bridesmaid dresses were floor-length black with lace over the bust. The men all wore tuxes, so the whole affair was very vintage Hollywood and shiny. That’s where the gold mason jars and glitter-covered table numbers came from.

How-to: Black & Gold Wedding Table Numbers | HandsOccupied.com

Supplies

mason jars
gold spray paint
baker’s twine
x-acto knife or a die cutting machine (I have and love the Cricut Mini.)
sparkle Mod Podge
sponge brush
scissors
Tacky Glue
votive candles
hole punch

Directions

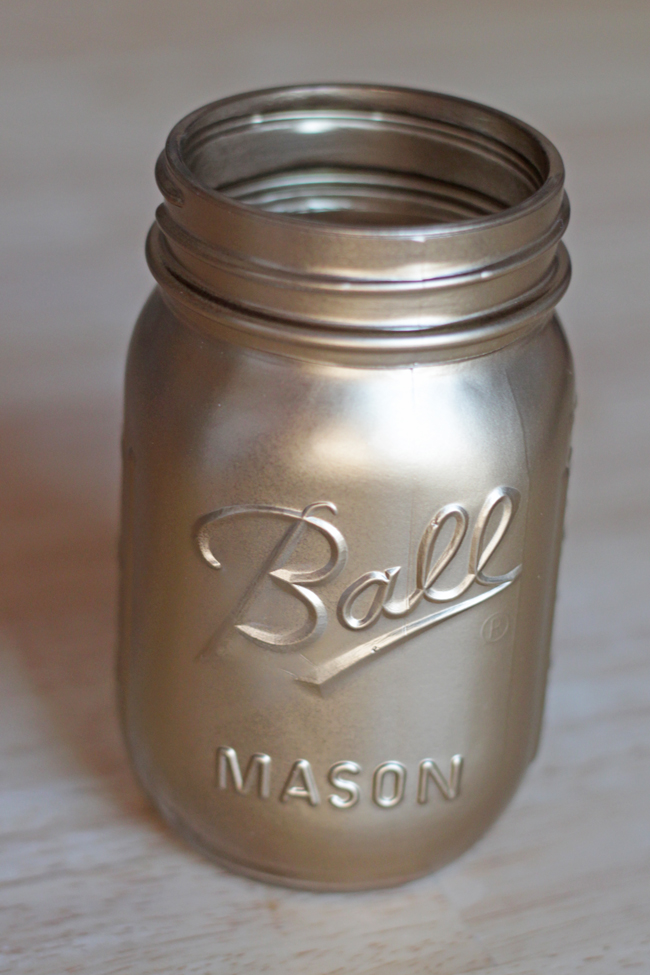
Spray paint your mason jars according to the can’s directions and let dry.

How-to: Black & Gold Wedding Table Numbers | HandsOccupied.com

Using either a stencil, pencil and x-acto knife, Cricut Mini, or whatever other craft machine you’ve got on hand, design and cut your table numbers.

How-to: Black & Gold Wedding Table Numbers | HandsOccupied.com

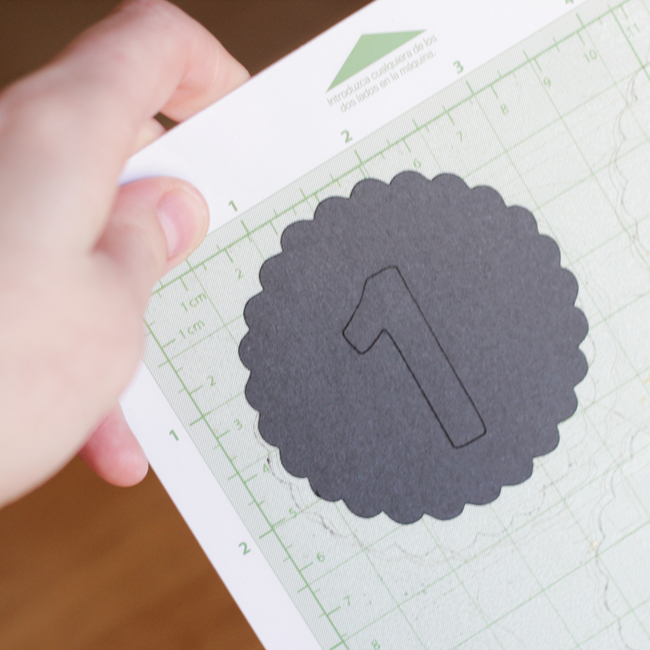
The Cricut Mini Specs I used

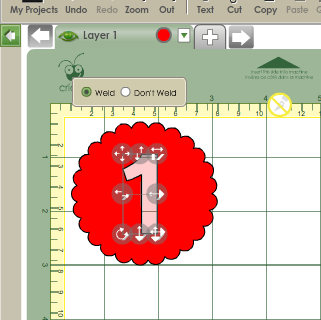
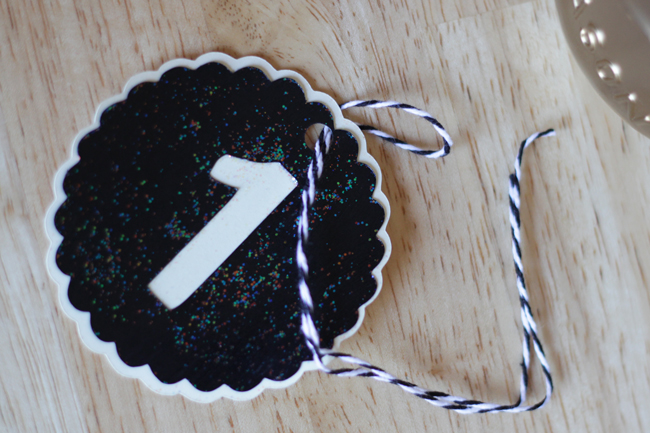
All of the graphics I used came out of the box with my Mini. The font is under My Cartridges> Cricut Classic Font, and all of the single-digit numbers were 1.5 inches tall. I made 18 numbers, and the double-digit numbers were 1.4 inches tall. I placed the numbers right over a scalloped circle (also available under Cricut Classic Font basic tab), 2.5 inches tall. When you overlay the number on the scalloped circle, you’ll need to “weld” the images – see first screen shot below.

How-to: Black & Gold Wedding Table Numbers | HandsOccupied.com   How-to: Black & Gold Wedding Table Numbers | HandsOccupied.com

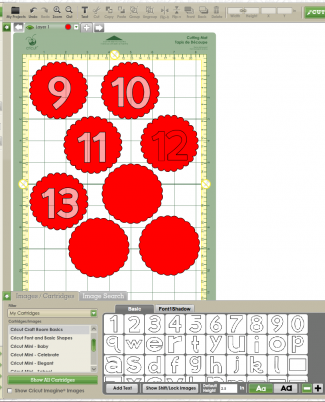
For the background scalloped circle, I used the My Cartridges> Cricut Classic Font scalloped circle under the shadow tab, also 2.5 inches tall. The scalloped circle under the shadow tab is designed to stick out beyond the edges of the basic tab’s scalloped circle, despite being the same height in inches.

For non-Circut users, the above might sound a  little like gibberish. Believe me, I designed and ran off all of these numbers in under an hour. If you do these all by hand with an x-acto, it will take several hours. Just a heads up. 

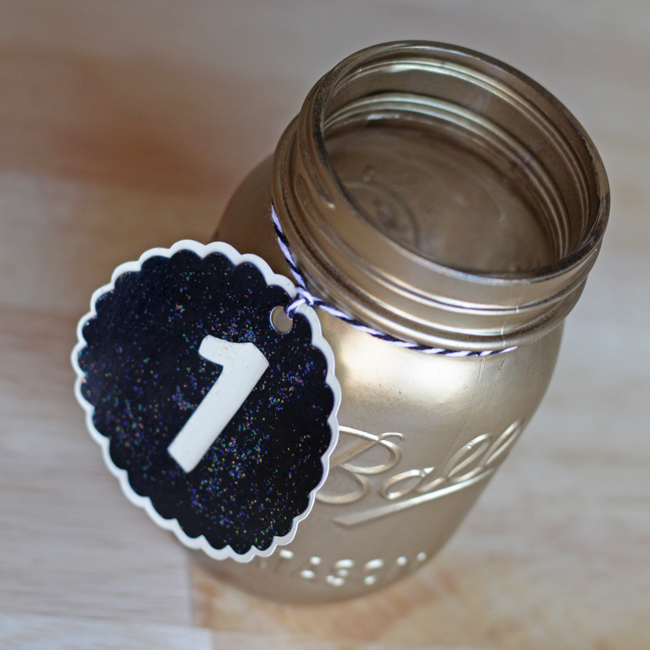
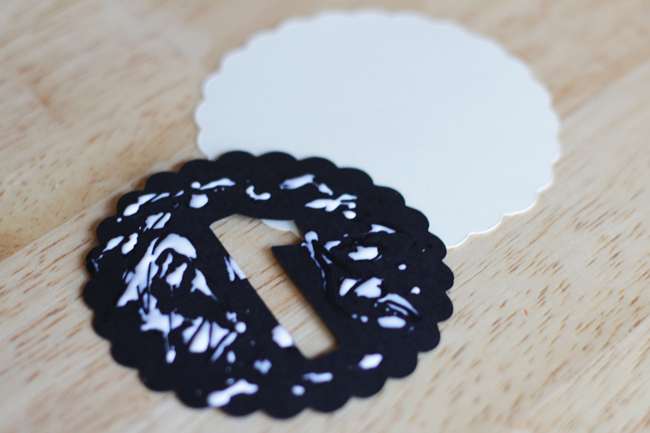
Once the numbers are all cut out, glue the number piece on top of the background piece with a thin layer of Tacky Glue (check out my tip on how to avoid wrestling with your Tacky Glue ever again). The thinner the better on the glue – since it’s paper, using too much glue will make these dry lumpy!

How-to: Black & Gold Wedding Table Numbers | HandsOccupied.com

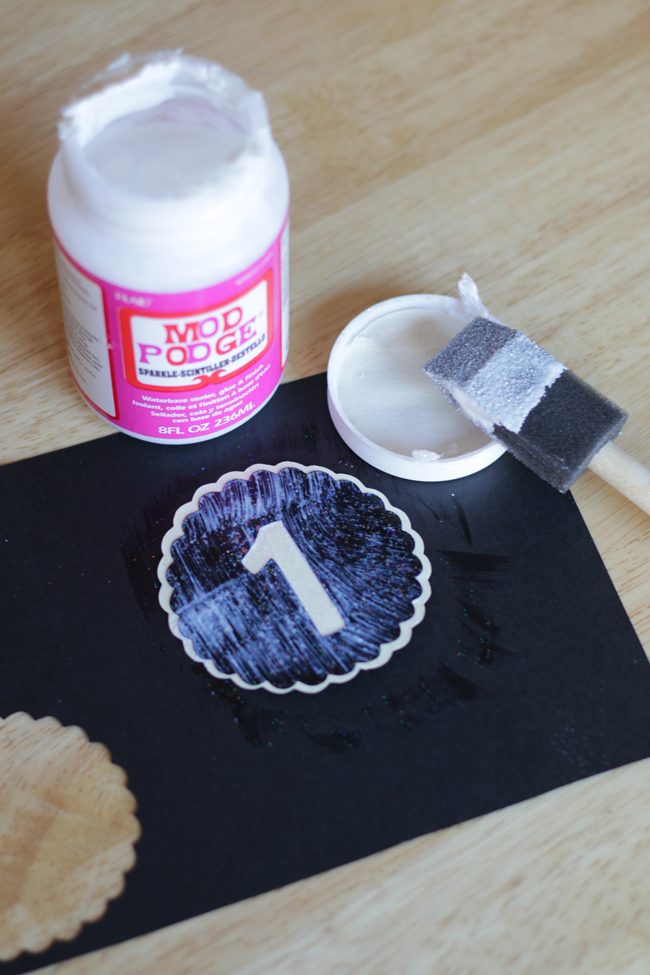
Apply a thin layer of sparkle Mod Podge over the whole thing to help avoid the paper curling up and add some glimmer to the numbers. Let all numbers dry.

How-to: Black & Gold Wedding Table Numbers | HandsOccupied.com

Punch a hole centered above the number near the top of the scalloped circle. Cut a piece of baker’s twine long enough to tie around the mouth of the mason jar with a couple inches to spare. Fold the twine in half and thread it through the hole as shown. String the ends of the twine through the loop to secure the number tag and tie the whole mess to the jar with a square knot. Trim extra string as desired.

How-to: Black & Gold Wedding Table Numbers | HandsOccupied.com

Drop in a votive candle to complete the look on the day of the wedding (or party if you’re making these for some other event). These are really easy if you have a Cricut machine on hand! The bride loved them and they went completely with her theme. I was so glad to be able to contribute something personal to her special day!

How-to: Black & Gold Wedding Table Numbers | HandsOccupied.com

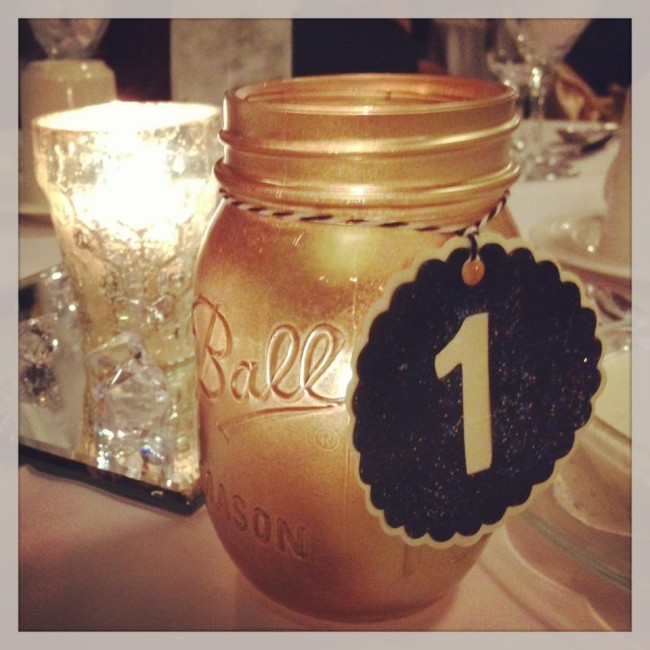
My Instagram shot of them in action at the wedding on Saturday. It was lovely!

Filed Under: Decoupage, DIY Wedding, How-to Tagged With: ball jar, black, diy, gold, hollywood, How-to, spray paint, table numbers, wedding

About Heidi

Heidi Gustad (she/her) is a craft book author & designer specializing in yarn crafts. Her work combines vintage and modern design elements, prioritizing color and graphic motifs. Her first book, Latch Hook: 12 Projects for the Modern Maker, is out now.

Previous Post: « Never Wrestle with Tacky Glue Again
Next Post: DIY Collar Inspiration »

Reader Interactions

DID YOU LIKE THIS POST?
Visit similar articles...

  • Attention, DIY Brides & Handmade Hostesses!Attention, DIY Brides & Handmade Hostesses!
  • How-to: Make a Perfect Paper PinwheelHow-to: Make a Perfect Paper Pinwheel
  • How-to: Ginormous Metallic Canvas ArtHow-to: Ginormous Metallic Canvas Art
  • How-to: Wedding Table Numbers (with video!)How-to: Wedding Table Numbers (with video!)

Leave a Reply Cancel reply

Your email address will not be published. Required fields are marked *

This site uses Akismet to reduce spam. Learn how your comment data is processed.

Primary Sidebar

Heidi Gustad from Hands Occupied / Craft Book Author and Knitting, Crochet, Latch Hook and Macrame Designer

Hi! I’m Heidi (she/her/hers), and I’ve been helping yarn crafters untangle various techniques on the internet since 2010. I got my start here, as a blogger, and since then I’ve shared more than a few tutorials here and on YouTube as I’ve grown as a pattern designer. 🧶 

learn more / work with me

Find Me on Social Media

  • Instagram
  • Pinterest
  • TikTok
  • YouTube
Latch Hook by Heidi Gustad

Footer

INSTAGRAM

Heidi Gustad 🧶 knitting & yarn crafts

handsoccupied

Knitting & yarn crafts designer 🧶
.
Stay up-to-date 💌 & shop new patterns ⤵️

POV: Showing you how my new Bevelled Tank pattern POV: Showing you how my new Bevelled Tank pattern fits with no ease vs. 4” of positive ease. There’s a bit more length to the cotton (brighter color) sample, but both are cropped and feature shoulder seams designed to sit an inch back onto the shoulder instead of on top, giving it a little swing. Length is easily adjustable for folks looking for less of a crop. 
.
Pattern: Bevelled Tank by @handsoccupied for @pompommag x @hobbii_yarn summer 2024. Available for free from Hobbii at the 🔗 in my profile.
Yarn pictured: @kelbournewoolens Skipper and Camper. 
Dress form is adjusted to a 36” chest and ~5’3”ish in height. 
Human has a 40” chest and is 5’5”.
Both skirts are vintage.
.
#pompomxhobbiisummer2024 #handsoccupied #intarsia #handmade #knitting #colorwork
Let’s talk about fit and ease! . During the Beve Let’s talk about fit and ease!
.
During the Bevelled Tank design process for @pompommag, I knit 2 samples using 2 different @KelbourneWoolens yarns. One was in Skipper (100% cotton, second photo) and the other was in Camper (100% 2 ply wool). The Skipper sample was knit for a 36” bust, which measures in at 40” with 4” of positive ease. And I knit the Camper Sample for my 40” bust with a 44” finished measurement. (BTW, I’m 5’5” for folks that find that measurement helpful in visualizing fit.)
.
Based on the size chart for the Bevelled Tank, that means I knit one size 3 sample and one size 4. As designed, I conveniently fit a size 4 as intended with 4” of positive ease. When I wear the 3, there is no ease at all because the garment and my body are both 40” in size. Comparing the 2 garments, you can see how the fiber content (cotton vs. wool) and fit (no ease vs. 4” of positive ease) makes a difference in the look and feel of the finished garment. 
.
These samples are a great way to compare what ease looks like on different bodies. While I can fit both a size 3 and 4, the garment with no ease feels more like pajamas or a bralette when I wear it. On the other hand, when I wear the one with 4” of positive ease, I feel comfortable enough to wear it to work, even as a crop top. Plus, it leaves me with enough room to layer it with a nice button down if I’m not feeling the cropped look one day. 
.
I’m curious - how would you style this tank? Would you modify it with a few stockinette rows for added length? I’m so curious now that this pattern is finally out in the world. :) 
.
#pompomxhobbiisummer2024 #bevelledtank #handsoccupied #knitting #intarisa #handmade #kelbournewoolens #croppedsweater #summerknits
After a 6 month hiatus, I am happy to say I’m ba After a 6 month hiatus, I am happy to say I’m back with a brand new pattern in 9 sizes, and it’s FREE as part of @pompommag x @hobbii_yarn’s summer design collection! (Link is in my bio.)
.
In my December newsletter, I announced that I was soliciting test knitters for a pattern that had originally been selected for the summer ’24 issue of Pom Pom Quarterly magazine. However, the magazine ceased publication after its spring ’24 issue, leaving in-progress designs unpublished. (It happens.) As a result, I’d begun the long process of editing, testing, and photographing the pattern for independent release through the Hands Occupied pattern shop and Ravelry.
.
Before I was done with that process, Pom Pom Quarterly’s former editors reached out with an exciting proposal for the pattern. Post-magazine, they’ve begun to partner with yarn companies to produce high quality pattern collections. They wanted to include designs from the would-be current issue of Pom Pom Quarterly in a new collection for Hobbii yarn, including my Bevelled Tank. I worked with the same technical editors I would have for the magazine on this one, and as you can see from the photos, Pom Pom’s team did an amazing job of styling the garment to the beautiful standards they’re known for.
.
You can learn more about the pattern on my blog and get the free pattern from Hobbii yarn - links to both in my profile. I’ll post sizing info in the comments for quick reference too. 🧶
.
#pompomxhobbiisummer2024 #knitting #intarsia #sponsored #colorworkknitting 
.
Photos: @dianascarrunz 
Model: @angel.jade_
Here’s a nice throwback for you: my take on a vi Here’s a nice throwback for you: my take on a vintage knitting pattern from 1938 called the Fernlace Pullover. A pattern so nice, I knit it twice.
.
Yellow version 💛: knit with Despondent Dyes’ Vintage Vixen Sport after attending a @squidneyknits vintage knitting retreat in 2019 & learning *so much*. Paired with a self-drafted circle skirt pattern. 
.
Blue version 💙: knit with @eweeweyarns Ewe So Sporty in Sky Blue. Paired with the 1940s Boardwalk Duet sewing pattern from @decades_of_style 
.
Head to my stories for 🔗🔗 to the handmade wardrobe blog posts I wrote about each take on the Fernlace Pullover, working with a vintage pattern, where to find vintage patterns (including the one I used), & some thoughts on sizing. 
.
Image descriptions available in alt text. 
.
#handsoccupied #handmadewardrobe #fernlacepullover #vintageknitting #vintageknittingpatterns #knitting_inspiration
Frogging is a word in the knitting world that mean Frogging is a word in the knitting world that means to rip out your knitting. It’s called frogging because frogs say “ribbit,” and when you’re tearing out your knitting, you will “rip it” out, and that sounds like ribbit. No really. 🐸 Did you know this fun fact? 
.
P.S. I did like this design concept, but to make the pattern more knitter friendly as well as more wearable, I am making some tweaks to the construction. Excited to share when it’s ready! 🥰🧶
.
Yarn: @blueskyfibers Woolstok North in Morning Frost & Highland Fleece 
.
#handsoccupied #knitting #frogging #blueskyfibers #knittersofinstagram #blueskymakers #knittingvocabulary #bsfmakers #knitdesign
Load More... Follow on Instagram

Copyright © 2025 / Foodie Pro Theme On Genesis Framework / Branding by Ink + Mortar
All Site & Shop Policies / Privacy Policy / Cookie Policy