• 0 items$0.00
  • Skip to primary navigation
  • Skip to main content
  • Skip to primary sidebar
  • Skip to footer

Hands Occupied

Colorful knitting, crochet, latch hook and macrame from craft book author & designer Heidi Gustad.

  • BLOG
    • Knitting
    • Crochet
    • Latch Hook
    • Macramé
    • Punch Needle
  • ABOUT
  • Shop
  • Nav Social Menu

    • Instagram
    • Pinterest
    • RSS
    • TikTok
    • YouTube

How-to: Wedding Table Numbers (with video!)

January 24, 2011 13 Comments

This how to post was going to be one of my standard narrative-plus-pics posts, but today you’re in luck! Below are the text-based instructions I promised in the video.
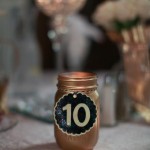
After an exhaustive search of Martha Stewart and other bloggers’ wedding table number ideas, I realized I wanted to do something a little different at my wedding. Using a technique I demonstrated in a previous post, I applied tissue paper numbers to the hurricanes I had once only intended to fill with dried artichokes.

Supplies

tissue paper

school glue

paint brush

x-acto knife

cardboard

straight pins

scissors

clear hurricane vases – mine are borrowed, but I highly recommend checking out dollar store websites to save big

computer with printer – optional

Directions


To begin, you’re going to need to print or draw the numbers needed on a piece of paper and cut them out, creating a stencil. Then, place a piece of tissue paper underneath your stencil and pin both items to some cardboard to protect your work surface. With an x-acto knife, cut along your stencil and through the tissue paper. Be careful when you are separating your cut out from the rest of the tissue paper to avoid ripping.

Next, grab one of your vases, and make sure it’s clean. Mix some school glue with water, at about a 1:1 ratio, and grab your paintbrush. Make sure that’s clean too.

Put some glue mixture on your vase, but not too much (watch the video for a full demo of this technique). Place your tissue paper cut out on the wet surface and paint over it with a little bit of the glue mixture. Be careful of wrinkles, but I can let you know from experience that as these dry, small wrinkles tend to sort themselves out. Let this dry completely, and yes, there should be excess glue visible on your vase. Leave it!

When your vase is dry, take some cotton balls moistened with water to remove any visible glue from your vase. Let dry again. My wedding theme is artichoke and asparagus, my fiance and I’s favorite veggies if you’re curious. I was lucky enough to find some awesome dried artichokes on clearance. I’m putting some in the hurricanes, and along with luminaries, and the pies I’ll be serving, my centerpieces are ready to go!


Filed Under: DIY Wedding, How-to Tagged With: craft audition, How-to, table numbers, videos, wedding

About Heidi

Heidi Gustad is a craft book author, designer & creator specializing in yarn crafts like knitting, crochet, latch hook & macramé. Her first book, Latch Hook: 12 Projects for the Modern Maker, is out now.

Previous Post: « How-to: Custom Home Sweet Home Cross Stitch
Next Post: My Bridal Shower! »

Reader Interactions

DID YOU LIKE THIS POST?
Visit similar articles...

  • How-to: Black & Gold Wedding Table NumbersHow-to: Black & Gold Wedding Table Numbers
  • Attention, DIY Brides & Handmade Hostesses!Attention, DIY Brides & Handmade Hostesses!
  • How-to: Make a Perfect Paper PinwheelHow-to: Make a Perfect Paper Pinwheel
  • Top 10 DIYs of 2013Top 10 DIYs of 2013

DON’T MISS ANOTHER UPDATE

Leave a Reply Cancel reply

Your email address will not be published. Required fields are marked *

This site uses Akismet to reduce spam. Learn how your comment data is processed.

Primary Sidebar

Heidi Gustad from Hands Occupied / Craft Book Author and Knitting, Crochet, Latch Hook and Macrame Designer

Hi! I’m Heidi (she/her/hers), a craft book author & pattern designer specializing in knitting, crochet, latch hook & macrame. Really anything with yarn! ❤️  My work combines vintage and modern design elements, featuring bold colors and graphic motifs.

EMAIL NEWSLETTER

Never miss a tutorial with these short & sweet monthly updates.

Find Me on Social Media

  • Instagram
  • Pinterest
  • TikTok
  • YouTube
Latch Hook by Heidi GustadDiscover Unique Items

Footer

INSTAGRAM

handsoccupied

Craft book author, designer & creator specializing in yarn crafts like knitting, crochet, latch hook & macramé
❤️ Email preferred

Heidi Gustad 🧶✂️
If only knitting a whole project took 39 seconds… 😮‍💨 
.
In this video, you can see how the Intarsia Flower Pillow pattern knits up - two flat panels, one with intarsia, both are blocked, and then they’re seamed. Find the pattern on @hi.ravelry & my website, just search Intarsia Flower Pillow. 🌸 
.
P.S. I’m really smiling in this video while seaming the pillow, so I guess I’m proving last week’s claim that I truly enjoy that sometimes-dreaded task. 😆🫣
In knitting, a Left Lifted Increase (LLI) lets you In knitting, a Left Lifted Increase (LLI) lets you add a stitch in between two columns of stitches that leans to the left. Similar to an M1L, LLIs allow you to increase nearly invisibly.
.
To learn more about lifted increases, including when to use them and how they differ from Make 1s, head to the 🔗 in my profle. 
.
Have you ever used lifted increases? I used M1’s almost exclusively for a long time when I needed to inc between stitches, but when I designed the Intarsia Flower Pillow pattern, I needed something that would allow me to increase a lot near my cast on, and M1’s resulted in edge curling. The more you know! 🌈 
.
Yarn: @lionbrandyarn Wool Ease from my Stash / Neddles: @boyeyarncrafts - Just remembered these are the needles I learned to knit on at age 8. 😂
.
#handsoccupied #knitting #learntoknit #howtoknit #sweaterknitting #knitinspiration #knittersofinstagram #liftedincreases
Last week I got to hang out with my family & helpe Last week I got to hang out with my family & helped babysit my red-headed niece and nephew. So here’s some plane knitting, and a couple pictures (shared with permission) of my babysitting adventures.
.
Lessons learned: 1️⃣ Trying to knit around 2 toddlers, 2 cats & 2 large dogs is pretty hard. 2️⃣ I learned during water color time that pink and black make “colorful black.” 🩷🖤 3️⃣ Toddlers do NOT care about your rainbow sorting of their toys. 4️⃣ Toddlers are very good at finding mischief in a very short amount of time, what a surprise. 😂
.
#handsoccupied #knitting #placesyoucanknit #knitters #knitinpublic #handmadelife #knitting_inspiration
Weaving in ends & seaming with mattress stitch are Weaving in ends & seaming with mattress stitch are both so useful for garment knitting! But for me, weaving in ends can feel like a chore while the latter feels like I’ve successfully done magic. 🧙🏻‍♀️ Does anybody else run into this phenomenon? Are you the opposite? Any theories as to why they feel different? 
.
In this video, I’m finishing my brand new Intarsia Flower Pillow. 🌸 I’m working with @universal_yarn Uni Merino & the pattern is available at the 🔗 in my b1o. 
.
#handsoccupied #intarsiaflowerpillow #intarsia #intarsiaknitting #knitting #colorwork #knitpillow #knittinginspiration #knittersofinstagram
I independently released a knitting pattern today, I independently released a knitting pattern today, my first in 5 years! The Intarsia Flower Pillow is a 16” (40cm) round pillow knit with an intentional combination of intarsia, stockinette, garter and seed stitch. This pillow has everything you need to level up your intarsia technique while also knitting something you can use. 
.
This pillow allows you to practice knitting intarsia while simultaneously increasing and decreasing. The Intarsia Flower Pillow pattern was designed to be a little knit-nerdy for learning and a little cute, arming you with many of the skills you'd need to knit an intarsia sweater. 
.
Intarsia Flower Pillow is available in the Hands Occupied Sh0p and on @hi.ravelry . You can read more about the pattern on the bl0g, the🔗 are where you’d think.
. 
YARN: @universal_yarn Uni Merino in Antiquity, Fjord and Conch / NEEDLES: US 2 (2.75 mm) / PATTERN: Intarsia Flower Pillow by Heidi Gustad
Load More... Follow on Instagram

Copyright © 2023 / Foodie Pro Theme On Genesis Framework / Branding by Ink + Mortar
All Site & Shop Policies / Privacy Policy / Cookie Policy