• 0 items$0.00
  • Skip to primary navigation
  • Skip to main content
  • Skip to primary sidebar
  • Skip to footer

Hands Occupied

Contemporary yarn crafts by Heidi Gustad. Knitting, crochet, latch hook and macrame.

  • BLOG
    • Knitting
    • Crochet
    • Latch Hook
    • Macramé
  • ABOUT
  • Shop
  • Studio
  • Nav Social Menu

    • Facebook
    • Instagram
    • Pinterest
    • RSS
    • Twitter
    • YouTube

How-to: Camera Jacket

December 26, 2011 Leave a Comment

I hope you all had an awesome holiday break. Today, I wanted to share my Christmas gift to myself this year, a camera jacket!

I was inspired by a very stylish camera wrap featured at Craft a couple of weeks ago. It was so handsome, I had to try my hand at making one for myself.

I followed the featured wrap’s directions and came up with the following for my Canon t3i.

For my particular camera and its medium length lens, I felt like the above design was a little too bulky. I decided my needs would be better suited with a more compact wrap, or jacket as I like to think of it.

Supplies

1/4 yd. vinyl

1/2 yd. of felt in one color

another 1/2 yd. of felt in another color

1 yd. fusible interfacing

freezer paper

pencil

tape measure

camera

iron

fabric scissors

straight pins

sewing needle

sewing machine

3 rivets

mallet

1 set of fabric snaps

Directions

Trace the outline of your camera onto a piece of fabric paper twice. Measure the length of perimeter of your camera (wrap your tape measure around your camera to see how many inches around it is). Then, measure the height of your camera. Draw a rectangle on some freezer paper using these measurements, with some added seam allowance. My camera was 21 inches around and 4 inches high, so my rectangle was 21.5 by 4.5 inches.

Cut out each pattern piece. Iron one camera silhouette and the rectangle to the right side of your felt. Iron the other camera piece to the wrong side of your felt.

Cut out the rectangle as you’ve drawn it, and cut out the camera silhouettes, leaving 1/2″ of seam allowance. Leave the freezer paper ironed to the felt for the time being. This will help you keep track of which camera silhouette is which.

Next, cut out a piece of fusible interfacing for each felt piece and iron them each piece of felt you cut out. The two pieces of felt whose patterns were ironed to the right side of the felt should have the interfacing ironed to the wrong side of the felt, and I recommend still leaving  the freezer paper in place. For the other camera silhouette piece, remove its pattern from it and set aside. Iron the fusible interfacing to the wrong side of that felt, i.e. the side you just removed the pattern piece from.

Basically, the reason you need to do this whole song and dance is because one of the camera silhouettes will be the top of the case, and one will be the bottom. When the interfacing is attached, the silhouettes will be mirror images of each other.

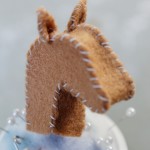
The photo above shows the camera silhouette pattern I used in the design of the first camera bag I attempted to make. In my second attempt, I oped to make my pattern piece curved, rather than angular (see below). My husband actually suggested that design change – if the camera you’re making this wrap for has a lens any longer than a couple of inches, the angular pattern I tried ends up looking like a lumpy snake head.

When your interfacing is properly fused, cut out a second set of felt pieces for your bag. The felt pieces with the interfacing fused to them will be your bag’s liner, and the second set will be the outside. Since I’m a waste not, want not type of gal, I used leftover angular (red) felt pieces as my bag’s liner. 

Using a basting stitch, attach your liner pieces to the outside pieces. Sew one silhouette piece to the large rectangle, and then another, keeping the two silhouettes lined up to avoid a crooked bag. Leave the non-lens end of the bag open.

Fold the out and inside felt layers inward and sew down, all the way around both flaps and the back end of the top and bottom silhouette pieces.

Making the straps

Cut two rectangles of vinyl out, 2 inches wide by 1/2 inch shorter than your camera’s height. Fold the vinyl as shown, and hand sew each piece together.

It’s hammer time!

Grab your mallet, rivets and snaps. Follow the directions provided with your rivets and snaps. Attach one vinyl strap at two points on one flap with rivets. Attach the other strap at one point with a rivet, and at the other point with a snap. Follow the package directions for attaching the snaps too.

You’re done! I also sealed my wrap with Scotch Guard to help waterproof it, but I’m really happy with how it turned out. Can you see now why I decided to call it a jacket? It keeps my camera safe from the elements – snow and water, dicks on the train, etc.

Filed Under: How-to, Sewing Tagged With: camera bag, camera wrap, felt, How-to

About Heidi

Heidi Gustad is an artist, author and crafts designer specializing in knitting, crochet, latch hook and macrame. In addition to running the Hands Occupied Blog and Pattern Shop, you can find her making videos & co-hosting the Very Serious Crafts podcast.

Previous Post: « Twelfth Ornament of Christmas
Next Post: *bespoke*’s Top 10 Handmade/Vintage Finds of 2011 »

Reader Interactions

DID YOU LIKE THIS POST?
Visit similar articles...

  • How-to: Felt Horsie Finger PuppetHow-to: Felt Horsie Finger Puppet
  • How-to: Felt Swedish HeartsHow-to: Felt Swedish Hearts
  • How-to: Kermit CollarHow-to: Kermit Collar
  • How-to: Felt Thanksgiving WreathHow-to: Felt Thanksgiving Wreath

DON’T MISS ANOTHER UPDATE

Leave a Reply Cancel reply

Your email address will not be published. Required fields are marked *

This site uses Akismet to reduce spam. Learn how your comment data is processed.

Primary Sidebar

Heidi Gustad from Hands Occupied / Craft Book Author and Knitting, Crochet, Latch Hook and Macrame Designer

Hi! I’m Heidi, an author, yarn craft designer and content creator specializing in knitting, crochet, latch hook & macrame. My work unapologetically features primary colors and vintage-meets-modern style. My first book, Latch Hook: 12 Projects for the Modern Maker, is now available!

work with heidi

UPDATES BY EMAIL

Get a free pattern + biweekly updates sent to your inbox.

Let’s be friends!

  • Facebook
  • Instagram
  • Pinterest
  • Twitter
  • YouTube
Latch Hook by Heidi Gustad

Footer

INSTAGRAM

handsoccupied

Craft book author & content creator in love with primary colors & vintage vibes. / #latchhookbook out now!
.
knitting, crochet, latch hook & macramé

Heidi Gustad 🧶✂️
There’s an update on the blog today, & it’s ab There’s an update on the blog today, & it’s about how I’m going to take the next 2 weeks off to rest & recharge. ☺️🧶 No new content for y’all means I can also take a moment to zoom out & plan what’s next. Link is in bio. 
.
.
A note on Very Serious Crafts: In the post I discuss stepping away from the @seriouscrafts podcast to give myself more time to devote to some minor medical issues. Don’t you worry - my health will be fine, & @molliejohanson @redhandledscissors and I are still pals, and after a short break of their own, the podcast will be back! Just sans moi. 💁🏼‍♀️😆 
.
.
See you in a couple weeks! ✌🏻#handsoccupied #knitdesign #craftdesign #sofadedsweater
Been a little quiet this holiday week, as it shoul Been a little quiet this holiday week, as it should be. ☺️🎄The past few days have been filled with a lot of catching up on festive zoom calls & raising toasts to the camera. 🥂 Connecting with people has been a welcome change of pace! Now I’m feeling ready to meet my inevitable end-of-year deadlines. 😆
.
.
Warmest wishes for the season, my friends! ❤️💛💙
Hi, I’m Heidi, the craft book author & maker beh Hi, I’m Heidi, the craft book author & maker behind Hands Occupied! 👋🏻 I’ve been enjoying making Reels a lot lately, but I wanted to bop in to share a regular photo & say hello. 🤓 
.
.
rather than giving you my bio right now, I have a question. I just got this new sweater & I can’t stop imaging how funny it would be to wear this to a knitting class ... is that bad? 🤣🤣🤣
.
.
Pictured: a blond woman with glasses wearing a sweater that reads “all your sweaters are ugly” standing in front of a Christmas tree.
Wet blocking, also called immersive blocking, is o Wet blocking, also called immersive blocking, is one of the most common methods for finishing a knitting project and helping ensure its final size and shape. Learn basic blocking for absolute beginners in an easy-to-follow (non-Reel!) video tutorial! Catch the tutorial on YouTube or the Hands Occupied Blog, link is in bio. 🧶 #handsoccupied #stopswatchandblockit #KPAmbassadorsDec20 #sponsored
Had to share this perfect capture of one of my fav Had to share this perfect capture of one of my favorite weird homemade Christmas ornaments: a simple macramé Santa face with beads for the eyes and nose! My Great-Grandma made it too. 🎄
.
Might have to try making a quickie Reel tutorial for this guy - I think it’s the perfect project for it, don’t you? 🎅🏼 #handsoccupied #macrame
Load More... Follow on Instagram

Copyright © 2021 / Foodie Pro Theme On Genesis Framework / Branding by Ink + Mortar
All Site & Shop Policies / Privacy Policy / Cookie Policy