• 0 items$0.00
  • Skip to primary navigation
  • Skip to main content
  • Skip to primary sidebar
  • Skip to footer

Hands Occupied

Contemporary yarn crafts by Heidi Gustad. Knitting, crochet, latch hook and macrame.

  • BLOG
    • Knitting
    • Crochet
    • Latch Hook
    • Macramé
  • ABOUT
  • Shop
  • Studio
  • Nav Social Menu

    • Facebook
    • Instagram
    • Pinterest
    • RSS
    • Twitter
    • YouTube

How-to: Faux Neon Sign

April 29, 2013 1 Comment

How-to: Faux Neon Sign at HandsOccupied.com

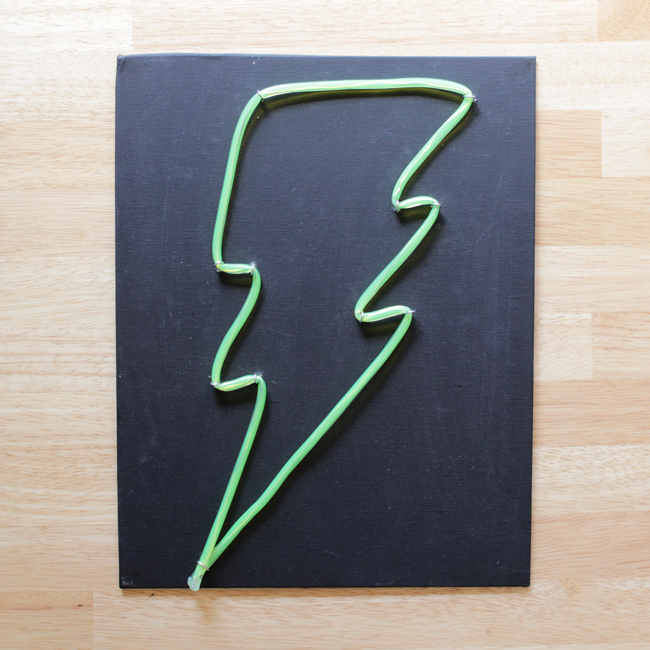
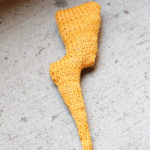
A few weeks ago, it struck me that there must be some way to DIY a neon sign. I found this great video showing how real neon signs are made, which was really inspiring, but advanced glass blowing skills required are far beyond my skill set. Then I discovered this article sharing how to make a fake neon sign designed for a student science fair project. Forming the neon tubing into a shape like the lightning bolt above is the hard part, even with the article I found. Lucky for you, I spent a bunch of time figuring out tips for making the neon tubing and an easy way to mold the tubing into shapes and letters.
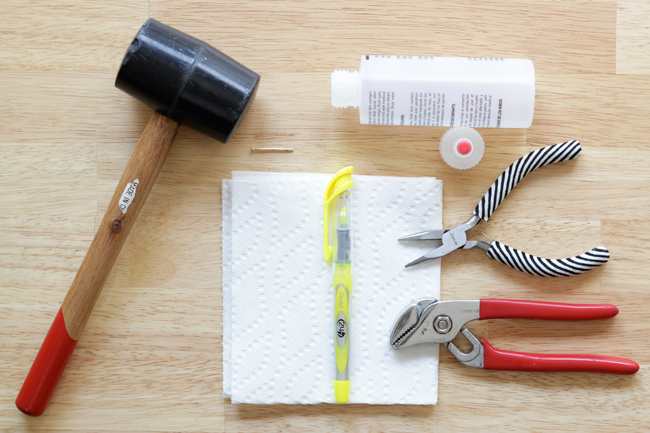
Supplies

clear aquarium tubing (like this)
2 liquid ink highlighters
hammer
small nail
black canvas panel (like this)
drill
16 gauge aluminum crafting wire
jewelry pliers
wire cutters
scissors
regular pliers
squirt bottle
sink
hot glue gun & glue

Directions

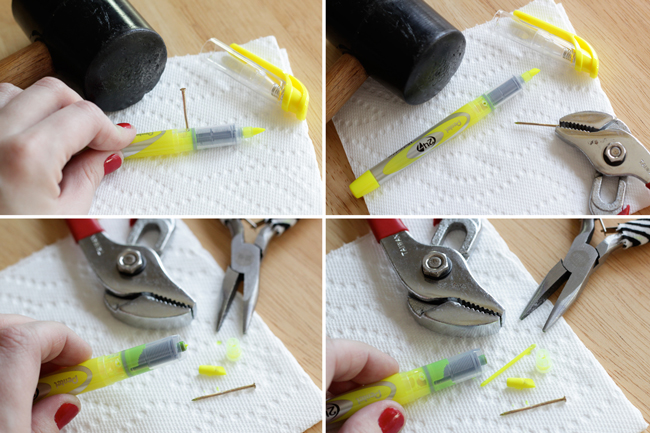
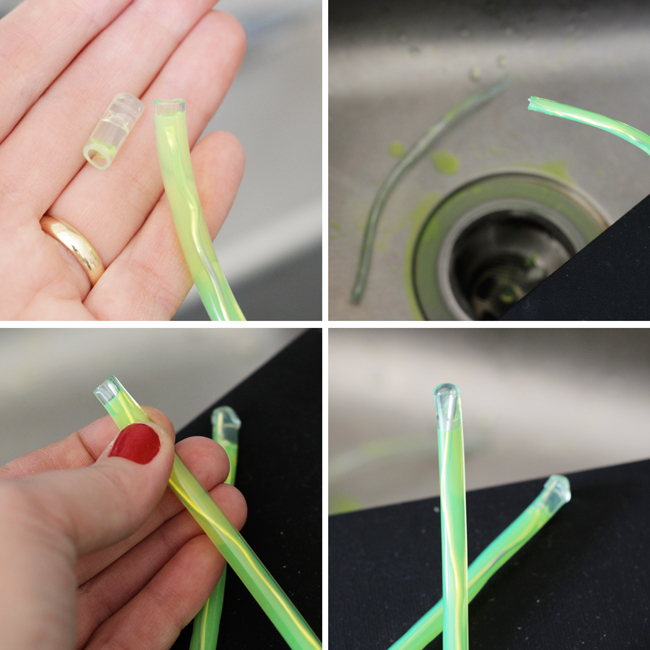
1. De-ink your highlighters

Phase one of this project is to carefully disassemble two liquid ink highlighters.

How-to: Faux Neon Sign at HandsOccupied.com

Hammer your nail into the liquid chamber of the pen. You’ll feel a little less resistance from the plastic when you’re through the body of the pen.

Note: I spent a TON of time figuring out how to do this, and I promise you that at least for the Pentel 24/7 highlighters I used, that plastic is crazy strong. I de-inked 5 total highlighters, and none of the pens exploded or even cracked in the process. There are some liquid ink highlighters whose design is different than the ones I used, but most of what I could find appear to be of the same design as the Pentel ones I used. 

Remove the nail using pliers. To double-check that the nail was all the way into the pen, check the nail’s tip – there will be a little bit of ink on it. Next, remove the tip of the highlighter and its plastic casing with pliers. Then, with a jewelry pliers, pull out the little wick, if your highlighter has one. Be careful, as soon as the wick is out, the ink will be pourable from the highlighter.

How-to: Faux Neon Sign at HandsOccupied.com

Pour the highlighter ink into a squeeze bottle. De-ink another pen and add its ink to the bottle. Top with water.

2. Prepare and fill your tubing 

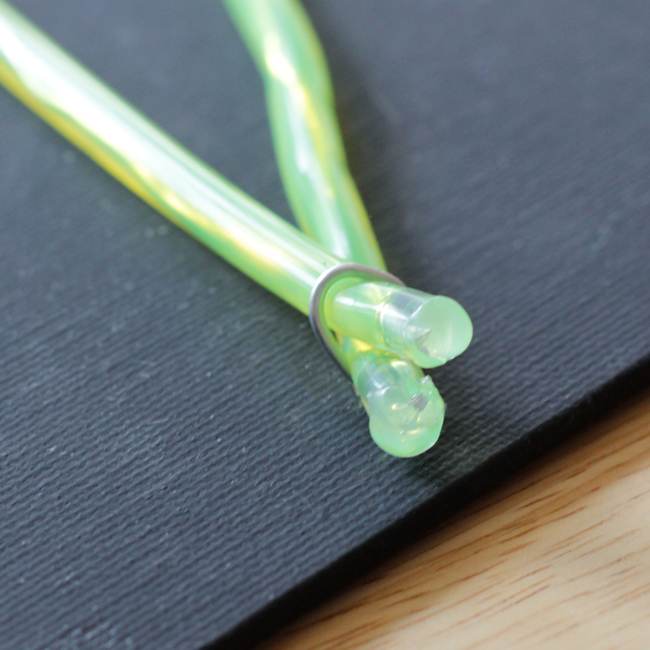
Shove wire into aquarium tubing that’s the length needed for your sign’s design plus 5-6 inches.

How-to: Faux Neon Sign at HandsOccupied.com

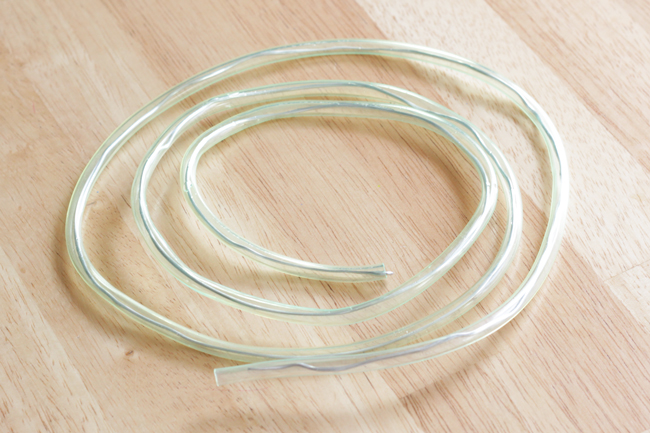
Holding both ends of the tubing/wire vertically, preferably over a sink, fit the aquarium tubing around the opening of the squeeze bottle. Fill the tube in a steady stream all at once, avoiding air bubbles as much as you can. Leave some space at the ends of the tube.

How-to: Faux Neon Sign at HandsOccupied.com

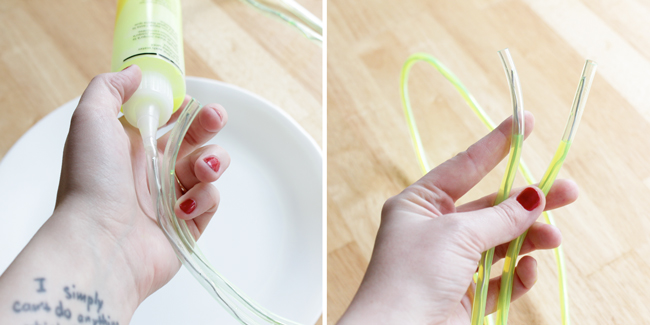
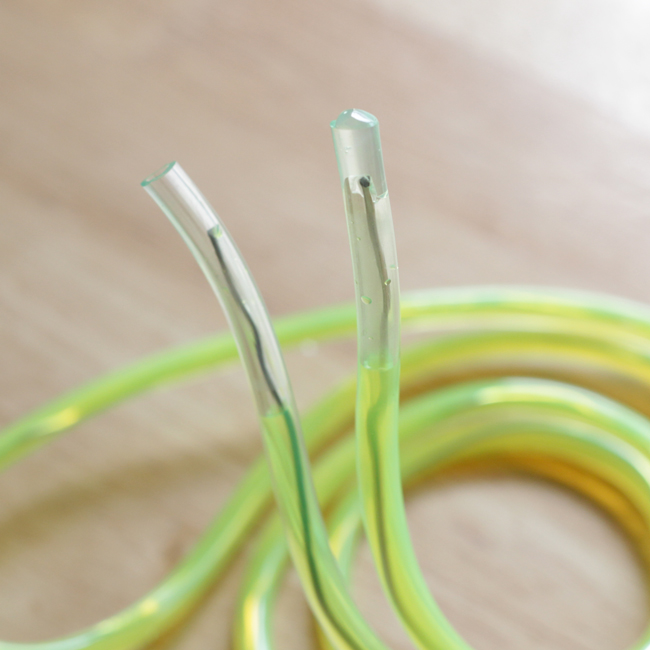
Seal each end of your tubing with hot glue.

How-to: Faux Neon Sign at HandsOccupied.com

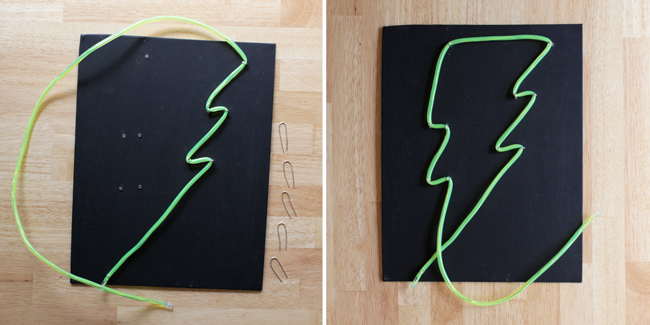
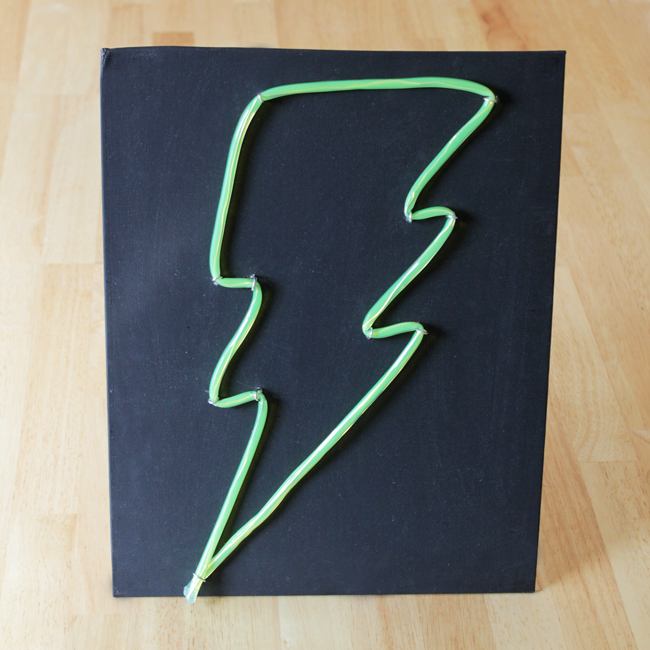
3. Mount the tubing on a black canvas panel

Lay a stencil or draw the design of your sign on a black canvas panel.

How-to: Faux Neon Sign at HandsOccupied.com

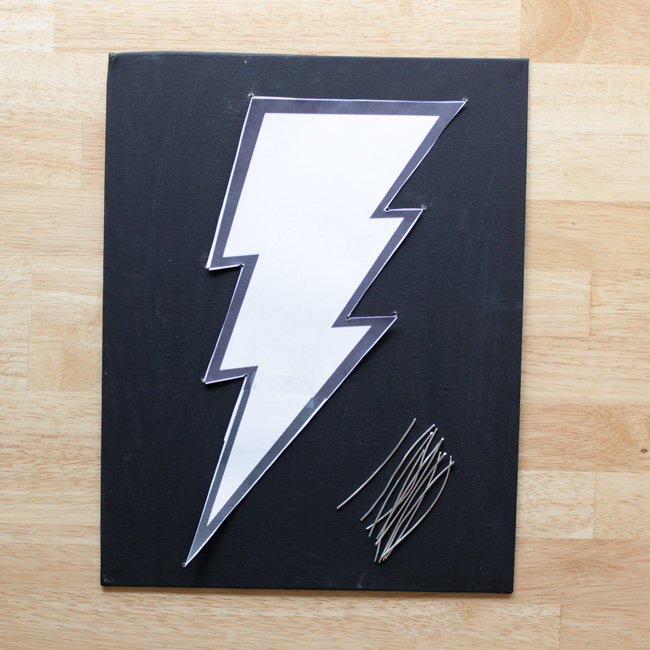
Drill holes at each bend in your design. Clip a 3-inch piece of wire for each hole. My lightning bolt has 11 points, so I drilled 11 holes and cut 11 pieces of wire.

How-to: Faux Neon Sign at HandsOccupied.com

Fold a piece of wire over as shown an insert it in one of the canvas holes. Use it to attach the tubing to the canvas, folding down the ends of the wire on the back of the canvas at a 90 degree angle to keep it and the tubing in place.

How-to: Faux Neon Sign at HandsOccupied.com

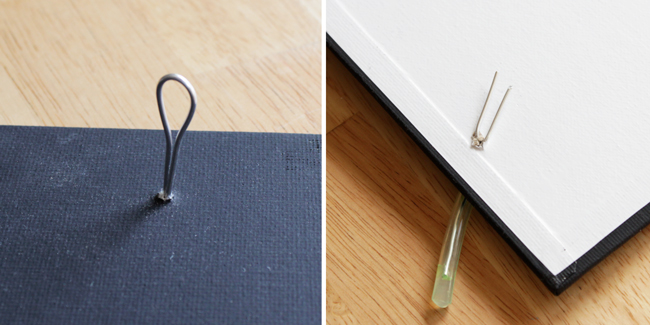
Keep attaching the tubing to the canvas like this, bending the wired tubing at each angle.

How-to: Faux Neon Sign at HandsOccupied.com

The last step is getting rid of the excess tubing. Working over a sink, snip away the hot glue plug, cut the excess tubing, pinch out a little bit of the highlighter ink, and seal the end back up with hot glue. You’re going to want essentially zero air inside the tubing. The air bubble will float upward within the tube when you go to hang it up.

How-to: Faux Neon Sign at HandsOccupied.com

Since my lightning bolt is a closed shape, I secured the two tube ends with a single wire. If your design is a phrase or something that doesn’t loop, you can secure the tubing as normal.

How-to: Faux Neon Sign at HandsOccupied.com

Really the hardest part of this project is keeping air out of your tubing and forming the words. My biggest tips are:

  • Be careful as you disassemble your highlighters to avoid ink spillage.
  • Use a separate bit of tubing for each word if you’re creating a phrase for your sign.
  • Before I realized it made sense to put the wire inside the tubing, I played with hot gluing the tubing to wire bent into a shape. That doesn’t work – the hot glue and the wire just don’t stay glued to the tubing.
  • Don’t get too crazy when bending your tubing into shape. You can break the hot glue seal and lose all your ink.

How-to: Faux Neon Sign at HandsOccupied.com

PS: If you want this to glow at night, all you’ll need to do is shine a black light on it and it’ll shine brightly. The advantage of the highlighter, though, is that it shines fluorescently even in regular daylight!

Filed Under: Home Decor, How-to Tagged With: faux neon, highlighter, lightning bolt, neon, sign

About Heidi

Heidi Gustad is a craft book author & content creator in love with primary colors & vintage vibes. She specializes in knitting, crochet, latch hook and macramé, and her first book, Latch Hook: 12 Projects for the Modern Maker, is out now!

Previous Post: « Werther’s Original Sugar Free
Next Post: Wanted: Your Thoughts! »

Reader Interactions

DID YOU LIKE THIS POST?
Visit similar articles...

  • Knit Lightning Bolt ToyKnit Lightning Bolt Toy
  • How-to: Mess Free Tie DyeHow-to: Mess Free Tie Dye
  • How-to: Neon Picnic Tablecloth WeightsHow-to: Neon Picnic Tablecloth Weights
  • Eighth Ornament of ChristmasEighth Ornament of Christmas

DON’T MISS ANOTHER UPDATE

Trackbacks

  1. Science Meets Crafts Program Kit: Faux Neon Sign | Library as Incubator Project says:
    November 21, 2013 at 7:05 am

    […] out How to Make a Faux Neon Sign for the step by step on making these one at a time. In the tutorial on my blog, I did a couple […]

    Reply

Leave a Reply to Science Meets Crafts Program Kit: Faux Neon Sign | Library as Incubator Project Cancel reply

Your email address will not be published. Required fields are marked *

This site uses Akismet to reduce spam. Learn how your comment data is processed.

Primary Sidebar

Heidi Gustad from Hands Occupied / Craft Book Author and Knitting, Crochet, Latch Hook and Macrame Designer

Hi! I’m Heidi, an author, yarn craft designer and content creator specializing in knitting, crochet, latch hook & macrame. My work unapologetically features primary colors and vintage-meets-modern style. My first book, Latch Hook: 12 Projects for the Modern Maker, is now available!

Professionally I’m most known for: advanced intarsia knitting design & modern latch hook design.

work with heidi

UPDATES BY EMAIL

Get a free pattern + biweekly updates sent to your inbox.

Let’s be friends!

  • Facebook
  • Instagram
  • Pinterest
  • Twitter
  • YouTube
Latch Hook by Heidi Gustad

Footer

INSTAGRAM

handsoccupied

Craft book author & content creator in love with primary colors & vintage vibes. / #latchhookbook out now!
.
knitting, crochet, latch hook & macramé

Heidi Gustad 🧶✂️
A new YouTube tutorial is live today covering how A new YouTube tutorial is live today covering how to knit the Little Butterfly Stitch (aka Bowknot Stitch). It adds so much cute character to simple stockinette. Only a little funky to knit, and it packs a huge visual punch! 🦋 
.
Find the video & written stitch pattern on the blog and YouTube, links are in bio. 
.
#kpambassadorsfeb21 #sponsored
.
Yarn: @kelbournewoolens Germantown in Baby Blue via @knit_picks. Needles: Prism Interchangeables, also from Knit Picks. 
.
Pictured: a light blue swatch of Little Butterfly Stitch knitting on a pink background. A skein of yarn and a few stitches of knitting are nearby.
“You’re telling me words can be pronounced in “You’re telling me words can be pronounced in different ways and mean the same things?!” 👀 Posting this here, just to make it clear: when anyone says skayne, skeen, or skyne, it can be safely assumed we’re talking about a bundle o’ yarn,  a SKEIN. It’s not necessary to shame someone for using a word that is known to have MULTIPLE common pronunciations. 🧶
.
.
Can you plz comment sharing how you say SKEIN and where you learned it? The OED happens to say SKAYNE, but it’s not a personal attack if someone says SKEEN and you say SKYNE or even Saskatoon. I’m legitimately curious. We don’t all knit or crochet the same way, and craft evolves a bit like language - it is passed on. There is so much value in having conversations about & embracing these variations! ✌🏻
.
Pictured: A blond woman holds a skein of mustard yellow yarn up to her head like a phone, looking shocked. She’s wearing glasses & a knit sweater. 
.
#handsoccupied #heidigustad #skein #yarn #yarncraft #knit #crochet #yarnaddict #knitincolor #soldotnacrop #language #englishisweird #oed #oxfordenglishdictionary
Sometimes my weekend projects involve hair rather Sometimes my weekend projects involve hair rather than yarn. Here’s the latest mediocre-but-improving result of my slow quest to learn to set vintage inspired curls. 💇🏼‍♀️ I’m hoping to be able to wash my hair less using a regular vintage set, but we’ll see if it ends up being practical. 😆 Hair frustrates me so much more than crafts! 
.
Do you also style your hair using vintage methods? If you have any tips for vintage hair styling or good resources to share, please do!
I suppose this is one way to decide what yarn colo I suppose this is one way to decide what yarn color suits your pooch. 😆 Navy really might be Woodrow‘s color - what do you think? 
.
Pictured: A medium sized, brown, senior dog asleep on a green bed. For some reason a donut ball of navy wool yarn sits on his head.
The first stitch tutorial of the new year is live The first stitch tutorial of the new year is live on YouTube! Diamond Brocade is a great knit+purl only stitch for beginners or anyone wanting a classic look for their knitting project. Find the video with a written stitch pattern on the blog or head directly to the video on YouTube. Both are linked in bio. ✌🏻 
#kpambassadorsfeb21 #sponsored
Load More... Follow on Instagram

Copyright © 2021 / Foodie Pro Theme On Genesis Framework / Branding by Ink + Mortar
All Site & Shop Policies / Privacy Policy / Cookie Policy