• 0 items$0.00
  • Skip to primary navigation
  • Skip to main content
  • Skip to primary sidebar
  • Skip to footer

Hands Occupied

Colorful knitting, crochet, latch hook and macrame from craft book author & designer Heidi Gustad.

  • BLOG
    • Knitting
    • Crochet
    • Latch Hook
    • Macramé
    • Punch Needle
  • ABOUT
  • Shop
  • Nav Social Menu

    • Instagram
    • Pinterest
    • RSS
    • TikTok
    • YouTube

How-to: Lantern-style Votive Luminaries

September 2, 2013 1 Comment

How-to: Lantern-style Votive Luminaries | Hands Occupied

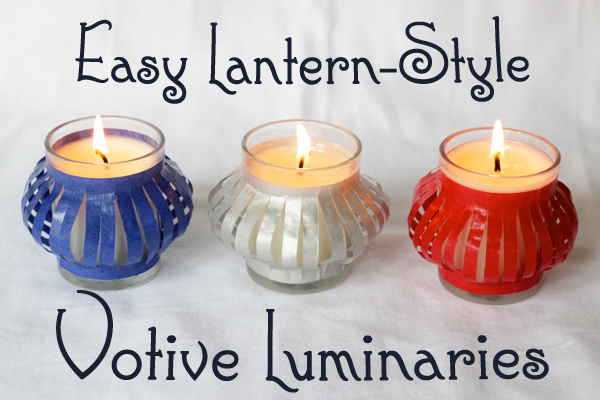
Take it easy this Labor Day and whip up a set of these simple lantern-style luminaries. I love these for every season of the year – all you have to do is swap out the color of the paper used to make them fit right in on a Halloween, Christmas, or any tablescape. If you craft on a regular basis, you might even have the needed supplies on hand already too!
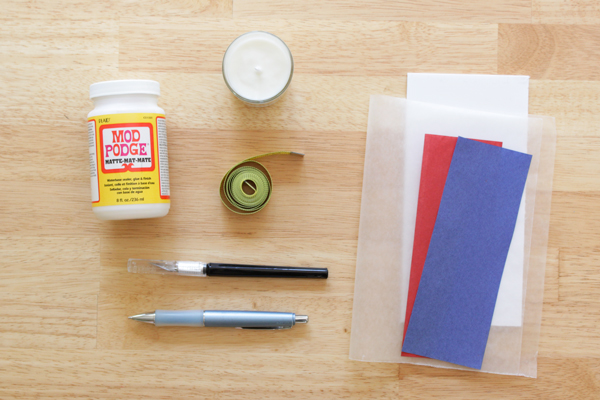
Supplies

votive candles that come in glass holders
matte Mod Podge
sponge brush
tissue paper
pre-filled glass votive candles
x-acto knife
pencil
scissors
measuring tape
ruler
waxed paper
cardboard or foam core to protect your work surface

Directions

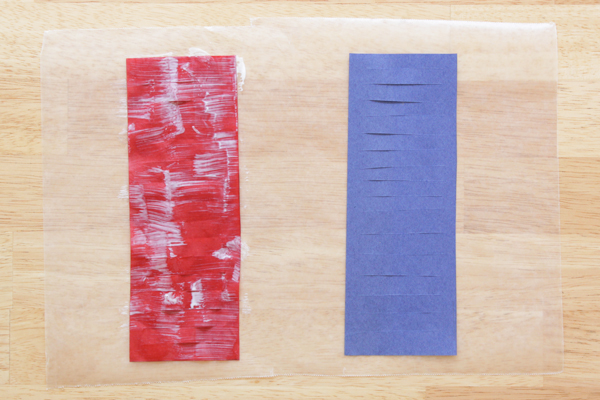
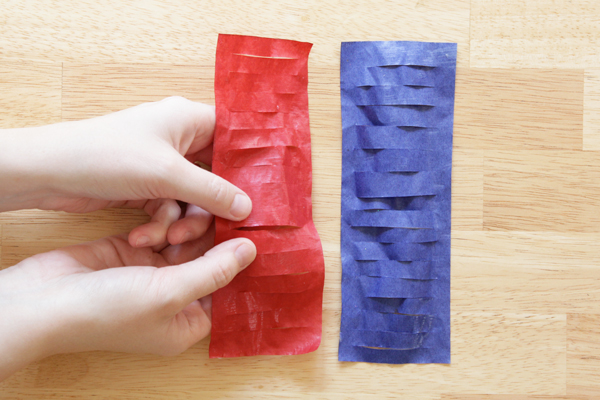
Measure the wider end of your votive and then measure its height using a tape measure. With those numbers, draw a rectangle on your tissue paper for each votive, and cut them out.

How-to: Lantern-style Votive Luminaries | Hands Occupied

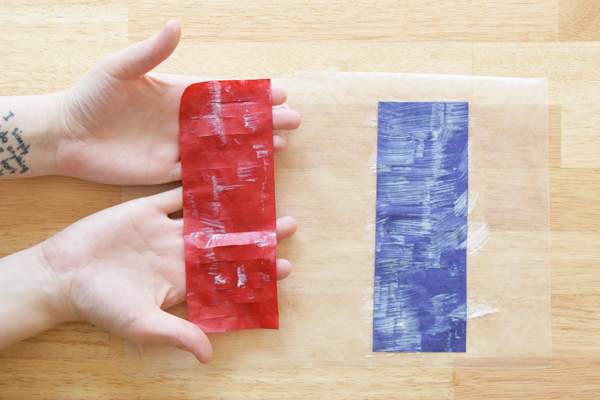
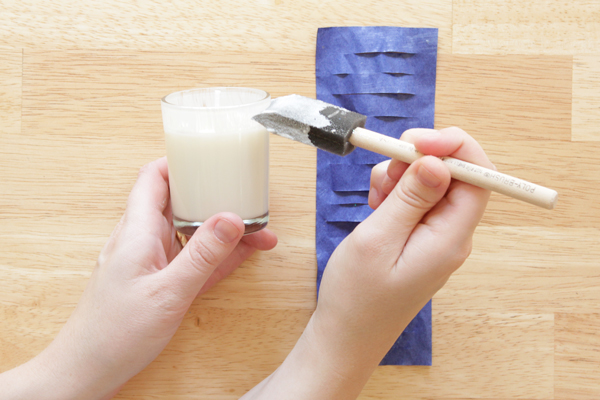
Set your tissue paper pieces on some cardboard or foam core and slice lines down the length of each rectangle without cutting through any edge of the tissue paper. Lay your sliced rectangles on waxed paper and carefully paint a layer of Mod Podge over them.

How-to: Lantern-style Votive Luminaries | Hands Occupied

Let dry for 5 minutes. Very carefully peel them from the waxed paper. Set each aside on a new, dry sheet of waxed paper to dry all the way.

Why hassle with delicate tissue paper on this project?
Tissue paper lets more light through! Yes, the slits in the paper will let light through, but the tissue paper will let even more light shine. You can swap regular paper for the tissue paper if you’d like, which would let you skip the waxed paper/Mod Podge layer/careful peel steps. 

How-to: Lantern-style Votive Luminaries | Hands Occupied

When the tissue paper has dried completely, cut along the slits with an x-acto knife to reopen them and carefully pull each slit apart.

How-to: Lantern-style Votive Luminaries | Hands Occupied

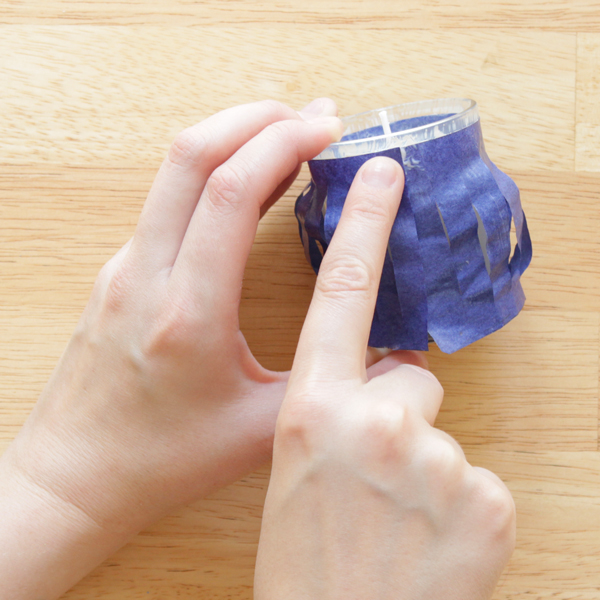
Paint approximately a centimeter of Mod Podge onto the top edge of your votive. You want to start with the top edge here because most votives that come in a container are wider at the top than bottom.

How-to: Lantern-style Votive Luminaries | Hands Occupied

Position your tissue paper about half a centimeter from the edge of the top of your votive. Place the tissue paper all the way around the votive, and when you come back around, there will be a little bit of overlap. Add a dot of Mod Podge at the point of overlap to secure. Next, paint some Mod Podge over the tissue paper along the top end of the votive.

How-to: Lantern-style Votive Luminaries | Hands Occupied

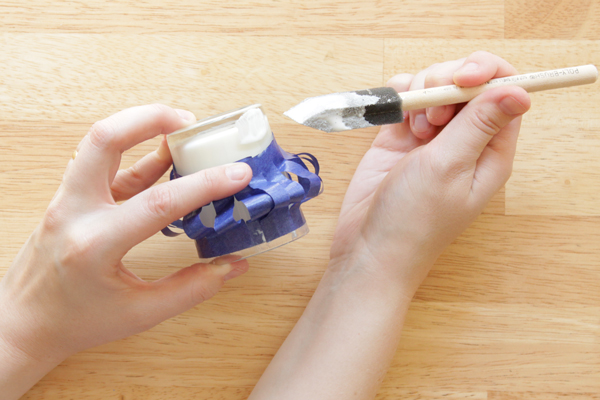
Just like at the top of your votive, paint a ring of Mod Podge about a centimeter wide along the bottom edge of the votive. Slide the bottom of your tissue paper to about half a centimeter from the votive’s base. Again, add a dot of Mod Podge where the tissue paper overlaps to secure it, and paint a layer of Mod Podge over the bottom end of the tissue paper to finish.

How-to: Lantern-style Votive Luminaries | Hands Occupied

^Please pardon my left hand being in the strangest physical configuration possible here.^

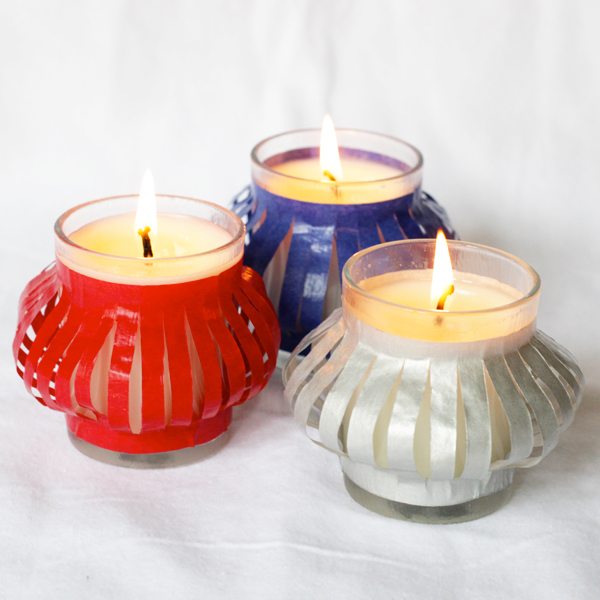
Here’s what the finished luminaries look like from the top…

How-to: Lantern-style Votive Luminaries | Hands Occupied

Gluing the paper on slightly in from the top and bottom edge of the votives makes the middle of the paper slits flare out for a cute lantern effect. Festive, right?

How-to: Lantern-style Votive Luminaries | Hands Occupied

Like this project? I originally wrote it for Mod Podge Rocks, a craft blog totally worth reading.

Filed Under: Decoupage, Fourth of July, How-to, My Work Elsewhere Tagged With: candles, craft, diy, easy, lanterns, luminaries, mod podge, patriotic, tissue paper, votives

About Heidi

Heidi Gustad is a craft book author, designer & creator specializing in yarn crafts like knitting, crochet, latch hook & macramé. Her first book, Latch Hook: 12 Projects for the Modern Maker, is out now.

Previous Post: « Weekly Reader
Next Post: Back to School Project Roundup »

Reader Interactions

DID YOU LIKE THIS POST?
Visit similar articles...

  • Twinkle in Your Eye Sunglasses Twinkle in Your Eye Sunglasses
  • Easy No Slip HangersEasy No Slip Hangers
  • Washi Tape Twist TiesWashi Tape Twist Ties
  • Dimensional Easter Egg EarringsDimensional Easter Egg Earrings

DON’T MISS ANOTHER UPDATE

Comments

  1. Ananasa

    September 8, 2013 at 1:28 am

    Really simple and beautiful posting! We love your creativity

    Ananasa.com- Home For Handmade

    Reply

Leave a Reply Cancel reply

Your email address will not be published. Required fields are marked *

This site uses Akismet to reduce spam. Learn how your comment data is processed.

Primary Sidebar

Heidi Gustad from Hands Occupied / Craft Book Author and Knitting, Crochet, Latch Hook and Macrame Designer

Hi! I’m Heidi (she/her/hers), a craft book author & pattern designer specializing in knitting, crochet, latch hook & macrame. Really anything with yarn! ❤️  My work combines vintage and modern design elements, featuring bold colors and graphic motifs.

EMAIL NEWSLETTER

Never miss a tutorial with these short & sweet monthly updates.

Find Me on Social Media

  • Instagram
  • Pinterest
  • TikTok
  • YouTube
Latch Hook by Heidi GustadDiscover Unique Items

Footer

INSTAGRAM

handsoccupied

Helping yarn crafters untangle various techniques on the internet since 2010
🧶 Really into intarsia
Stay up-to-date 💌 & shop the latest patterns ⤵️

Heidi Gustad 🧶 knitting & yarn crafts
How to convert a closet into WIPs storage with jus How to convert a closet into WIPs storage with just a few supplies ✂️
.
When I was a librarian, we would use these hanging bags to circulate books with audiobook CDs. They came to mind when I wanted to develop a filing cabinet-like system for my differently-sized WIPs. To fit in my studio closet, a standard bedroom closet, they just needed custom hangers. 🤙🏻 
.
HOW TO MAKE THE HANGERS
1. Carefully cut approx. a 9” (23 cm) length of flexible 3 mm aluminum wire.
2. Near the end of a large knitting needle or dowel, wrap the wire around it as you would a twist tie. 
3. Bend the other end into a hook shape, perpendicular to the circle shape you just created. 
4. Hang like a hanger in a closet, as shown. 
.
#handsoccupied #handmadelife #knitting_inspiration #craftcloset #craftroom #craftroomorganization #craftroomstorage #craftroomdecor #crocheter #latchhook #knittersofinstagram #wip #wips #hangingstorage
It’s time for the monthly review and giveaway! T It’s time for the monthly review and giveaway! This go around, get to know two new sister yarns from @manosyarnsusa, Marla and Sami, and enter to win a skein of each to try for yourself. 
.
What makes these yarns sisters is that, while dyed differently, they’re the same weight and come in intentionally coordinating color palettes. For my review, I opted for a sky-inspired combo of Sami in Natural and Marla in Nube. 🌧️ 
.
Check out the full review & enter the giveaway at the link in my bio. 
.
#handsoccupied #yarnreview #manosdeluruguay #knitting_inspire #crochet #yarngiveaway #knitters #yarn #crochetersofinstagram
If only knitting a whole project took 39 seconds… 😮‍💨 
.
In this video, you can see how the Intarsia Flower Pillow pattern knits up - two flat panels, one with intarsia, both are blocked, and then they’re seamed. Find the pattern on @hi.ravelry & my website, just search Intarsia Flower Pillow. 🌸 
.
P.S. I’m really smiling in this video while seaming the pillow, so I guess I’m proving last week’s claim that I truly enjoy that sometimes-dreaded task. 😆🫣
In knitting, a Left Lifted Increase (LLI) lets you In knitting, a Left Lifted Increase (LLI) lets you add a stitch in between two columns of stitches that leans to the left. Similar to an M1L, LLIs allow you to increase nearly invisibly.
.
To learn more about lifted increases, including when to use them and how they differ from Make 1s, head to the 🔗 in my profle. 
.
Have you ever used lifted increases? I used M1’s almost exclusively for a long time when I needed to inc between stitches, but when I designed the Intarsia Flower Pillow pattern, I needed something that would allow me to increase a lot near my cast on, and M1’s resulted in edge curling. The more you know! 🌈 
.
Yarn: @lionbrandyarn Wool Ease from my Stash / Neddles: @boyeyarncrafts - Just remembered these are the needles I learned to knit on at age 8. 😂
.
#handsoccupied #knitting #learntoknit #howtoknit #sweaterknitting #knitinspiration #knittersofinstagram #liftedincreases
Last week I got to hang out with my family & helpe Last week I got to hang out with my family & helped babysit my red-headed niece and nephew. So here’s some plane knitting, and a couple pictures (shared with permission) of my babysitting adventures.
.
Lessons learned: 1️⃣ Trying to knit around 2 toddlers, 2 cats & 2 large dogs is pretty hard. 2️⃣ I learned during water color time that pink and black make “colorful black.” 🩷🖤 3️⃣ Toddlers do NOT care about your rainbow sorting of their toys. 4️⃣ Toddlers are very good at finding mischief in a very short amount of time, what a surprise. 😂
.
#handsoccupied #knitting #placesyoucanknit #knitters #knitinpublic #handmadelife #knitting_inspiration
Load More... Follow on Instagram

Copyright © 2023 / Foodie Pro Theme On Genesis Framework / Branding by Ink + Mortar
All Site & Shop Policies / Privacy Policy / Cookie Policy