• 0 items$0.00
  • Skip to primary navigation
  • Skip to main content
  • Skip to primary sidebar
  • Skip to footer

Hands Occupied

Contemporary yarn crafts by Heidi Gustad. Knitting, crochet, latch hook and macrame.

  • BLOG
    • Knitting
    • Crochet
    • Latch Hook
    • Macramé
  • ABOUT
  • Shop
  • Studio
  • Nav Social Menu

    • Facebook
    • Instagram
    • Pinterest
    • RSS
    • Twitter
    • YouTube

How-to: Louise Dress from Bob’s Burgers

October 27, 2011 2 Comments

How-to: Louise from Bob's Burgers Costume | Hands Occupied.com

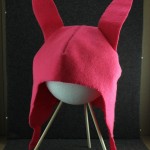
Last spring, I made myself a Louise hat from Bob’s Burgers when I was home sick. I figured that Halloween was the perfect excuse to tackle Louise’s dress. It was much easier than the hat! Not familiar with Bob’s Burgers or the character Louise? Check out her bio.

Supplies

enough green fabric to make a dress that will fit you. I needed about 3 yds.
coordinating thread
sewing machine
newspaper or tissue paper
scissors
a basic dress that fits you loosely
plain white t-shirt

Directions

I created the pattern for this using the same technique as I did for the Pawnee Goddess vest I shared the other day. 

How-to: Louise Dress from Bob's Burgers - Hands Occupied

Lay your dress on some news- or tissue paper. If the paper isn’t long enough, tape a few pieces together. Trace the shape of your dress on to the paper.

Then, I added a second line to the pattern for the neck opening on the front of the dress. For the dress I used as a template, I opened the zipper, marked where the front side of the dress’s neckline lands.

How-to: Louise Dress from Bob's Burgers - Hands Occupied

Cut out the pattern, leaving the higher neckline for the back panel of the dress intact.

How-to: Louise Dress from Bob's Burgers - Hands Occupied

Pin your pattern to your fabric and cut out the back panel, leaving 1/2″ of seam allowance. Remove your pattern from the fabric and cut the neckline down to the lower mark you added. Pin the pattern to your fabric and cut out the front panel of your dress, leaving 1/2″ of seam allowance.

How-to: Louise Dress from Bob's Burgers - Hands Occupied

I found it helpful to mark the wrong side of each dress panel with “B” for back, “F” for front.

How-to: Louise Dress from Bob's Burgers - Hands Occupied

Pin down the neckline, clipping a few notches to help it lay flat. Sew the necklines of both panels of the dress.

How-to: Louise Dress from Bob's Burgers - Hands Occupied

How-to: Louise Dress from Bob's Burgers - Hands Occupied

Hem both panels of the dress, making sure they’re both the same length after sewing. Then, pin both pieces together. Sew the shoulder and side seams. At this point, I tried the whole thing on for size and had to take it in a bit in the hips. To do that, I just sewed another side seam from the waist down to the bottom of the dress. It was about 3/4″ from the first seam I sewed.

How-to: Louise Dress from Bob's Burgers - Hands Occupied

Now it’s time to add the sleeves. I grabbed one of my husband’s undershirts and traced one of the sleeves on a bit of tissue paper, kind of like tracing the dress for the pattern.

How-to: Louise Dress from Bob's Burgers - Hands Occupied

Then, I folded the sleeve over and traced the line of the armpit on to the paper to complete the pattern.

How-to: Louise Dress from Bob's Burgers - Hands Occupied

I cut out the pattern and labeled which side was which. Remember, this is only the shape of half of one sleeve.

How-to: Louise Dress from Bob's Burgers - Hands Occupied

How-to: Louise Dress from Bob's Burgers - Hands Occupied

Pin this pattern to a folded over piece of fabric. Make sure to place the right part of the pattern on the fold.

How-to: Louise Dress from Bob's Burgers - Hands Occupied

How-to: Louise Dress from Bob's Burgers - Hands Occupied

Cut a second sleeve out using your pattern or the first sleeve you cut out. I opted for the latter method.

How-to: Louise Dress from Bob's Burgers - Hands Occupied

How-to: Louise Dress from Bob's Burgers - Hands Occupied

Lay one sleeve piece on your table next to the dress. My sleeves were from a men’s size large undershirt, so my sleeves were too tall for my dress’s armpit openings. Trim excess length from both sleeve pieces.

How-to: Louise Dress from Bob's Burgers - Hands Occupied

How-to: Louise Dress from Bob's Burgers - Hands Occupied

Hem the outer part of each sleeve. I opened up the armpit end of the side seams with a seam ripper to help with placement of the sleeves. With the right side of the fabric facing out, pin one sleeve in place.

How-to: Louise Dress from Bob's Burgers - Hands Occupied

How-to: Louise Dress from Bob's Burgers - Hands Occupied

How-to: Louise Dress from Bob's Burgers - Hands Occupied

Sew around to attach sleeves. Turn the sewn sleeves out. Pin the opening of the top of the side seam and the underside of the sleeve, as shown. Sew in place. Repeat this whole process for the second sleeve.

How-to: Louise Dress from Bob's Burgers - Hands Occupied

Turn your whole dress right side out and try it on! I’m pretty excited about how this turned out. The finishing touch is a pair of black mary jane flats, btw. Lucky for me, I had a pair laying around.

How-to: Louise Dress from Bob's Burgers - Hands Occupied

How-to: Louise Dress from Bob's Burgers - Hands Occupied

A huge thank you goes to my friend The Candy Fan for taking the pictures of me in costume. She blogs about candy and is awesome. Do yourself a Halloween favor and subscribe to her posts. 

Filed Under: Halloween, How-to, Sewing Tagged With: bob's burgers, costume, halloween, How-to, louise, tutorial

About Heidi

Heidi Gustad is an artist, author and crafts designer specializing in knitting, crochet, latch hook and macrame. In addition to running the Hands Occupied Blog and Pattern Shop, you can find her making videos & co-hosting the Very Serious Crafts podcast.

Previous Post: « How-to: Pawnee Ranger Costume
Next Post: How-to: Basic Screenprinting »

Reader Interactions

DID YOU LIKE THIS POST?
Visit similar articles...

  • How-to: Louise Hat from Bob’s BurgersHow-to: Louise Hat from Bob’s Burgers
  • Attempting a Giant Pom Pom CostumeAttempting a Giant Pom Pom Costume
  • How-to: Punk Rock Valentine’s ClutchHow-to: Punk Rock Valentine’s Clutch
  • How-to: Halloween Doggie Bow Tie How-to: Halloween Doggie Bow Tie

DON’T MISS ANOTHER UPDATE

Comments

  1. kat

    October 11, 2013 at 10:51 am

    Thanks for the pattern help. My daughter is going to love this!!!!

    Reply
  2. Verana

    October 21, 2013 at 10:29 pm

    This is magnificent! Thank you!

    Reply

Leave a Reply to kat Cancel reply

Your email address will not be published. Required fields are marked *

This site uses Akismet to reduce spam. Learn how your comment data is processed.

Primary Sidebar

Heidi Gustad from Hands Occupied / Craft Book Author and Knitting, Crochet, Latch Hook and Macrame Designer

Hi! I’m Heidi, an author, yarn craft designer and content creator specializing in knitting, crochet, latch hook & macrame. My work unapologetically features primary colors and vintage-meets-modern style. My first book, Latch Hook: 12 Projects for the Modern Maker, is now available!

work with heidi

UPDATES BY EMAIL

Get a free pattern + biweekly updates sent to your inbox.

Let’s be friends!

  • Facebook
  • Instagram
  • Pinterest
  • Twitter
  • YouTube
Latch Hook by Heidi Gustad

Footer

INSTAGRAM

handsoccupied

Craft book author & content creator in love with primary colors & vintage vibes. / #latchhookbook out now!
.
knitting, crochet, latch hook & macramé

Heidi Gustad 🧶✂️
There’s an update on the blog today, & it’s ab There’s an update on the blog today, & it’s about how I’m going to take the next 2 weeks off to rest & recharge. ☺️🧶 No new content for y’all means I can also take a moment to zoom out & plan what’s next. Link is in bio. 
.
.
A note on Very Serious Crafts: In the post I discuss stepping away from the @seriouscrafts podcast to give myself more time to devote to some minor medical issues. Don’t you worry - my health will be fine, & @molliejohanson @redhandledscissors and I are still pals, and after a short break of their own, the podcast will be back! Just sans moi. 💁🏼‍♀️😆 
.
.
See you in a couple weeks! ✌🏻#handsoccupied #knitdesign #craftdesign #sofadedsweater
Been a little quiet this holiday week, as it shoul Been a little quiet this holiday week, as it should be. ☺️🎄The past few days have been filled with a lot of catching up on festive zoom calls & raising toasts to the camera. 🥂 Connecting with people has been a welcome change of pace! Now I’m feeling ready to meet my inevitable end-of-year deadlines. 😆
.
.
Warmest wishes for the season, my friends! ❤️💛💙
Hi, I’m Heidi, the craft book author & maker beh Hi, I’m Heidi, the craft book author & maker behind Hands Occupied! 👋🏻 I’ve been enjoying making Reels a lot lately, but I wanted to bop in to share a regular photo & say hello. 🤓 
.
.
rather than giving you my bio right now, I have a question. I just got this new sweater & I can’t stop imaging how funny it would be to wear this to a knitting class ... is that bad? 🤣🤣🤣
.
.
Pictured: a blond woman with glasses wearing a sweater that reads “all your sweaters are ugly” standing in front of a Christmas tree.
Wet blocking, also called immersive blocking, is o Wet blocking, also called immersive blocking, is one of the most common methods for finishing a knitting project and helping ensure its final size and shape. Learn basic blocking for absolute beginners in an easy-to-follow (non-Reel!) video tutorial! Catch the tutorial on YouTube or the Hands Occupied Blog, link is in bio. 🧶 #handsoccupied #stopswatchandblockit #KPAmbassadorsDec20 #sponsored
Had to share this perfect capture of one of my fav Had to share this perfect capture of one of my favorite weird homemade Christmas ornaments: a simple macramé Santa face with beads for the eyes and nose! My Great-Grandma made it too. 🎄
.
Might have to try making a quickie Reel tutorial for this guy - I think it’s the perfect project for it, don’t you? 🎅🏼 #handsoccupied #macrame
Load More... Follow on Instagram

Copyright © 2021 / Foodie Pro Theme On Genesis Framework / Branding by Ink + Mortar
All Site & Shop Policies / Privacy Policy / Cookie Policy