• 0 items$0.00
  • Skip to primary navigation
  • Skip to main content
  • Skip to primary sidebar
  • Skip to footer

Hands Occupied

Colorful knitting, crochet, latch hook and macrame from craft book author & designer Heidi Gustad.

  • BLOG
    • Knitting
    • Crochet
    • Latch Hook
    • Macramé
    • Punch Needle
  • ABOUT
  • Shop
  • Nav Social Menu

    • Instagram
    • Pinterest
    • RSS
    • TikTok
    • YouTube

How-to: Metal Stamping 201 // *fml! Necklace

September 17, 2012 3 Comments

Last week, I shared a metal stamping 101 tutorial and video showing you guys the basics of how to stamp metal. Since making that video, I’ve gotten to practice my stamping a little more and have a few tips for making your metal stamping even better using office supplies most people have around the house.
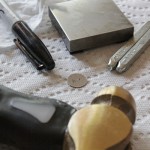
How-to: Metal Stamping 201 | HandsOccupied.com

Supplies

ImpressArt metal stamping kit

metal piece/medium to stamp on

sturdy work table

masking tape

ruler/measuring tape with metric system (mm, in particular) markings

marker

ball point pen

paper towel

ear protection (optional)

How-to: Metal Stamping 201 | HandsOccupied.com

Directions

Gather all of your supplies and the letters you’ll need for your project. Place your metal medium onto the steel block and center it. Use some pieces of masking tape lined up parallel to the top and bottom of your steel block to not only secure your metal piece, but also to provide a straight line to help keep your stamps straight.

How-to: Metal Stamping 201 | HandsOccupied.com How-to: Metal Stamping 201 | HandsOccupied.com

On the bottom piece of tape, mark every 5mm. On each cm mark, I used a permanent marker, and for every 5mm (1/2 cm), I used a ball point pen. I used the two pen types for the markings to make my life a little easier while stamping.

How-to: Metal Stamping 201 | HandsOccupied.com

How-to: Metal Stamping 201 | HandsOccupied.com

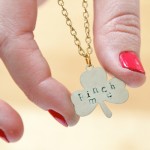
When you’re ready to stamp, gather your stamps in the order in which they’ll be stamped. I guess I worked on this necklace when I was in a grumpy mood, so I made a *fml! necklace. Metal stamping is super therapeutic if you’re grumpy. I recommend considering ear protection while you metal stamp because I definitely got sensitive to the noise after awhile.

How-to: Metal Stamping 201 | HandsOccupied.com

Start from the middle of your design. Ensuring your stamps are right side up, place your stamp in the middle of the metal piece, right above the middle line. Align the stamp and swiftly pound into it with the kit’s hammer. For a refresher on what this looks like, check out my Metal Stamping 101 video on YouTube.

How-to: Metal Stamping 201 | HandsOccupied.com

How-to: Metal Stamping 201 | HandsOccupied.com

Working outward toward the edges of your design, stamp the next letters. In the FML necklace, that’s F and L. The hardest part is getting them the same distance from each side of the M, and also getting them straight. My biggest tip is to take the time to get everything lined up before hammering because it’s not like you can press the delete key on stamped metal :).

How-to: Metal Stamping 201 | HandsOccupied.com

How-to: Metal Stamping 201 | HandsOccupied.com

When everything is stamped, you can use a marker, as I did in the metal stamping 101 video, to make your stamps pop. Basically, you color over it and rub off the excess ink before it’s dry to get the effect you see here. If you have any questions, leave a comment and I’ll be happy to answer it!

How-to: Metal Stamping 201 | HandsOccupied.com

The kit featured in this tutorial was provided by ImpressArt. Click to learn where to get a kit like this for yourself.

Filed Under: DIY Style, How-to, Metal Stamping Tagged With: 201, diy, fml, impressart, kit, metal stamping, necklace, tag, tape

About Heidi

Heidi Gustad is a craft book author, designer & creator specializing in yarn crafts like knitting, crochet, latch hook & macramé. Her first book, Latch Hook: 12 Projects for the Modern Maker, is out now.

Previous Post: « Excited by Ribbon
Next Post: How-to: Cricut Mini 101 // Review & Giveaway! »

Reader Interactions

DID YOU LIKE THIS POST?
Visit similar articles...

  • How-to: Metal Stamping 101How-to: Metal Stamping 101
  • Weekly ReaderWeekly Reader
  • Pinch Me Pendant for St. Patrick’s DayPinch Me Pendant for St. Patrick’s Day
  • How-to: Autumnal NecklaceHow-to: Autumnal Necklace

DON’T MISS ANOTHER UPDATE

Comments

  1. Percy

    June 10, 2013 at 10:46 pm

    This is the best metal stamping tutorial I’ve ever seen! thanks so much for sharing. Do you sell your jewelry anywhere? I’ll be in the Chicago area in a few months and would love to check out your collection. Thanks again!!!

    Reply
    • Heidi

      June 11, 2013 at 8:45 am

      Nope, I don’t sell any crafts anywhere, I exclusively blog about crafts & write original tutorials. I’m glad you enjoyed this post! Thanks!

      Reply

Trackbacks

  1. 12 Terrific DIY Metal Stamped Pendants - i can make says:
    February 28, 2014 at 12:07 am

    […] a little more, shall we say, cheeky?  Try this ‘fml’ pendant from Hands […]

    Reply

Leave a Reply Cancel reply

Your email address will not be published. Required fields are marked *

This site uses Akismet to reduce spam. Learn how your comment data is processed.

Primary Sidebar

Heidi Gustad from Hands Occupied / Craft Book Author and Knitting, Crochet, Latch Hook and Macrame Designer

Hi! I’m Heidi (she/her/hers), a craft book author & pattern designer specializing in knitting, crochet, latch hook & macrame. Really anything with yarn! ❤️  My work combines vintage and modern design elements, featuring bold colors and graphic motifs.

EMAIL NEWSLETTER

Never miss a tutorial with these short & sweet monthly updates.

Find Me on Social Media

  • Instagram
  • Pinterest
  • TikTok
  • YouTube
Latch Hook by Heidi GustadDiscover Unique Items

Footer

INSTAGRAM

handsoccupied

Craft book author, designer & creator specializing in yarn crafts like knitting, crochet, latch hook & macramé
❤️ Email preferred

Heidi Gustad 🧶✂️
Since it won’t be clean for long, swipe to see w Since it won’t be clean for long, swipe to see what my home studio looks like these days. Nothing will ever quite be like the old Hands Occupied Studio, but I’m pretty pleased with how I shoehorned everything in this space. Function over form + a layer of yarn cuteness-meets-chaos is how I’d describe my creative space needs. 😆 When I was still renting the studio, those needs included “doesn’t rain suspicious brown water from a crack in the ceiling for a year,” so this is an improvement! 😆
.
For a time lapse of the studio organizing and tszuj-ing process, scroll down a couple posts on my feed. (There’s also a video or two featuring the old studio if you’re curious.) Happy June, friends! 
.
#handsoccupied #handsoccupiedstudio #knitdesigner #craftdesign #yarncrafts #latchhook #makerlife #heidigustad #chicagocrafter
Who doesn’t love magic loop knitting? Who doesn’t know what it is? How about when circular needles were invented?
.
In todays new bl0g post + video tutorial, you’ll learn about the magic loop method for knitting in the round, how to do it and why to use it, and when it came to be. The 🔗 is in my b1o. 🧶 
.
#handsoccupied #magicloop #knitting #howtoknit #knittinginspiration #knittingintheround
Finally organizing & putting the finishing touches Finally organizing & putting the finishing touches on my home studio. After losing my studio space last fall, it’s feels really great to *occupy* this new space all the way. 😉
.
I started by removing general clutter & returning straggler supplies from various WIPs, videos & design deadlines to their homes. Next, I hung a third peg board in the space - this one is mostly for display and less for organizing tools or projects. For the first time ever, I’m displaying projects from my book, plus a couple other faves. (The best thing about designing more yarn crafts besides knit & crochet is that I have some really fun -and delightfully pettable 😆- samples around.) I finished by adding a square dowel to my small supply storage tower to keep it from tipping over, plus re-arranging and de-cluttering the closet. 
.
This cleaner space already has me feeling so much more creative and less overwhelmed. Now to find a safe spot in the basement for the tower of project samples in Rubbermaid tubs I liberated from my WIPs closet. Also why are there five?! 
.
Here’s to keeping it clean for a few weeks! 🧶 
.
#handsocupied #handsoccupiedstudio #craftroom #craftroomorganization #craftroomstorage #yarncraft #knitter #crocheter #latchhook #latchhookbook
It’s a disaster in here and my video microphone It’s a disaster in here and my video microphone isn’t cooperating, but it could be worse! How’s your day? 
.
(If we haven’t yet met, I’m Heidi and I’m a pattern designer and tutorial creator specializing in yarn crafts like knitting & latch hook. You can learn more about my work and regularly find new tutorials in my profile. ☺️👋🏻)
.
#handsoccupied #craftstudio #knitter #yarncrafter
How to knit a one-row buttonhole 🧶 . Sweater k How to knit a one-row buttonhole 🧶 
.
Sweater knitters, listen up! Learn how to knit a buttonhole over the course of a single row of knitting, a.k.a. a one-row buttonhole. In this technique, a combination of binding off and casting on stitches on opposite sides of the work creates a symmetrical, stretchy buttonhole. 
.
The time limit on these is 90 seconds, so this quick tutorial is perfect to save for future reference. (Did you know you can make folders of saved items like tutorials? 👩🏼‍🏫) 
.
If you’re brand new to the technique or want to see this demonstration slower and more in-depth, my bl0g and You/2be are the place to be. Thanks for watching & let me know if you have any questions or requests for future tutorials in the comments. ☺️
.
#handsoccupied #knitting #onerowbuttonhole #learntoknit #sweaterknitting #knittutorial #knitting_inspiration
Load More... Follow on Instagram

Copyright © 2023 / Foodie Pro Theme On Genesis Framework / Branding by Ink + Mortar
All Site & Shop Policies / Privacy Policy / Cookie Policy