
For years, I’d seen blogs I follow share a variety of personal die cutting machines (see a few examples here) and projects, and I didn’t really understand what they were. These machines seemed like something exclusively for scrapbooking projects, so I didn’t give them a second look. Then, I began blogging and I realized that these machines had some potential in other areas.
Basically a personal die cutting machine is like a printer for crafters. You create designs on your computer and the die cutting machine prints it out by cutting into the paper, vinyl, fabric, or other material you feed into it. There are a wide variety of personal die cutting machines out there, ranging from completely analog hand-cranked machines to super fancy digital machines that hook up to your computer and cost a lot. The Cricut Mini is a digital die cutting machine that is digital, yet affordable. The folks over at Cricut sent me a Cricut Mini to review for you, and they’re also sponsoring a giveaway of a Cricut Mini for one lucky reader!
// Click here to jump to the giveaway. //Â
**This giveaway has ended.**

I should start off by saying the packaging and the CM machine itself are durable because getting packages at my Chicago apartment building is baffling – all packages get launched over a 6-foot fence into my backyard. Let’s not get into the logic of why this happens. The CM box survived the assault without a scratch.  The box comes filled with a CM machine, cutting mat, card stock, USB cable, plug-in, blade and getting started guide. Note: The Cricut Mini requires a decent internet connection to work. Just FYI before you buy.

Through a combination of following the print step-by-step guide and following additional instructions provided at the Cricut website, I found getting everything started and set up was really easy. The hardest part, if you’re not tech-savvy will probably be installing the Cricut Craft Room software to your computer. Just remember to follow every step of the print and online guides. I only hit one snag while setting up my CM with my 2007 iMac running the Snow Leopard operating system. When I finally got to the point where I plugged the machine into my computer, this message popped up and threw me for a slight loop.

I asked my husband-with-a-computer-science-degree for help in setting up this part, and he said to ignore it. Skeptically, I hit cancel, and guess what? That was the right thing to do. The installed software knew what to do with the plugged in CM device.
Next, I recommend playing around with your Cricut Craft Room software and watching a few tutorial videos to get used to its functionality. I thought the software was very  user-friendly. What you design on your screen is what will come out of your CM machine. I decided to try out a little jack o’lantern design for my first project. I got everything laid out just like I wanted:

And then I set up my cutting mat and paper so that the spider would come out purple and the pumpkin, orange.

But then I went to print it, and got this message:

Here’s where my critique of the Cricut Mini comes in. You have to buy cartridges that come loaded with different design elements (in this case, the spider and pumpkin) to be able to create cuts with them. This is how the Cricut machines work. It was unclear that the designs I was using in the software were not necessarily designs I had the ability to cut with. I started over with some designs that I had access to – some really nice classic book-inspired bookmark designs.

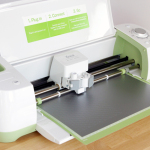
When your designs are all digitally laid out on your mat, you hit the Cut button, make a couple adjustments to the machine’s blade settings, and the CM does its thing.

Here’s what the Cricut Mini looks like in action…
Pretty cool. I thought it was mesmerizing to watch paper cutting happen before my eyes that would have taken me hours of hand cramp-inducing x-acto knife work.

When everything’s cut out by the machine, you can remove the paper from the cutting mat. I thought this was challenging, so I read the Cricut user forums for some tips. Best solution to a really stuck piece of paper? A metal cooking spatula.

My finished Pride & Prejudice and Moby Dick bookmarks turned out pretty cool, though the intricate designs took some time to safely remove from the cutting mat, even with the spatula. It took overall less time, of course, than cutting these by hand.

These are pretty incredible, and were done in just a few minutes once I understood how everything worked. Remember my critique about the cartridges, though? My true critique of the Cricut was that yes, these are some intricate and great designs, but they’re not mine. As crafters, I feel like the point is to be doing our own thing. Buying someone else’s designs, and only really having control over the size and type of paper in my finished project, isn’t really my speed. I could do so much with a personal die cutting tool given the freedom to create my own designs. I’d even pay a fee to be able to use my own designs rather than someone else’s, but after doing some research, I don’t know if the Cricut company will ever offer a custom design feature, given their water-tight copyright restriction history. Overall, though, I had a blast working with the Cricut Mini and have a lot of ideas for more projects to try with this machine.
Is the Cricut Mini for you? Find out for yourself
**This giveaway ended 10/2/12.**
You can enter the giveaway in a variety of ways – just leave a comment on this post each time you enter! The giveaway runs for two weeks, though Tuesday, October 2 at 11:59 pm central time. Winner will be announced in a post at Hands Occupied on Wednesday, October 3 and notified by email.
Ways to enter:
-leave a comment sharing an idea you want to try with the Cricut Mini
-like Cricut on Facebook
-like Hands Occupied on Facebook
-share this giveaway on Facebook
-follow Cricut on Twitter
-follow Hands Occupied on Twitter
-tweet this giveaway
-follow Cricut on Pinterest
-follow Hands Occupied on Pinterest
-pin this giveaway post on Pinterest
-follow Hands Occupied on Tumblr
-reblog this giveaway post on Tumblr
-follow Hands Occupied on YouTube
-like my Cricut video on YouTube (there’s a like button below the video on YouTube)
-follow Cricut on YouTube
The Cricut Mini featured here was provided to Hands Occupied by Cricut for review purposes.Â


I’m an architect, and curious as to how I can use a Cricut in our 3D training lab in my office. we train our staff and other offices.
It looks like this could really work out for Architectural models.
It depends on the kind of material you use for the models – you might have to investigate getting special blades and cutting mats if you want to cut something super thick like foamcore. Best of luck!
Hola, tengo una Cricut mini y no la puedo instalar ya que no aparece este modelo 😞. Alguien me podría ayudar
Estoy usando Google Translate, así que perdone cualquier error de traducción. Parece que la Cricut Mini se suspendió en 2018, pero no sé si eso significa que la atención al cliente está disponible para la Cricut Mini o no. Aquí hay algunas publicaciones de blog sobre la interrupción de Cricut Mini que pueden ser útiles para leer:
https://cricut.com/blog/cricut-craft-room-closing/
https://cricutdinos.com/cricut-mini/
https://www.ty-penguin.org.uk/~auj/blog/2018/09/08/cricut/
https://hobbycutters.com/legacy_cricuts/mini_hack/mini_hack.htm
Puede intentar comunicarse con su equipo de servicio al cliente para obtener ayuda. ¡Buena suerte!
—
I’m using Google Translate, so please forgive any translation errors. It looks like the Cricut Mini was discontinued in 2018, but I don’t know if that means customer support is available for the Cricut Mini or not. Here are a few blog posts about the Cricut Mini discontinuation that may be helpful to read:
(See links in Spanish language section above.)
You could try to reach out to their customer service team for assistance. Good luck!