• 0 items$0.00
  • Skip to primary navigation
  • Skip to main content
  • Skip to primary sidebar
  • Skip to footer

Hands Occupied

Colorful knitting, crochet, latch hook and macrame from craft book author & designer Heidi Gustad.

  • BLOG
    • Knitting
    • Crochet
    • Latch Hook
    • Macramé
    • Punch Needle
  • ABOUT
  • Shop
  • Nav Social Menu

    • Instagram
    • Pinterest
    • RSS
    • TikTok
    • YouTube

How-to: Orange Slice Pumpkins

September 12, 2013 Leave a Comment

How-to: Orange Slice Pumpkins | Hands Occupied Based on your wonderful Facebook & Twitter feedback this week, I have received the message loud and clear that my readers want to see some Halloween crafts NOW. ;) I figure we’ll start with something that can be a general fall craft or Halloween-specific, this cute little edible pumpkin project. This craft is super low-cost, messy (in the best possible way) and fun!
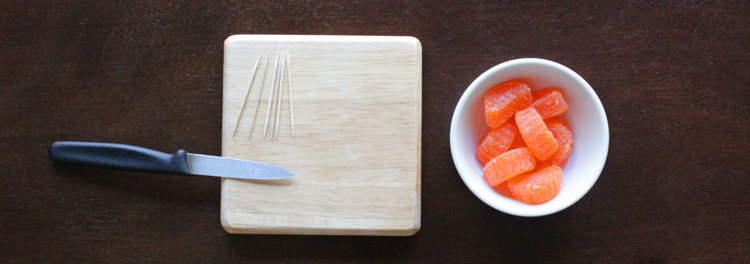
Supplies

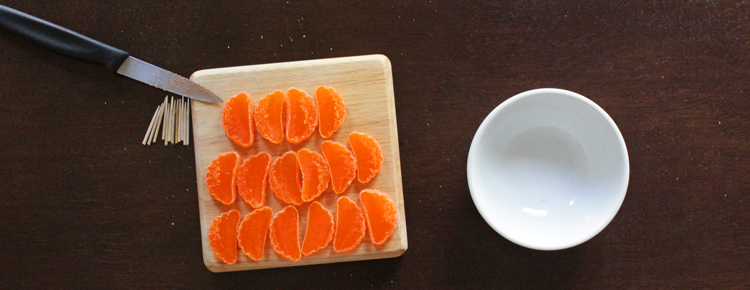
orange slice candies
sharp knife
cutting board
toothpicks
bendable straw
scissors

Directions

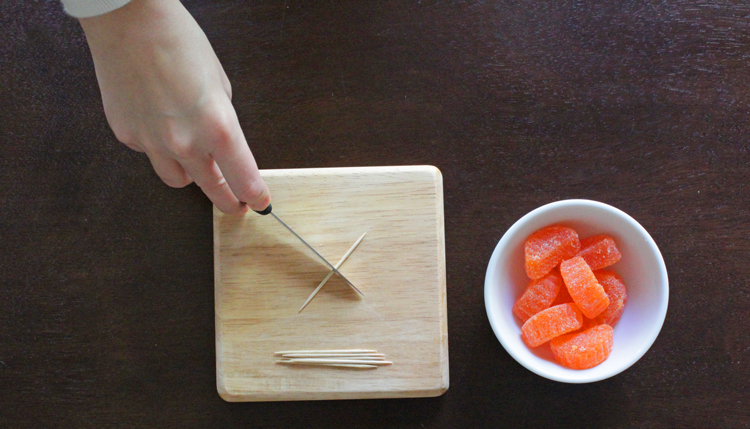
Cut your toothpicks in half. Carefully pressing hard on the center of the toothpick with a knife to score it is a great way to get a clean break and avoid the risk of slivers in your candy.

How-to: Orange Slice Pumpkins | Hands Occupied

How-to: Orange Slice Pumpkins | Hands Occupied

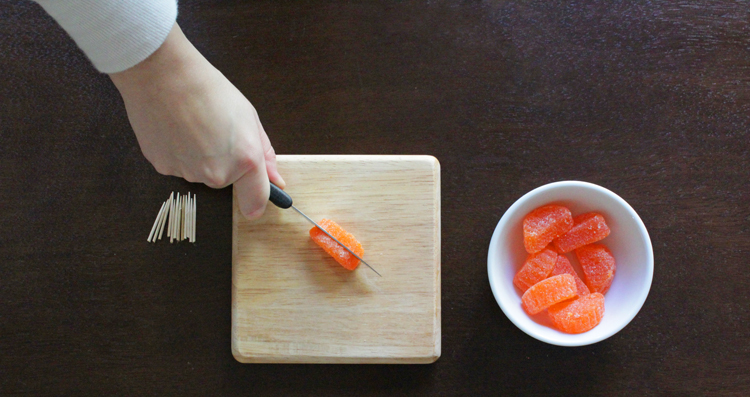
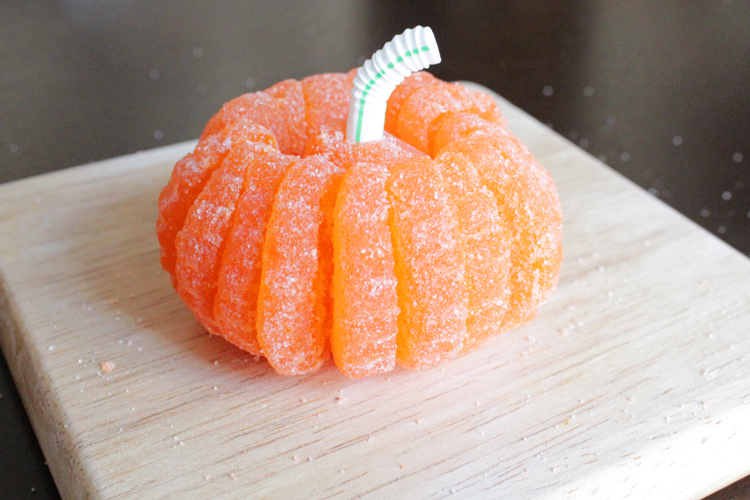
Next, slice eight orange slices in half without smashing them flat. Arrange the slices sticky side up on your cutting board as you go.

How-to: Orange Slice Pumpkins | Hands Occupied

How-to: Orange Slice Pumpkins | Hands Occupied

While your hands are probably covered in sugar and sticky orange stuff about now, those mess factors are what makes this project so easy! The sticky side and sugary sides stick together really nicely as you form your pumpkin.

How-to: Orange Slice Pumpkins | Hands Occupied

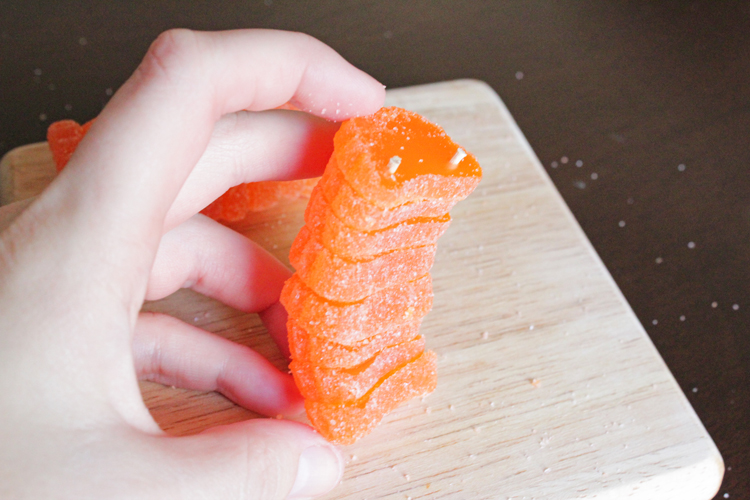
Create four bundles of four half-slices, as shown. Make sure every sugary side is stuck to the next slice’s sticky side.

How-to: Orange Slice Pumpkins | Hands Occupied

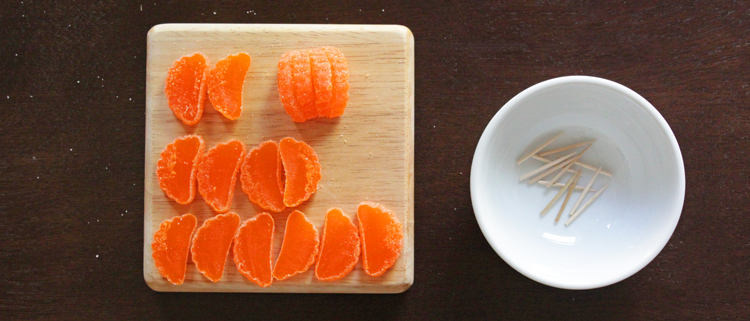
Use two half-toothpicks to hold each bundle of four firmly together. This step is kind of like setting up skewers for grilling.

How-to: Orange Slice Pumpkins | Hands Occupied

How-to: Orange Slice Pumpkins | Hands Occupied

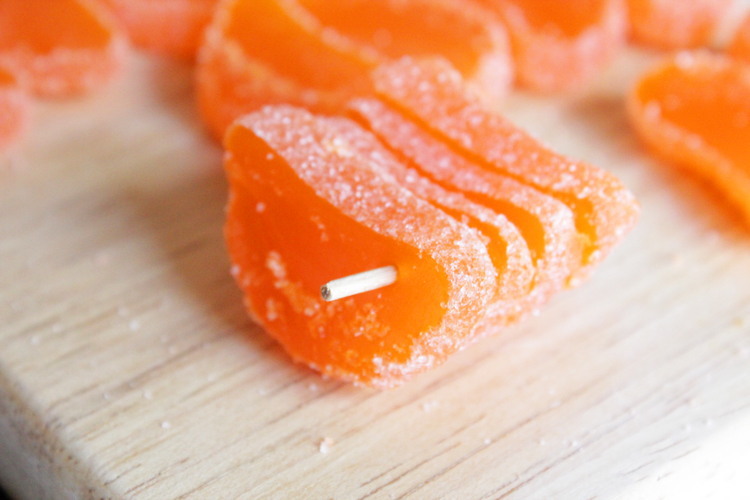
Join two sets of four together with an additional half-toothpick, creating big two sets of eight orange slice pieces.

How-to: Orange Slice Pumpkins | Hands Occupied

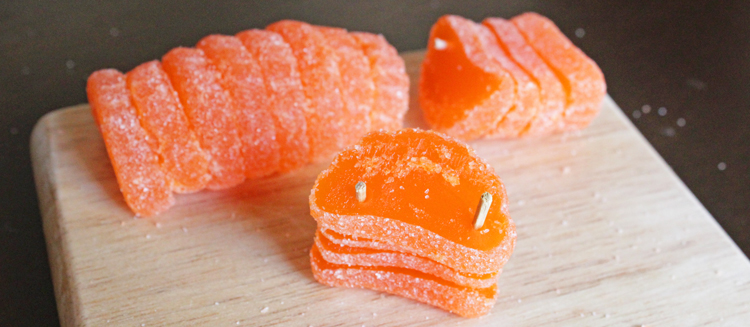
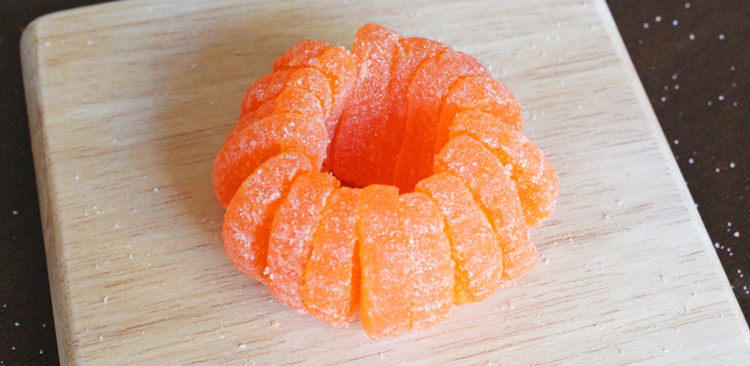
Finally join all slices together into an arch, adding toothpicks as needed.

How-to: Orange Slice Pumpkins | Hands Occupied

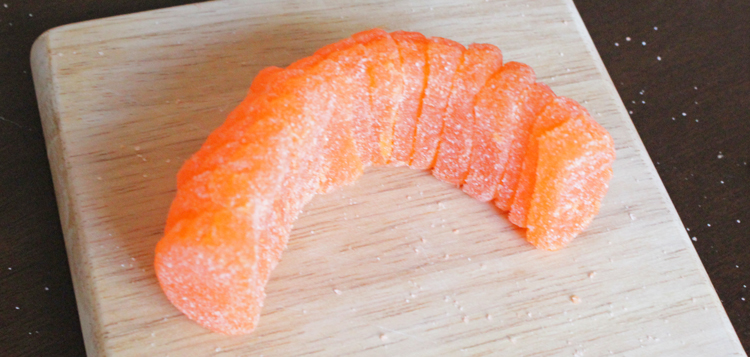
I recommend doing a lot of squishing to create your pumpkin shape. The squishing of the candy helps it all stick together. My pumpkin looked a little odd at first, but the more I worked with it, the more it looked like a pumpkin.

How-to: Orange Slice Pumpkins | Hands Occupied

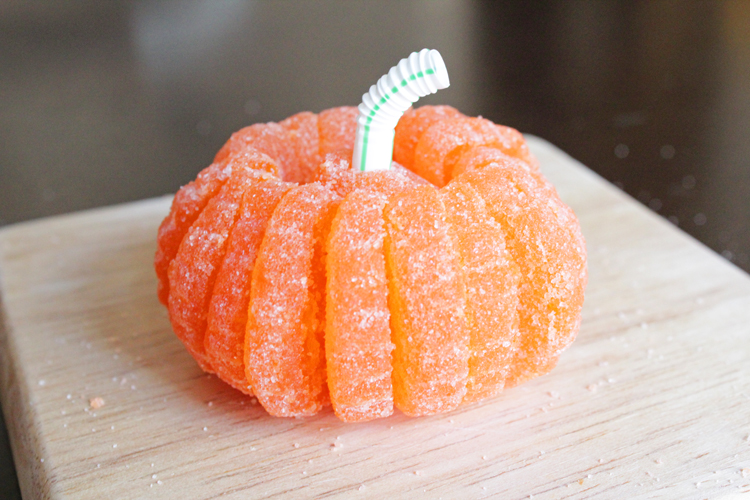
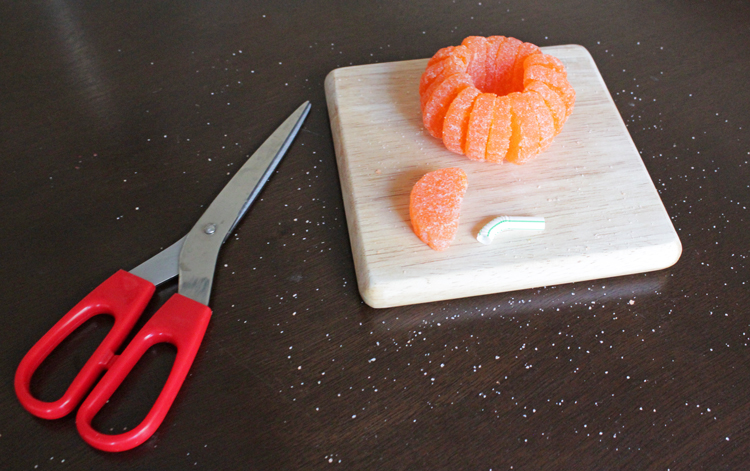
Finally, grab one whole orange slice and cut a bendy straw up as shown below. Put the straw piece into the top of the orange slice and place inside the orange slice circle.

How-to: Orange Slice Pumpkins | Hands Occupied

Now, you’ve got yourself a pumpkin! Store your finished pumpkin in an airtight container to keep it fresh. Also remember to warn anyone who’s going to eat this that there are toothpicks to pull out as they go!

How-to: Orange Slice Pumpkins | Hands Occupied

I think these would be right at home on a party dessert table, even just as decoration. How would you use these fun candy sculptures?

A version of this tutorial was originally shared at The Good Weekly.

Filed Under: Halloween, How-to Tagged With: candy, crafts, diy, edible crafts, fall, halloween, halloween craft, pumpkin

About Heidi

Heidi Gustad is a craft book author, designer & creator specializing in yarn crafts like knitting, crochet, latch hook & macramé. Her first book, Latch Hook: 12 Projects for the Modern Maker, is out now.

Previous Post: « How-to: Simple Stamped Pencils
Next Post: Weekly Reader »

Reader Interactions

DID YOU LIKE THIS POST?
Visit similar articles...

  • Weekly ReaderWeekly Reader
  • How-to: Bat Place CardsHow-to: Bat Place Cards
  • Halloween Decor InspirationHalloween Decor Inspiration
  • Picks of the WeekPicks of the Week

DON’T MISS ANOTHER UPDATE

Leave a Reply Cancel reply

Your email address will not be published. Required fields are marked *

This site uses Akismet to reduce spam. Learn how your comment data is processed.

Primary Sidebar

Heidi Gustad from Hands Occupied / Craft Book Author and Knitting, Crochet, Latch Hook and Macrame Designer

Hi! I’m Heidi (she/her/hers), a craft book author & pattern designer specializing in knitting, crochet, latch hook & macrame. Really anything with yarn! ❤️  My work combines vintage and modern design elements, featuring bold colors and graphic motifs.

EMAIL NEWSLETTER

Never miss a tutorial with these short & sweet monthly updates.

Find Me on Social Media

  • Instagram
  • Pinterest
  • TikTok
  • YouTube
Latch Hook by Heidi GustadDiscover Unique Items

Footer

INSTAGRAM

handsoccupied

Craft book author, designer & creator specializing in yarn crafts like knitting, crochet, latch hook & macramé
❤️ Email preferred

Heidi Gustad 🧶✂️
Nobody panic. This is just the back of an (admitte Nobody panic. This is just the back of an (admittedly insane) intarsia project. One day, this will be a seamed sweater, but today is not that day. 🧶 
.
Have a good weekend, everyone! 
.
Yarn: @universal_yarn’s Fibra Natura Cobblestone in Antarctica & Dragon’s Breath 
.
#handsoccupied #intarsia #intarsiaknitting #wip #knitting
Here’s how to work a Norwegian purl stitch for e Here’s how to work a Norwegian purl stitch for easier continental style knitting. With this purling method, the working yarn says tensioned (held) at the back of your knitting at all times. For many knitters, always holding the yarn at the back helps with tension issues, as well as feeling a little more comfortable. 
.
Have you ever encountered this style of purling before? If you’ve tried it, have you found it helps with your purl tension and knitting speed? I’m curious.
.
For a written tutorial, visit handsoccupied-dot-com. For video, you guessed it, You2be. Both of these platforms allow for longer, more in-depth versions of this tutorial, including full transcripts, alt text & the ability to pause, slow down or speed up at will. (Like if you really want to learn this, I recommend using a platform that doesn’t keep your hands occupied. Thinking of putting this in all my captions these days tbh - shout out to you if you made it this far. 🙌🏻😂)
.
#handsoccupied #learntoknit #continentalknitting #howtoknit #norwegianpurl #norwegianknitting #knit #knitting #knitter #knittersofinstagram #knittinghack  #handknitting #handknit #norwegianpurling
Have you ever tried this style of purl? . All thi Have you ever tried this style of purl? 
.
All this recent talk about throwing vs. continental style knitting made it clear many people struggle with purling in continental knitting. Turns out that Norway may have the answer! In Norwegian purling, the working yarn stays tensioned at the back at all times, helping with speed and tension. 🤯
. 
Head to the bl0g (🔗 in bi0) for a more in-depth look at how to work a Norwegian purl stitch, including a photo tutorial with animated GIF & a video tutorial. Wrapping your mind around how to work a stitch you’re familiar with in a totally new way can be confusing, so I tried to give a few options for clarity. 🤙🏻 Video is also on You2be. 
.
#handsoccupied #norwegianpurl #norwegianknitting #norwegianpurling #continentalknitting #howtoknit #learntoknit #knitterofinstagram #knitters
It’s been a hot second since I showed my face or It’s been a hot second since I showed my face or reintroduced myself, so here goes! I’m Heidi Gustad, a craft book author, pattern designer, and tutorial creator who specializes in yarn crafts. Lately, I’ve been focused on releasing quality knitting videos and related blog posts to help teach things like the difference between provisional cast ons and how to fix common knitting mistakes. Next week I’m shooting requested crochet and latch hook videos, so h👀kers, your time is coming! And if you ever have tutorial requests, please let me know. ☺️
. 
TLDR: I’m Heidi. I design & teach yarn crafts. You can find tutorials on my blog (est. 2010) & You2be. I also have several knitting & crochet patterns + a book about latch hook available. / All of these can be found on my website, the 🔗 is where you’d think. 
.
#handsoccupied #fridayintroduction #heidigustad #knitting #knitter #knittersofinstagram #yarncrafts #latchhookbook
Are you a picker or a thrower? Do you knit Contine Are you a picker or a thrower? Do you knit Continental or English Style? Here’s a quick overview of the differences between the two most common knitting styles, including a side by side comparison. (A good one to save for future reference. 👍🏻) 
.
There’s more on the differences between picking and throwing in my latest blog post & You 2ube video - the l1nk is where you’d think!
.
#handsoccupied #learntoknit #knittingstyles #howtoknit #knittersofinstagram #knitter
Load More... Follow on Instagram

Copyright © 2023 / Foodie Pro Theme On Genesis Framework / Branding by Ink + Mortar
All Site & Shop Policies / Privacy Policy / Cookie Policy