• 0 items$0.00
  • Skip to primary navigation
  • Skip to main content
  • Skip to primary sidebar
  • Skip to footer

Hands Occupied

Colorful knitting, crochet, latch hook and macrame from craft book author & designer Heidi Gustad.

  • BLOG
    • Knitting
    • Crochet
    • Latch Hook
    • Macramé
    • Punch Needle
  • ABOUT
  • Shop
  • Nav Social Menu

    • Instagram
    • Pinterest
    • RSS
    • TikTok
    • YouTube

How-to: Tissue Paper Luminaries

October 22, 2010 2 Comments

The best thing about this project is that I learned to do this when I was a kid using a jelly jar and recycled tissue paper from birthday gifts. After I finished this project last weekend, I even called my mom asking if she remembered the project this is based on, and she still has it in our basement.

Despite the really beautiful results, the process is really simple. The supplies you’ll need are: tissue paper, a paint brush, a cup of water, school glue (Elmer’s), a vase or other glass jar (these are the vases I ordered), and some candles for filling your luminaries.

Mix your glue and water. About three parts water to one part glue is the right consistency. Cut your tissue paper in to the sort of pieces you’d like to see on your lantern. A mosaic pattern looks cool, but the stripes I used were nice too.

Lay out some newspaper or paper towel on your work surface. Lots of glue water will drip on to it while you work. Using the paintbrush, paint a small amount of the glue water where you want to place your piece of tissue paper. Lay your tissue paper piece on the glue-covered area, and then paint over the paper again to seal it and make it stick well. Be careful not to over-saturate your tissue paper; it will tear if you’re not careful.

A note about inevitable bubbles that appear when placing tissue paper: Putting the tissue paper on your glass piece is kind of like putting a bumper sticker on a car. It’s really easy to get air bubbles caught in it. After making 13 of these lanterns, I realized that there are two effective ways to get rid of them. The first, shown in the two left pictures above, involves gently pulling the edges of the tissue paper to smooth out the wrinkles with your hands. To be honest, I ended up ripping a lot of the pieces I was trying to smooth when I did this.

A better technique is using the paintbrush on your second pass over the tissue paper to smooth out wrinkles. Just keep brushing from end to end over your tissue paper, and that takes care of it. You ultimately don’t have to worry about small wrinkles because, as you can see when comparing the right-hand picture above with the finished product below, everything smooths out as the lanterns dry.

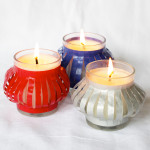
The last step, of course, is adding and lighting your candles once your lanterns are dry. Tea lights work ok, but I think I’m going to invest in three-inch candles for the wedding, as they’ll be burning all night.

Filed Under: DIY Wedding, How-to Tagged With: candle, centerpiece, elmer's glue, heidedwed, luminaries, tissue paper, vase, wedding

About Heidi

Heidi Gustad is a craft book author, designer & creator specializing in yarn crafts like knitting, crochet, latch hook & macramé. Her first book, Latch Hook: 12 Projects for the Modern Maker, is out now.

Previous Post: « How to: Halloween Tree
Next Post: Indoor Gardening Update »

Reader Interactions

DID YOU LIKE THIS POST?
Visit similar articles...

  • How-to: Lantern-style Votive LuminariesHow-to: Lantern-style Votive Luminaries
  • Knit Candle OrnamentKnit Candle Ornament
  • Attention, DIY Brides & Handmade Hostesses!Attention, DIY Brides & Handmade Hostesses!
  • Stacked Ombre Heart CandlesStacked Ombre Heart Candles

DON’T MISS ANOTHER UPDATE

Leave a Reply Cancel reply

Your email address will not be published. Required fields are marked *

This site uses Akismet to reduce spam. Learn how your comment data is processed.

Primary Sidebar

Heidi Gustad from Hands Occupied / Craft Book Author and Knitting, Crochet, Latch Hook and Macrame Designer

Hi! I’m Heidi (she/her/hers), a craft book author & pattern designer specializing in knitting, crochet, latch hook & macrame. Really anything with yarn! ❤️  My work combines vintage and modern design elements, featuring bold colors and graphic motifs.

EMAIL NEWSLETTER

Never miss a tutorial with these short & sweet monthly updates.

Find Me on Social Media

  • Instagram
  • Pinterest
  • TikTok
  • YouTube
Latch Hook by Heidi GustadDiscover Unique Items

Footer

INSTAGRAM

handsoccupied

Craft book author & pattern designer ❤️💛💙
knitting, crochet, latch hook & macramé
.
Please email for pattern support. 🧶

Heidi Gustad 🧶✂️
It’s been a hot second since I showed my face or It’s been a hot second since I showed my face or reintroduced myself, so here goes! I’m Heidi Gustad, a craft book author, pattern designer, and tutorial creator who specializes in yarn crafts. Lately, I’ve been focused on releasing quality knitting videos and related blog posts to help teach things like the difference between provisional cast ons and how to fix common knitting mistakes. Next week I’m shooting requested crochet and latch hook videos, so h👀kers, your time is coming! And if you ever have tutorial requests, please let me know. ☺️
. 
TLDR: I’m Heidi. I design & teach yarn crafts. You can find tutorials on my blog (est. 2010) & You2be. I also have several knitting & crochet patterns + a book about latch hook available. / All of these can be found on my website, the 🔗 is where you’d think. 
.
#handsoccupied #fridayintroduction #heidigustad #knitting #knitter #knittersofinstagram #yarncrafts #latchhookbook
Are you a picker or a thrower? Do you knit Contine Are you a picker or a thrower? Do you knit Continental or English Style? Here’s a quick overview of the differences between the two most common knitting styles, including a side by side comparison. (A good one to save for future reference. 👍🏻) 
.
There’s more on the differences between picking and throwing in my latest blog post & You 2ube video - the l1nk is where you’d think!
.
#handsoccupied #learntoknit #knittingstyles #howtoknit #knittersofinstagram #knitter
Spent time with family this weekend down South. Go Spent time with family this weekend down South. Got some stitching in & felt spring for a minute, which was lovely. ☀️ 
.
I’ll be catching up on comments, etc. tomorrow. 
.
#handsoccupied #travelknitting #planeknitting
Which way do you knit? Picking, throwing, Portugue Which way do you knit? Picking, throwing, Portuguese, Shetland… how about lever style? 
.
Today on the blog, we’re defining & comparing the two most common knitting styles: continental and throwing. They’re each known by a few names, and odds are one of them really is your grandmother’s knitting style (if she’s a western knitter that is). There’s a new video to help demonstrate the differences too. Another good one to save & share! 😉 
.
#handsoccupied #continentalknitting #englishknitting #americanknitting #howtoknit
This past weekend, my husband and I visited family This past weekend, my husband and I visited family out of state. Here’s what I packed to keep my hands occupied for the drive. 😉 
.
I try my hardest to be realistic about how much knitting I’m going to get done vs. the effort of schlepping my WIP(s) and yarn around. I definitely almost brought double this amount of yarn, which would have been hilariously unnecessary for a weekend trip. Why am I like this? 😆 Do you also struggle with overpacking when it comes to crafts? 
.
#handsoccupied #travelknitting #knitting #knitter #knittersofinstagram #knitting_inspiration
Load More... Follow on Instagram

Copyright © 2023 / Foodie Pro Theme On Genesis Framework / Branding by Ink + Mortar
All Site & Shop Policies / Privacy Policy / Cookie Policy