• 0 items$0.00
  • Skip to primary navigation
  • Skip to main content
  • Skip to primary sidebar
  • Skip to footer

Hands Occupied

Colorful knitting, crochet, latch hook and macrame from craft book author & designer Heidi Gustad.

  • BLOG
    • Knitting
    • Crochet
    • Latch Hook
    • Macramé
    • Punch Needle
  • ABOUT
  • Shop
  • Nav Social Menu

    • Instagram
    • Pinterest
    • RSS
    • TikTok
    • YouTube

How-to: Upholster Light Plate Covers

August 26, 2013 1 Comment

How-to: Upholster Light Plate Covers | Hands Occupied

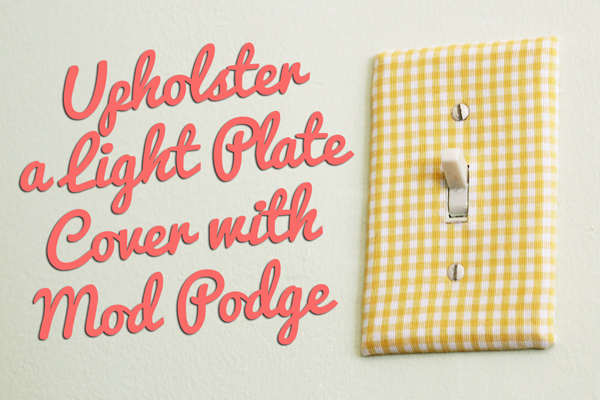
As an apartment dweller, you might have to deal with things like dirty or cracked light switch plates in particularly dated shades of beige. The switch plates might also have random paint on them from one or two lazy paint jobs by someone who didn’t think to remove (or tape over) said plates. If you’re looking for a solution to an ugly light plate problem, or just want to tie your rooms together with drapes and light plate covers in the same fabric, this easy project is for you.
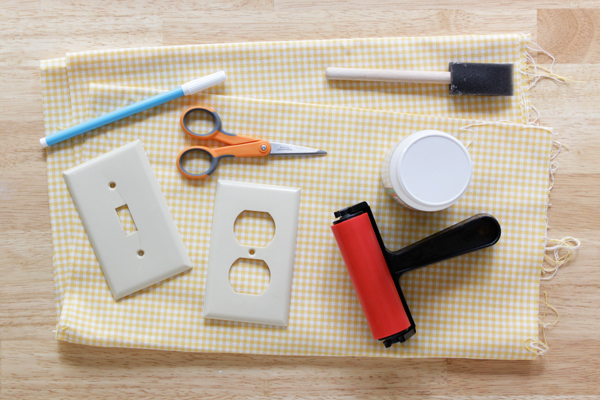
Supplies

rubbing alcohol
sharp scissors
light plate & outlet covers
water soluble pen
fabric
sponge brush
Matte Mod Podge
clothespins
waxed paper
brayer (optional)

How-to: Upholster Light Plate Covers | Hands Occupied

Directions

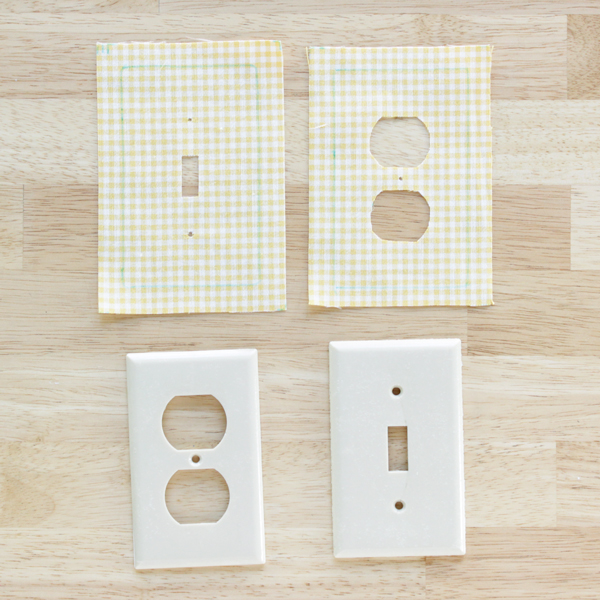
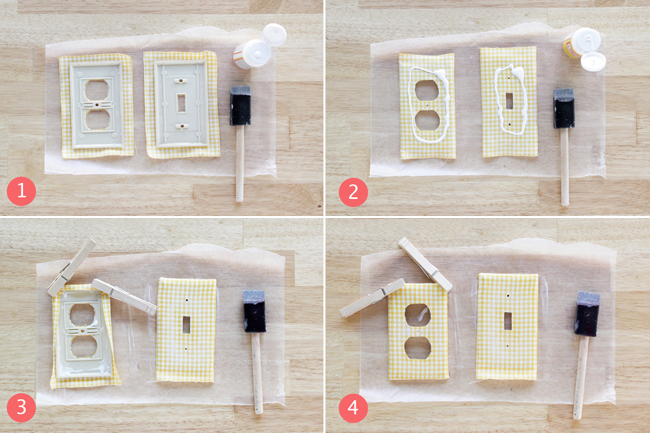
Use rubbing alcohol to clean your light plate or outlet covers. Trace your cover(s) onto the wrong side of your fabric. Cut out each tracing with an additional half inch of space between the outer edge of the tracing and the edge of your fabric piece. Cut out tiny holes for the screws, switches and electrical outlets too.

How-to: Upholster Light Plate Covers | Hands Occupied

Rinse off the pen lines with water and pat your fabric to dry, don’t wring it. The fabric should be as smooth and wrinkle free as you can get/keep it. Since Mod Podge is water-based, your fabric can be damp (not soaking, though) as you work on this project.

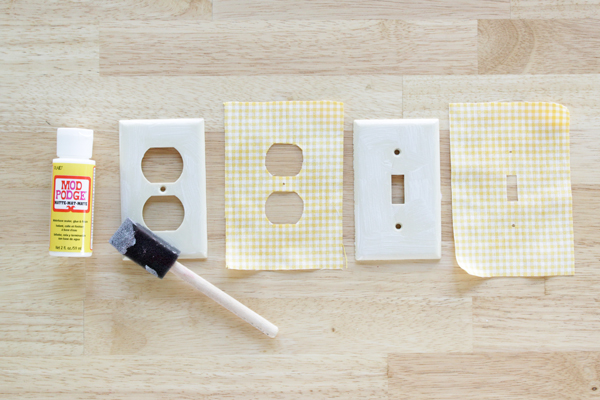
Paint a layer of Mod Podge directly on your plate covers. Line up your cut out fabric, wrong side down, on your Mod Podged light plate covers. Be careful to align the screw holes just right.

How-to: Upholster Light Plate Covers | Hands Occupied

Flip your lined up fabric and covers over and add some Mod Podge along the edges of the back of each cover. My fabric was fairly thick – upholstery grade. The fabric didn’t really want to stay in place on the back of the plates. What worked for me was to fold over two edges (see step 2 below) and let it sit for a half hour. That let the Mod Podge harden enough for the edges to stay put.

While the edges dried, I applied a generous layer of Mod Podge on the outside of the front of the plate cover. You should saturate the fabric for this project to work.

To get the fabric on the shorter ends of my plate covers to stay, I used clothespins (step 3) to hold the fabric in place until it dried enough to stay on its own. Don’t let the Mod Podge dry completely with the clothespins on because they’ll be stuck to the plates, ruining your project.

Tip: If you get bubbles between your fabric and plates, a brayer will help iron them out. 

How-to: Upholster Light Plate Covers | Hands Occupied

Eventually all of the fabric will stay where you want it to and you can let your plates dry completely, lying face up on waxed paper. Just check them once or twice while they dry to keep them from sticking to the waxed paper.

How-to: Upholster Light Plate Covers | Hands Occupied

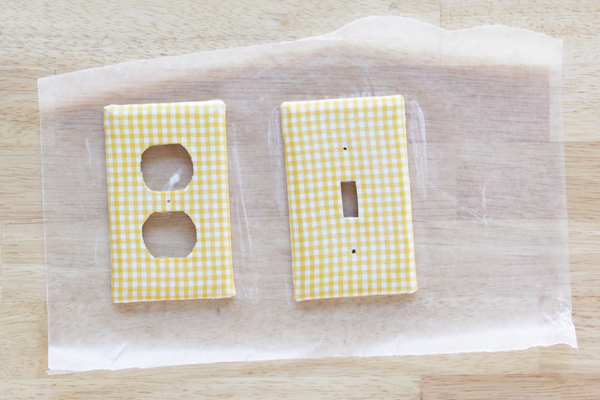
Here’s what the back of the covers look like when they’re done:

How-to: Upholster Light Plate Covers | Hands Occupied

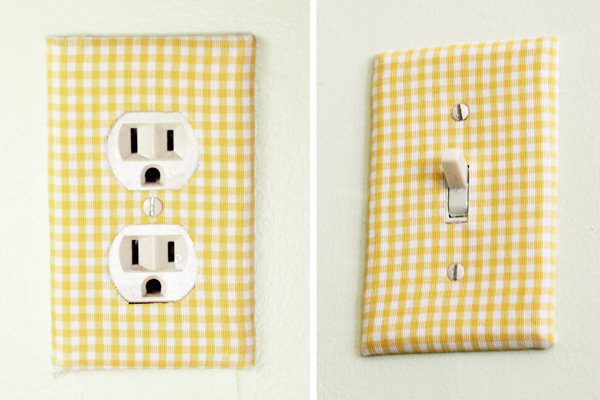
Of course, the last step is screwing the plates in place. Super cute, right?

How-to: Upholster Light Plate Covers | Hands Occupied

I originally posted a version of this tutorial at Mod Podge Rocks, an awesome craft blog you should follow.

Filed Under: Back to School, Decoupage, How-to, My Work Elsewhere Tagged With: apartment, cheap, crafts, diy, dorm, fabric, home decor, light plate cover, mod podge, outlet cover, upholster

About Heidi

Heidi Gustad is a craft book author, designer & creator specializing in yarn crafts like knitting, crochet, latch hook & macramé. Her first book, Latch Hook: 12 Projects for the Modern Maker, is out now.

Previous Post: « Weekly Reader
Next Post: How-to: Duck Tape Tablet Case & Foldover Clutch »

Reader Interactions

DID YOU LIKE THIS POST?
Visit similar articles...

  • How-to: Decorate with Glue DotsHow-to: Decorate with Glue Dots
  • How-to: Upholstered Arm Rest End Tables | Hands OccupiedHow-to: Upholstered Arm Rest End Tables
  • Weekly ReaderWeekly Reader
  • 50 Great DIY Gift Ideas50 Great DIY Gift Ideas

DON’T MISS ANOTHER UPDATE

Comments

  1. Lauren @ infinite.nu

    August 26, 2013 at 6:17 am

    What an easy way to make a room feel unique! :)

    Reply

Leave a Reply Cancel reply

Your email address will not be published. Required fields are marked *

This site uses Akismet to reduce spam. Learn how your comment data is processed.

Primary Sidebar

Heidi Gustad from Hands Occupied / Craft Book Author and Knitting, Crochet, Latch Hook and Macrame Designer

Hi! I’m Heidi (she/her/hers), a craft book author & pattern designer specializing in knitting, crochet, latch hook & macrame. Really anything with yarn! ❤️  My work combines vintage and modern design elements, featuring bold colors and graphic motifs.

EMAIL NEWSLETTER

Never miss a tutorial with these short & sweet monthly updates.

Find Me on Social Media

  • Instagram
  • Pinterest
  • TikTok
  • YouTube
Latch Hook by Heidi GustadDiscover Unique Items

Footer

INSTAGRAM

handsoccupied

Helping yarn crafters untangle various techniques on the internet since 2010
🧶 Really into intarsia
Stay up-to-date 💌 & shop the latest patterns ⤵️

Heidi Gustad 🧶 knitting & yarn crafts
It’s time for the monthly review and giveaway! T It’s time for the monthly review and giveaway! This go around, get to know two new sister yarns from @manosyarnsusa, Marla and Sami, and enter to win a skein of each to try for yourself. 
.
What makes these yarns sisters is that, while dyed differently, they’re the same weight and come in intentionally coordinating color palettes. For my review, I opted for a sky-inspired combo of Sami in Natural and Marla in Nube. 🌧️ 
.
Check out the full review & enter the giveaway at the link in my bio. 
.
#handsoccupied #yarnreview #manosdeluruguay #knitting_inspire #crochet #yarngiveaway #knitters #yarn #crochetersofinstagram
If only knitting a whole project took 39 seconds… 😮‍💨 
.
In this video, you can see how the Intarsia Flower Pillow pattern knits up - two flat panels, one with intarsia, both are blocked, and then they’re seamed. Find the pattern on @hi.ravelry & my website, just search Intarsia Flower Pillow. 🌸 
.
P.S. I’m really smiling in this video while seaming the pillow, so I guess I’m proving last week’s claim that I truly enjoy that sometimes-dreaded task. 😆🫣
In knitting, a Left Lifted Increase (LLI) lets you In knitting, a Left Lifted Increase (LLI) lets you add a stitch in between two columns of stitches that leans to the left. Similar to an M1L, LLIs allow you to increase nearly invisibly.
.
To learn more about lifted increases, including when to use them and how they differ from Make 1s, head to the 🔗 in my profle. 
.
Have you ever used lifted increases? I used M1’s almost exclusively for a long time when I needed to inc between stitches, but when I designed the Intarsia Flower Pillow pattern, I needed something that would allow me to increase a lot near my cast on, and M1’s resulted in edge curling. The more you know! 🌈 
.
Yarn: @lionbrandyarn Wool Ease from my Stash / Neddles: @boyeyarncrafts - Just remembered these are the needles I learned to knit on at age 8. 😂
.
#handsoccupied #knitting #learntoknit #howtoknit #sweaterknitting #knitinspiration #knittersofinstagram #liftedincreases
Last week I got to hang out with my family & helpe Last week I got to hang out with my family & helped babysit my red-headed niece and nephew. So here’s some plane knitting, and a couple pictures (shared with permission) of my babysitting adventures.
.
Lessons learned: 1️⃣ Trying to knit around 2 toddlers, 2 cats & 2 large dogs is pretty hard. 2️⃣ I learned during water color time that pink and black make “colorful black.” 🩷🖤 3️⃣ Toddlers do NOT care about your rainbow sorting of their toys. 4️⃣ Toddlers are very good at finding mischief in a very short amount of time, what a surprise. 😂
.
#handsoccupied #knitting #placesyoucanknit #knitters #knitinpublic #handmadelife #knitting_inspiration
Weaving in ends & seaming with mattress stitch are Weaving in ends & seaming with mattress stitch are both so useful for garment knitting! But for me, weaving in ends can feel like a chore while the latter feels like I’ve successfully done magic. 🧙🏻‍♀️ Does anybody else run into this phenomenon? Are you the opposite? Any theories as to why they feel different? 
.
In this video, I’m finishing my brand new Intarsia Flower Pillow. 🌸 I’m working with @universal_yarn Uni Merino & the pattern is available at the 🔗 in my b1o. 
.
#handsoccupied #intarsiaflowerpillow #intarsia #intarsiaknitting #knitting #colorwork #knitpillow #knittinginspiration #knittersofinstagram
Load More... Follow on Instagram

Copyright © 2023 / Foodie Pro Theme On Genesis Framework / Branding by Ink + Mortar
All Site & Shop Policies / Privacy Policy / Cookie Policy