• 0 items$0.00
  • Skip to primary navigation
  • Skip to main content
  • Skip to primary sidebar
  • Skip to footer

Hands Occupied

Colorful knitting, crochet, latch hook and macrame from craft book author & designer Heidi Gustad.

  • BLOG
    • Knitting
    • Crochet
    • Latch Hook
    • Macramé
    • Punch Needle
  • ABOUT
  • Shop
  • Nav Social Menu

    • Instagram
    • Pinterest
    • RSS
    • TikTok
    • YouTube

How-to: Upholstered Arm Rest End Tables

August 5, 2013 9 Comments

How-to: Upholstered Arm Rest End Tables | Hands Occupied

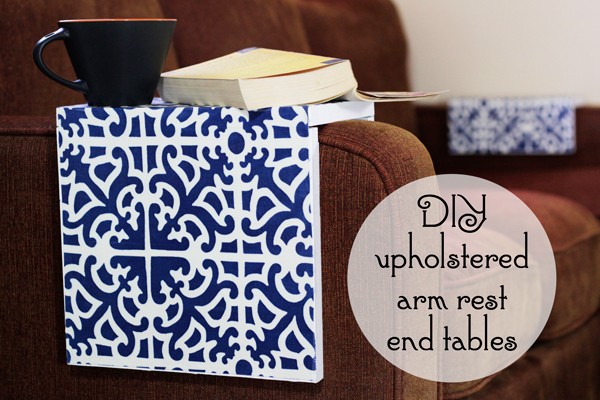
In every dorm room and small apartment, space is at a premium. My living room is definitely one I’m constantly getting creative in to save space, which is where the ideas for these arm rest “end tables” came from. I’ve been using these in my home for a few months now, and they’re super convenient for keeping drinks, phones and remotes within reach.

The arm rest end tables come together in two phases: first converting a single four foot board from the hardware store into the right shape, and phase two is as simple as a making them pretty with a bit of paint, fabric and Mod Podge.

Supplies

for phase 1, construction

1 x 12 x 4 unfinished pine shelf board
8 L-brackets
16 screws (unless your L-brackets require more than two each)
screw driver/drill
primer
paint
paint brush

for phase 2, upholstery

1/2 yd upholstery fabric, don’t use anything too stretchy
freezer paper (optional)
iron (optional)
pen
ruler/tape measure
paper scissors
fabric scissors (optional)
Matte Mod Podge
sponge brush
brayer (optional but recommended)
something to stand your arm rests on as you work
Hard Coat Mod Podge

Directions

Phase 1 – construct the arm rest end tables

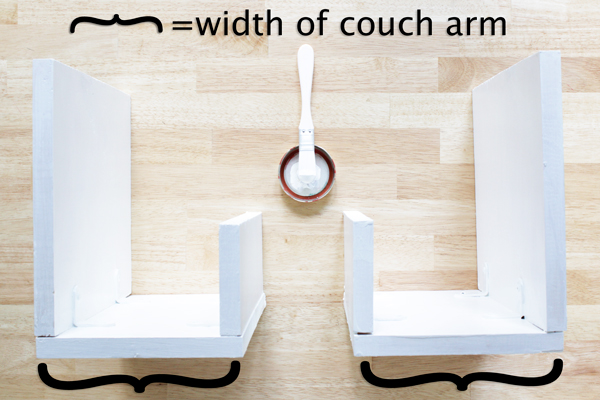
Measure the distance across the top of your couch’s arm rests. Cut your pine board into six pieces (with some assistance if necessary): two pieces that are the width of your couch’s arm rests, two pieces that are 4 inches long, and two pieces that are 10 inches long. You don’t have to use my exact measurements for the side pieces – I ultimately chose those lengths at based on how much board I had left after cutting the top pieces of wood for the arm rests.
How-to: Upholstered Arm Rest End Tables | Hands Occupied

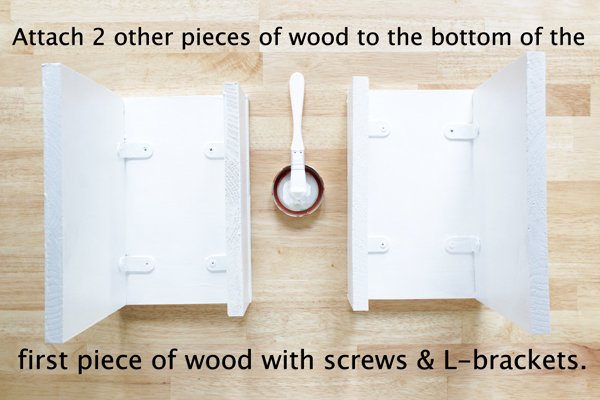
Next, using 4 L-brackets per arm rest, attach the side pieces of wood to the bottom of the top piece. See the above and below pictures for how I constructed mine. They construction is very straightforward. Just make sure to align the edges of the top and side pieces as closely as possible before securing with screws.
How-to: Upholstered Arm Rest End Tables | Hands Occupied

Prime your arm rests and paint them. The color they’re painted will be visible through the upholstery, so choose your paint color wisely. I went with white since there’s white in my upholstery fabric. Let dry completely before phase 2.

Phase 2 – “upholstery”
And by “upholstery,” I mean decoupaging fabric to wood. 

Take two measurements: all the way around the outside of the arm rest (the black dotted line pictured below) & the width of your arm rest (red dotted line below).
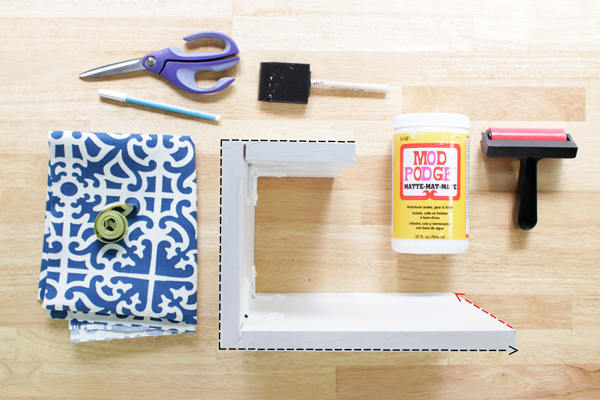
How-to: Upholstered Arm Rest End Tables | Hands Occupied

You’ve got two options for cutting out your fabric. One, you can draw your rectangle, using the measurements from above, onto the wrong side of your fabric with a water soluble marker (a.k.a. embroidery marker). Draw a second rectangle on the wrong side of your fabric and cut both out.

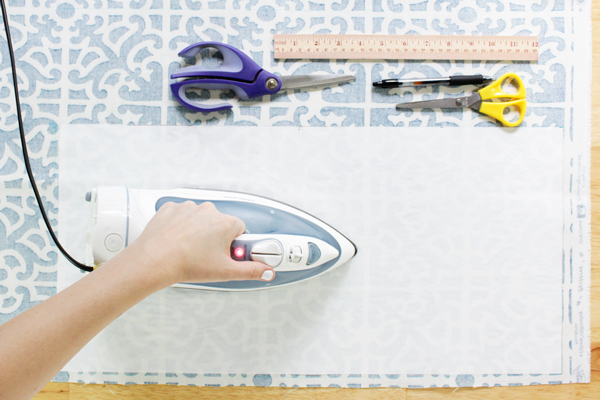
Two, you can draw your rectangle onto the non-waxed side of some freezer paper, cut it out, iron it to the wrong side of your fabric, and cut out your fabric. I opted for this method because I had the supplies necessary on hand, and because it’s incredibly accurate. And since the fabric will be adhered to the hard corners of a wooden object, my priority was accuracy. Bonus: you can reuse the freezer paper stencil for the second rectangle of fabric you’ll need to upholster your second arm rest. Just something to keep in mind! :)
How-to: Upholstered Arm Rest End Tables | Hands Occupied

When your fabric rectangle is all cut out and the freezer paper peeled off, double check your work by lining up the edges and corners of the fabric on the arm rest to ensure cuts are straight and the fabric is the right length.

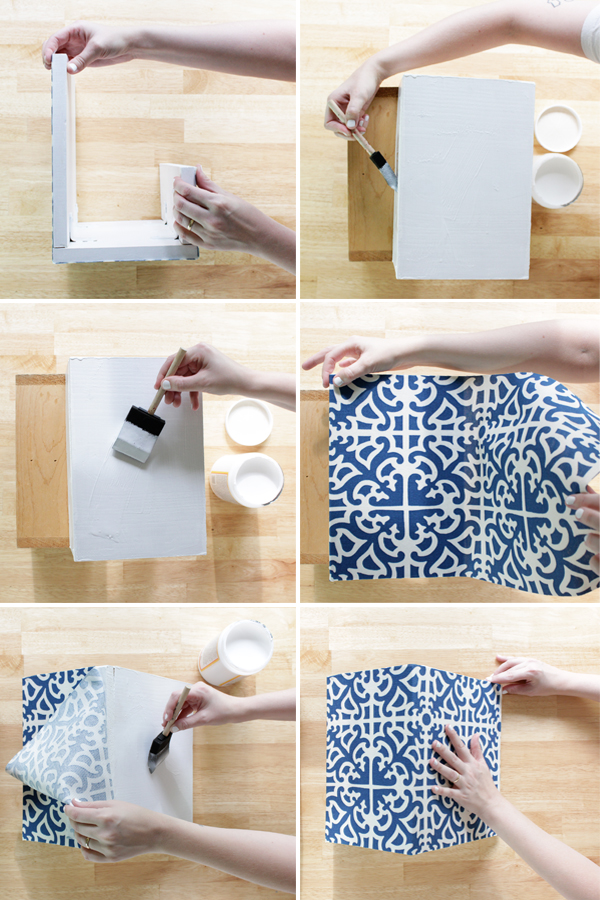
Find something to rest your arm rest on while you work through the rest of the project. Since the arm rests have differently-lengthed sides, they’re not a fan of standing on their own.

Paint a layer of Matte Mod Podge onto the shorter side and top of the arm rest. Carefully lay your fabric, all lined up, onto the shorter side and top of the arm rest. If you need to do any adjusting/realigning do it now. Last chance, guys. Luckily, it’s still super simple at this point and feels almost like moving a post-it note around.

All lined up? Next, move your arm rest stand, tilting the arm rest so it’s resting with the top and long sides facing up. Holding the rest of your fabric out of the way, paint a layer of Matte Mod Podge onto the long side of the arm rest. Fold down the fabric, carefully aligning the edges. If you measured right, all should be perfectly lined up. Just like when you stuck the fabric to the first two sides of the arm rest you can peel off the fabric from the long side – post-it note style – and rearrange it if needed.
How-to: Upholstered Arm Rest End Tables | Hands Occupied

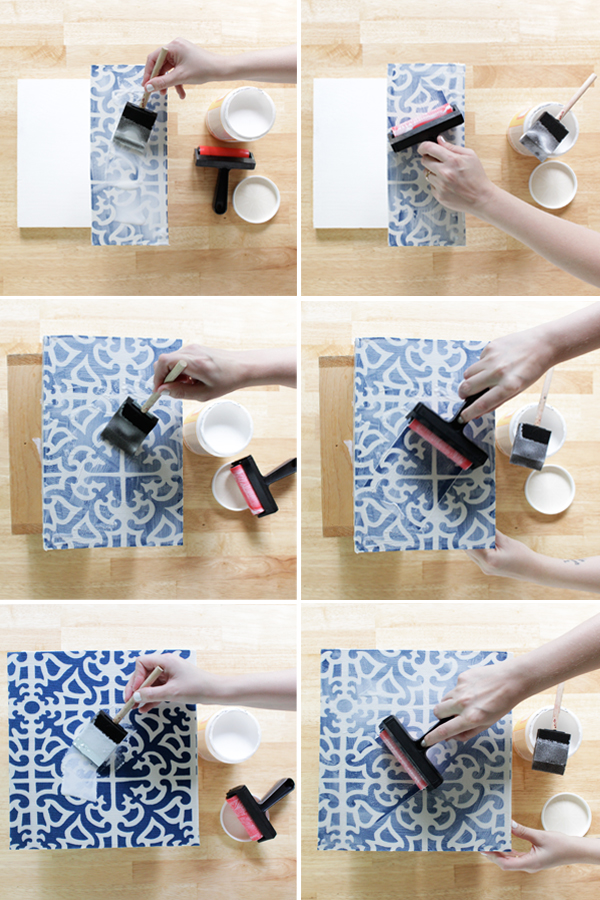
Now, we’re past point of no return.* For each side of the arm rest, starting with the shortest side, you’ll paint a layer of Matte Mod Podge and run the brayer over it to really work in the Podge. Same order as last time – small side, top side, long side. I find this easiest for grappling with the arm rest’s asymmetrical shape. Also, use your arm rest stand as necessary to keep from messing up your work.
How-to: Upholstered Arm Rest End Tables | Hands Occupied

*Yep, that was a Phantom of the Opera reference. I admit it. 

Repeat the whole “upholstery” process on the second arm rest and let both dry over night. In the morning, paint a layer of Mod Podge Hard Coat over the top of the whole thing with a sponge brush (no brayer required), and let dry for a few days. The instructions on the bottle for Hard Coat Mod Podge recommend letting it cure (get super duper sealed) for 4 days. So basically don’t put a bunch of condensation-covered beers on it for a few days before using. The Hard Coat is great because after the pain-in-the-butt that is curing, you’ll have a totally awesome, space-saving surface to set drinks, remote controls, or whatever on that you can wipe clean. Nice, huh?
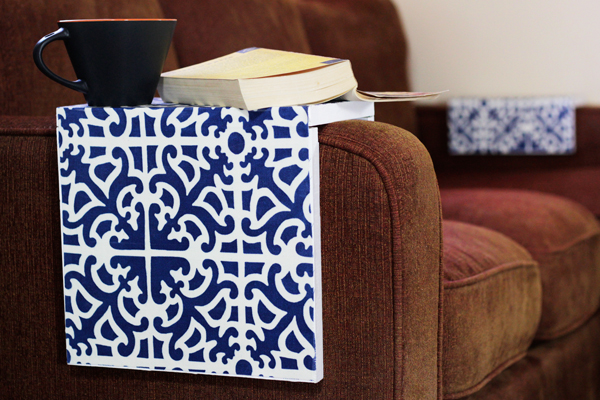
How-to: Upholstered Arm Rest End Tables | Hands Occupied

This project takes some doing, but it saved me so much money and a lot of space my tiny living room doesn’t have. How would you make this project yours? Different fabric? Covering the whole thing in fabric instead of just the top? Using Sparkle Mod Podge instead of Matte? Let me know, ladies!
Filed Under: Back to School, Decoupage, Home Decor, How-to Tagged With: apartment crafts, crafts, diy, dorm crafts, furniture, home decor, mod podge, mod podge crafts, upholstery, wood working

About Heidi

Heidi Gustad is a craft book author, designer & creator specializing in yarn crafts like knitting, crochet, latch hook & macramé. Her first book, Latch Hook: 12 Projects for the Modern Maker, is out now.

Previous Post: « Weekly Reader
Next Post: Style this DIY: Ruler Clutch »

Reader Interactions

DID YOU LIKE THIS POST?
Visit similar articles...

  • How-to: Upholster Light Plate CoversHow-to: Upholster Light Plate Covers
  • Stenciled Coffee Table MakeoverStenciled Coffee Table Makeover
  • Weekly ReaderWeekly Reader
  • 50 Great DIY Gift Ideas50 Great DIY Gift Ideas

DON’T MISS ANOTHER UPDATE

Comments

  1. Diane

    August 5, 2013 at 9:10 am

    What a super smart idea! Thanks for the great tutorial. This is an awesome innovation for a small space.

    Reply
  2. Carol

    August 7, 2013 at 9:27 pm

    Loved how they turned out.

    Reply
  3. Karen Gilleland

    August 8, 2013 at 7:50 am

    Great Idea. Maybe your dad and I could make that. Thanks for sharing.

    Reply
  4. Erin

    August 8, 2013 at 12:17 pm

    I love the idea of upholstering it. My sofa arms curve out a bit, so it doesn’t have a flat surface down the side. Do these sit sturdy enough around the arm that the side wouldn’t be a problem or would I have to somehow slant my side board in?

    Reply
    • Heidi

      August 11, 2013 at 5:48 pm

      I think it depends how heavy the wood you use is, and how balanced the arm rests are. You might consider padding the inside somehow, or using a fancy saw that lets you create a curved side to parallel your couch.

      Reply
  5. Alex

    August 16, 2013 at 11:08 am

    Thoughtful idea – and an easy way to accent a room.

    Reply
  6. Amy Anderson

    April 4, 2014 at 8:00 pm

    These are brilliant! Especially for people who like to snack in front of the TV, not that I know anyone like that :0

    Reply
    • Heidi

      April 5, 2014 at 8:36 pm

      LOL – why do you think I made them, Amy? :D

      Reply

Trackbacks

  1. Comfy Chair Series | Fabric Warehouse Direct Blog says:
    August 12, 2013 at 11:52 am

    […] is a cute DIY idea from the blog Hands Occupied that fits right in with our Comfy Chair Series – Upholstered Arm Rest […]

    Reply

Leave a Reply Cancel reply

Your email address will not be published. Required fields are marked *

This site uses Akismet to reduce spam. Learn how your comment data is processed.

Primary Sidebar

Heidi Gustad from Hands Occupied / Craft Book Author and Knitting, Crochet, Latch Hook and Macrame Designer

Hi! I’m Heidi (she/her/hers), a craft book author & pattern designer specializing in knitting, crochet, latch hook & macrame. Really anything with yarn! ❤️  My work combines vintage and modern design elements, featuring bold colors and graphic motifs.

EMAIL NEWSLETTER

Never miss a tutorial with these short & sweet monthly updates.

Find Me on Social Media

  • Instagram
  • Pinterest
  • TikTok
  • YouTube
Latch Hook by Heidi GustadDiscover Unique Items

Footer

INSTAGRAM

handsoccupied

Helping yarn crafters untangle various techniques on the internet since 2010
🧶 Really into intarsia
Stay up-to-date 💌 & shop the latest patterns ⤵️

Heidi Gustad 🧶 knitting & yarn crafts
At long last! I can share the Spiral Hill Sweater At long last! I can share the Spiral Hill Sweater Vest, my contribution to the new book Disney Tim Burton’s Nightmare Before Christmas: The Official Knitting Guide to Halloween Town and Christmas Town, out now! 🎃💀 
.
I’m hosting a knit along (KAL) October 1-29 for anyone who’d like to knit this vest along with a group & learn a little about intarsia while we’re at it. I’ve got weekly tutorials planned to help you knit this worsted weight sweater vest, and there’s a prize package giveaway at the end for KAL participants too. Details are on my site - you know where to find the 🔗 I think. 😉
.
Book by @tanisknits 
Publisher @insighteditions 
Yarn @brooklyntweed Imbue 
Find it wherever fine books are sold. 
.
#handsoccupied #nightmarebeforechristmas #intarsia #sweatervest #knittingpattern #knittingbook #spiralhill #knitting_inspiration #knitting
Since there was some interest in stills of my WIPs Since there was some interest in stills of my WIPs closet after this weekend’s quick tutorial, here are few. ✂️ The tutorial is one post back in my feed as a video.
.
As you can see, I didn’t worry about the wire hangers all being perfectly uniform, but it doesn’t matter to me. Also, this closet holds a lot! Despite that, it is already at capacity. Since the hanging bags don’t appear to be recyclable, I want to reuse them as long as possible. Who knows, maybe this will be a way to limit my WIPs? 😅
.
P.s. In the third photo you can see how I use this system to store the original swatches, scraps, yarn ball bands, & notes from a design project all together. 
.
#handsoccupied #wips #craftstorage #yarnstorage #yarncrafts #knitting_inspiration #craftstudio #craftroom #craftcloset
How to convert a closet into WIPs storage with jus How to convert a closet into WIPs storage with just a few supplies ✂️
.
When I was a librarian, we would use these hanging bags to circulate books with audiobook CDs. They came to mind when I wanted to develop a filing cabinet-like system for my differently-sized WIPs. To fit in my studio closet, a standard bedroom closet, they just needed custom hangers. 🤙🏻 
.
HOW TO MAKE THE HANGERS
1. Carefully cut approx. a 9” (23 cm) length of flexible 3 mm aluminum wire.
2. Near the end of a large knitting needle or dowel, wrap the wire around it as you would a twist tie. 
3. Bend the other end into a hook shape, perpendicular to the circle shape you just created. 
4. Hang like a hanger in a closet, as shown. 
.
#handsoccupied #handmadelife #knitting_inspiration #craftcloset #craftroom #craftroomorganization #craftroomstorage #craftroomdecor #crocheter #latchhook #knittersofinstagram #wip #wips #hangingstorage
It’s time for the monthly review and giveaway! T It’s time for the monthly review and giveaway! This go around, get to know two new sister yarns from @manosyarnsusa, Marla and Sami, and enter to win a skein of each to try for yourself. 
.
What makes these yarns sisters is that, while dyed differently, they’re the same weight and come in intentionally coordinating color palettes. For my review, I opted for a sky-inspired combo of Sami in Natural and Marla in Nube. 🌧️ 
.
Check out the full review & enter the giveaway at the link in my bio. 
.
#handsoccupied #yarnreview #manosdeluruguay #knitting_inspire #crochet #yarngiveaway #knitters #yarn #crochetersofinstagram
If only knitting a whole project took 39 seconds… 😮‍💨 
.
In this video, you can see how the Intarsia Flower Pillow pattern knits up - two flat panels, one with intarsia, both are blocked, and then they’re seamed. Find the pattern on @hi.ravelry & my website, just search Intarsia Flower Pillow. 🌸 
.
P.S. I’m really smiling in this video while seaming the pillow, so I guess I’m proving last week’s claim that I truly enjoy that sometimes-dreaded task. 😆🫣
Load More... Follow on Instagram

Copyright © 2023 / Foodie Pro Theme On Genesis Framework / Branding by Ink + Mortar
All Site & Shop Policies / Privacy Policy / Cookie Policy