A quick plug: If you’re in the Chicago area, you can take my Intro to Contemporary Latch Hook Workshop in a couple weeks.This workshop covers so much more about color picking, yarn processing, and blending than I’m able to cover in this post, so it’s a great way to really up your skills! As of this writing, there are still open spots, so visit my local yarn shop’s website to learn more & sign up.
How to do basic latch hook
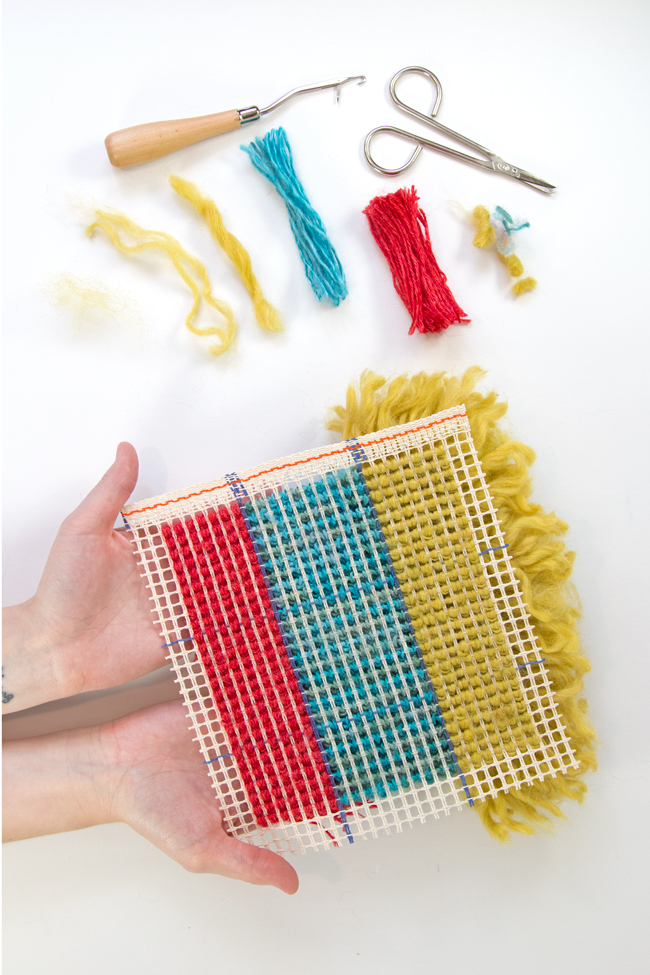
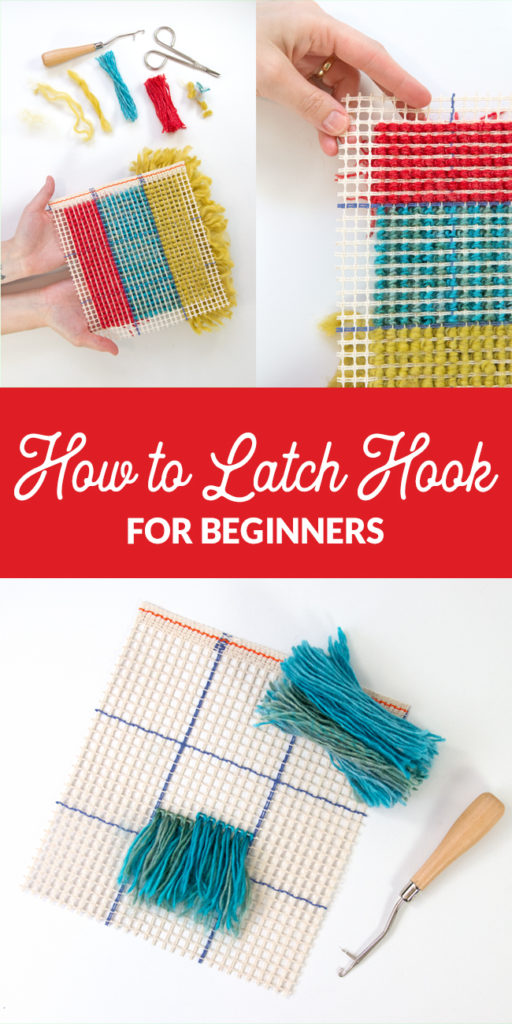
Supplies
rug canvas
latch hook tool
scissors
ruler
cardboard
yarn (scraps work great!)

Directions
Begin by thinking about how shaggy you want your project to be.
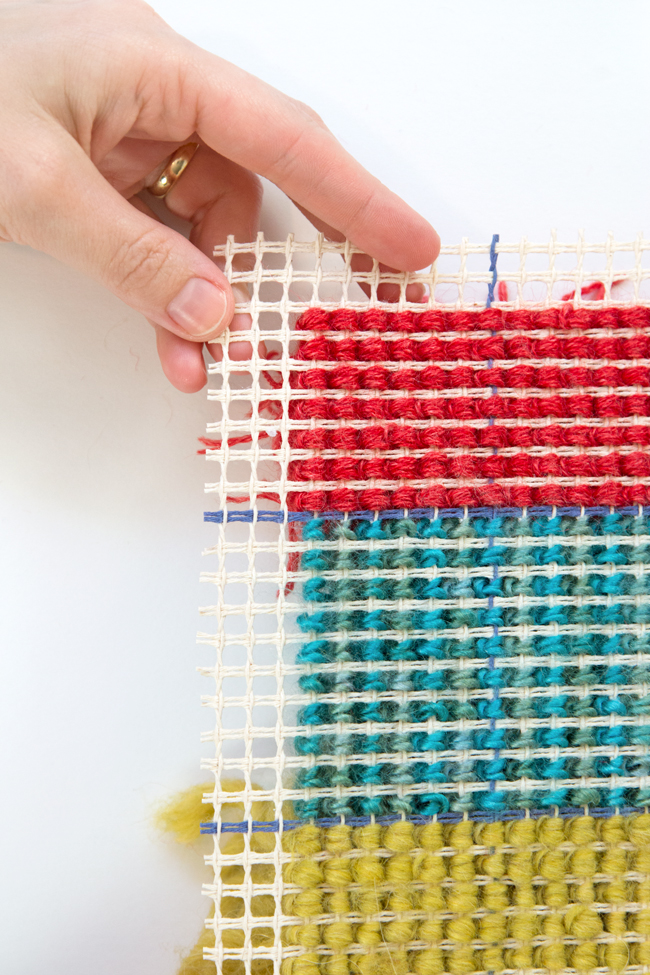
In rug-making (or carpet/rug buying in general), pile refers to the density of your rug, and pile height is a measure of how far the tip of your yarn is from the backing of your project. For beginners, please note that the backing of your project is the grid-like rug canvas into which you’ll work your latch hook project.
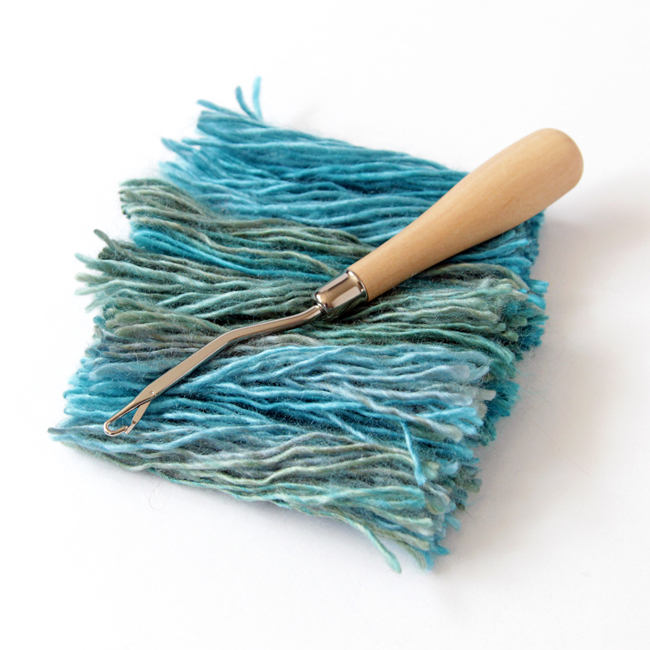
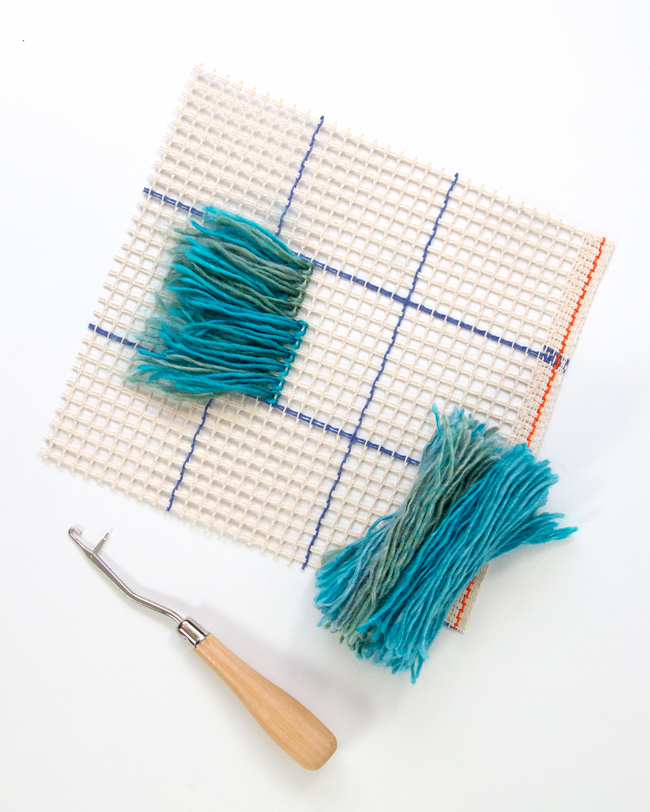
You can buy pre-cut yarn for latch hooking, but to me, that’s a little bit wasteful when you can very easily cut it yourself. To quickly cut your own latch hooking yarn, measure and cut out a rectangle of cardboard that is twice the length you want your pile height to be, plus another quarter of an inch.* Using your cardboard as a ruler, wrap your yarn around the cardboard several times, then cut the yarn at the top and bottom of the cardboard rectangle, creating the short lengths of yarn you’ll be working with.
*For example, if you want your pile height to measure 2 inches, you’ll need to cut your yarn into lengths that are 4.25″ because 2″ x 2 = 4″, and you need to add another 0.25″ to accommodate the knot you’ll be creating as you latch hook your yarn to your rug canvas.
If you’re feeling a little overwhelmed, read on and come back to the first couple paragraphs of these directions. As with any new craft, there’s a bit of vocabulary involved, but once you see the photos of latch hooking in action, and especially once you try it for yourself, this will all start to click. I promise! :)
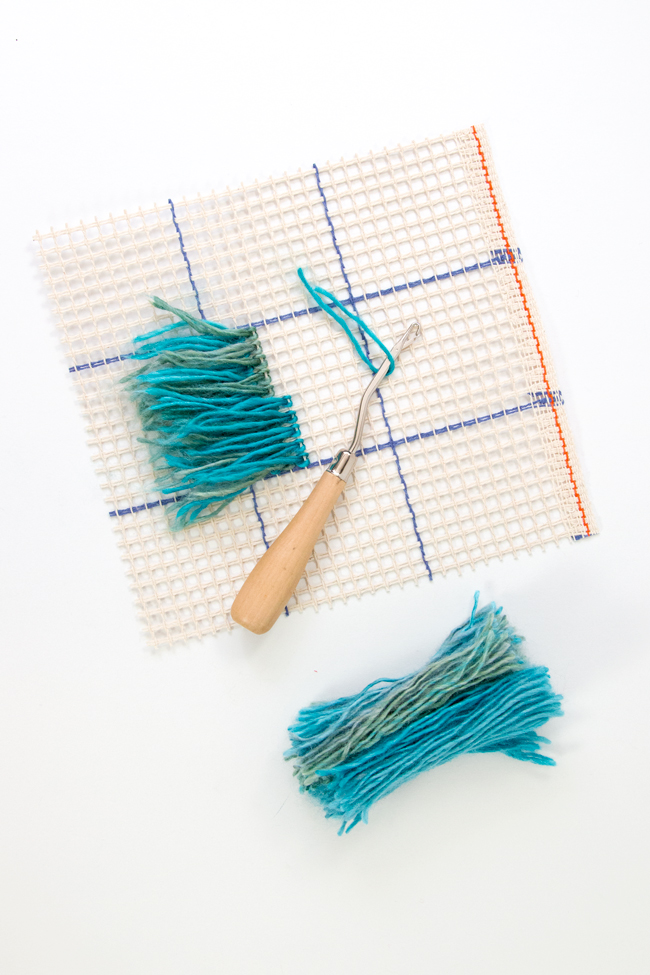
Using a sturdy pair of scissors (rug canvas is tough – it’s intended to be walked on!), cut your rug canvas to the shape/size you’d like your finished latch hook project to be, plus an inch or two. Much like in sewing, latch hook projects require a little extra canvas past the edge of where your project borders will end. This extra functions a lot like a seam allowance when it comes to finishing your project.
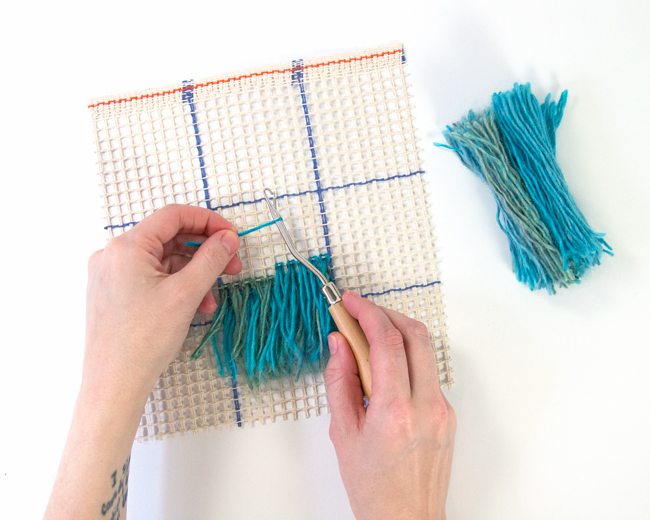
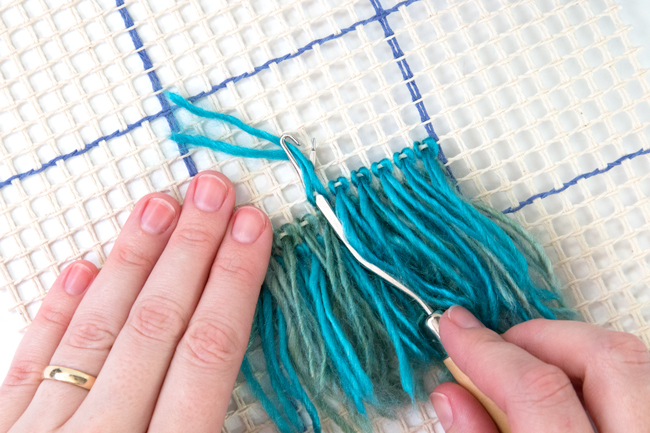
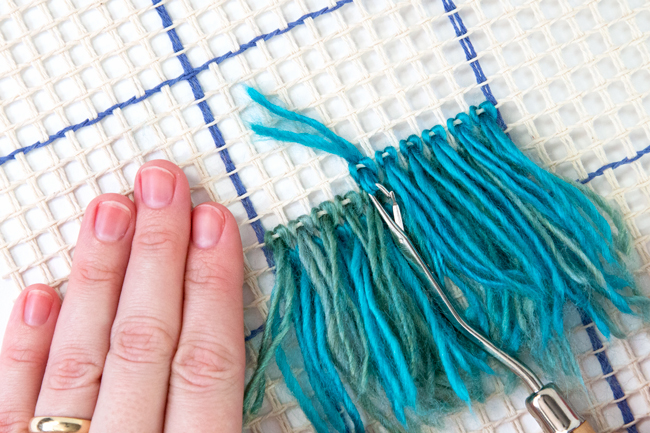
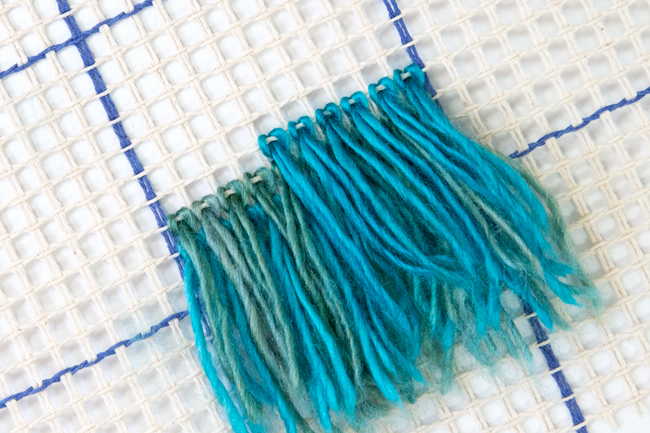
To form a latch hook knot, fold a piece of cut yarn in half around your latch hook tool, just below the latch mechanism.
MORE GREAT RESOURCES FOR LATCH HOOK BEGINNERS:
- Basic Latch Hook Finishing Tutorial
- Looking for contemporary latch hook inspiration? Here are 9 Things to Latch Hook
- Tiered Colorblock Wall Hanging – free latch hook pattern


Hi Heidi. Once again you’ve created a fabulous tutorial! I loved latch hook as a kid and am so thrilled it is coming back as a yarn craft. I’ve included your tutorial in our latest craft inspiration roundup. https://craftylikegranny.com/love-handmade/ Cheers Jodie :)
This is so awesome. Thanks for sharing all the clear DIY tutorial.
You’re welcome! ;)
Hi Heidi
I found your tutorial really helpful. I was wondering if you had any insight on how to attach two canvas’? I cant seem to find and helpful tips on this.
Thanks 😊
Yeah! I should do a tutorial on this one of these days (no promises on the time frame – I’ve got a big old deadline coming up in January!). If you look at my latch hook finishing tutorial, you can use the whip stitch demonstrated to hold two piece of canvas together flat and sew them that way. I’m working on a sculptural project right now (more of an experiment) with latch hook, and I used fishing line to get a sturdy join at the seams. Hopefully this gives you some direction to start with! Feel free to reply here or email me at heidi-at-handsoccupied-dot-com with other ideas or questions! -Heidi
Hi there,
this tutorial is very helpful!
I wonder what kind of yarn (how thick) are the best for latch hook?
I bought some rug wool but they are too thin for the canvas…
Thank you so much!
Hi! Thanks for the kind words. :) The size of your yarn and canvas should be complimentary when doing latch hook. You can get rug canvas in smaller (more squares per inch) or larger (fewer squares per inch) sizes. Much like you pair knitting needles or crochet hooks with appropriately-sized yarn, latch hook is like a less intense version of that. At the end of the day with most latch hook projects (most often using a 4 or 5-mesh rug canvas) worsted weight yarn will work great! Hope this helps, and thanks for reaching out! -Heidi
Hi
I recently found 100 one ounce little packages of precut virgin wool rug yarn in different colors that I had bought about 40 years ago on a close out sale. . I would like to make something but I’m wondering if you can tell me approximately how many square inches of canvas 1 ounce of four ply wool will cover? If you know this I won’t have to do a test run before I start designing.
Either way, thanks for your time.
Without the supplies on hand in person, I wouldn’t have a way of knowing that. But if it helps, here’s what I’d do to calculate this:
Hi. Iam completely new to latch hook. I have a kit. But can’t work out. The canvas has colour on it. Do I go with it. To latch hook. Or. Do I use the paper. Instructions. And grid. As my guide. For colour. And where to put the wool. Your instructions are very helpful. For a beginner like me
Is the color on the canvas kind of like a pattern or color by number? If so, I’d say go for it!
If you want the design to be correct, go with the paper instructions. I’ve run into the issue where the stamped colors on the canvas is uneven and can no longer be followed. Good luck!
Hi, my knots are quite loose and I have to keep tightening.. is there something I can put on the back of the work to stop the knots becoming loose? Some sort of fabric glued on for example?
There may be an issue with your fiber selection. If you’re making a short pile rug with artificial fibers, the knots will likely come undone since the fibers aren’t felting to each other to secure your knots. Totally ran into that myself – at some point I should do a post on fiber selection for latch hook. Thank you for the inspiration!
Is there any other craft you can use latch hook yarn with? I don’t want to resort to latch hook right now but I have inherited 2 large trash bags full of yarn all cut to use for latch hook but I would like yo find another craft. Please help!
Yarn scraps can be used for a lot of things. Stuffing, padding for packaging, tying things together. Stuffing is probably your best bet.
Thank you for sharing this tutorial! I’m not new to latch-hooking but usually buy pre-cut yarn. I was intrigued when you mentioned yarn scraps. What kind of yarn can be used? I think the pre-cut ones are all acrylic yarn, right? Does milk yarn work, too?
Nice to meet you Jennifer! :) Any kind of yarn can be used, but natural fibers and natural fiber blends work best because natural fibers interlock on their own (a.k.a. felting), helping keep each knot secure. I’ll do a whole post on cutting yarn for latch hook in the next few weeks and I’ll make sure to talk about this. Let me know if there are more questions you’d like covered in that post.
Best,
Heidi
P.S. I must admit I’m unfamiliar with milk yarn, but I love to learn. Tell me more. :)
how many precut 2 1/2″ pieces of yarn do i need to make a 3×5 latched rug?
thank ou
It depends whether you’re working with canvas featuring 4 knots per inch or 5 knots per inch. Regardless of strand length, you’ll need to do math.
3 feet x 12 inches = 36 inches tall
5 feet x 12 inches = 60 inches wide
From there, you’ll multiply the number of knots per inch times inches per side to find your total. 👍🏻
Hi. My name is Paige Lott. I am JUST starting to latch hook up keep my hands busy because I scratch myself until I leave marks on myself. Anyway, my question is AFTER you get done latch hooking and the design is all done, will there be any more yarn leftover? Thank you for your time and patience.
Welcome, Paige! :)
It depends how big your project is. You use a certain amount of strands of yarn per project, so you can do a bit of math to calculate exactly how many strands your project takes. For a square or rectangular project, multiply the number of rows on your canvas by the number of columns to calculate the number of total strands needed.
Yours in yarn,
Heidi
Hello, I am wondering where I can purchase the rug backing. I have done many kits and have a lot of yarn left over. Thank you.
My favorite rug canvas comes from a company called Color Crazy. You can buy the rug canvas by the foot, and also in multiple sizes (3.75 or 5 mesh, a.k.a. 4 or 5 knots per inch). When I wrote my latch hook book (more on the book 😉 ), I sourced most of my project canvas from them.
Here’s there supplies page: https://www.colorcrazy.com/collections/supplies-1 I can also vouch for their ergonomic hooks being worth it!
Yours in yarn,
Heidi
I started a rug to hook and realized I have put the yarn under the twisted row instead of the straight row of the canvas does this matter. Thanks Do I need to take it all out and start over. Ugh. Lol
In all honesty, unless this were a large scale project or a project I intended for heirloom purposes, I’d just keep on hooking. (😆 That joke never gets old!) Live your life! :)
Best of luck,
Heidi
Hi Heidi!
Interested in how you hooked the yellow yarn. Did you separate the pieces to get them to fit in your latch hook tool? I have some thicker, almost roving type yarn, but I have trouble fitting it in that little hook. Interested to hear your solution!
You can read about the pictured wall hanging in more detail and get the free pattern for it (including how to handle bulkier yarn) here: https://www.handsoccupied.com/tiered-colorblock-wall-hanging/
Hi Heidi
Just a short message a t the moment as i can barely see it. Can you get your webdesigner to change the font to a clearer colour as it is disconcerting to have it so pale it is almost invisible to those on this side, i thought something was wrong and kept starting again – this is also in the spot where we place our name and email address. Also the email needs to be in small font not capitals. Thanks.
Now the good stuff -thankyou so much, i was feeling quite ailly as i tried many times to get the idea of using the latch hook! After a fresh start this morning I GOT IT! Thankyou, all it is is people miss out one tiny piece of info and it makes all the difference. Thank you thankyou. I am sticking with you! Looking forward to an xciting journey of creation with you.
Cheers
Janet
I’m so glad the tutorial worked for you! I’ll let my designer know your feedback as well, thank you. :)