• 0 items$0.00
  • Skip to primary navigation
  • Skip to main content
  • Skip to primary sidebar
  • Skip to footer

Hands Occupied

Colorful knitting, crochet, latch hook and macrame from craft book author & designer Heidi Gustad.

  • BLOG
    • Knitting
    • Crochet
    • Latch Hook
    • Macramé
    • Punch Needle
  • ABOUT
  • Shop
  • Nav Social Menu

    • Instagram
    • Pinterest
    • RSS
    • TikTok
    • YouTube

Latch (Hook) the Rainbow: Tips & Tricks for Intuitive Latch Hooking

July 31, 2018 12 Comments

Latch (Hook) the Rainbow - This simple, four-panel latch hook project is all about finding a way to beautifully use and share scraps from your yarn stash. Gather your yarn ends! Quilters get to use fabric scraps to create beautiful works of art from their leftovers. Why can't the same concept apply to yarn crafters? Learn all about how to make an intuitive latch hook project like this with a craft tutorial from professional Knit & Crochet Designer, Heidi Gustad of Hands Occupied.
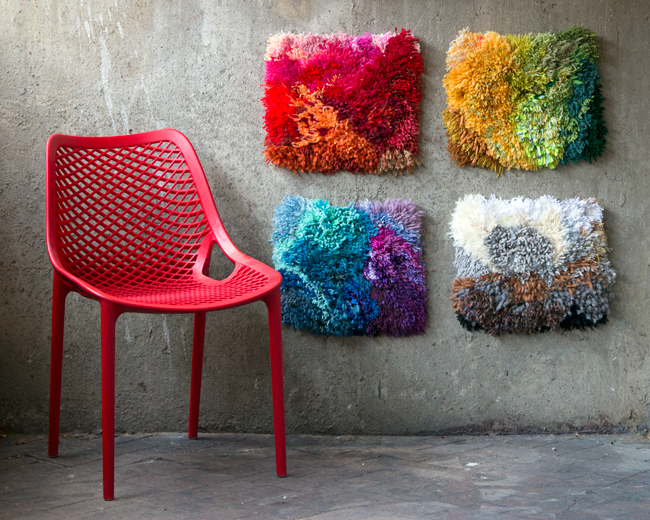
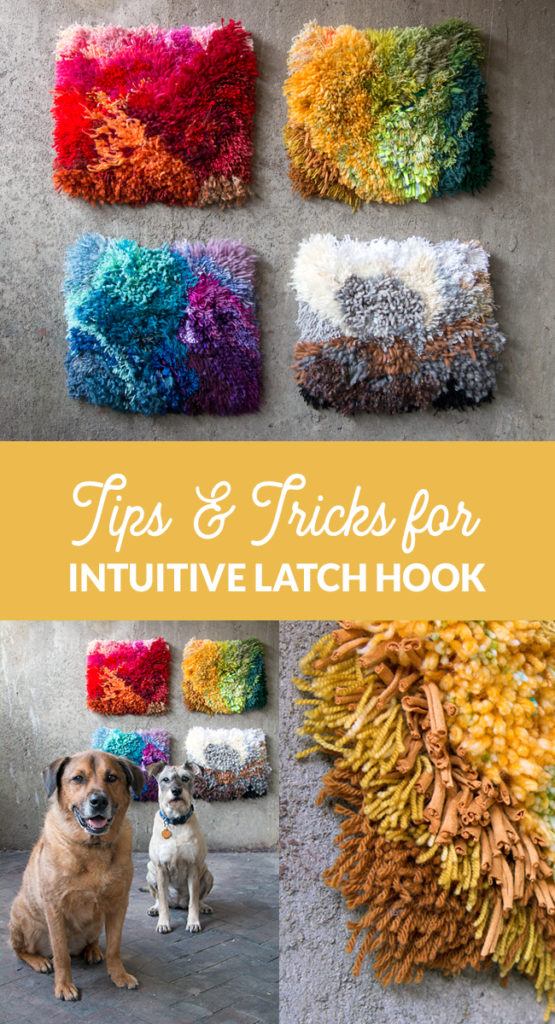
As loyal blog readers & fans of Very Serious Crafts, are well aware, I developed an obsession with a new yarn craft this spring and summer. And that obsession goes by the name latch hook. The project I’m sharing today is special – it’s the project that launched a creative compulsion that shows no sign of stopping. The basic idea behind this four panel latch hook piece was simple: find a way to beautifully use and share the massive quantity of yarn scraps in my stash. What you’re looking at here is more than 20 years of ends from knitting, crochet and yarn craft projects, all of which were collecting dust for one reason or another.

Want to get going with latch hook? Let’s get you started: Things to Latch Hook / Latch Hook Basics / Basic Latch Hook Finishing / Tiered Colorblock Wall Hanging (tutorial & free latch hook pattern)
Latch (Hook) the Rainbow - This simple, four-panel latch hook project is all about finding a way to beautifully use and share scraps from your yarn stash. Gather your yarn ends! Quilters get to use fabric scraps to create beautiful works of art from their leftovers. Why can't the same concept apply to yarn crafters? Learn all about how to make an intuitive latch hook project like this with a craft tutorial from professional Knit & Crochet Designer, Heidi Gustad of Hands Occupied.
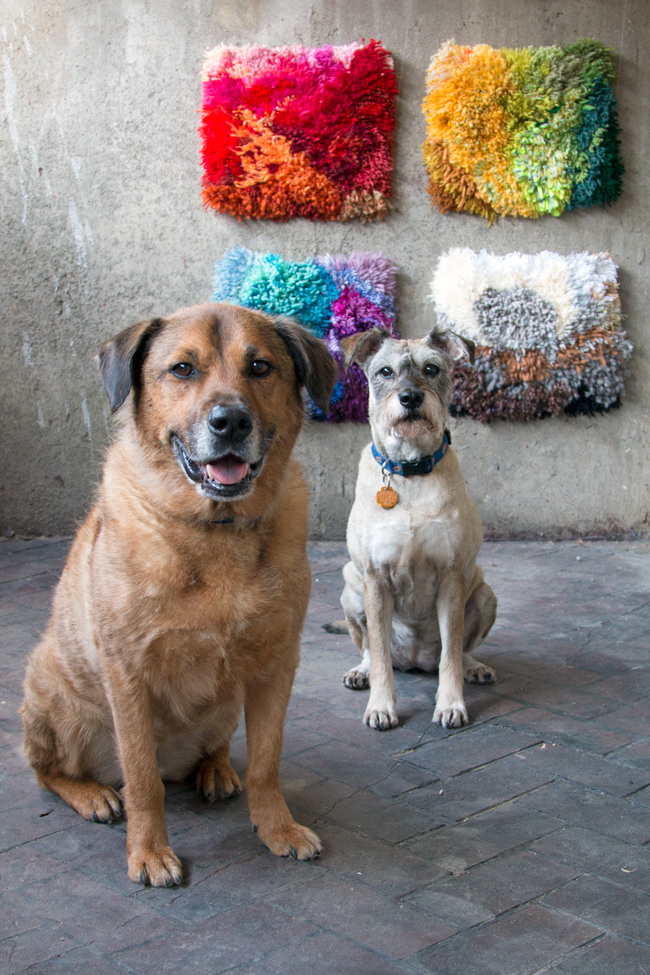
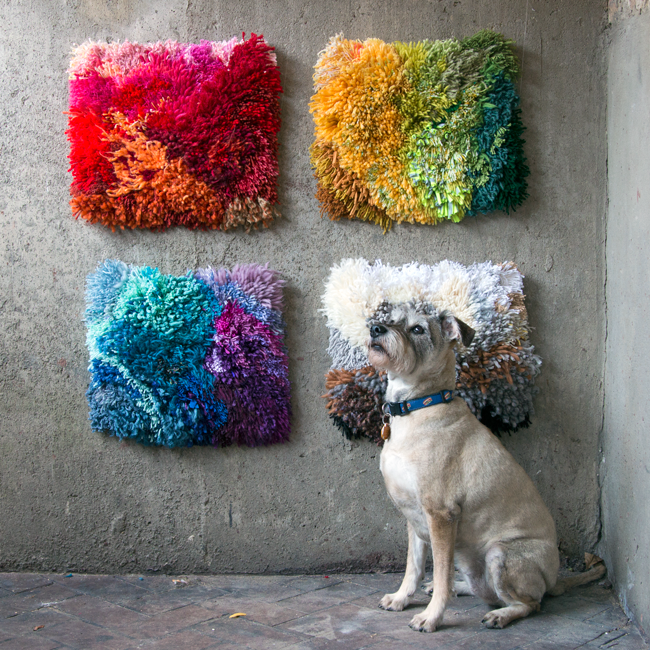
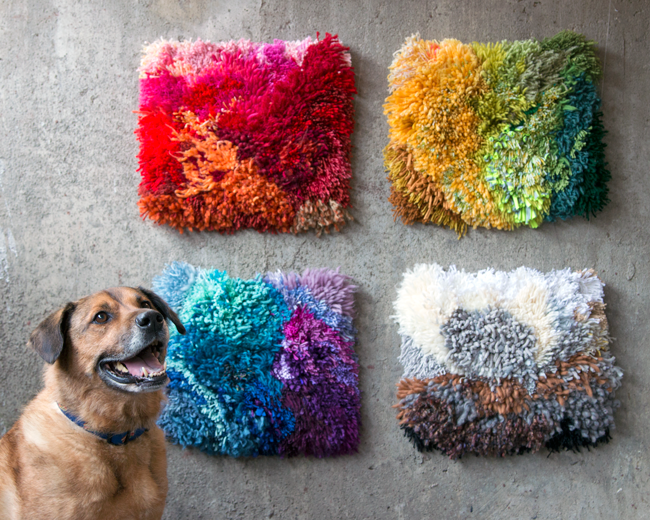
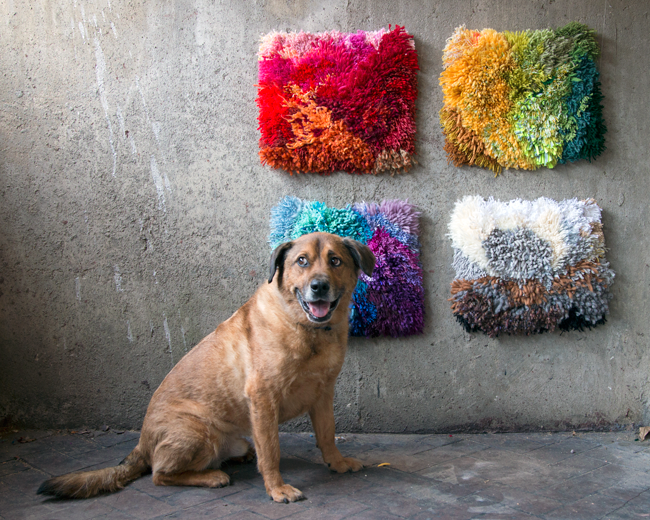
To be quite honest, I’ve had this particular project done for a little bit and have been sitting on it because I couldn’t quite figure out if this made more sense as a tutorial, a pattern, a tips & tricks for success guide, or simply sharing some photos of this project that I love. In the end, I’m going with kind of a combo of the two. If you’re a dog lover, you’re in luck, because Woodrow & Storm (viewers of my Instagram Stories will be well acquainted with them…) decided to help out with the photos. And they did a very good job.

The other unusual thing about this project & today’s post is the fact that everything is very strikingly contemporary looking. Instead of my usual primary colors and quasi-vintage vibe, this rainbow latch hook is positively present-day! Shocking, I’m sure.
Latch (Hook) the Rainbow - This simple, four-panel latch hook project is all about finding a way to beautifully use and share scraps from your yarn stash. Gather your yarn ends! Quilters get to use fabric scraps to create beautiful works of art from their leftovers. Why can't the same concept apply to yarn crafters? Learn all about how to make an intuitive latch hook project like this with a craft tutorial from professional Knit & Crochet Designer, Heidi Gustad of Hands Occupied.

Supplies required for this project

rug canvas (I used a piece of 24″ by 30″canvas cut exactly in half vertically and horizontally. Each quadrant of this 2 panel by 2 panel piece measures 12″ by 15″.)
latch hook tool
scissors
ruler
cardboard
yarn (particularly scraps in as many colors as possible)

Don’t forget – if you’re new to latch hook, check out this basics tutorial for more helpful information.  
Latch (Hook) the Rainbow - This simple, four-panel latch hook project is all about finding a way to beautifully use and share scraps from your yarn stash. Gather your yarn ends! Quilters get to use fabric scraps to create beautiful works of art from their leftovers. Why can't the same concept apply to yarn crafters? Learn all about how to make an intuitive latch hook project like this with a craft tutorial from professional Knit & Crochet Designer, Heidi Gustad of Hands Occupied.

Intuitive Latch Hook

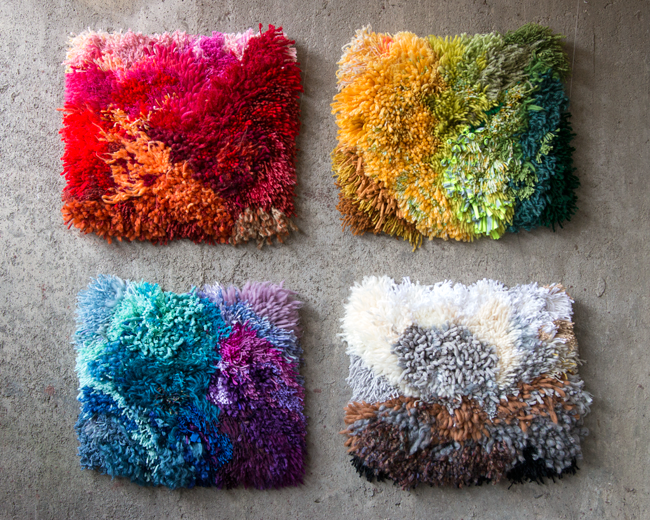
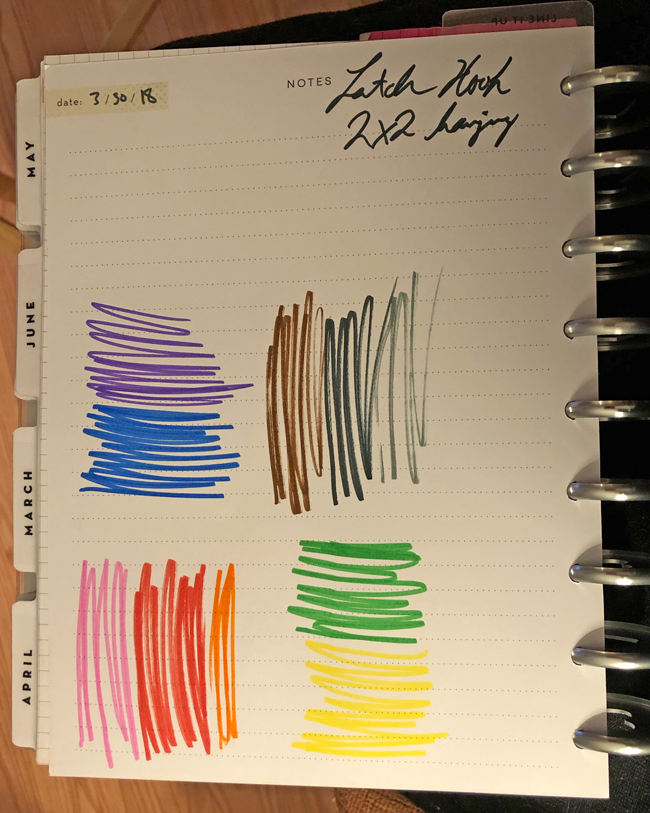
In my head, and then in person at my contemporary latch hook workshop last month, I’ve been referring to this style of latch hooking as “intuitive latch hook.” Instead of working from a pattern or having a limited number of colors, textures, weights and yarns to work with, you work basic latch hook stitches on 4 identically-sized pieces of rug canvas. But before you begin, you simply map out what colors you want to focus on for each square. The way my scrap stash broke down was like this: the upper left rectangle ranges from light pinks to dark oranges, upper right from buttery cream to deep evergreen, lower left covers aqua to eggplant, and the bottom right is simply pure white to pure black with browns sandwiched in the middle. (Apparently I haven’t been a huge knitter of earth tones in my knit & crochet career.)
Latch (Hook) the Rainbow - This simple, four-panel latch hook project is all about finding a way to beautifully use and share scraps from your yarn stash. Gather your yarn ends! Quilters get to use fabric scraps to create beautiful works of art from their leftovers. Why can't the same concept apply to yarn crafters? Learn all about how to make an intuitive latch hook project like this with a craft tutorial from professional Knit & Crochet Designer, Heidi Gustad of Hands Occupied.
Why do this? It’s simple, really. I didn’t want this yarn and all of its attached memories of learning and developing my craft go to waste. Sewists have quilting and other scrap fabric projects to show off their handmaking history in beautiful detail. Why can’t yarn crafters have the same? And by the way, it was super fun to make this! It gave me a chance to meditate on color and mastering a new technique (which, again, I’m addicted to for real right now). Plus taking a long, hard look at the detritus of my stash, and by extension my entire career from childhood crafter to professional handmaker. It was a very interesting, introspective process.

And if I’m being a little emotional/woo woo here for your taste… In the end, this is freaking pretty and I like it and I can’t wait to smile as I walk by a pretty yarn rainbow in my house. The end.
Latch (Hook) the Rainbow - This simple, four-panel latch hook project is all about finding a way to beautifully use and share scraps from your yarn stash. Gather your yarn ends! Quilters get to use fabric scraps to create beautiful works of art from their leftovers. Why can't the same concept apply to yarn crafters? Learn all about how to make an intuitive latch hook project like this with a craft tutorial from professional Knit & Crochet Designer, Heidi Gustad of Hands Occupied.

Tips & Tricks for Intuitive Latch Hooking 

  • All of the pieces of yarn used to make this latch hook piece measure 3.75″ to 4.25″ in length, all were hand cut.
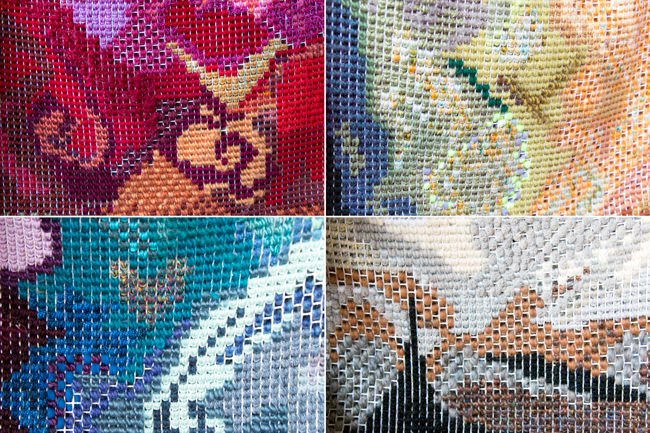
  • If you’re working with yarn that’s particularly thin (think DK/sport, fingering or lace weight if you know your yarns), work several strands held together as one to form your latch hook knots for that section. So you’ll cut 2 (sport/DK) or 3 (fingering or lace weight) strands of the yarn in question and work a single stitch using all of those strands as if they were a single scrap of yarn. That way you don’t end up with skinny little yarn pieces in your rug canvas that not only leave visual gaps, they also tend to undo and fall off! Pro tips, friends. Pro. Tips.
  • If you’re working with heavier weight or bulky yarn, don’t latch hook in every single cell of your rug canvas. It gets too dense and makes the canvas curl back on itself and not lay flat. Skip every other cell like a checkerboard and you’re golden. (see the back detail shots of this project to see what I mean.)
  • Don’t forget to leave yourself a perimeter of 1-2″ of unused rug canvas around your work for each panel of rug canvas for finishing your work.
  • If you’ve got a LOT of one color, only use part of it at a time. You’re manually cutting your latch hook yarn into scraps piece by piece, so chip away at a single color section and then switch it up. Just like I learned my stash is pretty lean on browns as I worked this project, you might find that you really have a thing for blues and purples. (And hey – if you’re hue-exclusive, you could do an entire tapestry or two in just gradients of one color family. Just sayin’!)
  • The closest thing I have to a pattern for this is the following doodle I made in my design notebook. I used straight up Crayola Markers – the 8 or 10 pack – to give myself a rough idea of where each color was going to go and remind myself that the red and neutral panels’ gradient ran top to bottom, and that the green and blue panels ran left to right.
Latch (Hook) the Rainbow - This simple, four-panel latch hook project is all about finding a way to beautifully use and share scraps from your yarn stash. Gather your yarn ends! Quilters get to use fabric scraps to create beautiful works of art from their leftovers. Why can't the same concept apply to yarn crafters? Learn all about how to make an intuitive latch hook project like this with a craft tutorial from professional Knit & Crochet Designer, Heidi Gustad of Hands Occupied.

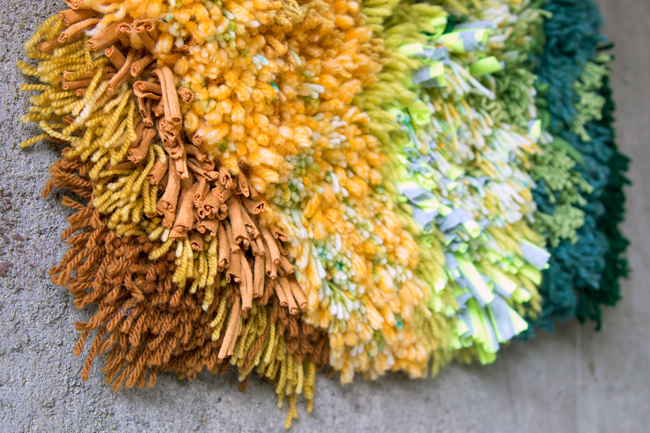
Front-of-Panel Details

Latch (Hook) the Rainbow - This simple, four-panel latch hook project is all about finding a way to beautifully use and share scraps from your yarn stash. Gather your yarn ends! Quilters get to use fabric scraps to create beautiful works of art from their leftovers. Why can't the same concept apply to yarn crafters? Learn all about how to make an intuitive latch hook project like this with a craft tutorial from professional Knit & Crochet Designer, Heidi Gustad of Hands Occupied.

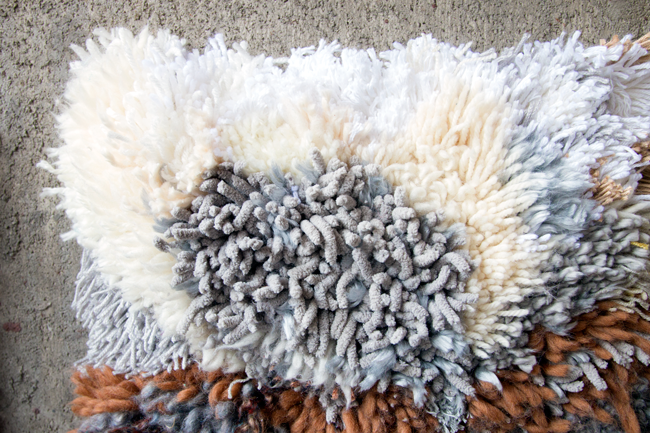
Back-of-Panel Details

Check out what the back of each panel looks like, particularly for handling extra thick or thin yarn.
Latch (Hook) the Rainbow - This simple, four-panel latch hook project is all about finding a way to beautifully use and share scraps from your yarn stash. Gather your yarn ends! Quilters get to use fabric scraps to create beautiful works of art from their leftovers. Why can't the same concept apply to yarn crafters? Learn all about how to make an intuitive latch hook project like this with a craft tutorial from professional Knit & Crochet Designer, Heidi Gustad of Hands Occupied.
In the end, remember this sort of project is all about having fun while learning a new technique! Plus, this lets you clear out those last bits of your yarn stash that might not otherwise have a home. Whatever you make is going to work out just fine – this is all about playing with color, texture and pattern. You can do whatever you want, but hopefully these tips & tricks will help guide you to success with your own intuitive latch hook! As always, if you’ve got any questions, don’t hesitate to reach out in the comments or via email at heidi [at] handsoccupied [dot] com.

Latch (Hook) the Rainbow - This simple, four-panel latch hook project is all about finding a way to beautifully use and share scraps from your yarn stash. Gather your yarn ends! Quilters get to use fabric scraps to create beautiful works of art from their leftovers. Why can't the same concept apply to yarn crafters? Learn all about how to make an intuitive latch hook project like this with a craft tutorial from professional Knit & Crochet Designer, Heidi Gustad of Hands Occupied.

Filed Under: Latch Hook, Yarn Crafts Tagged With: how to latch hook, intuitive latch hook, latch hook, latch hook tutorial, rug canvas, wall hanging

About Heidi

Heidi Gustad (she/her) is a craft book author & designer specializing in yarn crafts. Her work combines vintage and modern design elements, prioritizing color and graphic motifs. Her first book, Latch Hook: 12 Projects for the Modern Maker, is out now.

Previous Post: « Picks of the Week
Next Post: Picks of the Week »

Reader Interactions

DID YOU LIKE THIS POST?
Visit similar articles...

  • Basic Latch Hook Finishing for Small ProjectsBasic Latch Hook Finishing for Small Projects
  • Latch Hook BasicsLatch Hook Basics
  • Tiered Colorblock Wall Hanging – Latch Hook PatternTiered Colorblock Wall Hanging – Latch Hook Pattern
  • My book, Latch Hook: 12 Projects for the Modern Maker, is now available!My book, Latch Hook: 12 Projects for the Modern Maker, is now available!

Comments

  1. Elizabeth Lyons

    March 4, 2019 at 12:55 pm

    what type of different yarn did you use for this project?

    Reply
    • Heidi

      March 6, 2019 at 9:34 am

      I used dozens of different yarns – all of it came from leftover ends in my stash! :)

      Reply
  2. Ruth Hogberg

    March 23, 2019 at 6:39 pm

    How did you hang this project. I loved it so much I have two finished but they don’t lay flat on the wall when I hang them.
    Hint please.

    Reply
    • Heidi

      March 24, 2019 at 9:41 am

      You might want to attach a lightweight frame or sew a couple of dowels to the back of the project, hidden from view while hanging. Since latch hook is a rug-making technique, there is flexibility in the canvas you use. The biggest thing I’d keep in mind as you come up with a flat-hanging system is weight. I’d focus on balsa wood or small dowels to avoid your piece weighing a ton!

      Reply
  3. Nahed Minawi

    March 7, 2020 at 8:23 am

    Hello! These are gorgeous. Is there an entry on exctly how to hang these? Are they hanging from a nail in the wall? Cn you explain a bit more please about how to weigh them down? A picture would be amazing. Thank you!

    Reply
    • Heidi

      March 28, 2020 at 12:50 pm

      I haven’t done a blog post about latch hook hanging tips, but it’s on my to do list for the near future! Sorry for the delay in response – I was writing a book about latch hook these past few months which covers everything from start to finish, including hanging. 👍🏻 Keep your eyes peeled for more tutorials on this blog and on bookshelves in fall 2020. See a sneak peek here: https://www.instagram.com/p/B-LBzb1JlvI/?igshid=160g83svo4ump

      Reply
  4. Kathy

    May 16, 2020 at 2:11 pm

    You have inspired me looks like different lengths of thread have tons of stash yarn just waiting for canvas ty for this great artistic blog

    Reply
    • Heidi

      May 29, 2020 at 1:40 pm

      You’re so welcome! I have been so worried no one would “get” my explanation of a more artistic approach to the medium, so it’s great to hear from you! Have you gotten to try this method yourself yet?

      Reply
  5. Arti

    April 5, 2021 at 6:39 pm

    These pieces have inspired me to start off with this art form! They look absolutely stunning and so do your dogs!

    Reply
    • Heidi

      April 7, 2021 at 11:15 am

      Thank you so much – it’s a real blast! :)

      Reply
  6. Jayda

    May 16, 2021 at 5:14 pm

    Thanks so much for this inspiring blog post!! I have just ordered canvas to try it on my own – I remember helping my mom with a couple of latch hook projects as a kid and it was such a joyful experience. This kind of “intuitive” approach is exactly what I crave from the medium after trying out patterns and such. I can’t wait to get started :)

    Reply
    • Heidi

      May 24, 2021 at 3:10 pm

      Let me know if you get stuck or have questions, good luck! -Heidi :)

      Reply

Leave a Reply Cancel reply

Your email address will not be published. Required fields are marked *

This site uses Akismet to reduce spam. Learn how your comment data is processed.

Primary Sidebar

Heidi Gustad from Hands Occupied / Craft Book Author and Knitting, Crochet, Latch Hook and Macrame Designer

Hi! I’m Heidi (she/her/hers), and I’ve been helping yarn crafters untangle various techniques on the internet since 2010. I got my start here, as a blogger, and since then I’ve shared more than a few tutorials here and on YouTube as I’ve grown as a pattern designer. 🧶 

learn more / work with me

Find Me on Social Media

  • Instagram
  • Pinterest
  • TikTok
  • YouTube
Latch Hook by Heidi Gustad

Footer

INSTAGRAM

Heidi Gustad 🧶 knitting & yarn crafts

handsoccupied

Knitting & yarn crafts designer 🧶
.
Stay up-to-date 💌 & shop new patterns ⤵️

POV: Showing you how my new Bevelled Tank pattern POV: Showing you how my new Bevelled Tank pattern fits with no ease vs. 4” of positive ease. There’s a bit more length to the cotton (brighter color) sample, but both are cropped and feature shoulder seams designed to sit an inch back onto the shoulder instead of on top, giving it a little swing. Length is easily adjustable for folks looking for less of a crop. 
.
Pattern: Bevelled Tank by @handsoccupied for @pompommag x @hobbii_yarn summer 2024. Available for free from Hobbii at the 🔗 in my profile.
Yarn pictured: @kelbournewoolens Skipper and Camper. 
Dress form is adjusted to a 36” chest and ~5’3”ish in height. 
Human has a 40” chest and is 5’5”.
Both skirts are vintage.
.
#pompomxhobbiisummer2024 #handsoccupied #intarsia #handmade #knitting #colorwork
Let’s talk about fit and ease! . During the Beve Let’s talk about fit and ease!
.
During the Bevelled Tank design process for @pompommag, I knit 2 samples using 2 different @KelbourneWoolens yarns. One was in Skipper (100% cotton, second photo) and the other was in Camper (100% 2 ply wool). The Skipper sample was knit for a 36” bust, which measures in at 40” with 4” of positive ease. And I knit the Camper Sample for my 40” bust with a 44” finished measurement. (BTW, I’m 5’5” for folks that find that measurement helpful in visualizing fit.)
.
Based on the size chart for the Bevelled Tank, that means I knit one size 3 sample and one size 4. As designed, I conveniently fit a size 4 as intended with 4” of positive ease. When I wear the 3, there is no ease at all because the garment and my body are both 40” in size. Comparing the 2 garments, you can see how the fiber content (cotton vs. wool) and fit (no ease vs. 4” of positive ease) makes a difference in the look and feel of the finished garment. 
.
These samples are a great way to compare what ease looks like on different bodies. While I can fit both a size 3 and 4, the garment with no ease feels more like pajamas or a bralette when I wear it. On the other hand, when I wear the one with 4” of positive ease, I feel comfortable enough to wear it to work, even as a crop top. Plus, it leaves me with enough room to layer it with a nice button down if I’m not feeling the cropped look one day. 
.
I’m curious - how would you style this tank? Would you modify it with a few stockinette rows for added length? I’m so curious now that this pattern is finally out in the world. :) 
.
#pompomxhobbiisummer2024 #bevelledtank #handsoccupied #knitting #intarisa #handmade #kelbournewoolens #croppedsweater #summerknits
After a 6 month hiatus, I am happy to say I’m ba After a 6 month hiatus, I am happy to say I’m back with a brand new pattern in 9 sizes, and it’s FREE as part of @pompommag x @hobbii_yarn’s summer design collection! (Link is in my bio.)
.
In my December newsletter, I announced that I was soliciting test knitters for a pattern that had originally been selected for the summer ’24 issue of Pom Pom Quarterly magazine. However, the magazine ceased publication after its spring ’24 issue, leaving in-progress designs unpublished. (It happens.) As a result, I’d begun the long process of editing, testing, and photographing the pattern for independent release through the Hands Occupied pattern shop and Ravelry.
.
Before I was done with that process, Pom Pom Quarterly’s former editors reached out with an exciting proposal for the pattern. Post-magazine, they’ve begun to partner with yarn companies to produce high quality pattern collections. They wanted to include designs from the would-be current issue of Pom Pom Quarterly in a new collection for Hobbii yarn, including my Bevelled Tank. I worked with the same technical editors I would have for the magazine on this one, and as you can see from the photos, Pom Pom’s team did an amazing job of styling the garment to the beautiful standards they’re known for.
.
You can learn more about the pattern on my blog and get the free pattern from Hobbii yarn - links to both in my profile. I’ll post sizing info in the comments for quick reference too. 🧶
.
#pompomxhobbiisummer2024 #knitting #intarsia #sponsored #colorworkknitting 
.
Photos: @dianascarrunz 
Model: @angel.jade_
Here’s a nice throwback for you: my take on a vi Here’s a nice throwback for you: my take on a vintage knitting pattern from 1938 called the Fernlace Pullover. A pattern so nice, I knit it twice.
.
Yellow version 💛: knit with Despondent Dyes’ Vintage Vixen Sport after attending a @squidneyknits vintage knitting retreat in 2019 & learning *so much*. Paired with a self-drafted circle skirt pattern. 
.
Blue version 💙: knit with @eweeweyarns Ewe So Sporty in Sky Blue. Paired with the 1940s Boardwalk Duet sewing pattern from @decades_of_style 
.
Head to my stories for 🔗🔗 to the handmade wardrobe blog posts I wrote about each take on the Fernlace Pullover, working with a vintage pattern, where to find vintage patterns (including the one I used), & some thoughts on sizing. 
.
Image descriptions available in alt text. 
.
#handsoccupied #handmadewardrobe #fernlacepullover #vintageknitting #vintageknittingpatterns #knitting_inspiration
Frogging is a word in the knitting world that mean Frogging is a word in the knitting world that means to rip out your knitting. It’s called frogging because frogs say “ribbit,” and when you’re tearing out your knitting, you will “rip it” out, and that sounds like ribbit. No really. 🐸 Did you know this fun fact? 
.
P.S. I did like this design concept, but to make the pattern more knitter friendly as well as more wearable, I am making some tweaks to the construction. Excited to share when it’s ready! 🥰🧶
.
Yarn: @blueskyfibers Woolstok North in Morning Frost & Highland Fleece 
.
#handsoccupied #knitting #frogging #blueskyfibers #knittersofinstagram #blueskymakers #knittingvocabulary #bsfmakers #knitdesign
Load More... Follow on Instagram

Copyright © 2025 / Foodie Pro Theme On Genesis Framework / Branding by Ink + Mortar
All Site & Shop Policies / Privacy Policy / Cookie Policy