• 0 items$0.00
  • Skip to primary navigation
  • Skip to main content
  • Skip to primary sidebar
  • Skip to footer

Hands Occupied

Colorful knitting, crochet, latch hook and macrame from craft book author & designer Heidi Gustad.

  • BLOG
    • Knitting
    • Crochet
    • Latch Hook
    • Macramé
    • Punch Needle
  • ABOUT
  • Shop
  • Nav Social Menu

    • Instagram
    • Pinterest
    • RSS
    • TikTok
    • YouTube

How-to: Fabric Covered Shelves

October 17, 2013 5 Comments

How-to: Fabric Covered Shelves at Hands Occupied

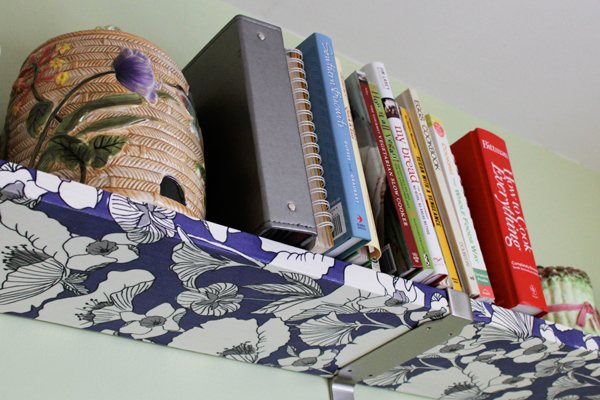
As an apartment dweller, I move more often than I’d love to. Sometimes a move means that the black shelves I bought for my old place didn’t exactly coordinate with the light finish wood of my kitchen cabinets. Rather than waste a chunk of change on new shelves that specifically match my honey-hued cupboards, I thought I’d take the opportunity to get a little creative.

Supplies

wooden shelves
Mod Podge Matte
Mod Podge Hard Coat
sanding & priming supplies (as needed)
fabric scissors
iron (optiona)
tape measure
sponge brush
brayer

Directions

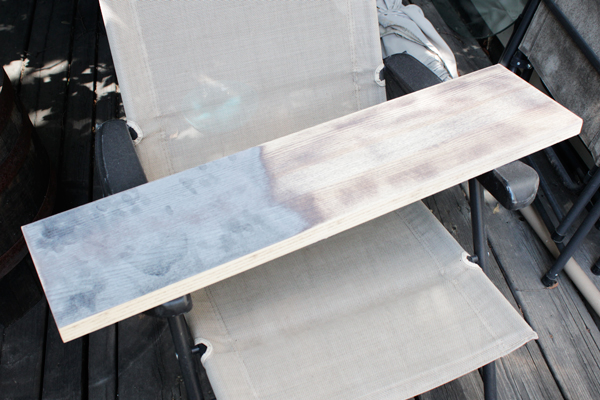
If your shelves need sanded, that’s the first step. My handy dandy power sander was necessary to avoid tendinitis and endless hours of rubbing back and forth to get the stubborn finish off. Wipe off any dust with a damp cloth, let your shelves dry, and then prime them.

How-to: Fabric Covered Shelves at Hands Occupied

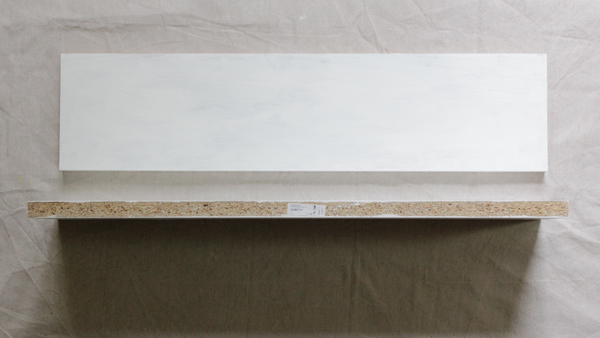
If your fabric is the same color as your primer, you don’t need to paint over the primer. If not, paint a layer of paint on your shelf that matches your fabric. The color of the shelf below your fabric will show through when you add the fabric. The shelves I made over are Ikea ekby bjarnums, in the dark finish, with brackets that cover the left and right-facing ends, so I only needed to prime/paint the front edge, top and bottom of the shelves. My fabric is white, which is why I only needed white primer on my shelves.

How-to: Fabric Covered Shelves at Hands Occupied

Cut a piece of fabric large enough to cover your shelf plus half an inch on the ends. To reiterate, since my shelf only required coverage on the top, bottom and front edge, I only needed a rectangle large enough to wrap around my shelf like a Christmas present, but with open ends on the short sides of the shelf and a little bit extra on the long side to wrap the fabric over to the edge that will be facing the wall the shelf is mounted on. Make sense? Holler in the comments if not! :)

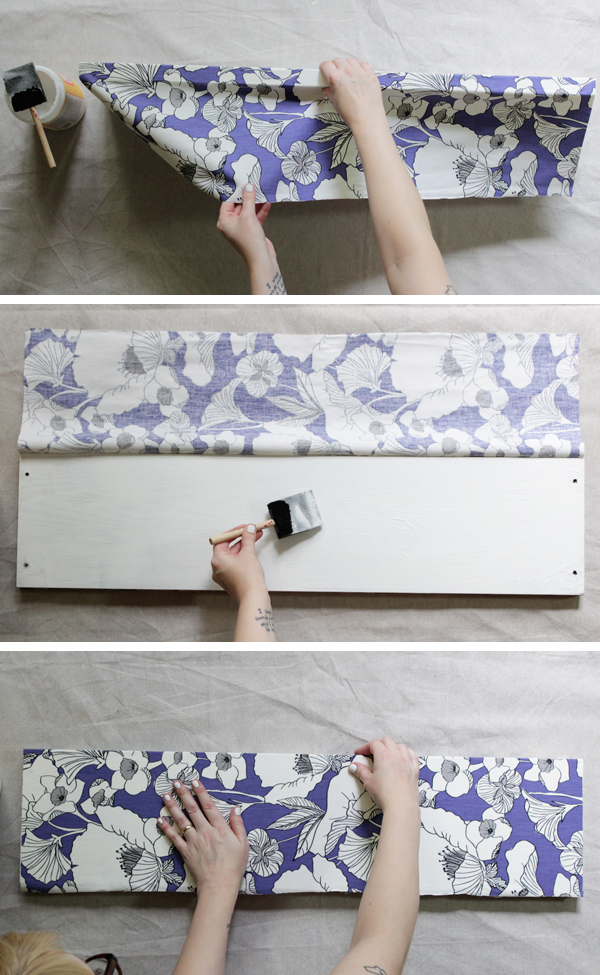
Apply a layer of Matte Mod Podge onto one side of your shelf and carefully align the fabric so it lays square on the shelf, leaving an extra half inch of fabric hanging off the first end. Right now is the time to get your fabric perfectly straight – you won’t be able to adjust it after this step. When you’re all lined up, smooth down the fabric onto the shelf and Mod Podge layer.

How-to: Fabric Covered Shelves at Hands Occupied

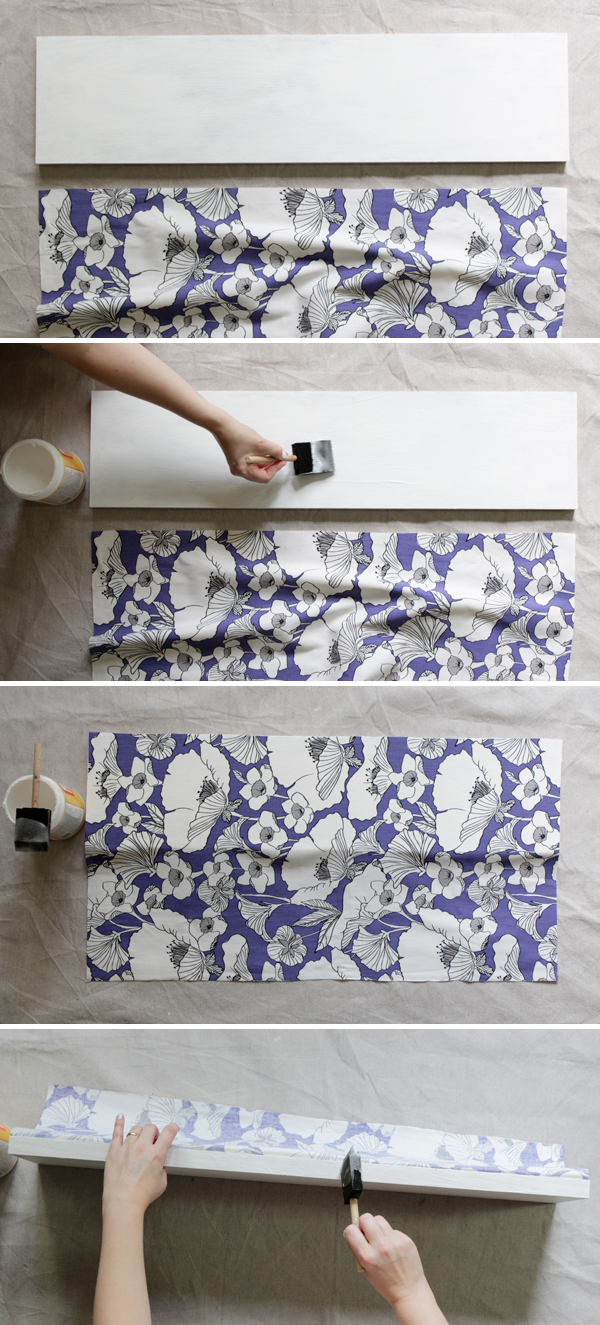
Paint Mod Podge to the short, front edge of the shelf and carefully fold the fabric over it, smoothing it straightly into place. Feel free to pull on your fabric as needed, but don’t pull on it so hard as to stretch your fabric, warping the pattern.

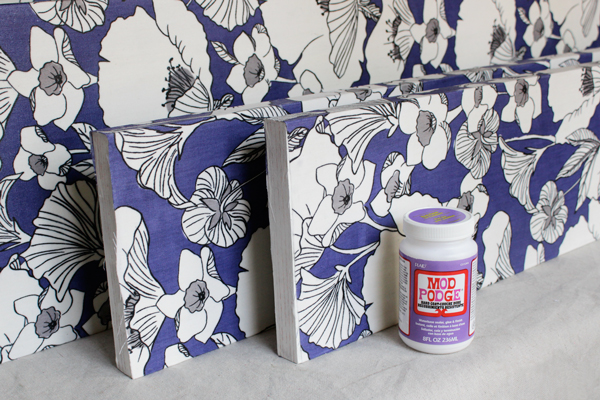
Next, apply Mod Podge to the third side of the shelf and smooth the fabric into place once again. There should be about a half inch of extra fabric on both raw ends. Paint a last layer of Mod Podge onto the wall-side edge of your shelf and stick the raw ends to it.

How-to: Fabric Covered Shelves at Hands Occupied

The next phase is to – one side at a time – paint Mod Podge all over the outside of your fabric and use a brayer to force the Mod Podge all the way through the fabric. Do all four sides and let the whole shelf dry completely.

How-to: Fabric Covered Shelves at Hands Occupied

After your shelves dry, paint over all four sides again with a layer of Mod Podge Hard Coat, and let your shelves dry completely once again. Before hanging them up, let them sit and cure for four days. The curing makes your shelves less sticky and more water resistant, which is always desirable in a decoupage project!

How-to: Fabric Covered Shelves at Hands Occupied

I shared a version of this tutorial at the uber-fantastic Mod Podge Rocks!

Filed Under: Decoupage, Home Decor, How-to, My Work Elsewhere Tagged With: craft, decoupage craft, diy, fabric covered shelves, fabric upholstered shelves, floral, home decor, mod podge craft, shelf

About Heidi

Heidi Gustad is a craft book author, designer & creator specializing in yarn crafts like knitting, crochet, latch hook & macramé. Her first book, Latch Hook: 12 Projects for the Modern Maker, is out now.

Previous Post: « 10 Awesome, Uncommon Gift Ideas
Next Post: Weekly Reader »

Reader Interactions

DID YOU LIKE THIS POST?
Visit similar articles...

  • Weekly ReaderWeekly Reader
  • Twinkle in Your Eye Sunglasses Twinkle in Your Eye Sunglasses
  • Easy No Slip HangersEasy No Slip Hangers
  • Washi Tape Twist TiesWashi Tape Twist Ties

DON’T MISS ANOTHER UPDATE

Comments

  1. Claudia Neves

    April 2, 2014 at 12:35 pm

    Lindo Trabalho……

    Reply
  2. Kathy

    June 8, 2020 at 10:42 am

    I am doing this currently using a duvet cover, and have successfully stuck down all sides of the fabric on to the shelf, do I do the full layer of mod podge once this is dried or pretty much straight away??

    Reply
    • Heidi

      June 8, 2020 at 12:14 pm

      Just saturate it – it’s so easy. As you use the brayer/roller to press out all the wrinkles, excess Podge will naturally come out. So fun! I haven’t done this in AGES. I’d love to hear how it comes out too! -Heidi :)

      Reply
  3. Jessica

    December 30, 2022 at 5:38 pm

    Heidi, how does this age? I’m considering putting fabric on the back wall of my kitchen cabinets for a pop of color – but will it yellow or otherwise age poorly? How have your shelves held up?

    Reply
    • Heidi

      January 5, 2023 at 9:42 am

      I ended up moving and giving the shelves away to a friend who’d always liked the fabric. However, I also used Mod Podge to cover some end tables I made with fabric, and they are still in great shape. Some folks complain about Mod Podge getting sticky with age, but if you use the correct type of Mod Podge (I like the Matte finish for covering fabric with wood), it won’t get sticky in my experience. I’ve had the end tables I linked for nearly a decade and use them in my living room daily.

      Best,
      Heidi

      Reply

Leave a Reply Cancel reply

Your email address will not be published. Required fields are marked *

This site uses Akismet to reduce spam. Learn how your comment data is processed.

Primary Sidebar

Heidi Gustad from Hands Occupied / Craft Book Author and Knitting, Crochet, Latch Hook and Macrame Designer

Hi! I’m Heidi (she/her/hers), a craft book author & pattern designer specializing in knitting, crochet, latch hook & macrame. Really anything with yarn! ❤️  My work combines vintage and modern design elements, featuring bold colors and graphic motifs.

EMAIL NEWSLETTER

Never miss a tutorial with these short & sweet monthly updates.

Find Me on Social Media

  • Instagram
  • Pinterest
  • TikTok
  • YouTube
Latch Hook by Heidi GustadDiscover Unique Items

Footer

INSTAGRAM

handsoccupied

Craft book author, designer & creator specializing in yarn crafts like knitting, crochet, latch hook & macramé
❤️ Email preferred

Heidi Gustad 🧶✂️
Here’s how to work a Norwegian purl stitch for e Here’s how to work a Norwegian purl stitch for easier continental style knitting. With this purling method, the working yarn says tensioned (held) at the back of your knitting at all times. For many knitters, always holding the yarn at the back helps with tension issues, as well as feeling a little more comfortable. 
.
Have you ever encountered this style of purling before? If you’ve tried it, have you found it helps with your purl tension and knitting speed? I’m curious.
.
For a written tutorial, visit handsoccupied-dot-com. For video, you guessed it, You2be. Both of these platforms allow for longer, more in-depth versions of this tutorial, including full transcripts, alt text & the ability to pause, slow down or speed up at will. (Like if you really want to learn this, I recommend using a platform that doesn’t keep your hands occupied. Thinking of putting this in all my captions these days tbh - shout out to you if you made it this far. 🙌🏻😂)
.
#handsoccupied #learntoknit #continentalknitting #howtoknit #norwegianpurl #norwegianknitting #knit #knitting #knitter #knittersofinstagram #knittinghack  #handknitting #handknit #norwegianpurling
Have you ever tried this style of purl? . All thi Have you ever tried this style of purl? 
.
All this recent talk about throwing vs. continental style knitting made it clear many people struggle with purling in continental knitting. Turns out that Norway may have the answer! In Norwegian purling, the working yarn stays tensioned at the back at all times, helping with speed and tension. 🤯
. 
Head to the bl0g (🔗 in bi0) for a more in-depth look at how to work a Norwegian purl stitch, including a photo tutorial with animated GIF & a video tutorial. Wrapping your mind around how to work a stitch you’re familiar with in a totally new way can be confusing, so I tried to give a few options for clarity. 🤙🏻 Video is also on You2be. 
.
#handsoccupied #norwegianpurl #norwegianknitting #norwegianpurling #continentalknitting #howtoknit #learntoknit #knitterofinstagram #knitters
It’s been a hot second since I showed my face or It’s been a hot second since I showed my face or reintroduced myself, so here goes! I’m Heidi Gustad, a craft book author, pattern designer, and tutorial creator who specializes in yarn crafts. Lately, I’ve been focused on releasing quality knitting videos and related blog posts to help teach things like the difference between provisional cast ons and how to fix common knitting mistakes. Next week I’m shooting requested crochet and latch hook videos, so h👀kers, your time is coming! And if you ever have tutorial requests, please let me know. ☺️
. 
TLDR: I’m Heidi. I design & teach yarn crafts. You can find tutorials on my blog (est. 2010) & You2be. I also have several knitting & crochet patterns + a book about latch hook available. / All of these can be found on my website, the 🔗 is where you’d think. 
.
#handsoccupied #fridayintroduction #heidigustad #knitting #knitter #knittersofinstagram #yarncrafts #latchhookbook
Are you a picker or a thrower? Do you knit Contine Are you a picker or a thrower? Do you knit Continental or English Style? Here’s a quick overview of the differences between the two most common knitting styles, including a side by side comparison. (A good one to save for future reference. 👍🏻) 
.
There’s more on the differences between picking and throwing in my latest blog post & You 2ube video - the l1nk is where you’d think!
.
#handsoccupied #learntoknit #knittingstyles #howtoknit #knittersofinstagram #knitter
Spent time with family this weekend down South. Go Spent time with family this weekend down South. Got some stitching in & felt spring for a minute, which was lovely. ☀️ 
.
I’ll be catching up on comments, etc. tomorrow. 
.
#handsoccupied #travelknitting #planeknitting
Load More... Follow on Instagram

Copyright © 2023 / Foodie Pro Theme On Genesis Framework / Branding by Ink + Mortar
All Site & Shop Policies / Privacy Policy / Cookie Policy