• 0 items$0.00
  • Skip to primary navigation
  • Skip to main content
  • Skip to primary sidebar
  • Skip to footer

Hands Occupied

Colorful knitting, crochet, latch hook and macrame from craft book author & designer Heidi Gustad.

  • BLOG
    • Knitting
    • Crochet
    • Latch Hook
    • Macramé
    • Punch Needle
  • ABOUT
  • Shop
  • Nav Social Menu

    • Instagram
    • Pinterest
    • RSS
    • TikTok
    • YouTube

How-to: Lucky Charms Bracelet

March 28, 2013 8 Comments

How-to: Lucky Charms Bracelet at HandsOccupied.com

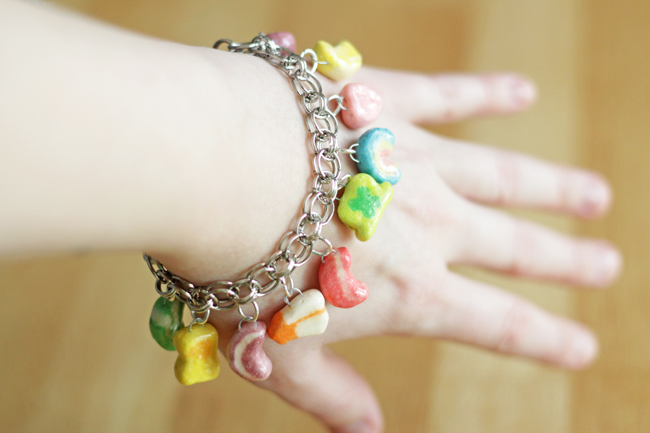
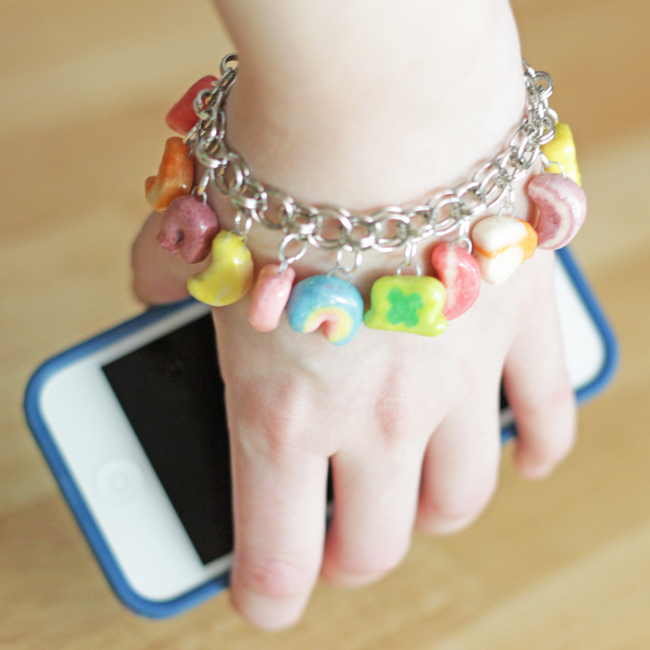
This fun bracelet is literally made with Lucky Charms cereal – no joke. My idea for a Lucky Charms marshmallow bracelet came long before I figured out how to make it work. I’ll warn you right now, this project isn’t for the crafting faint of heart. A decent amount of crafty research and development went into this bracelet. I Googled and found a few Lucky Charms inspired bracelets made with clay and glass, but I couldn’t find anyone who’d used actual cereal for a project. I initially shared this project at Mod Podge Rocks last month and got some great feedback from readers who tried this project for themselves and had some tips & questions they shared via Facebook that I’ll incorporate in the instructions below.

Supplies

  • Lucky Charms cereal
  • Mod Podge Dimensional Magic
  • crafting wire (I used 28 gauge, very low duty)
  • 2 pairs of jewelry pliers
  • small wire cutters
  • charm bracelet chain with clasp (I made my chain with this helmsweave chainmaille bracelet tutorial, but you can find similar items at stores.)
  • 5mm or 7mm jump rings that match your bracelet chain
  • paint brush
  • waxed paper
  • small plate

Directions

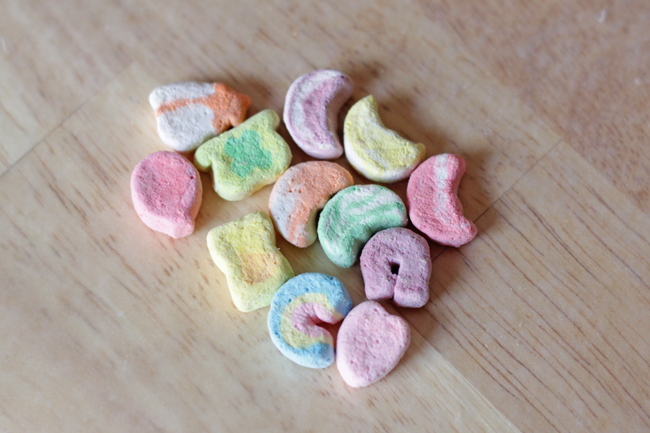
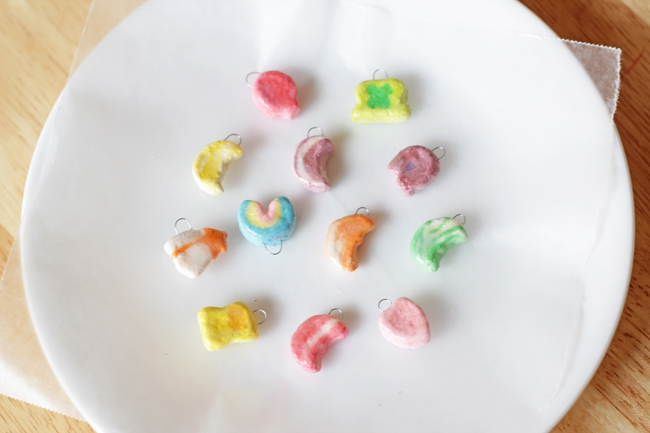
Separate one of each kind of marshmallow from your cereal. Not having eaten Lucky Charms in a long time, I don’t know what all of the moon marshmallows are about. They’re kind of pretty, so I included them in my bracelet for variety.

How-to: Lucky Charms Bracelet at HandsOccupied.com

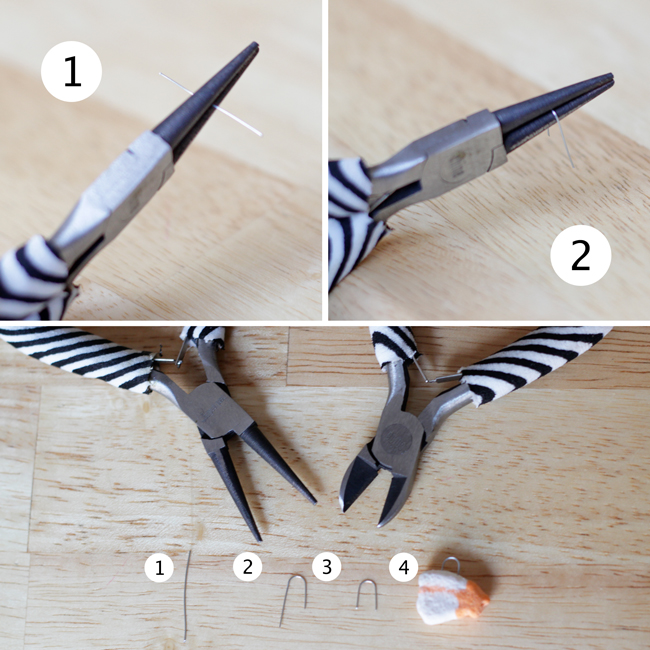
Count up your marshmallows and cut an inch-long piece of wire for each one (I needed 12 pieces). Then, following the pictures below, fold each wire into a horseshoe shape by holding it with a pair of round nose pliers and bending the ends down with your fingers. Use a wire cutter to even out the length of the ends with a snip. Push one wire horseshoe into each marshmallow. Be careful – marshmallows aren’t super sturdy, what with being food and all…

How-to: Lucky Charms Bracelet at HandsOccupied.com

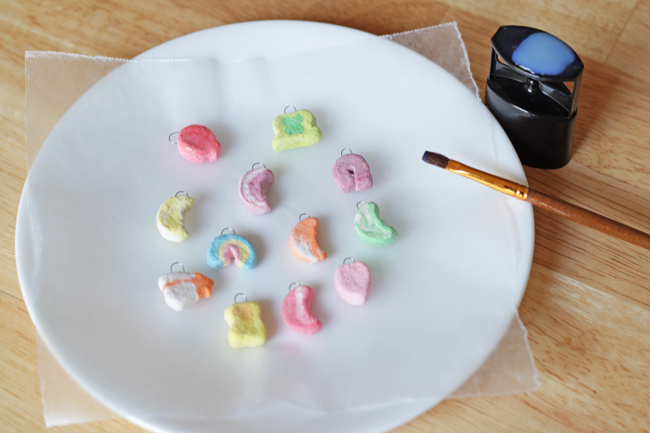
Lay out all of your wired marshmallows on a piece of waxed paper on a small plate.* Use a paintbrush to paint a SUPER THIN layer of Dimensional Magic (DM) on the top of each marshmallow. Let them dry completely. Facebook commenters reported cracking in their finished marshmallows, which I didn’t run into at all with my bracelet, even after wearing it out several times. As far as I can tell, the issue is that too much DM gets the marshmallows too wet, making them less structurally sound.  Just a heads up.

*The plate is just so you can easily & carefully move your marshmallows to a safe, out-of-the-way locations for let each layer of Dimensional Magic dry. If you just do this on waxed paper, you can’t move the drying marshmallows around without them sliding all over the place and sticking to things: each other, the waxed paper, etc. 

How-to: Lucky Charms Bracelet at HandsOccupied.com

Flip your marshmallows over and paint another thin layer of DM onto the marshmallows. Again don’t use too much DM and let dry completely. Then, carefully paint the sides of each marshmallow, again with just a little DM. The sides are the trickiest part because you don’t want to put too much DM on them and accidentally glue your marshmallows to the waxed paper.

How-to: Lucky Charms Bracelet at HandsOccupied.com

Repeat painting the top, bottom and sides of the charms 3 to 5 times. The more layers you apply, the stronger the seal will be on the marshmallow charms. You have to be patient with this project for it to turn out. The thinner the layers of Dimensional Magic the better. I initially tried to make this bracelet by pouring Dimensional Magic on the marshmallows straight from the bottle, which didn’t work. The marshmallows started to disintegrate, the DM went everywhere, and the wires fell out. It was a disaster, so believe me, slow and steady is the way to success on this project.

3-5 layers of Dimensional Magic later . . .

How-to: Lucky Charms Bracelet at HandsOccupied.com

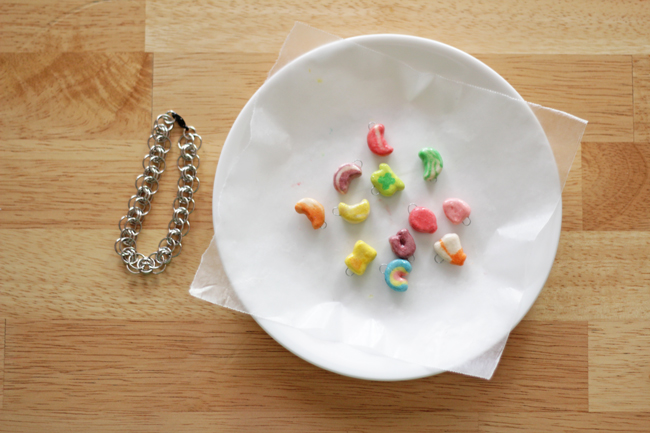
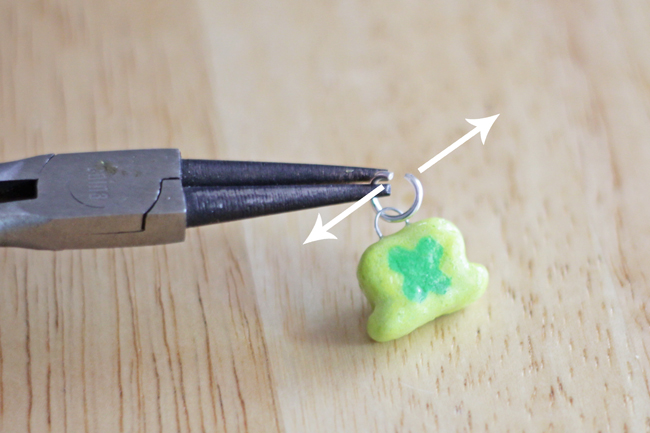
The hard part is over! The rest is simply attaching the charms to the chain bracelet. Begin by opening a jump ring. The best way to open a jump ring is with two pairs of jewelry pliers. Hold one side of the jump ring steady and push the other end of the ring away from the steady side as shown with the arrows below.

How-to: Lucky Charms Bracelet at HandsOccupied.com

Hook your charm onto the jump ring, hook the jump ring onto your bracelet, and close the jump ring by pushing it back together with a motion exactly the opposite of what you did when you opened the ring. The ends of the ring should be touching to be secure.

Take a few minutes to decide on the order of your charms. I didn’t want too many same-colored charms or too many moons next to each other, so I spent a few minutes rearranging them before attaching each charm to the bracelet.

How-to: Lucky Charms Bracelet at HandsOccupied.com

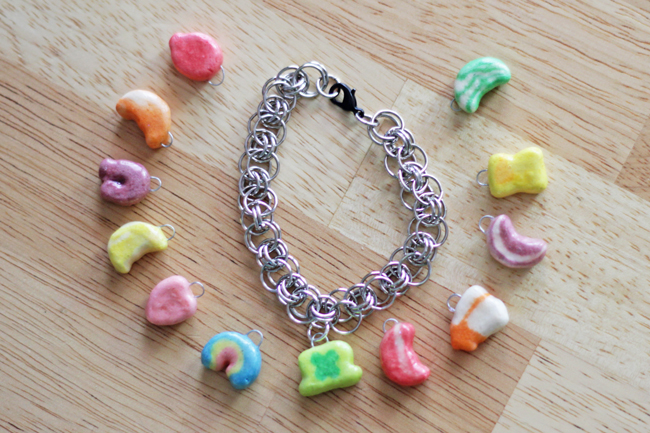
I was really psyched about how my bracelet turned out! It really wasn’t a heinous amount of work in the end – it just requires a bit of patience and figuring out the right way to apply the Dimensional Magic. Just remember: don’t apply too much Dimensional Magic to your marshmallows! It’s water-based and marshmallows are food. They’re made to dissolve in spit (sorry, it’s true), which is also full of water. Slow and steady wins the race.

How-to: Lucky Charms Bracelet at HandsOccupied.com

Like I said at the top of this post, I first posted this project at Mod Podge Rocks in March. In case you didn’t know, I write a tutorial for Mod Podge Rocks every month. Check out MPR on Facebook, Pinterest & Twitter for tons of craft project ideas.

Filed Under: DIY Style, How-to, My Work Elsewhere, St. Patrick's Day Tagged With: bracelet, charm bracelet, dimensional magic, fun, jewelry, lucky charms, marshmallows, mod podge, style, wakcy

About Heidi

Heidi Gustad (she/her) is a craft book author & designer specializing in yarn crafts. Her work combines vintage and modern design elements, prioritizing color and graphic motifs. Her first book, Latch Hook: 12 Projects for the Modern Maker, is out now.

Previous Post: « How-to: Astro Turf Peter Pan Collar
Next Post: Feed me! Well, you. »

Reader Interactions

DID YOU LIKE THIS POST?
Visit similar articles...

  • Twinkle in Your Eye Sunglasses Twinkle in Your Eye Sunglasses
  • Dimensional Easter Egg EarringsDimensional Easter Egg Earrings
  • DIY Light-Up Cuff BraceletDIY Light-Up Cuff Bracelet
  • DIY Color Blocked Glitter Bangle BraceletDIY Color Blocked Glitter Bangle Bracelet

Comments

  1. Amber

    June 19, 2013 at 8:18 pm

    I love this Lucky Charms Bracelet tut; could I ask for your permission to share it on other site? what should i do next if your answer is okay?

    Reply
    • Heidi

      June 20, 2013 at 12:08 pm

      Just remember to link back to this post and only use 1 or 2 pics. Thanks for asking! And thanks for featuring too!
      -Heidi :)

      Reply
  2. Stephanie

    October 3, 2013 at 8:56 pm

    This bracelet is super cool! I’m wondering how long you let them sit to “completely dry.” Did you wait the full 24 hours per the bottle instructions, or did they dry more quickly since it’s such a thin layer?

    Reply
    • Heidi

      October 3, 2013 at 9:22 pm

      I think I waited more like 6 hours per layer. It’s been awhile since I made this, though!

      Reply
  3. Ellie

    February 7, 2015 at 2:24 pm

    Any ideas for how to alter this craft for a teen program at the library? I’m thinking of having the teens make their own good luck charms, and I think we could turn this into a key chain (more gender neutral) that would be pretty popular. Just trying to think of alternatives for the dry time…

    Reply
    • Heidi

      February 7, 2015 at 8:20 pm

      I would actually recommend doing clay “marshmallows” for a library program. These take a lot of dry time, so if you did air dry clay, I think you might have a higher sucess rate among teens. :)

      Reply
  4. Lora

    February 27, 2022 at 12:52 pm

    My marshmallows turned brown after a while.
    Did yours?

    Reply
    • Heidi

      February 28, 2022 at 1:05 pm

      Yep! It took a few years, but eventually they turned brown. :)

      Reply

Leave a Reply Cancel reply

Your email address will not be published. Required fields are marked *

This site uses Akismet to reduce spam. Learn how your comment data is processed.

Primary Sidebar

Heidi Gustad from Hands Occupied / Craft Book Author and Knitting, Crochet, Latch Hook and Macrame Designer

Hi! I’m Heidi (she/her/hers), and I’ve been helping yarn crafters untangle various techniques on the internet since 2010. I got my start here, as a blogger, and since then I’ve shared more than a few tutorials here and on YouTube as I’ve grown as a pattern designer. 🧶 

learn more / work with me

Find Me on Social Media

  • Instagram
  • Pinterest
  • TikTok
  • YouTube
Latch Hook by Heidi Gustad

Footer

INSTAGRAM

handsoccupied

Knitting & yarn crafts designer 🧶
.
Stay up-to-date 💌 & shop new patterns ⤵️

POV: Showing you how my new Bevelled Tank pattern POV: Showing you how my new Bevelled Tank pattern fits with no ease vs. 4” of positive ease. There’s a bit more length to the cotton (brighter color) sample, but both are cropped and feature shoulder seams designed to sit an inch back onto the shoulder instead of on top, giving it a little swing. Length is easily adjustable for folks looking for less of a crop. 
.
Pattern: Bevelled Tank by @handsoccupied for @pompommag x @hobbii_yarn summer 2024. Available for free from Hobbii at the 🔗 in my profile.
Yarn pictured: @kelbournewoolens Skipper and Camper. 
Dress form is adjusted to a 36” chest and ~5’3”ish in height. 
Human has a 40” chest and is 5’5”.
Both skirts are vintage.
.
#pompomxhobbiisummer2024 #handsoccupied #intarsia #handmade #knitting #colorwork
Let’s talk about fit and ease! . During the Beve Let’s talk about fit and ease!
.
During the Bevelled Tank design process for @pompommag, I knit 2 samples using 2 different @KelbourneWoolens yarns. One was in Skipper (100% cotton, second photo) and the other was in Camper (100% 2 ply wool). The Skipper sample was knit for a 36” bust, which measures in at 40” with 4” of positive ease. And I knit the Camper Sample for my 40” bust with a 44” finished measurement. (BTW, I’m 5’5” for folks that find that measurement helpful in visualizing fit.)
.
Based on the size chart for the Bevelled Tank, that means I knit one size 3 sample and one size 4. As designed, I conveniently fit a size 4 as intended with 4” of positive ease. When I wear the 3, there is no ease at all because the garment and my body are both 40” in size. Comparing the 2 garments, you can see how the fiber content (cotton vs. wool) and fit (no ease vs. 4” of positive ease) makes a difference in the look and feel of the finished garment. 
.
These samples are a great way to compare what ease looks like on different bodies. While I can fit both a size 3 and 4, the garment with no ease feels more like pajamas or a bralette when I wear it. On the other hand, when I wear the one with 4” of positive ease, I feel comfortable enough to wear it to work, even as a crop top. Plus, it leaves me with enough room to layer it with a nice button down if I’m not feeling the cropped look one day. 
.
I’m curious - how would you style this tank? Would you modify it with a few stockinette rows for added length? I’m so curious now that this pattern is finally out in the world. :) 
.
#pompomxhobbiisummer2024 #bevelledtank #handsoccupied #knitting #intarisa #handmade #kelbournewoolens #croppedsweater #summerknits
After a 6 month hiatus, I am happy to say I’m ba After a 6 month hiatus, I am happy to say I’m back with a brand new pattern in 9 sizes, and it’s FREE as part of @pompommag x @hobbii_yarn’s summer design collection! (Link is in my bio.)
.
In my December newsletter, I announced that I was soliciting test knitters for a pattern that had originally been selected for the summer ’24 issue of Pom Pom Quarterly magazine. However, the magazine ceased publication after its spring ’24 issue, leaving in-progress designs unpublished. (It happens.) As a result, I’d begun the long process of editing, testing, and photographing the pattern for independent release through the Hands Occupied pattern shop and Ravelry.
.
Before I was done with that process, Pom Pom Quarterly’s former editors reached out with an exciting proposal for the pattern. Post-magazine, they’ve begun to partner with yarn companies to produce high quality pattern collections. They wanted to include designs from the would-be current issue of Pom Pom Quarterly in a new collection for Hobbii yarn, including my Bevelled Tank. I worked with the same technical editors I would have for the magazine on this one, and as you can see from the photos, Pom Pom’s team did an amazing job of styling the garment to the beautiful standards they’re known for.
.
You can learn more about the pattern on my blog and get the free pattern from Hobbii yarn - links to both in my profile. I’ll post sizing info in the comments for quick reference too. 🧶
.
#pompomxhobbiisummer2024 #knitting #intarsia #sponsored #colorworkknitting 
.
Photos: @dianascarrunz 
Model: @angel.jade_
Here’s a nice throwback for you: my take on a vi Here’s a nice throwback for you: my take on a vintage knitting pattern from 1938 called the Fernlace Pullover. A pattern so nice, I knit it twice.
.
Yellow version 💛: knit with Despondent Dyes’ Vintage Vixen Sport after attending a @squidneyknits vintage knitting retreat in 2019 & learning *so much*. Paired with a self-drafted circle skirt pattern. 
.
Blue version 💙: knit with @eweeweyarns Ewe So Sporty in Sky Blue. Paired with the 1940s Boardwalk Duet sewing pattern from @decades_of_style 
.
Head to my stories for 🔗🔗 to the handmade wardrobe blog posts I wrote about each take on the Fernlace Pullover, working with a vintage pattern, where to find vintage patterns (including the one I used), & some thoughts on sizing. 
.
Image descriptions available in alt text. 
.
#handsoccupied #handmadewardrobe #fernlacepullover #vintageknitting #vintageknittingpatterns #knitting_inspiration
Frogging is a word in the knitting world that mean Frogging is a word in the knitting world that means to rip out your knitting. It’s called frogging because frogs say “ribbit,” and when you’re tearing out your knitting, you will “rip it” out, and that sounds like ribbit. No really. 🐸 Did you know this fun fact? 
.
P.S. I did like this design concept, but to make the pattern more knitter friendly as well as more wearable, I am making some tweaks to the construction. Excited to share when it’s ready! 🥰🧶
.
Yarn: @blueskyfibers Woolstok North in Morning Frost & Highland Fleece 
.
#handsoccupied #knitting #frogging #blueskyfibers #knittersofinstagram #blueskymakers #knittingvocabulary #bsfmakers #knitdesign
Follow on Instagram

Copyright © 2025 / Foodie Pro Theme On Genesis Framework / Branding by Ink + Mortar
All Site & Shop Policies / Privacy Policy / Cookie Policy