• 0 items$0.00
  • Skip to primary navigation
  • Skip to main content
  • Skip to primary sidebar
  • Skip to footer

Hands Occupied

Colorful knitting, crochet, latch hook and macrame from craft book author & designer Heidi Gustad.

  • BLOG
    • Knitting
    • Crochet
    • Latch Hook
    • Macramé
    • Punch Needle
  • ABOUT
  • Shop
  • Nav Social Menu

    • Instagram
    • Pinterest
    • RSS
    • YouTube

How-to: Metal Stamped Cuff

April 1, 2013 18 Comments

How-to: Metal Stamped Cuff at HandsOccupied.com

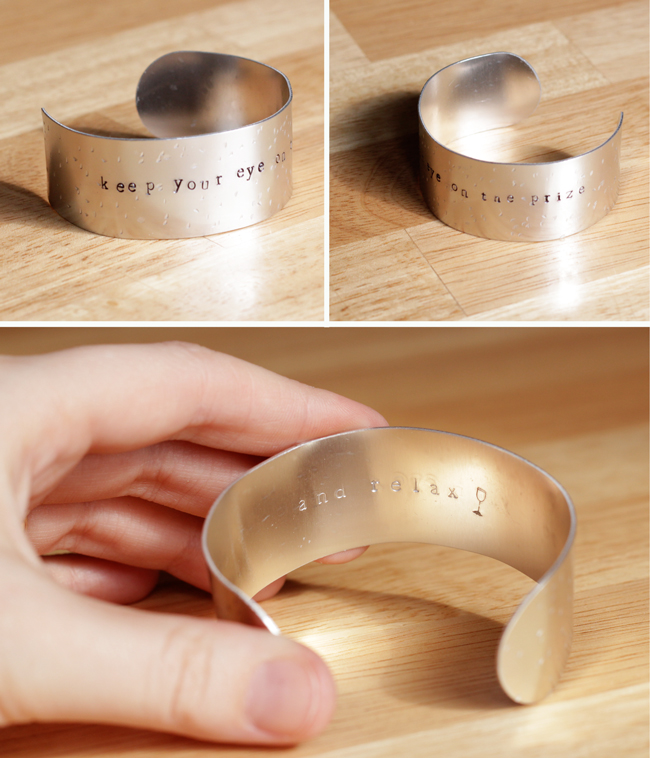
Lately, I’ve been spending a lot of time working to meet some goals and have been really exhausted, to the point that I have skipped out on things like sleeping enough and hanging out with friends. Today’s bracelet is one I plan to wear on days when I’m feeling like I need a little extra motivation to keep working toward my goals and staying sane. The outside of the bracelet says “keep your eye on the prize” and the inside is a personal reminder to relax once in awhile.

Supplies

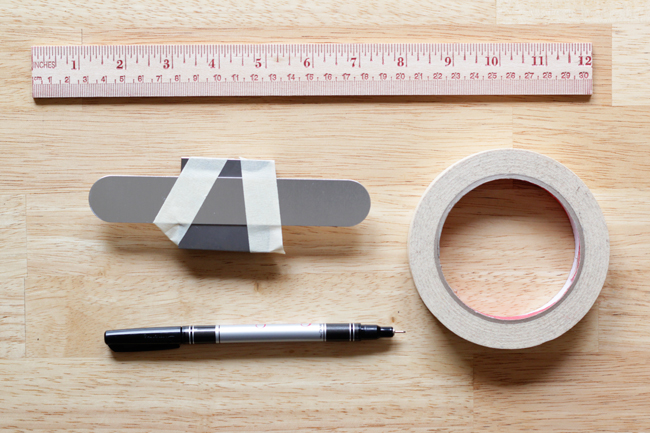
aluminum bracelet blank
Wedding Celebration Design Stamps Pack
Metal Stamping Kit with stamping block, chasing hammer, & newsprint letter stamps
pencil
masking tape
ruler
fine point permanent marker
ultra fine point permanent marker
rubbing alcohol
paper towel
rubber mallet
bracelet mandrel or a round object to shape your cuff on

How-to: Metal Stamped Cuff at HandsOccupied.com

Directions

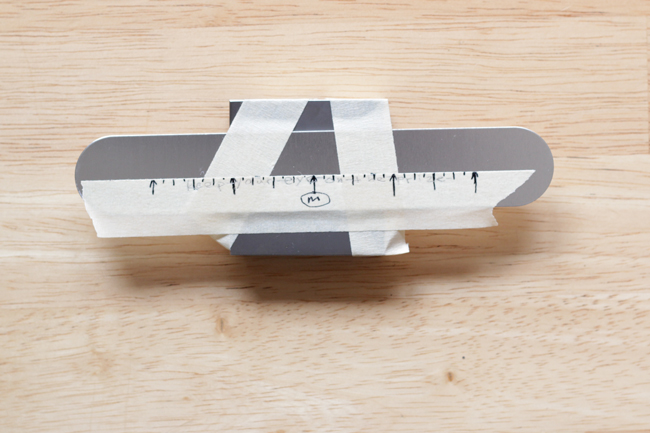
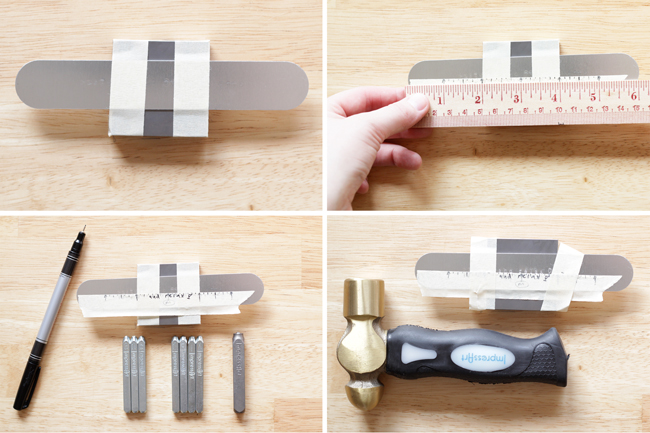
Tape your bracelet blank to your stamping block. Mark just past the vertical center of the blank on the masking tape with your ultra fine marker. My blank is 1 inch tall, so I marked my tape 0.6 inches from the top of the blank.

How-to: Metal Stamped Cuff at HandsOccupied.com

Attach a horizontal piece of tape at the marks you made. Using your ruler as a guide, make tick marks on your tape that mimic the marks on your ruler, and indicate the exact center of your bracelet blank. My blank was 6 inches wide, so my middle point is at 3 inches.

How-to: Metal Stamped Cuff at HandsOccupied.com

The phrase I used on my bracelet is “keep your eye on the prize”, which is 26 characters long, including spaces. The second e in the word “eye” is the centermost character in my phrase, so I wanted that just to the left of the exact center mark on my tape. In pencil, I worked from the center to write out my phrase on the tape. See the above photo for where I placed my phrase.

How-to: Metal Stamped Cuff at HandsOccupied.com

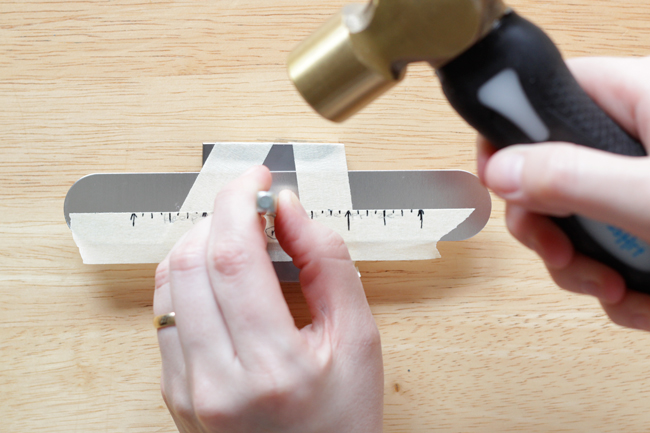
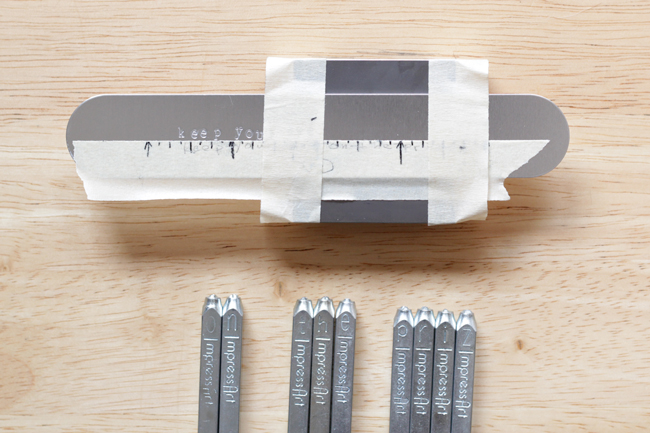
Working from the middle, begin stamping your letters onto your bracelet. Don’t know the first thing about metal stamping? Check out my Metal Stamping 101 (which has a video!) and Metal Stamping 201 tutorials.

If you run out of room on your stamping block, carefully shift your tape and bracelet blank as shown to accomodate your stamping.

How-to: Metal Stamped Cuff at HandsOccupied.com

How-to: Metal Stamped Cuff at HandsOccupied.com

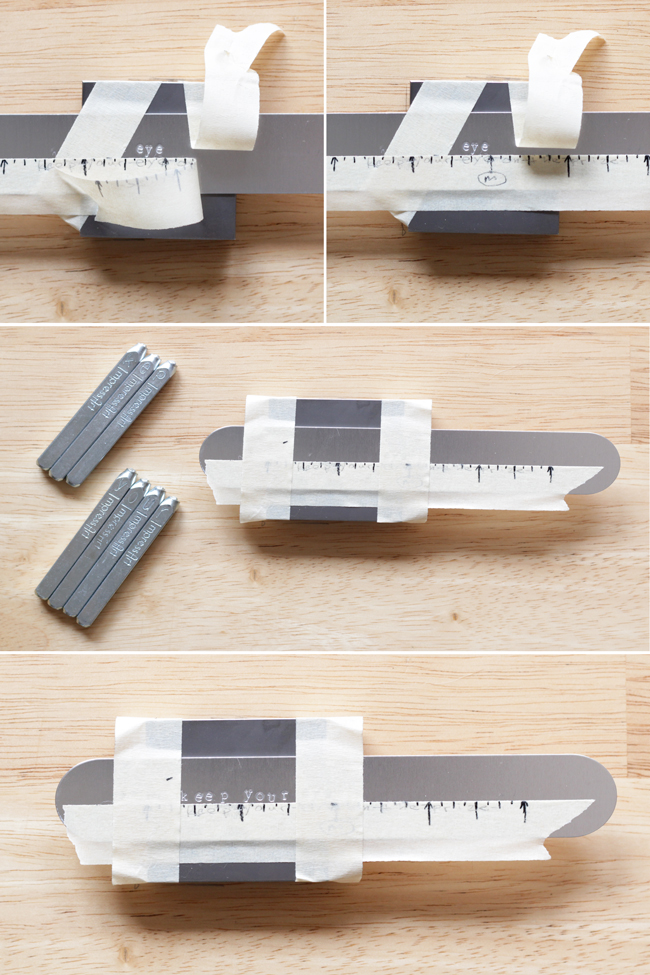
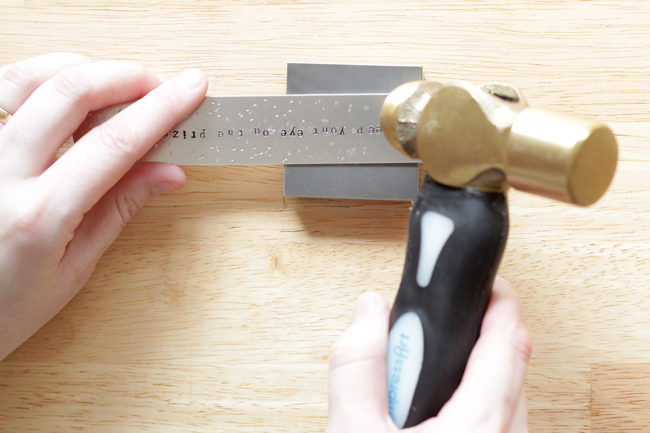
Carefully peel the ruler tape off of your bracelet and retain it for use in the next phase of the project.
How-to: Metal Stamped Cuff at HandsOccupied.com

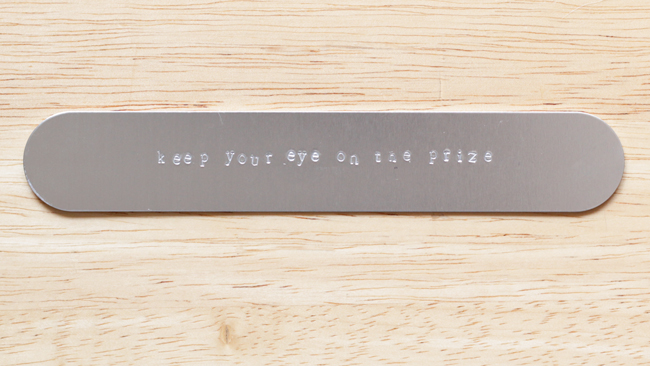
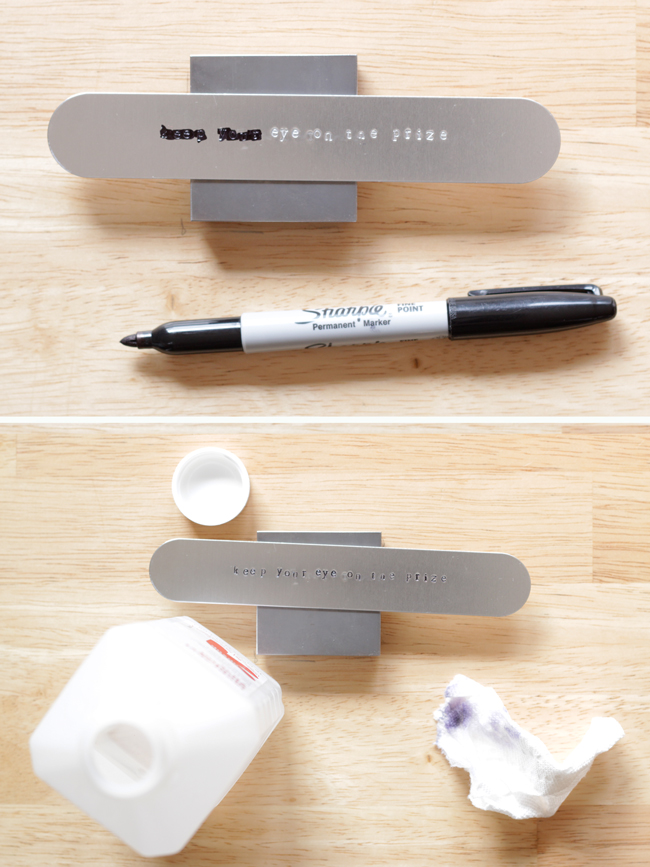
Next, use your fine point marker to color in all of the stamped letters, and use rubbing alcohol to clean off the excess ink. The marker fills in each letter and makes it stand out from the bracelet blank really nicely.

How-to: Metal Stamped Cuff at HandsOccupied.com

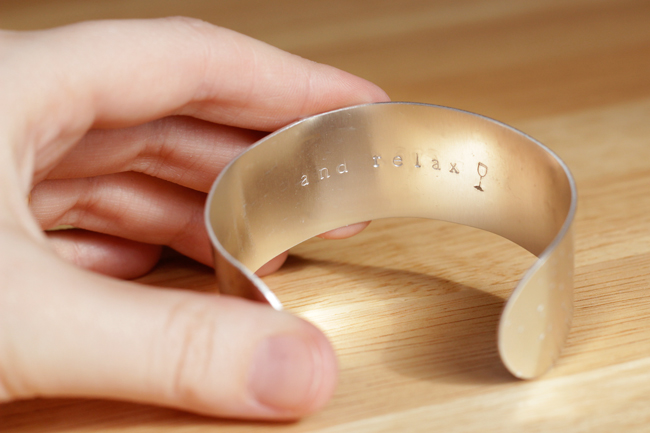
Flip your blank over and spend a couple minutes measuring to find the center of your bracelet blank like you did on the other side. Then, use your fine point marker to write your second phrase on the masking tape right over the pencil letters from the first side. I incorporated a design stamp for a cheeky touch on my bracelet. If you use a design element, you’ll need to count it as an extra character when you count up your phrase characters to find its center.

The back of my bracelet reads “and relax [champagne flute]”, so the center of my back phrase is between the letters r and e of “relax.” I placed the r just to the left of center and the e just to the right. Just like on the first side, I started stamping from the middle and worked my way outward.

How-to: Metal Stamped Cuff at HandsOccupied.com

If you want to fill in the back with marker, you can do that. Then, flip your bracelet back over and use the rounded end of your chasing hammer to add some texture to the outside of your bracelet by hammering all over the bracelet. Don’t forget to use the stamping block to protect your work surface from the hammering.

How-to: Metal Stamped Cuff at HandsOccupied.com

Finally, shape your bracelet. Don’t try to simply bend it around your wrist like the first photo below. Doing that will result in a weirdly angular cuff, rather than something shaped more like the letter C.

What you’ll want to do is use a rounded object and rubber mallet to shape your cuff. I don’t own a fancy bracelet mandrel since I’m not a pro jewelry maker, so I grabbed a dusty free weight I had laying around the house. It was almost as big as my wrist and could handle a bit of hammering.

How-to: Metal Stamped Cuff at HandsOccupied.com

When you’re all done, it should be shaped something like this:

How-to: Metal Stamped Cuff at HandsOccupied.com

Metal stamping supplies featured in this post were provided by ImpressArt. All opinions are my own. (PS: Regarding the phrase, “keep your eye on the prize”, I’ve always said “eye” and not “eyes,” which a bit of post-project Googling taught me is weird. Whoops! :))

Filed Under: DIY Style, How-to, Metal Stamping Tagged With: accessories, bracelet, cuff, diy, hammer, metal, metal stamping, style

About Heidi

Heidi Gustad is a craft book author & content creator in love with primary colors & vintage vibes. She specializes in knitting, crochet, latch hook and macramé, and her first book, Latch Hook: 12 Projects for the Modern Maker, is out now!

Previous Post: « Feed me! Well, you.
Next Post: Wednesday Treat: Shabby Apple Giveaway »

Reader Interactions

DID YOU LIKE THIS POST?
Visit similar articles...

  • DIY Cuff InspirationDIY Cuff Inspiration
  • DIY Light-Up Cuff BraceletDIY Light-Up Cuff Bracelet
  • 10 DIY Knotted Jewelry Projects10 DIY Knotted Jewelry Projects
  • How-to: Washi Tape Statement NecklaceHow-to: Washi Tape Statement Necklace

DON’T MISS ANOTHER UPDATE

Comments

  1. Andrew

    April 1, 2013 at 8:36 am

    It looks great Heidi. Maybe it is like having one eye on the prize but your other eye is free to look around to keep your options open.

    Reply
    • Heidi

      April 1, 2013 at 9:57 am

      lol! That fits me to a T :D

      Reply
  2. Erin S.

    April 1, 2013 at 2:23 pm

    This is the best tutorial I’ve seen for metal stamping! Bookmarking now and sharing on Pinterest!

    Reply
  3. Ruth

    April 6, 2013 at 4:47 pm

    I am jealous of your hammer…and I love your bracelet “mandrel” !!! Way to improvise! Awesome project!

    Reply
  4. Pauline

    September 28, 2013 at 2:06 am

    Great tutorial,…. Gonna attempt this today!
    x

    Reply
    • Heidi

      September 28, 2013 at 5:32 pm

      Thanks! :) Let me know how it goes!

      Reply
  5. Rachel | 52 Weeks Project

    January 5, 2014 at 8:37 pm

    This is so cool! I’ve done basic metal stamping before, but this makes me want to run out and get my own kit :)

    Reply
  6. Michelle

    March 15, 2014 at 7:35 am

    So cute! I love your tape ruler, I have been trying to figure out how to space my letters and that will really help!

    Reply
    • Heidi

      March 15, 2014 at 11:59 am

      Yeah, I swear by my masking tape “rulers”! :)

      Reply
  7. Jenna

    July 16, 2014 at 1:39 am

    love the cuff bracelet, I get my blanks from http://handstamping.com which are wonderful but they do not carry cuff bracelets and these look like they are a similar thickness to their aluminum metal stamping blanks, do you mind sharing where you get them, I could not find them on impressart’s site
    Thanks!

    Reply
    • Heidi

      July 16, 2014 at 6:55 pm

      I got those blanks at Michaels in a multi-pack, they’re great!

      Reply
  8. Julie

    December 22, 2015 at 3:37 pm

    Hi! I’m just starting out with metal stamping. I’ve done one Mother’s day necklace so far. Made quite a few mistakes but I think I’ve got it now. I plan on reading your video. I’m a librarian too! :)

    Reply
    • Heidi

      December 22, 2015 at 10:19 pm

      Awesome! I can’t wait to see how it turns out. Metal stamping is super fun! -Heidi

      Reply
  9. Jeannie

    August 1, 2016 at 3:20 am

    Great tutorial thank you

    Reply

Trackbacks

  1. Links I Like says:
    April 6, 2013 at 12:36 pm

    […] your own personalized metal stamped cuff. What would you stamp on yours? This floral embroidery (appliqued to a sweater), is just gorgeous. […]

    Reply
  2. October Craft: gioielli fai da te di metallo | Inspire We Trust says:
    October 4, 2013 at 1:41 am

    […]  /  5. DIY Bracelet  /  6. DIY Chained Rings  /  7. DIY Three Finger Rings  /  8. How-to: Metal Stamped Cuff  /  9. Rib-like Curved Bar Necklace  /  10. Brass tube necklace  /  11. Ring around the […]

    Reply
  3. 10 Beautiful Metal Stamped Bracelet Projects - i can make says:
    February 20, 2014 at 11:46 pm

    […] motivated with this metal stamped cuff from Hands […]

    Reply
  4. Utisni svoju ljubav u metal | Hypo Teens Klub says:
    January 23, 2015 at 8:12 am

    […] Narukvica za djevojke može biti i ponešto drugačija. Duguljasta na koju stane sve što želiš. Možda čak i njezina omiljena pjesma. Kako ju izraditi pogledaj na stranici Hands Occupied. […]

    Reply

Leave a Reply Cancel reply

Your email address will not be published. Required fields are marked *

This site uses Akismet to reduce spam. Learn how your comment data is processed.

Primary Sidebar

Heidi Gustad from Hands Occupied / Craft Book Author and Knitting, Crochet, Latch Hook and Macrame Designer

Hi! I’m Heidi (she/her/hers), a craft book author & pattern designer specializing in knitting, crochet, latch hook & macrame. Really anything with yarn! ❤️  My work combines vintage and modern design elements, featuring bold colors and graphic motifs.

UPDATES BY EMAIL

Monthly highlights sent to your inbox.

Find Me Elsewhere, If You’re There

  • Instagram
  • Pinterest
  • YouTube
Latch Hook by Heidi GustadDiscover Unique Items

Footer

INSTAGRAM

handsoccupied

Craft book author & pattern designer ❤️💛💙
knitting, crochet, latch hook & macramé
.
Please email for pattern support. 🧶

Heidi Gustad 🧶✂️
Working on a sample for some upcoming videos. It’s an overcast day with intermittent sunshine & I have a scruffy little sidecar. 🐶 Can’t complain! 
.
What’s on your needles this week? 
.
Yarn: @debbieblissknits Cashmerino Aran 
.
#handsoccupied #knitting #knittinglife
Peg boards and craft room organization go together Peg boards and craft room organization go together like peanut butter and jelly. So, as you can see, do latch hook tools and screwdriver organizers! 🪛 
.
I think this trick translates to any tool with a thick handle, so leather working tools, punch needles, print making tools, etc. should work! What other tools am I, a needlecrafter, blanking on right now? 
.
#craftorganization #handsoccupied #latchhook #latchhooking
Pegboard storage is my favorite for craft supplies Pegboard storage is my favorite for craft supplies, so getting a few hung in my new studio has been a priority. Here’s my first attempt. 🔨 
.
Details: This pegboard panel is for organizing my knitting needles, latch hook tools, sewing thread, etc. It doesn’t need to hold much weight, so I didn’t anchor this into a stud - just used basic drywall anchors. I’ve also got a set of two 2’x4’ panels for another spot in my studio, and those will need a stud/more than 3 drywall anchors. Wish me luck! 
.
[description: video features a woman hanging a panel of pegboard using a square dowel and drill]
It’s time for the annual Hands Occupied new year It’s time for the annual Hands Occupied new year update, and for the first time in years, I feel like I have some clarity about what I’m doing next. ❤️ Head to the blog to read all about it, the 1ink is where you’d think. 
.
#handsoccupied #knitting #creativeburnout
June’s face is giving, “What fresh heck is thi June’s face is giving, “What fresh heck is this?” 😆
.
June’s big ears can get cold in winter, so I’m improvising a doggie ear warmer/hood for her. What are the odds she tries to shred it immediately when it’s done? 
.
#knitting #knittingfordogs #handsoccupied #schneagle #wipwednesday #wip
Load More... Follow on Instagram

Copyright © 2023 / Foodie Pro Theme On Genesis Framework / Branding by Ink + Mortar
All Site & Shop Policies / Privacy Policy / Cookie Policy