• 0 items$0.00
  • Skip to primary navigation
  • Skip to main content
  • Skip to primary sidebar
  • Skip to footer

Hands Occupied

Colorful knitting, crochet, latch hook and macrame from craft book author & designer Heidi Gustad.

  • BLOG
    • Knitting
    • Crochet
    • Latch Hook
    • Macramé
    • Punch Needle
  • ABOUT
  • Shop
  • Nav Social Menu

    • Instagram
    • Pinterest
    • RSS
    • YouTube

How-to: Ruler Clutch Purse

September 4, 2012 3 Comments

How-to: Ruler Clutch Purse | HandsOccupied.com

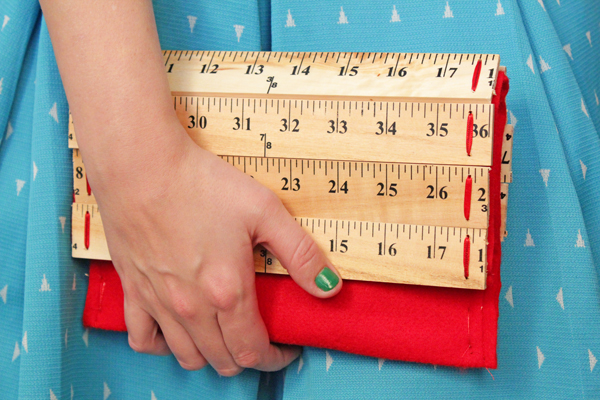
I finished my library science Master’s last December and am really excited about not being in school this fall. In honor of the start of the first year in several that I haven’t been enrolled in school, I designed a cute academic-y clutch purse using wooden yardsticks, ribbon and felt.

Supplies

3 yardsticks
hacksaw
drill & a 5/64″ drill bit
spool of 1/8″ ribbon
1/4 yd. felt
tapestry needle
thread in color coordinating with your ribbon & felt
regular needle
sewing machine (optional)
scissors

Directions

Cut each yardstick into four 9-inch lengths with a hacksaw – 12 total pieces. Drill two evenly-spaced holes on each end of each length, for four holes per piece.

How-to: Ruler Clutch Purse | HandsOccupied.com

How-to: Ruler Clutch Purse | HandsOccupied.com

How-to: Ruler Clutch Purse | HandsOccupied.com

Sew all of your piecestogether with the 1/8″ ribbon and a tapestry needle, knotting each end.

How-to: Ruler Clutch Purse | HandsOccupied.com

If you want to ensure all of the rulers lay right side up on the front & back of the purse, have four rulers point one way and five the other way. The group of four will be the clutch’s flap, and the five will be the clutch’s back.

How-to: Ruler Clutch Purse | HandsOccupied.com

Cut a rectangle of felt that’s about 9 1/4″ wide by 18″ long. Hem each of the short sides of the felt by hand or with a sewing machine.

How-to: Ruler Clutch Purse | HandsOccupied.com

Fold over and sew 6″ of one end of the rectangle, forming an envelope shape.

How-to: Ruler Clutch Purse | HandsOccupied.com

Sew your strip of rulers to the felt pouch, starting at the hem of the flap, as shown. I used a metallic red thread so the hand sewing would blend in with the ribbon & felt. Sew right through the felt pouch, and sew down both ends of each ruler.

How-to: Ruler Clutch Purse | HandsOccupied.com

How-to: Ruler Clutch Purse | HandsOccupied.com

This clutch is a great size for fitting a phone, lipstick & wallet in – just what you need for hitting the clubs and not the books this fall! ;)

How-to: Ruler Clutch Purse | HandsOccupied.com


Filed Under: Back to School, DIY Style, How-to, Sewing Tagged With: clutch, diy, felt, purse, ribbon, Ruler, yardstick

About Heidi

Heidi Gustad is a craft book author & content creator in love with primary colors & vintage vibes. She specializes in knitting, crochet, latch hook and macramé, and her first book, Latch Hook: 12 Projects for the Modern Maker, is out now!

Previous Post: « How-to: Back to School Motivatonal Owls
Next Post: How-to: Metal Stamping 101 »

Reader Interactions

DID YOU LIKE THIS POST?
Visit similar articles...

  • DIY Pencil ClutchDIY Pencil Clutch
  • 50 Back to School DIYs50 Back to School DIYs
  • Weekly ReaderWeekly Reader
  • How-to: Duck Tape Tablet Case & Foldover ClutchHow-to: Duck Tape Tablet Case & Foldover Clutch

DON’T MISS ANOTHER UPDATE

Comments

  1. Cat T

    February 21, 2016 at 5:14 am

    Love your project! If you wanted to make it vintage-y looking, you could apply a medium to dark or even a gray stain to your rulers 1st. Congratulations on getting finished with school. I remember that joyous feeling as well.

    Reply

Trackbacks

  1. Geek Crafts: Back-to-School Ruler Craft Roundup says:
    July 24, 2014 at 11:14 am

    […] How-to: Ruler Clutch Purse from Hands […]

    Reply
  2. DIY Pencil Clutch Tutorial at Hands Occupied says:
    August 25, 2014 at 6:01 am

    […] and my alarming level of nerd love for school supplies has yet to wane. A couple years ago, I made a clutch using rulers and felt that I am still pretty excited about and use all the time. Since I can’t get enough of […]

    Reply

Leave a Reply Cancel reply

Your email address will not be published. Required fields are marked *

This site uses Akismet to reduce spam. Learn how your comment data is processed.

Primary Sidebar

Heidi Gustad from Hands Occupied / Craft Book Author and Knitting, Crochet, Latch Hook and Macrame Designer

Hi! I’m Heidi (she/her/hers), a craft book author & pattern designer specializing in knitting, crochet, latch hook & macrame. Really anything with yarn! ❤️  My work combines vintage and modern design elements, featuring bold colors and graphic motifs.

UPDATES BY EMAIL

Monthly highlights sent to your inbox.

Find Me Elsewhere, If You’re There

  • Instagram
  • Pinterest
  • YouTube
Latch Hook by Heidi GustadDiscover Unique Items

Footer

INSTAGRAM

handsoccupied

Craft book author & pattern designer ❤️💛💙
knitting, crochet, latch hook & macramé
.
Please email for pattern support. 🧶

Heidi Gustad 🧶✂️
Working on a sample for some upcoming videos. It’s an overcast day with intermittent sunshine & I have a scruffy little sidecar. 🐶 Can’t complain! 
.
What’s on your needles this week? 
.
Yarn: @debbieblissknits Cashmerino Aran 
.
#handsoccupied #knitting #knittinglife
Peg boards and craft room organization go together Peg boards and craft room organization go together like peanut butter and jelly. So, as you can see, do latch hook tools and screwdriver organizers! 🪛 
.
I think this trick translates to any tool with a thick handle, so leather working tools, punch needles, print making tools, etc. should work! What other tools am I, a needlecrafter, blanking on right now? 
.
#craftorganization #handsoccupied #latchhook #latchhooking
Pegboard storage is my favorite for craft supplies Pegboard storage is my favorite for craft supplies, so getting a few hung in my new studio has been a priority. Here’s my first attempt. 🔨 
.
Details: This pegboard panel is for organizing my knitting needles, latch hook tools, sewing thread, etc. It doesn’t need to hold much weight, so I didn’t anchor this into a stud - just used basic drywall anchors. I’ve also got a set of two 2’x4’ panels for another spot in my studio, and those will need a stud/more than 3 drywall anchors. Wish me luck! 
.
[description: video features a woman hanging a panel of pegboard using a square dowel and drill]
It’s time for the annual Hands Occupied new year It’s time for the annual Hands Occupied new year update, and for the first time in years, I feel like I have some clarity about what I’m doing next. ❤️ Head to the blog to read all about it, the 1ink is where you’d think. 
.
#handsoccupied #knitting #creativeburnout
June’s face is giving, “What fresh heck is thi June’s face is giving, “What fresh heck is this?” 😆
.
June’s big ears can get cold in winter, so I’m improvising a doggie ear warmer/hood for her. What are the odds she tries to shred it immediately when it’s done? 
.
#knitting #knittingfordogs #handsoccupied #schneagle #wipwednesday #wip
Load More... Follow on Instagram

Copyright © 2023 / Foodie Pro Theme On Genesis Framework / Branding by Ink + Mortar
All Site & Shop Policies / Privacy Policy / Cookie Policy