• 0 items$0.00
  • Skip to primary navigation
  • Skip to main content
  • Skip to primary sidebar
  • Skip to footer

Hands Occupied

Colorful knitting, crochet, latch hook and macrame from craft book author & designer Heidi Gustad.

  • BLOG
    • Knitting
    • Crochet
    • Latch Hook
    • Macramé
    • Punch Needle
  • ABOUT
  • Shop
  • Nav Social Menu

    • Instagram
    • Pinterest
    • RSS
    • TikTok
    • YouTube

Knit Along Day 2: Heel Flap

April 24, 2014 3 Comments

Knit Along Day 2: Heel Flap | Hands Occupied

How’s it going, knit-alongers? Hopefully you’ve all survived swatching, casting on, and knitting your ankles last week. If you’re still working on the ankle, no worries! Everyone is welcome to knit at their own pace and ask questions as you work through each phase of your socks. :) Just a reminder that there’s a Hands Occupied Knit Along Ravelry Group, and you can check out other knitters’ progress or share yours on Twitter, Instagram, etc. with #handsoccupiedkal.

Knit Along Day 2: Heel Flap | Hands Occupied

Today we’re going to be adding a heel flap to our socks, which is super duper easy! It’s the one part of knitting a sock done flat instead of in the round.  This means you’ll be knitting back and forth for a few inches, turning your work just like you’re making a scarf or blanket.

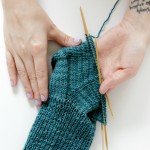
Working the heel flap

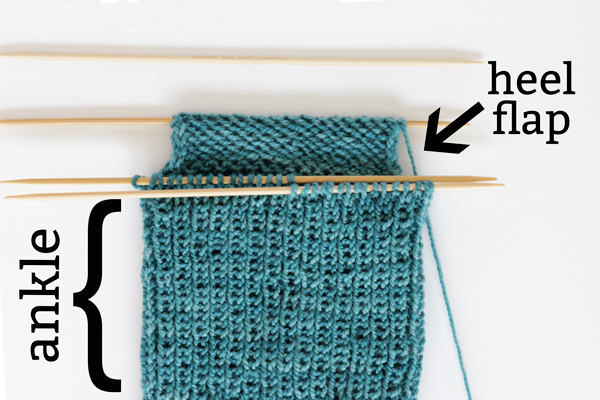
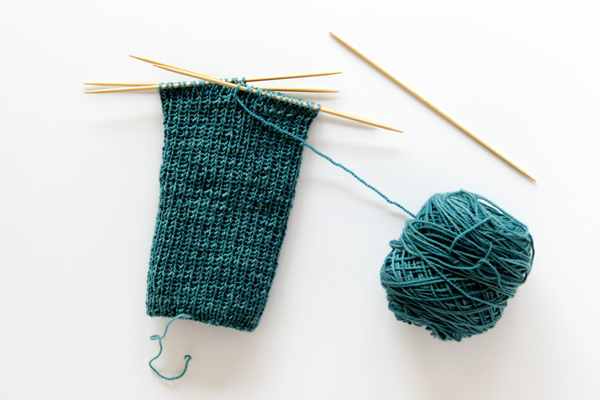
Your ribbed (knitted k1, p1 in the round for 7 or so inches) sock ankle should look something like this:

Knit Along Day 2: Heel Flap | Hands Occupied

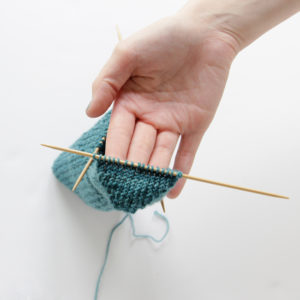
Dividing the stitches

You should make sure your stitches are divided evenly onto 4 needles. If you cast on 64 stitches like me, that means there needs to be 16 stitches per needle. For the heel flap, you’ll be working with half (in my case 32) of your stitches. The other half will just be chilling for a coupled days until your heel flap is done and you’ve turned your sock ankle (which we’ll be doing day 3 of this knit along).

Knit Along Day 2: Heel Flap | Hands Occupied

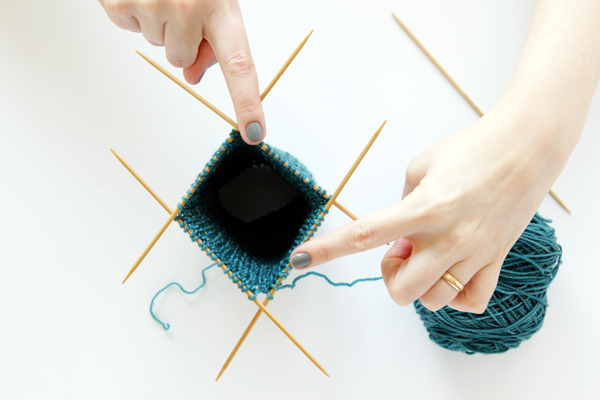
Here’s a good video showing how to distribute stitches on DPNs. 

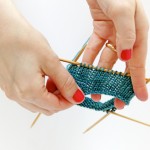
Knitting the flap itself

A lot of people like to straight up put half of their stitches onto a single needle for working the heel flap. Personally, I like to knit a few rows of my heel flap on two needles just till the heel flap starts hanging separately from the tube of the sock ankle. Since we’re working on double pointed needles (DPNs), I feel like it’s just a little easier on your poor tiny baby stitches to keep the extra needle in play for a bit. I know yarn, especially superwash sock yarn stretches and whatever, but it’s just a habit I got into that I really like.

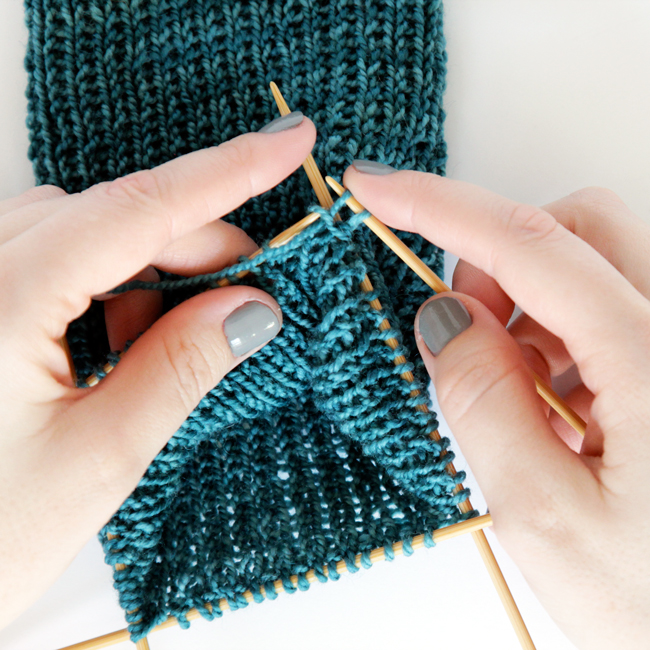
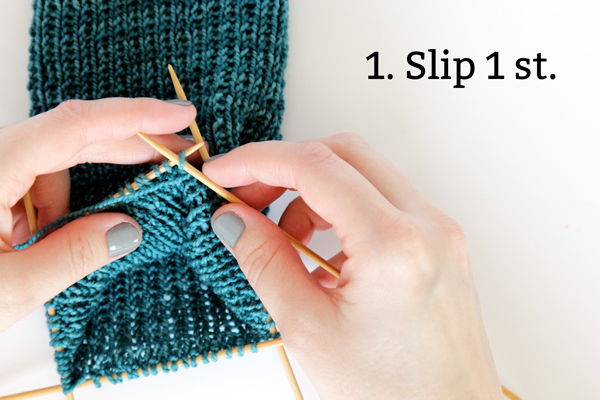
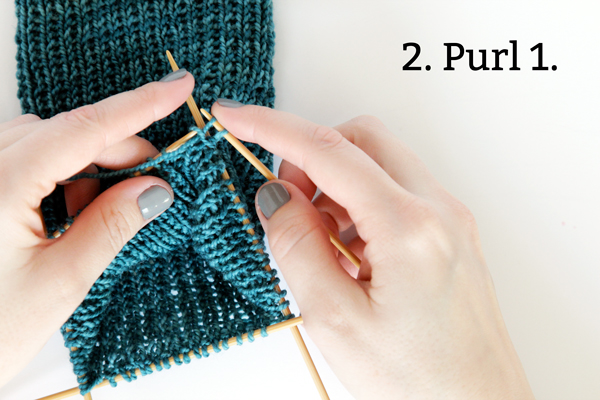
Anyway! :) Row 1 of the heel flap starts with the wrong side (a.k.a. inside, purl side) facing you. Slip 1 stitch purlwise, then purl 1 stitch across, which means you’ll repeat sl 1, p1, sl 1, p1 all the way across the row. You should be working with an even number of stitches, so you’ll end on a p1.

Knit Along Day 2: Heel Flap | Hands Occupied

Knit Along Day 2: Heel Flap | Hands Occupied

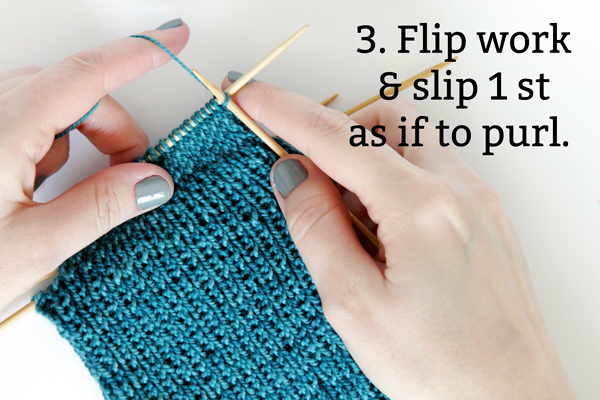
At the end of the row, flip your work to the other side (a.k.a. right side, outside, knitting side). For this side you’ll repeat slipping one stitch and knitting one stitch across, but you’ll be slipping as if to purl, despite being on the knit side.

A visual explanation of slipping as if to purl vs. slipping as if to knit.

Knit Along Day 2: Heel Flap | Hands Occupied

Knit Along Day 2: Heel Flap | Hands Occupied

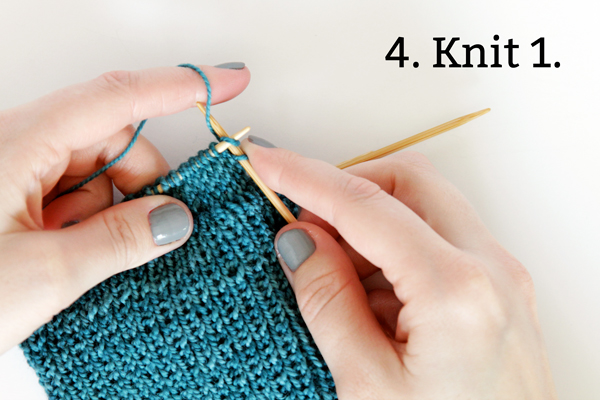
Note: All of the stitches you’re slipping on the knit side were purled on the purl side, and all of the stitches you’re knitting were slipped on the purl side. This staggering of slips and knits/purls creates a really dense and strong weave for your sock heel, which is the most-abused part of your finished sock. You want it to be as strong as it can be!

Knit your heel flap for 2.5 to 3 inches, depending on the size of the foot you’re knitting it for. I shoot for about 2.75 inches for my feet, but I’ve got high arches. If you want to check out a good thread filled with a variety of sock knitters’ insights on measuring the heel flap, I recommend this one. 

The day 2 pattern

Heads up- for all of the pattern sections of my Knit Along posts, I’ll include all of the previous days’ sections of the pattern for reference.

Abbreviations

sl – slip
st – stitch
k – knit
p – purl
CO – cast on
WS – wrong side
RS – right side

CO 64 sts, join into a circle with DPNs and begin working a knit 1, purl 1 rib stitch all the way around. Continue working in k1 p1 until your sock is 7 inches from the cast on edge, or as long as you want the ankle to be on your leg.

The heel
Divide half of your stitches* onto 1 needle (or 2 if you like my method of starting on more to avoid stretching). Leave the other stitches on 1-2 needles, untouched.

row 1. (WS) {sl 1, p1} across
row 2. {sl 1 as if to p, k1} across

*If you’re working with 64 stitches, that means you’ll be working 32 sts.

—

Other posts in this knit along series

KAL announcement / KAL Day 1: Testing Gauge & Casting On / more coming soon!

Tune in next week Monday, April 28 for the next installment of the Knit Along – we’ll be turning our sock heels, which is (nerdily) kind of the coolest part of sock knitting. If you get stuck this week, please don’t hesitate at all to ask questions in the comments, I’m more than happy to help! You can also tag pictures of your in-progress socks with #handsoccupiedkal and join our Hands Occupied Knit Along Ravelry Group if you’re interested. Happy Knitting!

PS: If you want to grab the Knit Along badge for your site too, here’s the embed code.

<a href=”https://www.handsoccupied.com/knitalong”><img src=”https://www.handsoccupied.com/wp-content/uploads/2014/04/april2014kal.jpg”></a>

Knit along with me! - The first Hands Occupied Knit Along!

Filed Under: Knit Along, Knitting, Knitting & Crochet Tagged With: double pointed needles, dpns, hands occupied knit along, handsoccupiedkal, heel flap, knit along, sock knitting, spring2014kal, top down

About Heidi

Heidi Gustad (she/her) is a craft book author & designer specializing in yarn crafts. Her work combines vintage and modern design elements, prioritizing color and graphic motifs. Her first book, Latch Hook: 12 Projects for the Modern Maker, is out now.

Previous Post: « Book Review & Giveaway | Washi Wonderful
Next Post: Weekly Reader »

Reader Interactions

DID YOU LIKE THIS POST?
Visit similar articles...

  • Knit Along Day 1: Testing Gauge & Casting OnKnit Along Day 1: Testing Gauge & Casting On
  • Knit Along Day 4: The GussetKnit Along Day 4: The Gusset
  • Knit Along Day 3: The Heel Turn | Hands OccupiedKnit Along Day 3: The Heel Turn
  • The First Hands Occupied Knit Along!The First Hands Occupied Knit Along!

Comments

  1. mary-clare

    July 7, 2015 at 10:10 pm

    Thank you for such clear instructions and photos!

    Reply
  2. Phyllis

    February 20, 2016 at 2:30 pm

    Thank you so much for the clear instructions! Will tune in later for the gusset tutorial.

    Reply
  3. Louise I

    February 25, 2016 at 4:44 am

    Really clear instructions and explanations, so helpful with knitting my first pair of socks!

    Reply

Leave a Reply Cancel reply

Your email address will not be published. Required fields are marked *

This site uses Akismet to reduce spam. Learn how your comment data is processed.

Primary Sidebar

Heidi Gustad from Hands Occupied / Craft Book Author and Knitting, Crochet, Latch Hook and Macrame Designer

Hi! I’m Heidi (she/her/hers), and I’ve been helping yarn crafters untangle various techniques on the internet since 2010. I got my start here, as a blogger, and since then I’ve shared more than a few tutorials here and on YouTube as I’ve grown as a pattern designer. 🧶 

learn more / work with me

Find Me on Social Media

  • Instagram
  • Pinterest
  • TikTok
  • YouTube
Latch Hook by Heidi Gustad

Footer

INSTAGRAM

Heidi Gustad 🧶 knitting & yarn crafts

handsoccupied

Knitting & yarn crafts designer 🧶
.
Stay up-to-date 💌 & shop new patterns ⤵️

POV: Showing you how my new Bevelled Tank pattern POV: Showing you how my new Bevelled Tank pattern fits with no ease vs. 4” of positive ease. There’s a bit more length to the cotton (brighter color) sample, but both are cropped and feature shoulder seams designed to sit an inch back onto the shoulder instead of on top, giving it a little swing. Length is easily adjustable for folks looking for less of a crop. 
.
Pattern: Bevelled Tank by @handsoccupied for @pompommag x @hobbii_yarn summer 2024. Available for free from Hobbii at the 🔗 in my profile.
Yarn pictured: @kelbournewoolens Skipper and Camper. 
Dress form is adjusted to a 36” chest and ~5’3”ish in height. 
Human has a 40” chest and is 5’5”.
Both skirts are vintage.
.
#pompomxhobbiisummer2024 #handsoccupied #intarsia #handmade #knitting #colorwork
Let’s talk about fit and ease! . During the Beve Let’s talk about fit and ease!
.
During the Bevelled Tank design process for @pompommag, I knit 2 samples using 2 different @KelbourneWoolens yarns. One was in Skipper (100% cotton, second photo) and the other was in Camper (100% 2 ply wool). The Skipper sample was knit for a 36” bust, which measures in at 40” with 4” of positive ease. And I knit the Camper Sample for my 40” bust with a 44” finished measurement. (BTW, I’m 5’5” for folks that find that measurement helpful in visualizing fit.)
.
Based on the size chart for the Bevelled Tank, that means I knit one size 3 sample and one size 4. As designed, I conveniently fit a size 4 as intended with 4” of positive ease. When I wear the 3, there is no ease at all because the garment and my body are both 40” in size. Comparing the 2 garments, you can see how the fiber content (cotton vs. wool) and fit (no ease vs. 4” of positive ease) makes a difference in the look and feel of the finished garment. 
.
These samples are a great way to compare what ease looks like on different bodies. While I can fit both a size 3 and 4, the garment with no ease feels more like pajamas or a bralette when I wear it. On the other hand, when I wear the one with 4” of positive ease, I feel comfortable enough to wear it to work, even as a crop top. Plus, it leaves me with enough room to layer it with a nice button down if I’m not feeling the cropped look one day. 
.
I’m curious - how would you style this tank? Would you modify it with a few stockinette rows for added length? I’m so curious now that this pattern is finally out in the world. :) 
.
#pompomxhobbiisummer2024 #bevelledtank #handsoccupied #knitting #intarisa #handmade #kelbournewoolens #croppedsweater #summerknits
After a 6 month hiatus, I am happy to say I’m ba After a 6 month hiatus, I am happy to say I’m back with a brand new pattern in 9 sizes, and it’s FREE as part of @pompommag x @hobbii_yarn’s summer design collection! (Link is in my bio.)
.
In my December newsletter, I announced that I was soliciting test knitters for a pattern that had originally been selected for the summer ’24 issue of Pom Pom Quarterly magazine. However, the magazine ceased publication after its spring ’24 issue, leaving in-progress designs unpublished. (It happens.) As a result, I’d begun the long process of editing, testing, and photographing the pattern for independent release through the Hands Occupied pattern shop and Ravelry.
.
Before I was done with that process, Pom Pom Quarterly’s former editors reached out with an exciting proposal for the pattern. Post-magazine, they’ve begun to partner with yarn companies to produce high quality pattern collections. They wanted to include designs from the would-be current issue of Pom Pom Quarterly in a new collection for Hobbii yarn, including my Bevelled Tank. I worked with the same technical editors I would have for the magazine on this one, and as you can see from the photos, Pom Pom’s team did an amazing job of styling the garment to the beautiful standards they’re known for.
.
You can learn more about the pattern on my blog and get the free pattern from Hobbii yarn - links to both in my profile. I’ll post sizing info in the comments for quick reference too. 🧶
.
#pompomxhobbiisummer2024 #knitting #intarsia #sponsored #colorworkknitting 
.
Photos: @dianascarrunz 
Model: @angel.jade_
Here’s a nice throwback for you: my take on a vi Here’s a nice throwback for you: my take on a vintage knitting pattern from 1938 called the Fernlace Pullover. A pattern so nice, I knit it twice.
.
Yellow version 💛: knit with Despondent Dyes’ Vintage Vixen Sport after attending a @squidneyknits vintage knitting retreat in 2019 & learning *so much*. Paired with a self-drafted circle skirt pattern. 
.
Blue version 💙: knit with @eweeweyarns Ewe So Sporty in Sky Blue. Paired with the 1940s Boardwalk Duet sewing pattern from @decades_of_style 
.
Head to my stories for 🔗🔗 to the handmade wardrobe blog posts I wrote about each take on the Fernlace Pullover, working with a vintage pattern, where to find vintage patterns (including the one I used), & some thoughts on sizing. 
.
Image descriptions available in alt text. 
.
#handsoccupied #handmadewardrobe #fernlacepullover #vintageknitting #vintageknittingpatterns #knitting_inspiration
Frogging is a word in the knitting world that mean Frogging is a word in the knitting world that means to rip out your knitting. It’s called frogging because frogs say “ribbit,” and when you’re tearing out your knitting, you will “rip it” out, and that sounds like ribbit. No really. 🐸 Did you know this fun fact? 
.
P.S. I did like this design concept, but to make the pattern more knitter friendly as well as more wearable, I am making some tweaks to the construction. Excited to share when it’s ready! 🥰🧶
.
Yarn: @blueskyfibers Woolstok North in Morning Frost & Highland Fleece 
.
#handsoccupied #knitting #frogging #blueskyfibers #knittersofinstagram #blueskymakers #knittingvocabulary #bsfmakers #knitdesign
Load More... Follow on Instagram

Copyright © 2025 / Foodie Pro Theme On Genesis Framework / Branding by Ink + Mortar
All Site & Shop Policies / Privacy Policy / Cookie Policy