I’m having such a nerdy blast hosting my first knit along. I hope you guys are having as much fun as I am! It’s interesting how much you reinforce your understanding of something when you’re actually explaining to another person (or people) how to do it. Knowledge is power! Even knitting knowledge. ;)
Brace yourself! Big foot sighting ahead…
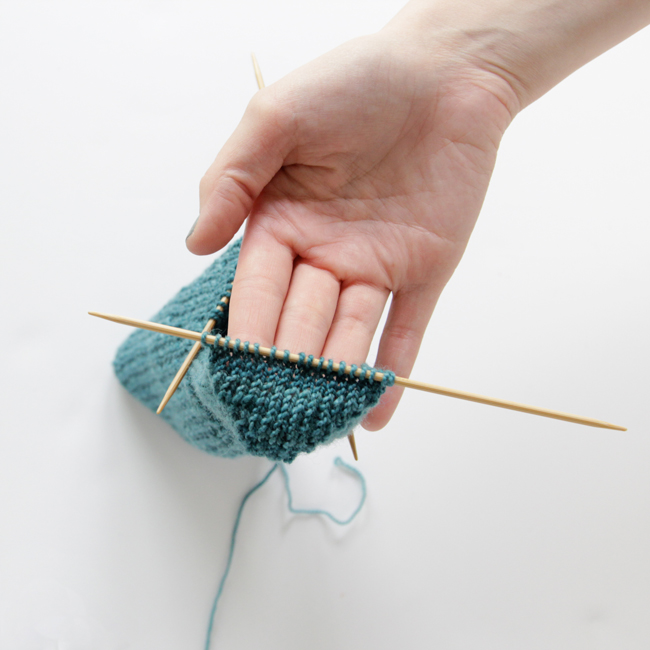
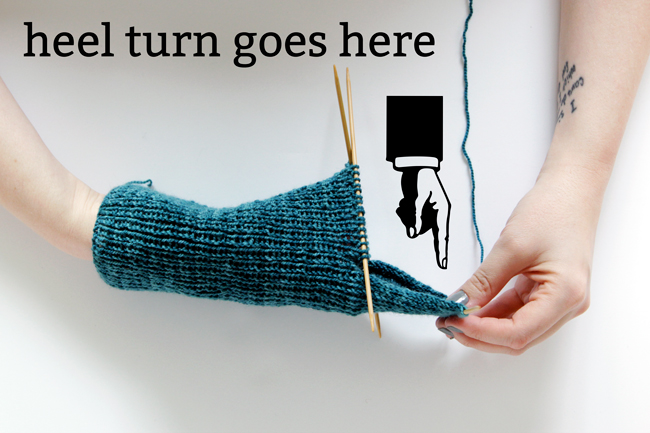
So before you turn the heel, this is what you’re working with – a ribbed leg that’s several inches long, and a 2.5-3 inch heel flap. Now all of a sudden, since humans’ feet are perpendicular to their legs, you’ve got to start knitting in a totally different direction than you have been! Plus, half your sock is chilling up on the top of your foot, and the other half is down at the base of your heel. First time knitters, you’re probably thinking this is pretty weird about now, amirite?
Oh, and here’s the visual of how your in-progress sock is looking, since I do think it helps to see the sock come together on an actual foot.
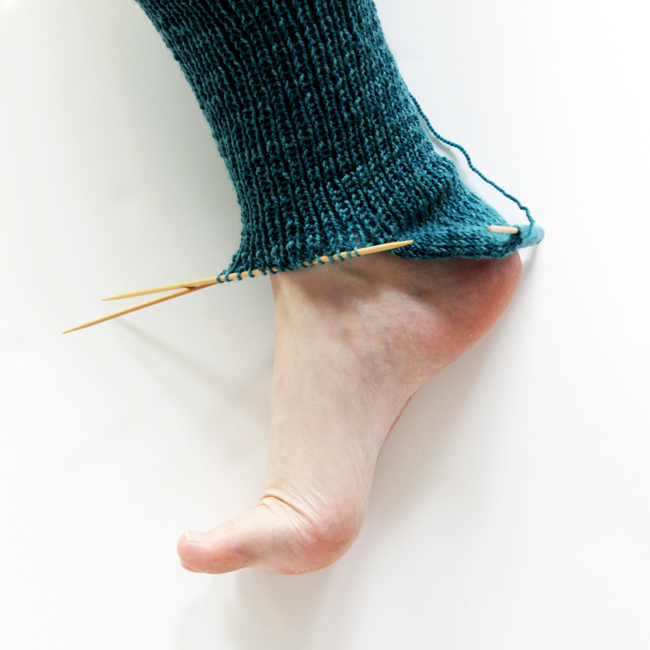
Please forgive my pale, pale, vein-visible foot. And short toes. Can you tell I feel super awkward about showing my foot (instead of thirteen bazillion shots of my hands, lol) on the internet?
During the heel turn, the needles holding half of your socks’ stitches that hung out during knitting the heel flap will continue to hang out. You’re just going to be knitting off of the heel flap.
The day 3 pattern
Reminder: for all of the pattern sections of my Knit Along posts, I’ll include all of the previous days’ sections of the pattern for your reference.
Abbreviations
sl – slip
st – stitch
k – knit
p – purl
CO – cast on
RS – right side
WS – wrong side
k2tog – knit 2 sts together
ssk- sl 1 st as if to k, sl 1 st as if to p, k2tog
p2tog – purl 2 sts together
turn – turn your work over and work on the other side (even if you aren’t at the end of a row/round!)
CO 64 sts, join into a circle with DPNs and begin working a knit 1, purl 1 rib stitch all the way around. Continue working in k1 p1 until your sock is 7 inches from the cast on edge, or as long as you want the ankle to be on your leg.
Heel Flap
Divide half of your stitches* onto 1 needle (or 2 if you like my method of starting on more to avoid stretching). Leave the other stitches on 1-2 needles, untouched.row 1. (WS) {sl 1, p1} across
row 2. {sl 1 as if to p, k1} across*If you’re working with 64 stitches, that means you’ll be working 32 sts.
Turn Heel
row 1. sl 1, k 16**, ssk, k1, turn
row 2. sl 1, p3, p2tog, p1, turn
row 3. sl 1, k4, ssk, k1, turn
row 4. sl 1, p5, p2tog, p1, turn
row 5. sl 1, k6, ssk, k1, turn
row 6. sl 1, p7, p2tog, p1, turn
row 7. sl 1, k8, ssk, k1, turn
row 8. sl 1, p9, p2tog, p1, turn
row 9. sl 1, k 10, ssk, k1, turn
row 10. sl 1, p 11, p2tog, p1, turn
row 11. sl 1, k 12, ssk, k1, turn
row 12. sl 1, p 13, p2tog, p1, turn
row 13. sl 1, k 14, ssk, k1, turn
row 14. sl 1, p15, p2tog, p1, turnFor a heel turn starting with 16 sts, the heel turn is complete. There should be 18 sts on the needle now. If you’re working with more or less sts, your heel needle will have 2 more sts than you began the turn with.
**or whatever number is half of the stitches in your heel flap, a.k.a. 25% of the total number of stitches CO
Tips & Tricks for Turning the Heel
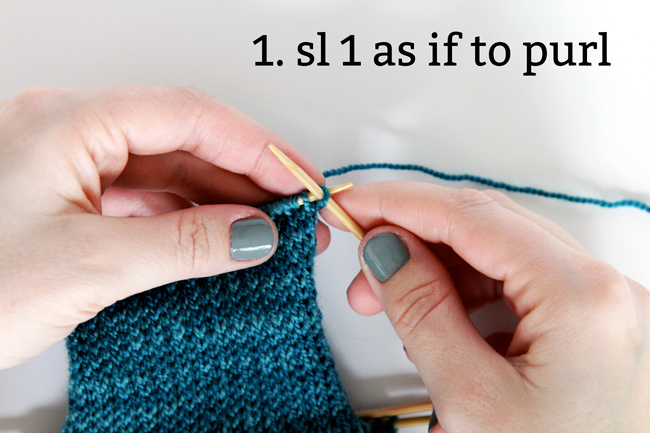
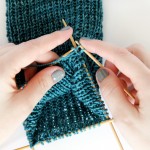
Since I truly believe it’s basically impossible to understand how to turn a sock heel for the first time based on a knitting pattern, here’s a step-by-step photo breakdown of what the heck is going on.
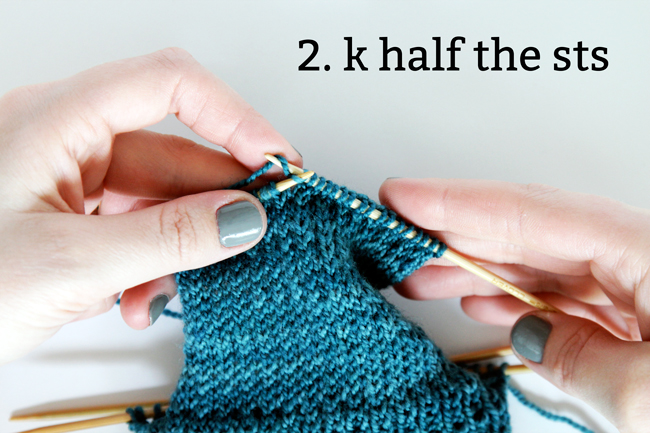
First up, you’re working on the right side of your work, and you’ll do a simple slip of one stitch as if to purl.
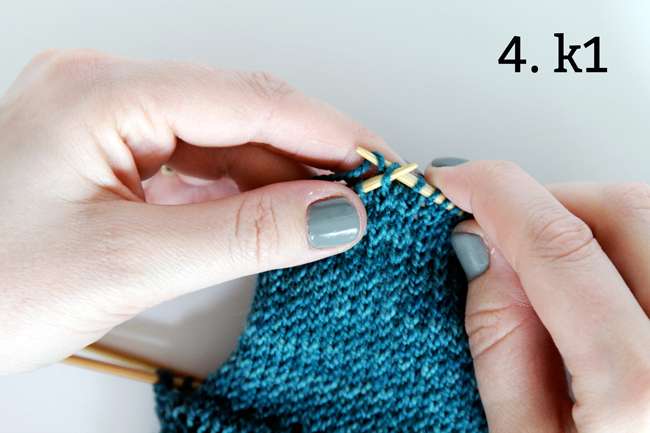
Next, knit half of the stitches on your heel flap needle. In my case, that’s 16 stitches.
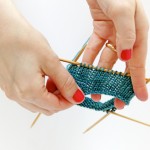
The SSK / slip slip knit
For those of you who have never done a ssk before, here’s how to do that.
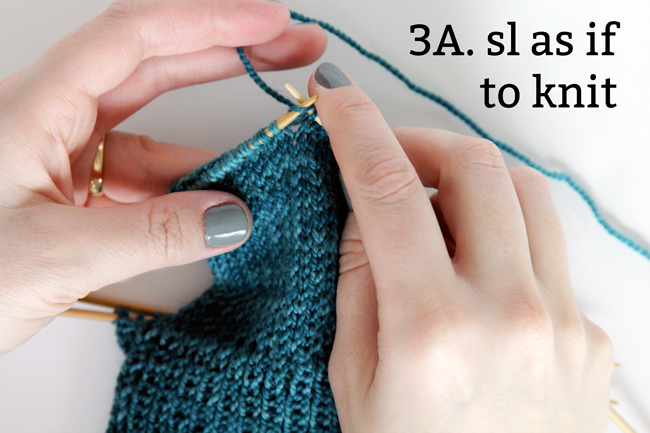
A. Slip the first stitch as if to knit.
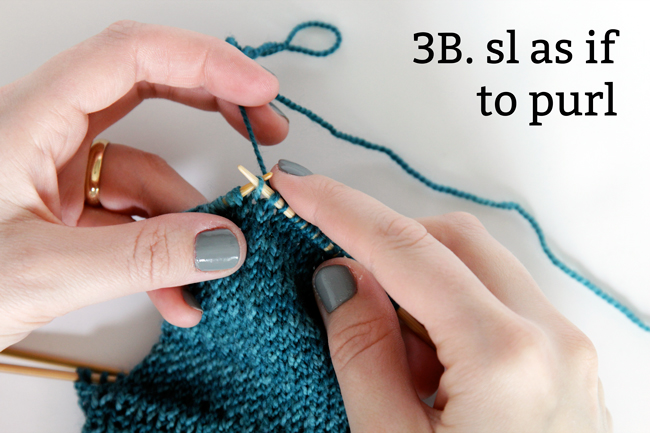
B. Slip the next stitch as if to purl.
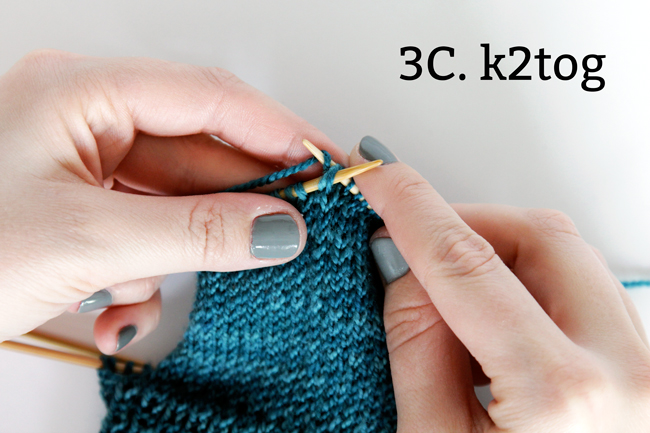
C. Pass the 2 slipped stitches back on to the left needle. Then knit those 2 stitches together, as shown, as if they were a single stitch.
Knit one stitch after the ssk.
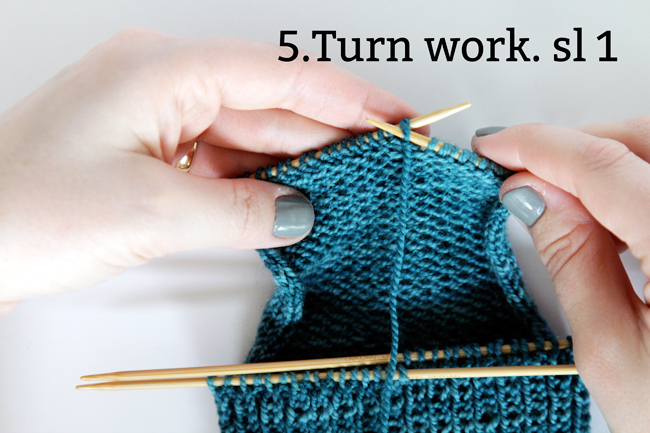
Wait, we’re turning the work before I’m even done with this row?
Yep! This is called working in short rows. Now you’re on the purl/wrong side of your work. Slip the first stitch.
Purl 3 stitches, then purl 2 stitches together by putting your right needle through 2 stitches at once and purling them at the same time.
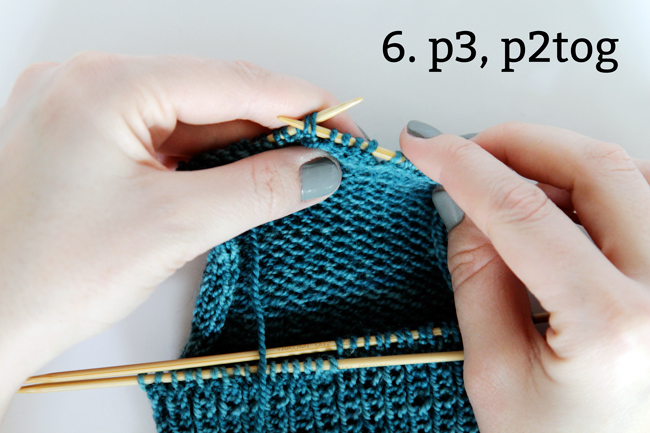
Purl one more after the p2tog.
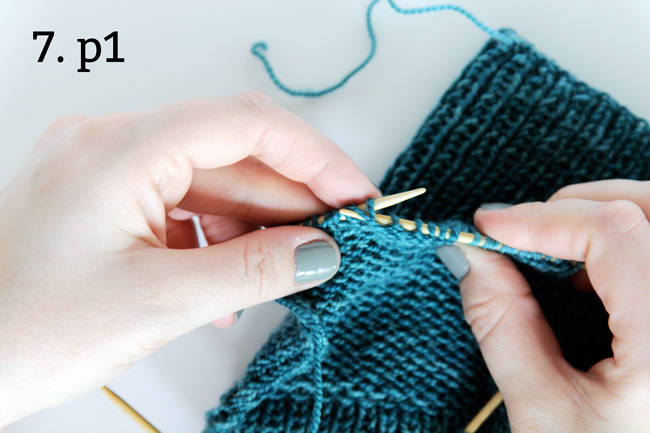
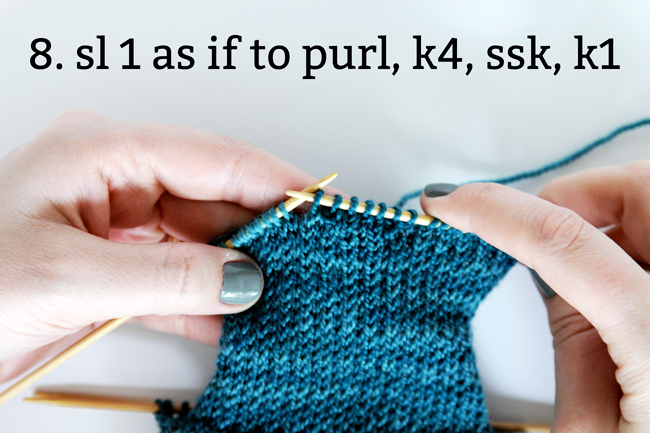
Turn your work back to the right side (yes, already!), and slip one stitch as if to purl, knit 4, ssk, and knit one.
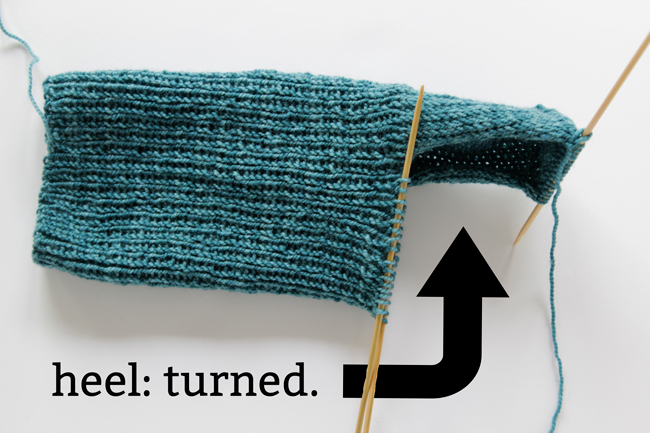
Sensing a pattern? Every row involves working just one more stitch across before the ssk or p2tog. You repeat the pattern until you’ve run out of stitches, and your sock is looking like this.
–
Other posts in this knit along series
KAL announcement / KAL Day 1: Testing Gauge & Casting On / KAL Day 2: Heel Flap / more coming soon!
The next Knit Along day is Tuesday, May 6 – it’ll be a knitting and a vocabulary lesson since we’ll be working on the GUSSET of the sock. I’ve always thought a gusset sounds like something out of a Victorian tale, but it’s not. More on that later!
If you get stuck on this week’s or any of the previous knit along steps, please don’t hesitate at all to holler in the comments, I’m more than happy to help! As always, you can tag pics or tweets with #handsoccupiedkal, you can embed the KAL badge with the code below, or join our Hands Occupied Knit Along Ravelry Group to connect with other folks making socks. Happy heel turning!
<a href=”https://www.handsoccupied.com/knitalong”><img src=”https://www.handsoccupied.com/wp-content/uploads/2014/04/april2014kal.jpg”></a>


This is such a great tutorial! I really could have used something like this when I was learning to knit socks. Really nice pictures too, and no need to be ashamed of your foot, haha :P
Lol, thanks! ;)
hey am i supposed to be working the same part of the heel for this or going through the whole row?
Hi Alice! I’m not sure what you mean, but I’m happy to help. Can you provide more information about your question?
I have such a hard time picking up the stitches after turning the heel without getting a hole right before the instep stitches. Is there any trick to doing this or do you just have to deal with a hole there. I would love to see a tutorial on this part. Thanks
Hi Rosie! I found this Craftsy article that had this helpful tip:
Excellent idea. Thank you so much for your help!
OH!! Thank you so much! I had been stuck on the directions for a few days, and scouring the internet for someone to give me the info that’s in this post.
Thank you, Thank you, Thank you!!
First time sock-knitter!
Heidi, I wish I bump into your site much earlier!!
I have started my first sock project and got stuck at the heel turn. Caused me an hour and stilk no clue what the heck the pattern means! The whole turning without finishing all the sts was so so confusing, and the boon that i was following didn’t explain at all! :(
I was seriously about to put down my project until I found your site!! Thank you so so much!
Sally
No problem! Glad to hear it was helpful! :)
The info is great I’m a first time sock knitter ,the heel in my pattern has terms I do not get,,it’s for a boomerang heel, the part I don’t get is wrap (1st wrong side facing) I under stand the rest just not Wrap it’s not in abbreviations I would be grateful for any help,also how long is the flap supposed to be , I am following a arnie@carlos pattern,
Does your pattern call for a wrap and turn? If so, there are a bunch of great tutorials on YouTube if you’d like me to recommend one. If you’re following a pattern, it should list a recommended heel flap length at some point, even if it’s as simple as, “Try the sock on and see how long to make the flap so it fits your foot.” Good luck!
Can you help with the turn heel working a pattern from the toe up?
This is my first attempt knitting socks and I am really confused as to what to do next. I am at the Turn heel in the directions.
N1 has 30 sts.
N2 has 26 sts.
N3 has 26 sts.
My next round says to work the instep sts in pattern (N1); k29,ssk,k1,turn. Keeping N1 sts on hold for the instep, work back and forth the sts on N2 and N3 as follows.
Row 1(WS) Sl 1, p7, p2tog, p1, turn Do I do this across both N2 & N3?
Row 2(RS) Sl 1, k8, ssk, k1, turn
Row 3 Sl 1, p9, p2tog, p1, turn
Row 4 Sl 1, k10, ssk, k1, turn
Row 5 Sl 1, p11, p2tog, p1, turn
I am assuming the k29,ssk,k1 is meant for N2 and part of N3? Because I only have 26 sts. on N2…. using 6 sts from N3 or 5 sts after the ssk
Next question is this puts 26 sts on the N2 and I now have been told I put the other 5 from N3 to another needle that I will call N2a that I’m working with
but above in the directions Row 1(WS) shows me only using 11 of the sts now of the 31 sts total between N2 & N2a? Not to mention the sts still on N3 Am I supposed to go back and forrth only using the 11 sts and each time I turn I pick up an additional sts from the N2 and then the N2a until I end up with the 26sts all on N2
Hi Linda,
The instructions you’ve outlined are for how to turn a heel on a toe down sock, not a toe up sock, which this blog post features. Have you tried looking for toe-up specific instructions? It sounds like you’re using a heel flap method, I wonder if this video tutorial may be helpful for you. It features instructions on toe up socks made with a heel flap & gusset.
Best of luck – you can do it!
Heidi
Hi Heidi: I was finally able to grasp the directions to complete my first pair of socks. I am confused though because you stated that my directions listed were for a toe down sock…. what is that? I thought that when you cast on a small amount of stitches that was a toe up and a larger amount of stitches initially was a cuff down?
On to my next pattern….I started with the cuff by casting on 48 sts over 3 needles.
24 sts on N1
12 sts on N2
12 sts on N3
When I reached the desired length my next round was
N1 work pattern; with N2 and N3 knit.
Turn to work back and forth on the 24sts. on N2 &N3 only as follows:
Row 1 (WS) Purl
Row 2 (RS) Kfb, *k1,sl 1; rep from* across, end k1-25 sts.
Row 3 Purl
Row 4 *k1, sl 1; rep from * across, end k1.
Rep rows 3 and 4 until heel flap measures 2″, rep row 3 (purl row) once more.
NEXT RND With N1, k2tog, k23, pickup and k 12 sts along edge of heel flap; with N2, k24; with N3, pickup and k12 sts along edge of heel flap, then 12 sts from N1, PM for new beg of round-72sts., 24 sts on each dpn.
I am at that point working with N2&N3 needles only, I can not k on N1 at this point because I have the edge of the heel flap between the last stitch of N3 ane the first sts on N1. In this reference are the instructions using a 4th needle and calling it N1 until I complete the round?
I figured it out and have almost completed first sock of this pair. Thank you though!
I’ve also figured out if I get stuck on something …put it down, right a question to you and as I read it after I finished my question, ….I have the answer.
I am making Christmas stockings for my twin grandchildren just born and I have been using several patterns. The heel turn was very trying for me especially because the patterns I had called for less stitches and I couldn’t figure out how many stitches before turning. You explained it so well so that I can use any amount I like.
My sincerest thanks,
Beth
I have a question about turning the heel if I have more stitches than your pattern. I have 36 stitches on my heel flap needle so Row 1 of my heel turn will be;
Row 1. sl 1, k 16**, ssk, k1, turn
My question is….in the following rows can I follow your pattern directly or do I have to amend the number of stitches?
Eg. should row 2 be “sl 1, p3, p2tog, p1, turn” as per your example OR should it be “row 2. sl 1, p????, p2tog, p1, turn”? If it is to be different how do I work out the number of stitches I should be knitting/purling?
Instead of 16 sts in row 1, it should be whatever number is half of the stitches in your heel flap, a.k.a. 25% of the total number of stitches CO. If you cast on 36×2 sts (72 sts), that number should be 18. Then you can work your short rows beginning in row 2 as written. You’ll just need more than 14 rows to complete the heel turn since your socks are using more sts. Best of luck!
If I am using 15 stitches in row 1 does anything need to change?
Was 60 your original cast on count?
Hi Heidi, I am so happy with the sock heel instructions but I want to move on to the next stage of picking up stitches, will you please help me.
Thank you so much
Maureen
Hi Maureen,
Are you just looking for a tutorial on how to pick up stitches? If so this one’s great: https://www.youtube.com/watch?v=htAHtNnuE7Q. If you’re looking for the next tutorial from this series, you can find all of them here: https://handsoccupied.com/tag/spring2014kal/.
Good luck!
Heidi
Knitting a doll sock and pattern instructions are…
What do I do when pattern says knit to last 2 sts. Turn.
Don’t know what to do with 2 sts
You leave them on the needle – this is called working short rows. You don’t work the whole row of stitches all the way across. Here’s an article explaining short rows: http://www.interweave.com/article/knitting/free-guide-knitting-short-rows/
My co was 32 stitches so i have 16st for the heel to start with. I did the heel turn but now i only have 10st instead of 18.
Question is if i have 16st for the heel turn does the pattern fpr the heel turn change or is it the same? If not wha did i do wrong?
The pattern does change, because you’re working with a different number of sts to start with.