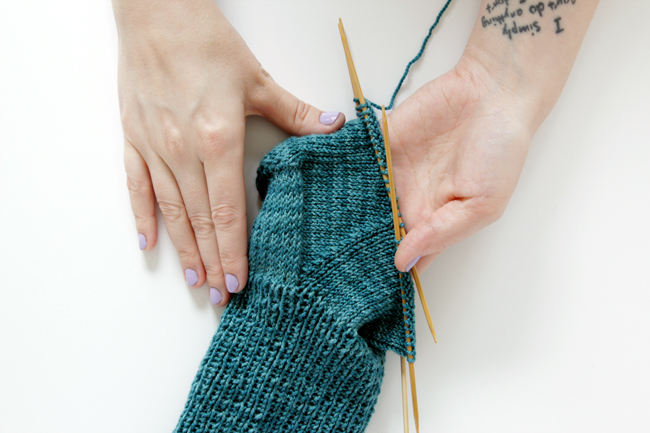
This is a gusset. While is has one of the weirdest names in knitting, the gusset isn’t all that weird. Gussets actually appear in other parts of clothing to help make them fit over the many curves of the human body. In socks, the shape being addressed is just the part of the foot that gradually narrows from where your ankle meets your foot to the size it should be to fit your arch.
The day 4 pattern
Reminder: for all of the pattern sections of my Knit Along posts, I’ll include all of the previous days’ sections of the pattern for your reference.
Abbreviations
sl – slip
st – stitch
k – knit
p – purl
CO – cast on
RS – right side
WS – wrong side
k2tog – knit 2 sts together
ssk- sl 1 st as if to k, sl 1 st as if to p, k2tog
p2tog – purl 2 sts together
turn – turn your work over and work on the other side (even if you aren’t at the end of a row/round!)
rnd – round
CO 64 sts, join into a circle with DPNs and begin working a knit 1, purl 1 rib stitch all the way around. Continue working in k1 p1 until your sock is 7 inches from the cast on edge, or as long as you want the ankle to be on your leg.
Heel Flap
Divide half of your stitches* onto 1 needle (or 2 if you like my method of starting on more to avoid stretching). Leave the other stitches on 1-2 needles, untouched.row 1. (WS) {sl 1, p1} across
row 2. {sl 1 as if to p, k1} across*If you’re working with 64 stitches, that means you’ll be working 32 sts.
Turn Heel
row 1. sl 1, k 16**, ssk, k1, turn
row 2. sl 1, p3, p2tog, p1, turn
row 3. sl 1, k4, ssk, k1, turn
row 4. sl 1, p5, p2tog, p1, turn
row 5. sl 1, k6, ssk, k1, turn
row 6. sl 1, p7, p2tog, p1, turn
row 7. sl 1, k8, ssk, k1, turn
row 8. sl 1, p9, p2tog, p1, turn
row 9. sl 1, k 10, ssk, k1, turn
row 10. sl 1, p 11, p2tog, p1, turn
row 11. sl 1, k 12, ssk, k1, turn
row 12. sl 1, p 13, p2tog, p1, turn
row 13. sl 1, k 14, ssk, k1, turn
row 14. sl 1, p15, p2tog, p1, turnFor a heel turn starting with 16 sts, the heel turn is complete. There should be 18 sts on the needle now. If you’re working with more or less sts, your heel needle will have 2 more sts than you began the turn with.
**or whatever number is half of the stitches in your heel flap, a.k.a. 25% of the total number of stitches CO
Beginning the Gusset
Next row: k 9 (half) of the heel sts
k 9 (the other half) of the heel sts with another needle.
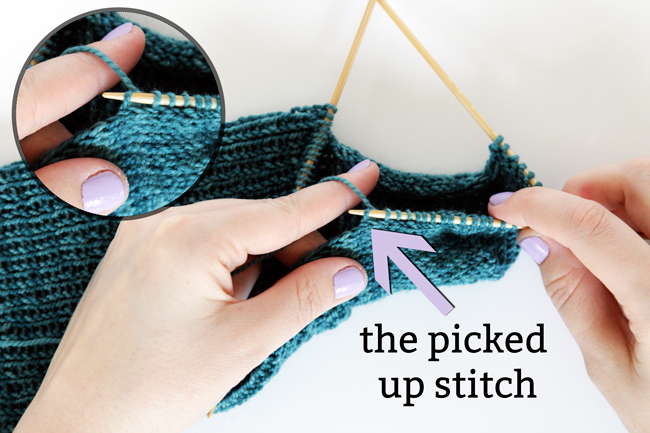
Pick up and knit 17 sts*** along the side of the heel with the same needle.
k across the instep sts.
Pick up and knit 17 sts*** along the other side of the heel with a new needle, and use the same needle to k 9 (half) of the heel sts.*** 25% of the number of CO stitches plus 1.
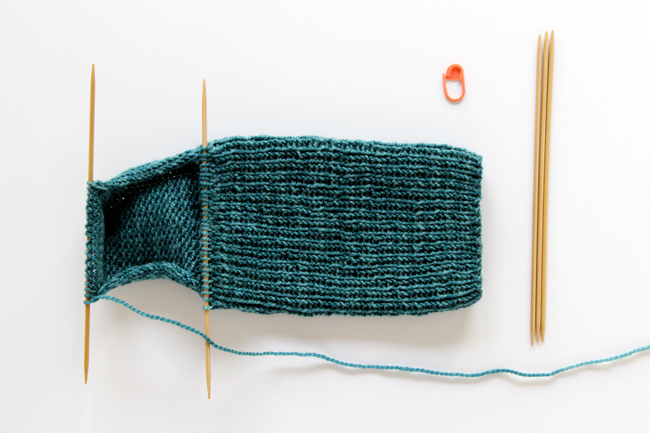
Shaping the Gusset
The beginning of each round is (again) the center of the heel. If you’re working with 64 sts, there will now be 26 sts on the first and third needles, and 32 sts on the second.rnd 1. k around
rnd 2. first needle: k until 3 sts from end of needle, k2tog, k1
second needle: k across
third needle: k 1, ssk, k to end of needleKeep working rnds 1 and 2 until there are 25% of your CO sts on the first and third needle. If you CO 64 sts, there would be 16 sts on needle 1 and 3, and 50% of your CO sts on needle 2.
Tips & Tricks for the Gusset
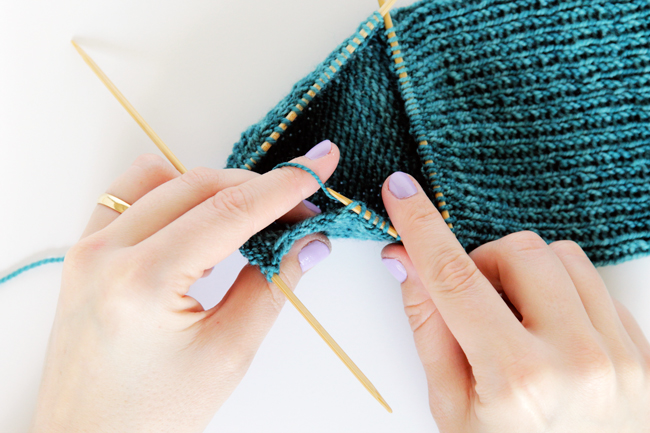
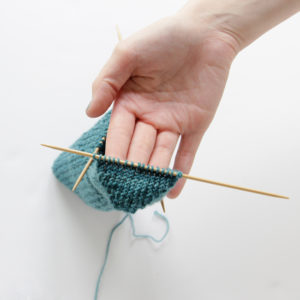
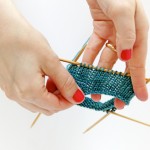
After the heel turn, this is what we’re working with. I find it useful to have a stitch marker and a full set of 5 DPNS on hand for working on the gusset, although the stitch marker and fifth needle are optional. You can knit the gusset (and the whole sock, actually) with just 4 needles.
Knit half of your heel stitches (in my case 9 sts). Use a second needle to knit the other half of the heel sts.
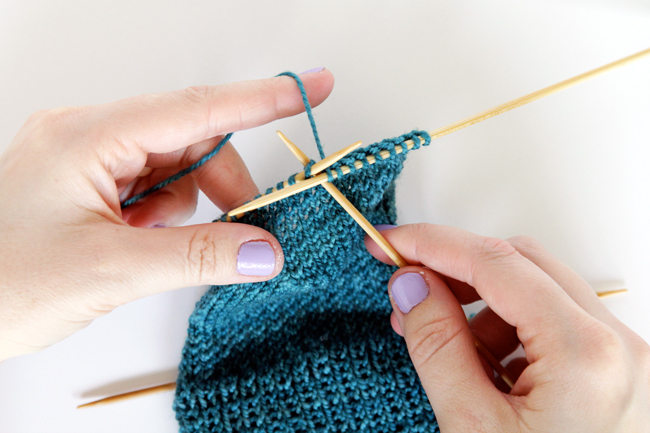
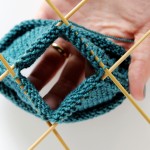
Using that same needle, pick up and knit 17 stitches (25% of your CO sts plus one) along the first side of the heel. I’ve always only picked up and knit through one loop when picking up and knitting stitches, which is pictured below. I should note that the proper technique is to go through two loops – here’s a great video tutorial showing proper technique for picking up and knitting stitches.
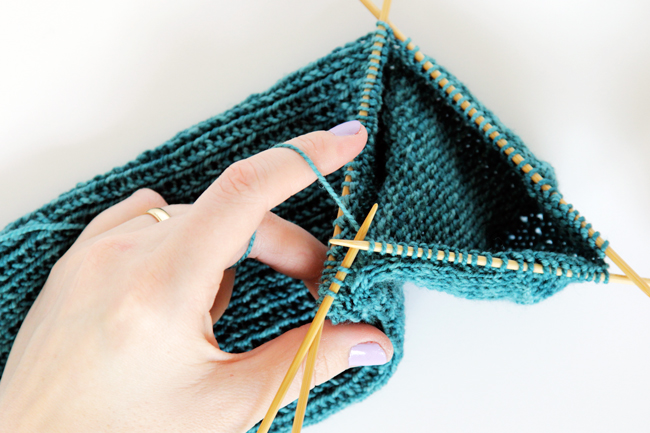
And here’s a still close-up of how I pick up and my single loop gusset. In my experience, both techniques do, in fact, result in a successful sock in the end. ;)
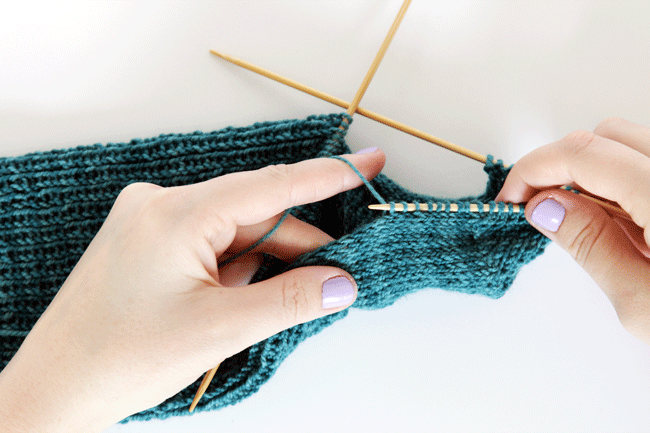
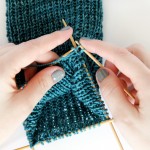
Next, knit straight across the second needle, a.k.a. 32 sts, a.k.a half of your CO sts, of the instep of the sock.

Pick up and knit another 17 sts (or 25% of CO sts plus 1) along the other side of the heel.
Shaping the Gusset
Round 1. For the first round, knit all the way around. Note: you’ll be knitting around all odd rounds as you shape the gusset.
Round 2: First Needle
Knit down the first needle until there are 3 sts left.
Then, knit 2 sts together (k2tog), then k1.
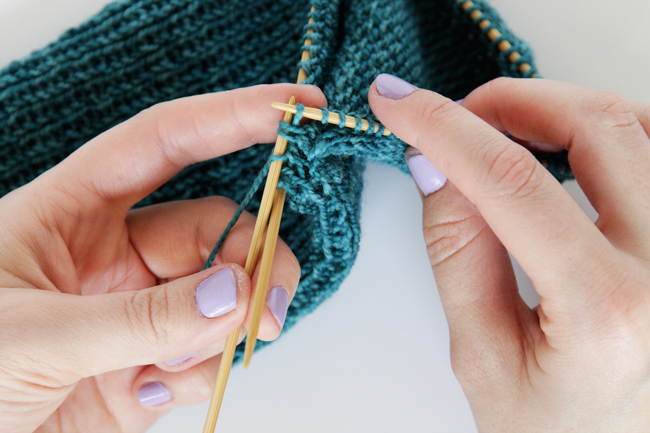
Round 2: Second Needle
K across the instep/ second needle.

Round 2: Third Needle
Knit 1 st, then ssk (slip 1 as if to knit, slip 1 as if to purl, knit the two together), and then knit across the rest of the needle.

Continuing the Gusset
Just keep alternating between knitting one round and doing a round with the k2tog and ssks, until there are just 16 sts on needles 1 and 3, and 32 sts on needle 2. If you didn’t cast on 64 sts, that means that needles 1 and 3 will have 25% of your cast on sts, and needle 2 will have 50% of them.

–
Other posts in this knit along series
KAL announcement / KAL Day 1: Testing Gauge & Casting On / KAL Day 2: Heel Flap / KAL Day 3: The Heel Turn / we’re almost done!
The next, and nearly our last, Knit Along day is Tuesday, May 13 – it’ll be super easy. We’ll be knitting the foot and shaping the toe!
If you get stuck on the gusset or any of the previous sock knitting stages, please leave a comment, I’m checking in regularly. As always, you can tag pics or tweets with #handsoccupiedkal, you can embed the KAL badge with the code below, or join our Hands Occupied Knit Along Ravelry Group to connect with other folks making socks. Happy gusseting!
<a href=”https://www.handsoccupied.com/knitalong”><img src=”https://www.handsoccupied.com/wp-content/uploads/2014/04/april2014kal.jpg”></a>


Firstly… Thank you for this series! My sock is looking sock like!
Second, I have a question! When I’m done with the gusset should there be 25% of my CO stitches on needles 1 and 3 each, or should there be 25% of CO stitches split between 1 and 3? Right now I have 25% on each but out makes the foot look kinda big. Maybe it’s my poor gauge control? :)
Third … That winter sea stocking cap looks adorb. I may have to make one in green…. After my hands stop hurting from the socks.
Hi Liz! Sorry for my delayed response, I was on vacation in the woods. :) There should be 25% of the stitches on needle one, 50% on needle two, and another 25% on needle three. If you try your sock on after finishing the gusset and find that it’s too big, you can keep reducing until the fit is a bit more snug. Just keep in mind that you’ll be working with fewer stitches when you get to the toe later on. Let me know if this helps! -Heidi
That helps a ton, thanks! :) sock #1 is getting a toe tonight and seems to fit like a sock so I’ll just go with our for now.
I hope your vacation was awesome!
Thanks again, these instructions are so clear and easy to follow. I particularly appreciate the gif of picking up stitches, really illuminating!
After you pick up 17 stitches for the second time, what happens to the 9 stitches left on the other needle? Do you just slip them onto the third needle before you start shaping the gusset and before you knit all the way around?
Thanks…..I’m knitting my first pair of socks!
Delores
You just knit those, no slipping. Hope your first socks are going well!
Thanks!
Oops, there is a mistake on your directions for the third needle. It says to knit down the needle until there are 3 stitches left (which I did) then ssk, k2t, then k1. Now that I have finished shaping the gusset, the sock is not symmetrical. Ugh. The third needle should start with a k1, the ssk, k2t, then k right to the end. Right?
The pattern is correct. There’s no k2t. It reads:
rnd 1. k around
rnd 2. first needle: k until 3 sts from end of needle, k2tog, k1
second needle: k across
third needle: k 1, ssk, k to end of needle
I think you misread “k to end of needle” as k2t, which is not a standard knitting abbreviation I use. If you’re reading it as knit two together, the standard abbreviation I use is k2tog. Best of luck!
The problem is under a picture and the heading is Round 2: Third Needle.
(Kt2 is just my personal shortform for k2tog). Sorry.
Delores
Aha! I see what you mean – thank you so much for letting me know! For those of you reading along in these comments, the pattern as written was correct, but I updated the detailed instructions under Round 2: Third Needle in the “Shaping the gusset” section. Thanks again, Delores!
Happy that other newbies like me have detailed instructions with illustrations. Now to finish that second sock!
THANK YOU for this. You have no idea how helpful this has been. I’ve been scouring the Internet trying to figure out how to knit socks without having to go in to my local knitting boutique to ask for help and this is by far the most easy to understand walkthrough that I’ve come across. You walked me through the turn heel and gusset and made me conquer all my fears! Thanks so much :)
Thank you for the pattern and for your sweet reply to Delores.
You’re most welcome!
Hi , I have a question I’m using magic loop and I’m a little confused on decreasing.When I knit to last three stitches and knit 2tg than knit front stitches than knit 1 and a ask.knit to the end. It seems like I should do two decreases in one row than knit one row.Is that what I should do?
I think working from one needle at a time is confusing you since you’re not using DPNs. Round 1 is knit. Round 2 is knit unitl 3 sts remain on the first needle of the round (referring to DPNs). Still working on round 2, you knit all of the sts on the second DPN of your round. And again still workin on round 2, you knit 1, ssk, and knit to the end of the third needle. All to complete round 2.
rnd 1. k around
rnd 2. first needle: k until 3 sts from end of needle, k2tog, k1
second needle: k across
third needle: k 1, ssk, k to end of needle.